Chapter
2
Visual Studio .NET
Visual Studio .NET is the latest incarnation of Microsoft’s suite of software development tools. The VS .NET team has done a great job of providing a top-notch experience for the developer regardless of the .NET language you use. This chapter takes you on a tour of VS .NET, familiarizing you with its features so you can get up and running quickly.
Before .NET, tools in Visual Studio were loosely related products packaged in one box—Visual Studio .NET changes all that. Teams of developers working with different languages such as C#, Visual Basic .NET, and C++ now have a common, familiar Integrated Development Environment (IDE) that’s a pleasure to work in.
The Start Page
One of the biggest challenges in learning .NET is finding information. The Visual Studio .NET Start Page is all about helping you find information that can get you up and running quickly. Most developers don’t take the time to explore the Start Page, so I’ll take you on a quick tour.
When you launch VS. NET, the Start Page appears with the Get Started pane selected
(Figure 1). This page is displayed in a Web browser tab (a tab refers to
a tabbed document window in the VS .NET IDE), complete with a browser toolbar
containing navigation buttons and a combo box, which allows you to enter any
valid URL.
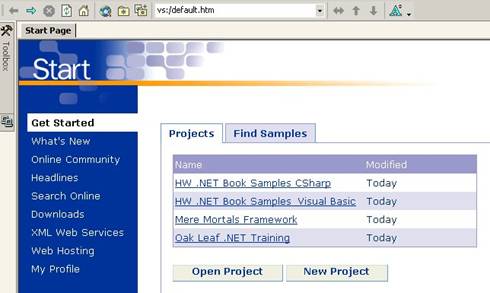
Figure 1. The VS .NET Start Page shows a list of your most recent used projects.
Get Started
The Get Started pane displays a page frame with two tabs—Projects and Find Samples. The Projects tab allows you to open or create a new project. The Find Samples tab allows you to search for online samples by language (C++, C# and Visual Basic .NET) or by Visual Studio Developer, which displays all samples. There is a wealth of examples to choose from. I highly recommend checking them out.
Setting a Filter
When you view the Online Community, Headlines, and Downloads panes, you can set a filter to limit how much information is shown (Figure 2). This filter is persisted between VS .NET sessions. If you set the filter on a language, I recommend that you select the language “and related” filter (for example, “Visual C# and related”). If you select a filter such as “Visual C#”, you miss out on a lot of important information.
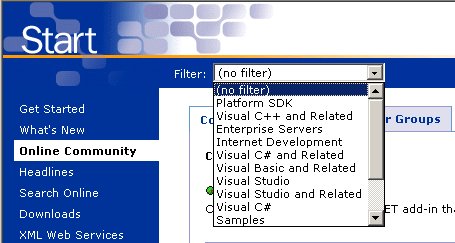
Figure 2. You can limit the information you see in the on-line options of the Start Page by setting a filter.
What’s New
If you select the What’s New pane when you are not connected to the Internet, you see a list of .NET Help topics discussing what’s new with different aspects of .NET, including information on individual languages.
However, if you’re connected to the Internet, you see a Technology tab containing a much fuller list of options including links to check for Visual Studio .NET service packs, Windows security and Platform SDK updates, as well as a variety of links to web pages (mostly Microsoft) containing information about .NET. You also see a Training and Events tab containing links to upcoming .NET training events. Another cool feature is the Tips and Walkthroughs tab that contains links to web-based presentations that explain both basic and more advanced .NET concepts.
Online Community
The Online Community pane allows you to locate online code samples, newsgroups, user groups, find experts on a particular .NET technology, and find third-party add-ons for .NET. Figure 3 shows how to search for a .NET user group in your area.
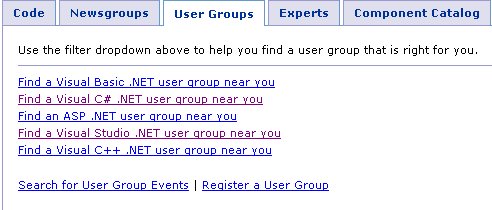
Figure 3. The Online Community | User Groups option on Visual Studio .NET’s Start Page allows you to find a user group in your area.
Headlines
The Headlines pane of the Start Page shows you online headlines that are also currently found on Microsoft’s MSDN site at http://msdn.microsoft.com. This is a great place to keep up to date with the latest in .NET and other Microsoft technologies. I’ve actually had my default home page in Internet Explorer pointing to this URL for quite some time. It’s a great way to keep in touch with what’s new and what’s coming.
Search Online
The Search Online pane allows you to search the MSDN online library. If you click the Advanced button, it opens up a new VS .NET web browser tab that allows you to search Microsoft.com, see the Top Downloads, Top Support Links, and Top Searches.
Downloads
The Downloads pane contains a wealth of download links—both free downloads and MSDN subscriber downloads.
XML Web Services
If you want to search the UDDI registry for a
particular type of XML Web service, you can
do so right from Visual Studio .NET. The XML
Web Services pane (Figure 4) allows you to specify a
category and additional search criteria to locate either a production
environment
or test environment XML Web service. For more information on UDDI, see Chapter
12, “XML Web Services”.

Figure 4. You can search for both production and test Web Services from within VS .NET based on a category and additional search criteria.
Web Hosting
If you want to find an Internet service provider to host your .NET web applications, the Web Hosting pane allows you to find ISPs who are participating in the Visual Studio .NET Web Hosting Portal. These providers offer an environment in which you can upload and test your XML Web Services or ASP.NET applications.
My Profile
The My Profile pane of the Start Page allows you to set your working preferences for VS .NET. The Profile setting allows you to select a profile that sets your Keyboard Scheme, Windows Layout, and Help Filter. The Keyboard Scheme setting lists different shortcut key configurations you can choose. The Windows Layout setting specifies a default VS .NET window configuration. Help Filter specifies how (if at all) you want the VS .NET Help file filtered (Figure 5). The Show Help option allows you to specify whether you want to display VS .NET Help within the IDE or in a separate window outside the IDE. The At Startup option allows you to specify what appears when you first launch Visual Studio.
![]()
If you filter your Help file on a particular language, it’s best to select the language “and Related” option (Figure 5). If you filter on C# or Visual Basic .NET only, many important help topics are filtered out.
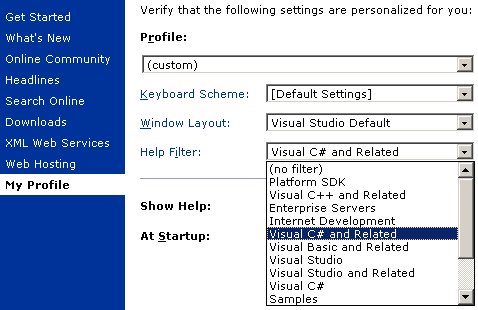
Figure 5. You can specify a default filter for the VS .NET Help file.
Showing the Start Page
When you view a help topic in VS .NET, it typically closes the Start Page. If you want to view the Start Page again, select Help | Show Start Page from the menu.
Now that you’ve seen where to find help in learning about .NET, I will move on to the mechanics of using Visual Studio .NET.
Solutions and Projects
One of the first concepts you should grasp is Visual Studio .NET’s approach to managing and organizing your .NET applications. At its highest level of organization, VS .NET uses solutions and below solutions are projects.
A solution is a container that can hold one or more related projects. Solutions allow you to work on multiple projects in the same instance of VS .NET, as well as set options and work on items that are common to a group of projects. When you create a new project, VS .NET automatically creates a solution that contains the new project.
A project in VS .NET is very similar to a project in Visual FoxPro. It is a container that holds related files such as source code, forms, user interface controls, text files, images, and so on. You can compile a project into an EXE, DLL or a module, among other things. When you compile a solution, a separate output file is generated for each project in the solution.
Creating a new project
To create a new project, go to the VS .NET Start Page and click the New Project button. This launches the New Project dialog (Figure 6). Select the type of project you want in the Project Types pane.
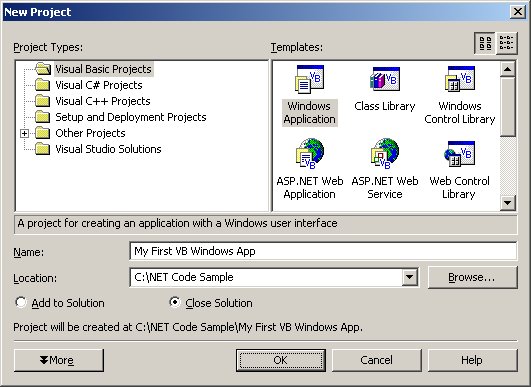
Figure 6. You can create new projects in your .NET language of choice based on a variety of project templates.
You can choose to create a Visual Basic, C#, C++, or Setup and Deployment project, or a Visual Studio Solution (an empty solution). The Other Projects node allows you to create Database projects (which include scripts and queries for accessing multiple databases), Enterprise Template projects for distributed applications, Visual Studio Analyzer projects for collecting event information and performing analysis on your projects, Extensibility projects for creating VS .NET add-ins, and Application Center Test projects.
Project Templates
In Visual FoxPro, when you create a new project, the project is empty. Although you have this option in Visual Studio .NET, there are also a wide variety of templates to choose from. If you select Visual Basic or C# Projects in the Project Types pane, it displays a list of templates in the Templates pane on the right (Table 1).
Table 1. Visual Basic .NET and C# project templates
|
Project Template |
Description |
|
Windows Application |
Traditional Windows application (WinForms) |
|
Class Library |
Library of classes that can be reused from other projects |
|
Windows Control Library |
Library of Windows controls for use on Windows Forms |
|
ASP.NET Web Application |
Web Forms application |
|
ASP.NET Web Service |
XML Web Service |
|
Web Control Library |
Library of Web Controls that can be used on Web Forms pages |
|
Console Application |
Command-line application |
|
Windows Service |
Windows Service application that does not have a user interface |
|
Empty Project |
Empty Windows project |
|
Empty Web Project |
Empty Web project |
|
New Project In Existing Folder |
Empty project created in an existing application folder |
The templates you will use most often are the Windows Application template when creating WinForms applications (see Chapter 9, “Building .NET WinForm Applications”), the ASP.NET Web Application template (see Chapter 10, “Building Web Applications with ASP.NET”), and the ASP.NET Web Service template (see Chapter 12, “XML Web Services”).
Example: Building a Visual Basic Windows Application
To help you understand the mechanics of solutions and projects, I will walk you through the initial steps of building a Visual Basic Windows Application. The information in this section also applies to C# Windows Applications.
To create a new Visual Basic .NET Windows Application, follow these steps:
1. Click the New Project button on the VS .NET Start Page. This displays the Add New Project dialog.
2. Select Visual Basic Projects under the Project Types pane and Windows Application in the Templates pane.
3. In the Name text box, enter the name you want to give your new project. I’ll call this one “My First VB Windows App”.
4. In the Location text box, select the folder where you want to create your new project. The dialog displays the folder you specified as the default project folder when you first installed Visual Studio .NET, but you can change the folder if you wish.
If you currently have a solution open in VS .NET, you see an additional option group that allows you to specify whether you want to add the new project to the currently open solution or close the solution (see Figure 6). If you close the solution, VS .NET automatically creates a new solution for your new project.
5. By default, the new solution is given the same name as your project. However, if you want a different solution name, click the More button. This displays a Create directory for Solution check box. If you select the check box, it enables the New Solution Name text box, allowing you to specify a different name for your solution. In either case, at the bottom of the dialog, it displays a message “Project will be created at…” showing the name of the directory where the project will be created. Notice that VS .NET creates a new folder for your solution and project beneath the folder specified in the Location text box.
6. To create the new project and associated solution, click the OK button. After a few moments, the new solution and project are displayed in the VS .NET IDE (Figure 7).
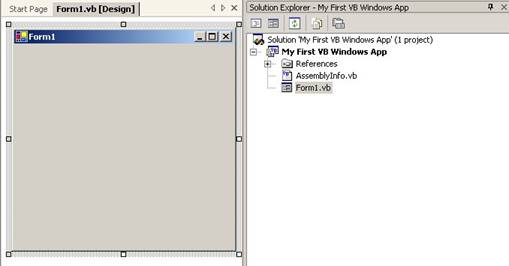
Figure 7. VS .NET creates new projects for you based on the template you choose. The Solution Explorer presents an organized view of your projects and files.
In the left pane, VS .NET displays a new, empty form named Form1. Look at the tab above the form and you will see that you are viewing the form in Design mode and the form is stored in a file named Form1.vb.
![]()
All Visual Basic .NET source files (forms, classes, modules, components, controls) have a .vb extension. All C# source files have a .cs extension. This is different from VFP where different types of files have different extensions (.FRX for reports, .SCX for forms, .PRG for program files, and so on).
Examining the new solution with Solution Explorer
On the right side of the IDE, you should see the Solution Explorer. If the Solution Explorer is not visible, select View | Solution Explorer from the menu. The Solution Explorer provides an organized view of your projects and associated files.
The very first node in the Solution Explorer contains the name of the new solution and an indicator that shows how many projects are in the solution (Figure 7).
![]()
By default, not all items in a solution are shown in the Solution Explorer. To see all items in a solution, click the Show All Files button at the top of the Solution Explorer (Figure 8)

Figure 8. To see all files in a solution, click the Show All Files button
Behind the scenes, a solution definition is stored in two different files, an .sln and an .suo file. For example, the new solution you just created is comprised of a file named “my first vb windows app.sln” and “my first vb windows app.suo”. The .sln file stores solution metadata detailing the projects that are associated with the solution, items that are added at the solution level (rather than belonging to a particular project), and build configurations. The .suo file stores solution-specific user options (such as document window positions) that you specify to customize the IDE. If you’re the curious sort, you can open the .sln file in Visual FoxPro (it’s a text file) and examine its contents.
Examining the new project
The second node of the Solution Explorer contains the name of the new project. By default, it is given the same name as the solution, which in this case is “My First VB Windows App”. Directly below the project node, expand the References node and you will see a list of .NET component DLLs that have automatically been added to the project (Figure 9).
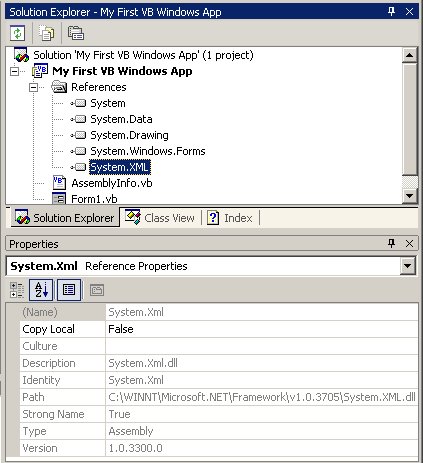
Figure 9.When you create a new project, VS .NET automatically adds references to several .NET component DLLs to your project.
If you click on a reference, information about the DLL displays in the Properties Window. If the Properties Window is not visible, select View | Properties Window from the menu.
Beneath the References node, there is a file named AssemblyInfo.vb. If you double-click on this file, a new tab is opened displaying the contents of the file. There are two items of note in this file. The first is the list of assembly attributes (Figure 10). Attributes allow you to add descriptive declarations that are used to annotate assemblies, classes, methods, properties, and other elements. When you compile your project, these attributes are added as extra descriptive information into the IL produced by the compiler. For more information on attributes, see Chapter 5, “Object Orientation in C# and Visual Basic .NET”.
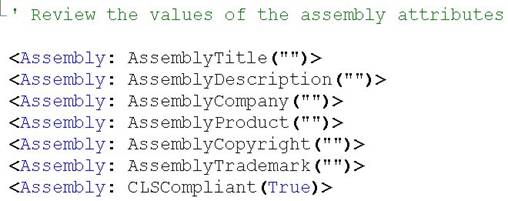
Figure 10. You can set assembly attribute values to provide additional information about your assembly to consumers.
In addition to the attributes shown in Figure 10, there is also a Guid attribute (Globally Unique Identifier) that is automatically generated when you create a new project. This identifier is used for your assembly’s type library if the project is accessed from COM. For details on interoperability with COM, see Chapter 15, “Interoperability with Visual FoxPro”. At the bottom of the AssemblyInfo.vb file, there is an AssemblyVersion attribute. The comment explains that you can leave the value of this attribute “as is”, with an asterisk as the minor version number, and VS .NET automatically generates the build and revision numbers for you. Otherwise, you can remove the asterisk and simply hard-code the version number.
For now, I’ll save the discussion of the Windows form file, Form1.vb, for Chapter 9, “Building .NET WinForm Applications”.
Adding another project to an existing solution
In this section, I’ll show off .NET’s language interoperability by creating a new C# project and adding it to your existing solution.
To add a project to the existing solution, first open the solution in Visual Studio .NET (if it’s not already open), then follow these steps:
1. In the Solution Explorer, right-click on the solution (the very first node) and select Add | New Project from the shortcut menu or go back to the Start Page and click the New Project button. This displays the Add New Project dialog.
2. Select Visual C# Projects in the Project Types pane and select Class Library in the Templates pane.
3. In the Name text box, enter “My CSharp Class Library”. Note that you have to spell out “CSharp” because project names cannot contain the pound sign (#).
4. Click OK to create the new project. After a few moments the new C# project is shown in the Solution Explorer (Figure 11).
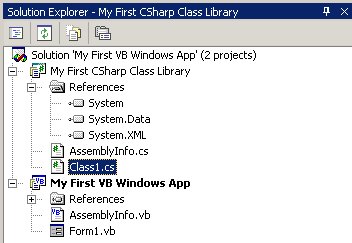
Figure 11. You can add multiple projects of the same or different languages to a single solution.
Specifying a startup project
Notice that the “My First VB Windows App” project is shown in bold, but the new C# project is not. This indicates that the VB project is the startup project. The startup project specifies the project or projects that run when you start the Visual Studio debugger. If you only want one project in the solution to be the startup project, just right-click on the project in the Solution Explorer and select Set as Startup Project from the shortcut menu.
If you want to build, run, and debug more than one project in a solution when you launch the VS .NET debugger, you can specify multiple startup projects in the Solution Property Pages dialog. Launch this dialog by right-clicking the solution node in the Solution Explorer and selecting Properties from the shortcut menu. To see the startup project properties, expand the Common Properties folder in the left pane and select the Startup Project item (Figure 12).
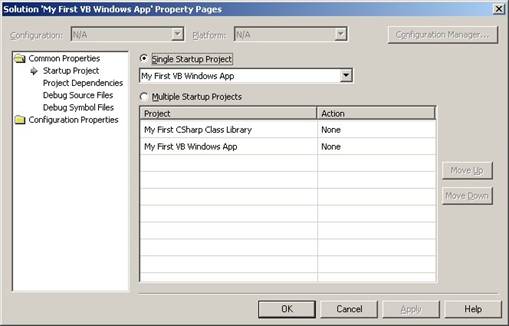
Figure 12. The Solution Property Pages dialog allows you to specify one or more startup projects for your solution.
By default, a solution has only one startup project. If you want to specify more than one, select the Multiple Startup Projects option. Next, click the Action combo box next to the projects you want to set as startup projects and select either Start or Start without debugging. Typically, when in production mode, you should select Start so you can debug your project. If you specify multiple startup projects, when you return to the Solution Explorer the solution is displayed in bold.
For this project, I will leave the settings “as is” and have the VB Windows project be the startup project.
Building a Solution
Although this first .NET solution is bare bones, this is a good point to learn how to compile a solution and/or project.
Build configurations
Build configurations allow you to specify how projects in a solution are to be built and eventually deployed. In Visual Studio .NET, there are two different levels of build configurations—solution build configurations and project configurations.
Solution build configurations
When you create a new solution, VS .NET automatically creates two solution build configurations for you—a “Debug” configuration and a “Release” configuration.
To see your solution’s build configurations, right-click on
your solution in the
Solution Explorer and select Configuration Manager
from the shortcut menu. This
launches the Configuration Manager
(Figure 13), which displays all projects in the solution and their
configuration, their target platform, and a check box that indicates if the
project should be built.
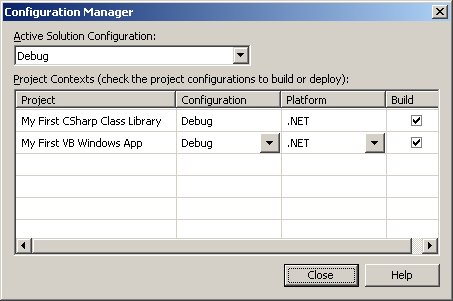
Figure 13. The Configuration Manager allows you to view, edit, and create solution build configurations.
By default, the Debug configuration is displayed in the combo box. As you design and build your application, it’s typical to have the active configuration set to Debug. Once you’re ready to build an application for deployment, it’s typical to set the active configuration to Release. An application compiled for release does not allow you to debug your application, but as with Visual FoxPro, an application runs much faster without debugging turned on. To see the solution’s default release configuration, select Release from the Active Solution Configuration combo box.
Project configurations
Project configurations allow you to specify how projects are built. They include settings that specify whether to include debug information in the build, if or how the output file should be optimized, location of the output file, and so on. This is similar to Visual FoxPro’s Project Information dialog.
To view a project’s build configuration, right-click on the project in the Solution Explorer and select Properties from the shortcut menu. This launches the Project Properties dialog (Figure 14). Under the Configuration Properties folder in the left pane there are four types of configuration settings listed: Debugging, Optimizations, Build, and Deployment.

Figure 14. You can set a wide variety of build options for each project in a solution.
For additional information on these configurations, select any of these items and click the Help button.
Build options
To build a project, select Build from the menu, which shows four build options:
· Build Solution – Builds the solution, including all projects in the solution
· Rebuild Solution – Rebuilds the solution, cleaning up solution configuration files
· Build Project – Builds a particular project
· Rebuild Project – Rebuilds a particular project, cleaning up project configuration files
Building your sample solution
If you have been following the instructions for creating a sample solution, you’re ready to build it now. To do this, select Build | Build Solution from the menu.
At this point, Visual Studio .NET builds the project output files for you in the directory you have specified in each of the project’s configurations. When building a debug configuration, by default the output files are placed in your project’s bin\Debug subfolder.
When you build your solution, if the compiler encounters any errors, it displays them in the Output window. If everything succeeds, it displays a “Done” message in the Output window indicating it found no errors (Figure 15).

Figure 15. VS .NET displays the progress and result of the build process in the Output window.
For information on handling compiler errors, see Chapter 13, “Error Handling and Debugging in .NET”.
Examining the build output files
If you look in the output directory for “My First VB
Windows App”, you will see two
files—My First Windows App.exe and My First Windows App.pdb. The first file is
obviously the Windows executable. The second file has a PDB extension. This is
the
“program debug database”.
When you build a project, and specify that it includes debug information, VS .NET creates a program debug database for you that maps MSIL to source code. Typically, you won’t use the PDB file directly—it’s used by VS .NET when debugging an application.
If you look in the output directory for “My First CSharp
Class Library” you’ll also see two files—My First CSharp Class Library.dll and
My First CSharp Class Library.pdb. Because the C# project is a class library, a
DLL is generated by the compiler rather than
an EXE.
Running the compiled program
To run the compiled sample application, select Debug | Start from the menu, press the F5 key or click the Start button on the Standard toolbar (Figure 16).

Figure 16. Click the Start button in the Standard toolbar to run a compiled application.
When the application is run, you see a Windows form with the caption “Form1”. To close this form, just click the close button in the upper right corner of the form.
Creating and installing shared assemblies
As mentioned in Chapter 1, “Introducing .NET”, you can create both private and shared assemblies. The main difference between a private and shared assembly is where they are physically located. Shared assemblies are stored in the Global Assembly Cache, which by default is your <windows directory>\assembly folder.
Creating a strong name for a shared assembly
Because a shared assembly is stored in a common Global
Assembly Cache, it runs the risk of having name collisions with other
assemblies. To avoid this, shared assemblies are given a unique strong name based on private key cryptography.
![]()
The details of private key cryptography are beyond the scope of this book. For details on this subject, see the .NET Help topic “Cryptography Overview”.
There are a few ways you can create a strong name for a shared assembly. The easiest method involves three steps.
First, you need to generate a new public-private key pair and store it in a strong name key file. The .NET Framework has a Strong Name command-line tool (Sn.exe) that can do this for you. To access it, run the following command at the command prompt:
sn –k <outfile>
Now, to generate the new key pair and store it in a file named keyPair.snk (the snk extension stands for “strong name key”), run the following command:
sn –k keyPair.snk
Next, you need to reference the strong name key file from the assembly. To do this, open up the solution from which the assembly is created in Visual Studio .NET. In the Solution Explorer, double-click on the AssemblyInfo.cs or AssemblyInfo.vb file to open it for editing.
If you’re working with C#, you’ll see the following assembly attribute:
[assembly: AssemblyKeyFile("")]
Specify the name of the strong name key file between the double quotes as follows:
[assembly: AssemblyKeyFile("keyPair.snk")]
If the file is located in a directory other than the project’s output directory you need to specify a relative path so VS .NET can find the file. The path is relative to the project’s output directory, so if you have the strong name key file in the project’s root directory, and the project’s output directory is <Project Directory>\bin\debug, you would specify the following:
[assembly: AssemblyKeyFile("..\\..\\keyPair.snk")]
In Visual Basic .NET, this assembly attribute does not already exist, so you need to add it manually. This is how it’s done in VB .NET—notice that I have specified a fully qualified path. Although the .NET Help says I can specify a relative path for the key file, this doesn’t seem to work in VB .NET, so for now, I have specified a fully qualified path:
<Assembly: AssemblyKeyFile("\MySharedAssemblyVB\bin\keyPair.snk")>
The final step is to compile the project. This “signs” the assembly with the strong name located in the strong name key file.
Installing an assembly into the Global Assembly Cache
Unlike private assemblies, you can’t just copy assemblies into the Global Assembly Cache—you must install them. There are three main ways you can do this:
· The Microsoft Windows Installer 2.0 (recommended for production machines)
· The .NET command line utility GacUtil.exe (recommended for development machines only).
· The Assembly Cache Viewer (development machines only)
GacUtil is easy to use. You simply run the following command at the command prompt:
gacutil –I <assembly name>
For example, if you want to install an assembly named MySharedAssembly in the Global Assembly Cache, you run the following command:
gacutil –I MySharedAssembly.dll
If you have the .NET Framework SDK loaded on a development machine, the Assembly Cache Viewer (described in the section “Viewing assemblies in the Global Assembly Cache” in Chapter 1, “Introducing .NET”) is the easiest way to install a shared assembly into the Global Assembly Cache. All you have to do is drag and drop a strong-named .NET assembly into an instance of Windows Explorer where the Assembly Cache Viewer is hosted, and the assembly is automatically registered in the Global Assembly Cache for you.
Dynamic Help
Visual Studio .NET has a great little feature called dynamic help that “watches” what you’re doing in the IDE and displays a list of help topics that it thinks will be of assistance to you.
To try out dynamic help, click on the Dynamic Help window—by default it’s placed at the bottom right corner of your screen as a tab associated with the Properties window. If the window is not visible, just select Help | Dynamic Help from the main menu. Next, click on your solution in the Solution Explorer. It displays the help topics shown in Figure 17.
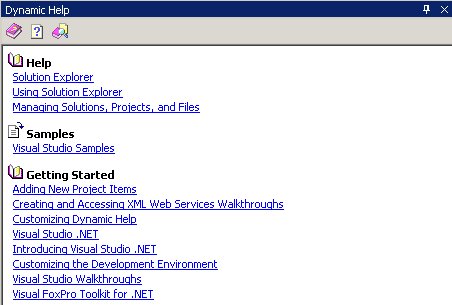
Figure 17. The Dynamic Help window displays help topics that it thinks will be of assistance to you based on what you have currently selected in the IDE.
If you have “My First VB Windows App” solution open in the Solution Explorer, right-click on Form1.vb and select View Code from the shortcut menu. Try clicking on different words in the VB .NET source file such as “Class” and “Inherits”. Do the same thing with the C# Class1.cs source code file and click on “using”, “namespace”, “public”, and “class”. You can also try clicking on some of the other windows in the IDE—you’ll see applicable help topics appear in the Dynamic Help window.
To customize dynamic help, launch the Options dialog by selecting Tools | Options from the main menu. The dynamic help settings are located in the Environment folder.
The Properties Window
The Visual Studio .NET Properties Window (Figure 18) is similar in functionality to Visual FoxPro’s Properties Window, however there is one big difference. In VFP, you use the Properties Window to view/edit properties, events, and methods of an object. In Visual Basic .NET, you can only use the Properties Window to view/edit properties. In C#, you can use it to view/edit both properties and events.
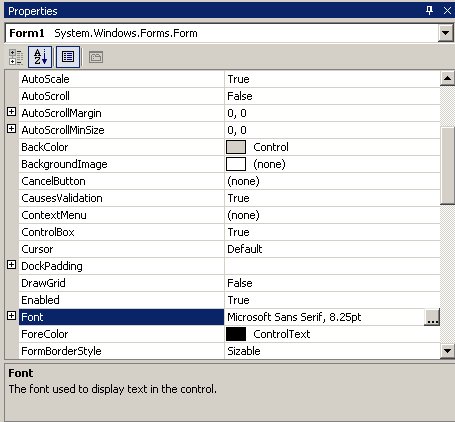
Figure 18. You can sort the Properties Window alphabetically, as shown here, or by category.
A combo box at the top of the Properties Window displays the name of the object and the fully qualified class (complete namespace and class name) on which it is based.
As with Visual FoxPro, if you change the default value of a property it is shown in bold in the Properties Window. Unlike Visual FoxPro, there is no way to display only the properties that have been changed.
If a property has a finite set of values, you can double-click on the property and rotate through the possible values. If you select the default value, the property is marked as “unchanged” in the Properties Window. This is different (and better) than VFP, which marks a property as “non-default” even if you enter the default value.
Sorting items in the Properties Window
There are two ways to sort the items in the Properties Window—alphabetically or by category. Figure 18 shows the Properties Window sorted alphabetically (my personal preference).
To sort the Properties Window alphabetically, click the Alphabetic button, (the second button from the left at the top of the Properties Window)
When you sort the Properties Window by category, related properties are grouped together under several different categories. For example, when you are viewing the properties of a Windows Form the categories are: Accessibility, Appearance, Behavior, Configurations, Data, Design, Focus, Layout, Misc, and Window Style. To sort the Properties Window by category, click the Categorized button (the first button on the left at the top of the Properties Window). Properties within each category are sorted alphabetically.
Displaying events
If you edit an object in C#, the Properties Window gives you the added ability to view an object’s events (Figure 19).
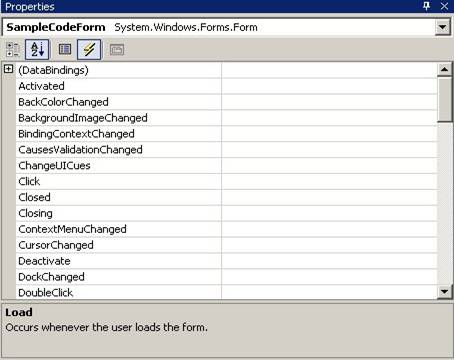
Figure 19. If you’re using C#, you can also view
an object’s events in the
Properties Window.
You can view events in the Properties Window by clicking the Events button (the fourth button from the right at the top of the Properties Window—the “lightning bolt”). To go back to viewing properties, click the Properties button (the third button from the right).
In Visual Basic .NET, although you can’t view events in the Properties window, you can get to them using the combo boxes at the top of the code-editing windows. If you select (Base Class Events) from the combo box on the left (Figure 20), a list of corresponding events appear in the combo box on the right (Figure 21).
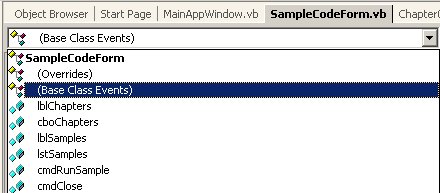
Figure 20. To view events in VB .NET, select (Base Class Events) from the combo box at the top left of the code-editing window.
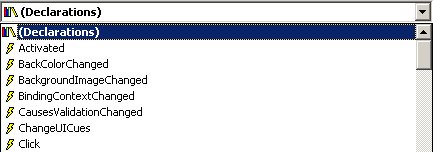
Figure 21. In VB .NET, when you select (Base Class Events) from the combo box, it displays the events in the combo box at the top right of the code-editing window.
For more information on events, see Chapter 5, “Object Orientation in C# and Visual Basic .NET”.
Code editing
To demonstrate the code editing capabilities of Visual Studio .NET, in the Solution Explorer, right-click on the Class1.cs file located in the “My First CSharp Class Library” project, and select View Code from the shortcut menu. This opens up a code-editing window in the IDE (Figure 22).
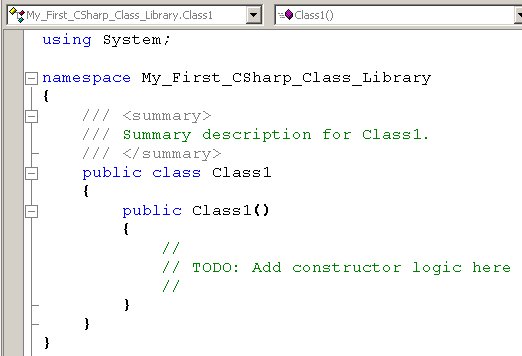
Figure 22. The code-editing window allows you to easily select the class and method to be edited, and provides color-coding like Visual FoxPro.
At the top left of the code-editing window is a combo box listing all classes in the source file. At the top right is a combo box listing each of the currently selected class members. As you page down through the source code file, these combo boxes automatically display the current class and member where the cursor is located. If you select an item from these combo boxes, the cursor is placed in the source code of the corresponding item.
IntelliSense
If you’re familiar with IntelliSense in Visual FoxPro 7 and later, you’ll be comfortable using IntelliSense in Visual Studio .NET. IntelliSense comes in the form of member lists, parameter information, quick info, word completion, and brace matching.
Member lists
When you enter the name of a class or structure and then enter a period, IntelliSense displays all valid members in a scrollable list from which you can select the desired member. Once the member you want is highlighted in the list, you can insert it into your code a few different ways. First, you can type the character that follows the member, such as a comma, space, or parenthesis. Alternately, you can press TAB, Ctrl+Enter, Enter, or double-click.
To close the members list, press Escape at any time. The easiest way to redisplay the members list is to press Ctrl+J.
Parameter information
When you type an open parenthesis after the name of a function, VS .NET displays the parameters list in a popup window, with the current parameter displayed in bold. If a method is overloaded, it displays a list of all available methods and their associated parameters that you can scroll through by using the UP and DOWN arrow keys (Figure 23). For an explanation of overloaded methods, see Chapter 5, “Object Orientation in C# and Visual Basic .NET”.
![]()
Figure 23. If a method is overloaded, IntelliSense displays a list of available methods and their associated parameters you can scroll through
To close the parameters list, press Escape at any time. The easiest way to redisplay the parameters list is to press Ctrl+Shift+Space.
Quick Info
When you hover your mouse pointer over any identifier in your code, VS .NET displays the identifier’s complete declaration in a yellow pop-up box.
To manually display the quick info pop-up, press the Ctrl+K, and then Ctrl+I.
Word completion
VS .NET can automatically complete a variable, command or function name once you have entered enough of the name to distinguish it. To invoke word completion, enter the first few letters of the variable, command, or function name, and then press Alt+RightArrow. If you have not entered enough letters to uniquely identify the word, VS .NET displays a scrollable list from which you can choose.
For example, if you type “Oper” in the Code Window and then press Alt+RightArrow, VS. NET inserts “OperatingSystem” for you.
Brace matching
When you type a closing brace, both the starting and ending brace are displayed in bold until you press another key or move the cursor. Brace matching works for parentheses ( ), brackets [], braces { },. and angle brackets < >.
If you are using C#, you can move back and forth between matching braces by placing the cursor to the left of any kind of brace and pressing Ctrl+]. This feature is not available in VB .NET.
Visual Basic .NET-specific IntelliSense
When using Visual Basic .NET, you get additional IntelliSense features, such as completion on the keywords goto, Implements, Option, and Declare. You also get completion Enum and Boolean, as well as syntax tips.
Modifying IntelliSense
By default, all of the IntelliSense options appear automatically in the IDE. However, if you prefer to turn off the automatic IntelliSense and manually invoke it only when you need it, you can do so by setting IntelliSense options.
To turn off automatic IntelliSense, select Tools | Options from the menu. Expand the Text Editor folder and select the language you want to customize. Select the General item under the language and clear the check boxes for the IntelliSense options you want to turn off.
Outlining
The Visual Studio .NET code editor allows you to hide and show your code by means of a feature called outlining. In some circles, VS .NET’s code editor is referred to as a folding editor.
If you look at a code-editing window (Figure 24), you can see VS .NET automatically adds a minus sign (-) next to the start of code blocks, such as namespaces, class definitions, and method definitions. When you click a minus sign, the code between the minus sign you clicked and the next minus sign is hidden, and a plus sign is displayed next to the start of the code block along with a “. . .” displayed in a box at the end of the line (Figure 24). These are visual indicators that code has been hidden.
What’s particularly nice about this is if you hover your mouse pointer over the box containing “. . .”, it displays a Quick Info box showing the contents of the collapsed code.
To expand code that has been collapsed, either click on the minus sign or double-click on the box containing “. . .”.
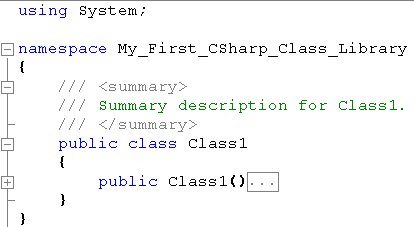
Figure 24. Visual Studio .NET’s outlining feature allows you to hide code so you can easily see only the code you want.
In addition to VS .NET’s automatic outlining, you can manually create your own outlining. To do this, simply select the text you want to outline, right-click on the selected text, and select Outlining | Hide Selection from the shortcut menu.
There are six additional options available in the Outlining shortcut menu:
· Hide Selection – Hides the currently selected text. In C#, you only see this option when auto-outlining is off or Stop Outlining is selected.
· Toggle Outlining Expansion – Reverses the current collapsed or expanded state of the selected code, or the outlining section in which the cursor is located.
· Toggle All Outlining – Sets all code outlining in the document to the same state.
· Stop Outlining – Turns off outlining for the entire document.
· Stop Hiding Current – Removes outlining information from the currently selected user-defined region. In C#, you only see this option when auto-outlining is off or Stop Outlining is selected.
· Collapse to Definitions – Creates outlining regions for all procedures in your document and then collapses them.
Bookmarks
You can bookmark your code much the same way you do in Visual FoxPro, except bookmarks in Visual Studio .NET are persisted between sessions and bookmarks in VFP are lost when you exit your Visual FoxPro session.
To create a bookmark, place your cursor on a line of code (or select one or more lines of code) and select Edit | Bookmarks | Toggle Bookmarks from the menu. You can also press Ctrl+K twice to toggle a bookmark.
To move to the next bookmark in a document, press Ctrl+K, and then Ctrl+N. To move to a previous bookmark, press Ctrl+K, and then Ctrl+P. To clear all the bookmarks in a document, press Ctrl+K, and then Ctrl+L. These hotkey functions are also available as menu items under Edit | Bookmarks.
Formatting text
The Edit | Advanced menu selection provides a number of options for formatting text. Table 2 contains a quick rundown on these options.
Table 2. A variety of Text formatting options are available, a few of them not found in Visual FoxPro.
|
Project Template |
Description |
Hot Key |
|
Format Document |
Applies smart indenting rules to the entire document. Only available when editing VB .NET source code |
Ctrl+K, Ctrl+D |
|
Format Selection |
Applies smart indenting rules to the selected code |
Ctrl+K, Ctrl+F |
|
Tabify Selection |
Converts white space to tabs |
- |
|
Untabify Selection |
Converts tabs to spaces |
- |
|
Make Uppercase |
Uppercases the selected text. Use this and “Make Lowercase” with care in case-sensitive languages such as C#. |
Ctrl+Shift+U |
|
Make Lowercase |
Lowercases the selected text |
Ctrl+U |
|
Delete Horizontal White Space |
Deletes the horizontal white space in the selected text. This option does not delete blank lines |
Ctrl+K, Ctrl+\ |
|
View White Space |
Displays a visible representation of all white space in the current document. Tabs appear as arrows and spaces appear as dots. |
Ctrl+R, Ctrl+W |
|
Word Wrap |
Turns on word wrap in the current document |
Ctrl+R, Ctrl+R |
|
Incremental Search |
Turns on incremental search in the current document. As you type characters, the cursor moves to the first matching word. |
Ctrl+I |
|
Comment Selection |
Comments out the selected text |
Ctrl+K, Ctrl+C |
|
Uncomment Selection |
Uncomments the selected text |
Ctrl+K, Ctrl+U |
|
Increase Line Indent |
Indents the selected text |
- |
|
Decrease Line Indent |
Decreases the indent on the selected text |
- |
By default, the Decrease Line Indent, Increase Line Indent, Comment Selection and Uncomment Selection options can also be invoked by a button on the Text Editor toolbar (Figure 25).
![]()
Figure 25. There are Decrease Line Indent, Increase Line Indent, Comment Selection and Uncomment Selection buttons found on the Text Editor toolbar.
Visual Studio .NET Windows
Visual Studio .NET gives you a lot of flexibility in customizing the IDE windows to work the way that suits you best—including auto-hiding, docking, splitting windows, tab-linking, and the ability to drag windows around the IDE. I recommend playing with these different settings to see what environment setup works best for you. This section provides a quick overview of some of these features. Check the Visual Studio .NET Help file for more information.
There are a two main window types in the Visual Studio .NET IDE—tool windows and document windows.
Tool windows
Tool windows are found in the VS .NET View menu and include the Solution Explorer, Class View, Server Explorer, Resource View, Properties Window, Toolbox, Web Browser, Macro Explorer, Object Browser, Document Outline, Task List, Command Window, Output Window, Find Results windows, and Favorites. They have the ability to auto-hide, dock, float, be tab-linked with other tool windows, and even be displayed on other monitors. To set the mode in which you want a tool window to operate, right-click on the window and select the desired setting from the shortcut menu.
Each of the tool windows mentioned here are discussed in detail later in this chapter.
Displaying tool windows on other monitors
If you have configured your computer to support multiple monitors, you can display a tool window on another monitor by simply dragging it to that monitor.
Document windows
Document windows are automatically created when you open items in your solution. You can choose to work with document windows in either Tabbed Documents mode (the default) or MDI (Multiple Document Interface) mode. You can change your document window mode by selecting Tools | Options from the menu to launch the Options dialog, and then expand the Environment folder and select General. The document window mode setting is listed at the top of the form.
If you need to view two parts of a document at the same time, you can split the window (Figure 26).
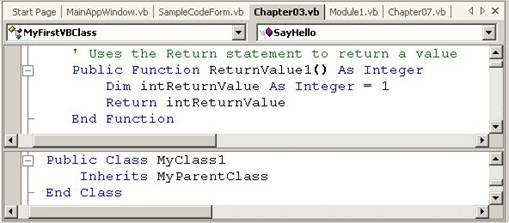
Figure 26. If you need to view two parts of the same document simultaneously, you can split the window.
To split a document window, choose Window | Split from the menu. To remove the split, choose Window | Remove Split from the menu.
Full Screen mode
You can view a document window in Full Screen mode by selecting View | Full Screen from the menu. This temporarily hides all tool windows and displays the currently selected document full screen.
To return to normal viewing mode, click the Full Screen floating toolbar that automatically appears when you go into Full Screen mode.
Searching and Replacing
Visual Studio .NET has powerful search and replace capabilities. If you select Edit | Find and Replace from the menu, it displays five options:
·
Find
·
Replace
·
Find
in Files
·
Replace
in Files
·
Find
Symbol
Find and Replace
Selecting either Find or Replace from the menu eventually gets you to the same place. If you are in the Find dialog, and click the Replace button the Find dialog turns into the Replace dialog (Figure 27). The hot key for launching the Find form is Ctrl+F and the hot key for the Replace form is Ctrl+H.
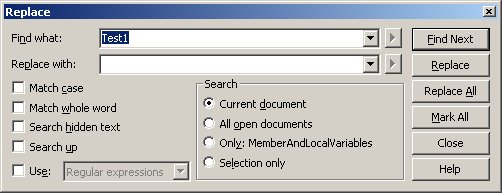
Figure 27. The Replace dialog offers a variety of options for searching and replacing text
There are a set of check boxes and an option group that allow you to control how the search is performed. One of the options that may not be familiar to you is Search hidden text. If you check this box, VS .NET searches concealed text, such as a design-time control’s metadata or a hidden / collapsed area of an outlined document.
The Search option group allows you to narrow your search to the current document, the current block in which the cursor is located, or within the currently selected text. You can also expand your search to all open documents.
If you have one or more words in a single line selected when you launch the Find or Replace dialogs, those words are automatically inserted into the Find What box.
After you have selected and entered your search criteria, use the Find Next, Replace, Replace All, and Mark All buttons to perform the search and optionally replace. The Mark All button adds a bookmark to each line of code that contains the specified text. You can then navigate between bookmarks to see each instance that was found. See the “Bookmarks” section earlier in this chapter for details.
Find in Files and Replace in Files
Selecting Find in Files or Replace in Files also eventually gets you to the same place. If you click the Replace button in the Find in Files dialog, it turns into the Replace in Files dialog (Figure 28). The hot key for launching the Find in Files dialog is Ctrl+Shift+F and the hot key for launching the Replacing in Files dialog is Ctrl+Shift+H.
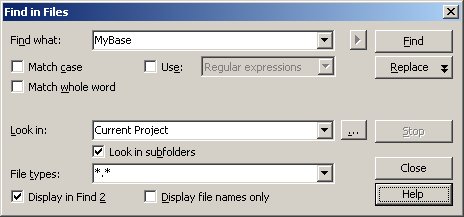
Figure 28. The Replace in Files dialog allows you to search for text in all the same places as the Replace dialog, plus you can also search all files in the current project, a specified file, or a specified directory.
There is a set of check boxes that allow you to specify how the search is performed. One interesting option is Keep modified files open after Replace All. This leaves files open so you can verify changes that were made and optionally undo them.
The Look in combo box allows you to specify where to search for the specified text. You can search in all the same places as the Replace dialog, but you can also select to search all files in the current project. In addition, you can manually type in the name of a file or a directory you want to search. The Look in subfolders check box specifies that the search should include files located in subfolders. You can also specify the types of files you want to search. The default is all files (*.*).
After executing a find, the criteria as well as the search results are displayed in a Find Results window (Figure 29). If you double-click on any of the search results, it automatically opens the associated file and places the cursor on the line containing the search text.

Figure 29. The Find Results window displays the search criteria as well as the search results.
The Display in Find 2 check box specifies that you want search results to be displayed in the Find Results 2 window rather than the Find Results 1 window. This allows you to view multiple result sets.
Find Symbols
The Find Symbols dialog (Figure 30) allows you to search for symbols, which in this context are objects (classes, structures, interfaces, namespaces, and so on) and their members. This option lets you narrow your search so it doesn’t include text found in comments or within methods. The hot key for launching the Find Symbols dialog is Alt+F12.
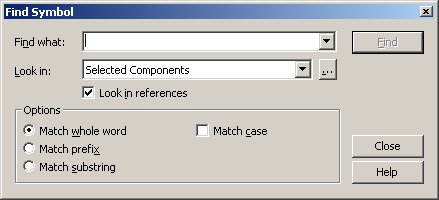
Figure 30. The Find Symbol dialog allows you to search objects and their members for the specified text.
The Look in combo box allows you to specify whether to search in the “Active Project” or “Selected Components”. If you specify to search Selected Components, click the Browse button (…) to launch the Selected Components dialog (Figure 31), where you can specify which components to search.
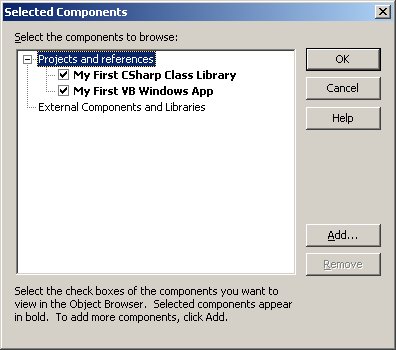
Figure 31. The Selected Components dialog allows you to specify which components to search for the specified symbol.
When you execute the search, the results are displayed in the Find Symbol Results window (Figure 32). The result list includes file name, line number, and character position of the symbol you searched for.

Figure 32. The Find Symbol Results window displays the file name, line number, and character position of the symbols you search for.
Another cool feature of Find Symbols is you can search for .NET classes, interfaces, and so on. In this case, search results are displayed in the VS .NET Object Browser. For more information on the Object Browser, see the “Object Browser” section later in this chapter.
Setting IDE options
The Visual Studio .NET IDE is highly customizable. The Options dialog (Figure 33) allows you to change the following categories of IDE behavior:
· Environment
· Source Control
· Text Editor
· Analyzer
· Database Tools
· Debugging
· HTML Designer
· Projects
· Windows Forms Designer
· XML Designer
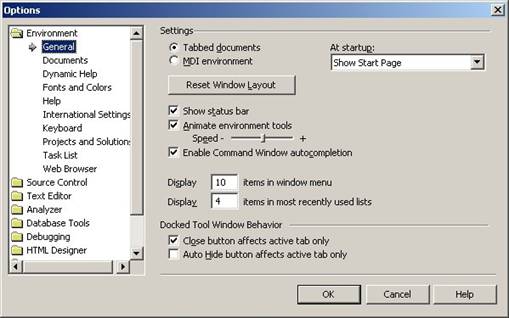
Figure 33. Taking time to examine all of the settings in the Options dialog allows you to set up the IDE in a way that best suits the way you work.
To launch the Options dialog, select Tools | Options from the menu. For a detailed explanation of each setting, select a category and click the Help button.
Object Browser
Visual Studio .NET’s Object Browser (Figure 34) is similar in functionality to Visual FoxPro’s Object Browser. It allows you to examine both .NET components and COM components. You can launch the Object Browser by selecting View | Other Windows | Object Browser from the menu or by pressing Ctrl+Alt+J.

Figure 34.The Object Browser lets you examine both .NET and COM components.
When you launch the Object Browser, it lists all of the projects in your current solution as well as any components referenced in these projects. You can drill down into projects and components using the tree view in the left pane of the Object Browser. As you select objects, their members are displayed in the Members pane on the right. If you click on a member, a description of the member is displayed in the description pane at the bottom of the browser.
There are dozens of different icons used in the Object Browser. For a list describing each of these, check out the .NET Help topic “Class View and Object Browser Icons”.
One particularly useful feature of the Object Browser is the ability to right-click on one of your custom classes and select Go To Definition from the shortcut menu. If the source code is available, it automatically opens the file that contains the class and positions you at the start of the class definition.
Class View window
The Class View window (Figure 35) is similar to the Object Browser, but it is only used to view the symbols found in your solution rather than in external components. In addition, it provides a hierarchical view (by project and namespace) of your symbols. To launch the Class View window, select View | Class View from the menu or press Ctrl+Shift+C.
If you double-click on a class or class member in the Class View window, it automatically opens the associated source code file (if it’s not already open), and places your cursor on the corresponding code. This always works the other way. If you are in the code-editing window, right-click on a class or class member and select Synchronize Class View from the shortcut menu, the Class View window receives focus, highlighting the item you have selected.
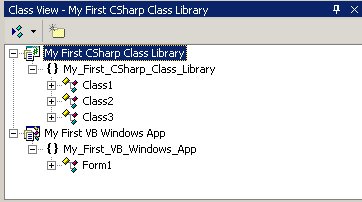
Figure 35. The Class View window displays the symbols in your solution by project and namespace.
C# special Class View features
If you right-click on a C# class, you see a few extra options in the shortcut menu that are not available in VB .NET. The most interesting is the Add option (Figure 36), which allows you to add a method, property, field, or indexer to a class directly from the Class View window.

Figure 36. C# has a special feature that allows you to add a method, property, field, or indexer directly from the Class View window.
For more information on methods, properties, fields, and indexers, see Chapter 5, “Object Orientation in C# and Visual Basic .NET”.
Task List
VS .NET’s Task List (Figure 37) is very similar to Visual FoxPro’s Task List. It’s a tool that helps you organize your project tasks. The Task List is usually found as a tab at the bottom of the VS .NET IDE. If you don’t see the Task List, you can view it by selecting View | Other Windows | Task List from the menu or by pressing Ctrl+Alt+K.

Figure 37. The Task List contains tasks automatically added by VS .NET as well as tasks you have entered yourself.
VS .NET automatically adds items to the Task List. For example, when you add a new class to your project and VS .NET creates a constructor method (which is similar to a Visual FoxPro class Init method), it adds a TODO item to the list telling you to add code to the constructor method.
You also add items to the Task List by clicking in the top line of the window and manually typing the task description. In addition, you can add an item to the Task List by right-clicking a line of source code and selecting Add Task List Shortcut from the shortcut menu.
Command Window
If you’re thinking that Visual Studio .NET’s Command Window comes anywhere near Visual FoxPro’s Command Window, you’ll be sadly disappointed! You can launch the Command Window by selecting View | Other Windows | Command Window from the menu or by typing Ctrl+Alt+A. For more information on the Command Window, check out Chapter 13, “Error Handling and Debugging in .NET”.
Favorites
The Favorites window displays your Web browser’s favorites within the VS .NET IDE (Figure 38). You can display the Favorites window by selecting View | Other Windows | Favorites from the menu or by typing Ctrl+Alt+F. If you right-click on an item in the Favorites window, you see the same shortcut menu that is available within Internet Explorer, allowing you to delete favorites, rename favorites, create new folders, and so on.
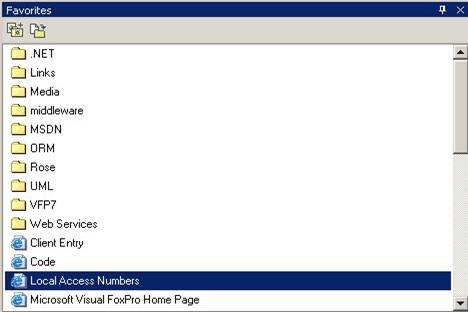
Figure 38. The Favorites window allows you to display your Web browser favorites within the VS .NET IDE.
Toolbox
By default, the VS .NET Toolbox is automatically hidden in the IDE. To display the Toolbox, simply hover your mouse pointer over the hammer and wrench icon (Figure 39) on the left side of the desktop.
![]()
Figure 39. Hovering your mouse pointer over the Toolbox icon automatically displays the Toolbox window.
If you don’t see this icon, open the Toolbox by selecting View | Toolbox from the menu.
The Toolbox contains several different tabs that display a variety of items, depending on what you currently have selected in the IDE. For example, if you have a Windows Form selected, it displays the Windows Forms tab containing dozens of different user interface controls that you can add to your form (Figure 40).
You will see details in various chapters throughout this book of how each one of these tabs is used. For example, Chapter 9, “Building .NET WinForm Applications” demonstrates how to use the Windows Forms tab.
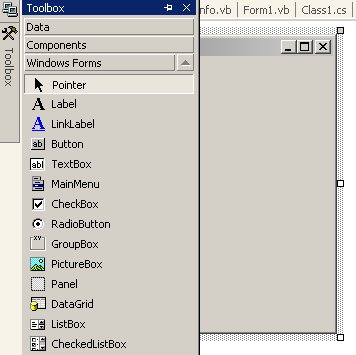
Figure 40. The Toolbox displays a variety of items depending on what you currently have selected in the IDE.
Server Explorer
The Server
Explorer is great feature of Visual Studio .NET. It allows you to
open data connections, log on to servers, and work with databases. You can work
with servers such
as SQL Server and Oracle—you can also use Server
Explorer to work with MSDE (Microsoft Database Engine)!
By default, the Server Explorer is auto-hidden on the left side of the VS .NET IDE. You can make the Server Explorer visible if you hover your mouse pointer over the Server Explorer tab or by selecting View | Server Explorer from the menu.
The Server Explorer tree view contains two main nodes—Data Connections and Servers (Figure 41).
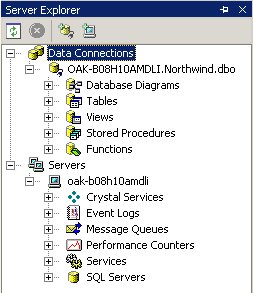
Figure 41. The Server Explorer allows you to create connections to servers, view their databases, event logs, message queues, performance counters, and system services.
Data Connections
You can add a connection to any server to which you have network access by right clicking on the Data Connections node and selecting Add Connection… from the shortcut menu. This launches the Data Link Properties tabbed dialog. You can select a provider on the Provider tab, then set properties in the Connection, Advanced and All tabs for your data connection. Click the Help button if you need assistance in setting up a connection.
Once you have created a connection to a database, you can view and manipulate its data without leaving the Visual Studio IDE. For example, if you create a connection to the SQL Server Northwind database, expand the Tables node under the connection to see a list of all tables in the database. If you right-click on a table, you see options to retrieve data from the table, design the table, create a new table, and so on.
Figure 42 shows the results of right clicking on the Northwind database’s Employees table and selecting Retrieve Data from Table.
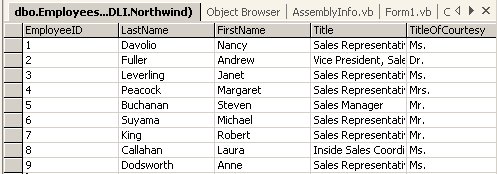
Figure 42. If you use the Server Explorer to retrieve data, the result set is displayed in the VS .NET IDE.
When the results tab has focus, the Query toolbar is automatically displayed, containing buttons such as Run Query, Verify SQL Syntax, Sort Ascending, Sort Descending, Remove Filter, and so on.
Servers
The Servers node in Server Explorer displays the list of servers currently available for use. Beneath each server is a node for Crystal Services (Crystal Reporting options), Event Logs, Message Queues, Performance Counters, Services, and SQL Servers.
For more details on the Server Explorer, check out the Visual Studio .NET Help topic “Introduction to Server Explorer”.
Source control
As you might expect, Microsoft integrated Visual Studio .NET with Visual SourceSafe to provide source control capabilities. Visual SourceSafe 6.0c is a “re-release”, in Microsoft terms, of the 6.0 product that shipped with Visual Studio 6.0. It rolls-up all of the fixes up to and including Visual Studio 6, Service Pack 5 (the most recent). In addition, 6.0c includes some bug fixes, speed enhancements, and interface extensions that make it compatible with the VS. NET IDE.
You can add a project or an entire solution to source control. To add a project to source control:
· Select the project in the Solution Explorer
· Select File | Source Control | Add Selected Projects to Source Control…
As with Visual FoxPro, when you add a project to source control, icons are displayed next to project items indicating their source control status such as “checked in” and “checked out” (Figure 43).
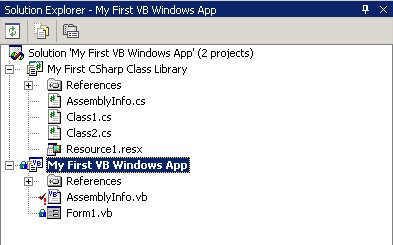
Figure 43. You can add individual projects or an entire solution to source control.
To add an entire solution to source control:
· Right-click on the solution in the Solution Explorer and select Add Solution to Source Control… from the shortcut menu.
· If prompted, log on to source control.
· When the Add to SourceSafe Project dialog appears, it displays the name of your solution. Select (or create) the folder where you want to store your project, and then click OK.
Details on working with VS .NET and Visual SourceSafe are available on the web at http://msdn.microsoft.com/library/?url=/library/en-us/dnbda/html/tdlg_rm.asp?frame=true or see the .NET Help topic “Source Control Basics”, which contains links to several other source control topics. For even more information on working with Visual SourceSafe, check out “Essential SourceSafe” by Ted Roche, available from Hentzenwerke Publishing. An addendum to the book specifically for Visual Studio .NET and SourceSafe 6.0c, is scheduled to be published on the Hentzenwerke web site soon.
Macro Explorer
Macros allow you to automate repetitive actions or series of keystrokes during development. Visual Studio .NET takes creating and managing macros to a new level. The Macro Explorer tool window shows you all the macros available for a solution. In VS .NET, macros are stored in macro projects, which can be shared by multiple solutions. Macros are the area where Visual Basic .NET rules supreme—you can’t create macros using any other .NET language.
To view the Macro Explorer, select View | Other Windows | Macro Explorer from the menu (Figure 44). The Macro Explorer allows you to create new macro projects, load existing macro projects, or unload projects.
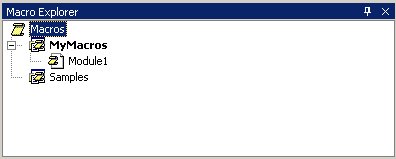
Figure 44. The Macro Explorer is your window to creating and managing macros in Visual Studio .NET.
Macros IDE
VS .NET contains a separate Macros IDE that allows you to create, manage, and run your macros (Figure 45). This IDE comes complete with its own Project Explorer, Class View, Properties Window, Toolbox, Web Browser, Dynamic Help, Debugger, and so on.
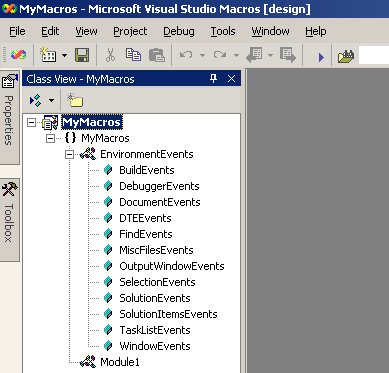
Figure 45. VS .NET has a separate Macros IDE you can use to create and manage your macros.
To launch the IDE, right-click the top-most Macros node in the Macro Explorer and select Macros IDE… from the shortcut menu.
For details on creating, running, and managing your macros check out the .NET Help topic “Managing Macros”.
Conclusion
This chapter took a quick tour of Visual Studio .NET’s many features. You can see that Microsoft has put a great deal of effort into making VS .NET a great environment for developing software. However, this chapter could have been twice its size to really cover all the features of VS .NET. I recommend you take the time to go through the VS .NET Help file to learn more about what it can do for you.