Chapter
3
Introduction to C#
Some developers are “afraid” of C# because C-based languages have a reputation for being advanced, and therefore difficult to learn and use. This chapter aims to dispel any misgivings you might have by providing a side-by-side comparison of C# and Visual FoxPro—you’ll be amazed at their similarities. It will also help you leverage your knowledge of Visual FoxPro in learning the basics of C#.
There has been a lot of excitement generated about C#, Microsoft’s newest programming language. It’s a very clean and elegant implementation of an object-oriented .NET language. However, new doesn’t mean it’s untested or “wet behind the ears”. Microsoft put C# to the test and used it to write the .NET Framework’s base classes (For the record, the .NET Framework could have been written in Visual Basic .NET. C# was chosen because most developers working on the .NET Framework were C++ developers and the C# compiler was completed before the VB .NET compiler).
Of all the existing programming languages, C# is the most similar to Java. The October, 2000 issue of Java™ Report states: “C# is Java with single inheritance; automatic memory management; 41 of the same 43 operators; all the same flow of control statements, plus foreach; 38 of 50 Java keywords; and if you allow for synonyms, 46 of the same 50 keywords.”
Although C# is new, it still has many features that are associated with more mature languages such as Visual FoxPro. In this chapter you will start out learning the basics—strong typing vs. weak typing, variables, constants, data types, conditional statements, flow of control loops, jump statements, and converting between different data types.
Although I will touch on basic object-oriented elements of C# in this chapter, such as declaring a simple class, the real discussion of C# and VB .NET’s object-oriented features takes place in Chapter 5, “Object Orientation in C# and Visual Basic.NET”.
![]()
For a side-by-side comparison of C#, Visual Basic.NET, and Visual FoxPro’s operators and keywords, check out “Appendix A – Language Comparison Tables”. For a comparison of each language’s data types, see “Appendix B – Data Type Comparison”.
Weak typing vs. strong typing
One of the biggest differences between C# and Visual FoxPro is weak typing vs. strong typing. Visual FoxPro is a weakly typed language. This means that you can store a value of any type in a variable. For example, as shown in the following code, you can store a DATETIME value in a variable, save a string in the same variable, and then turn around and store an integer in the same variable without having the Visual FoxPro compiler complain:
LOCAL MyVariable
MyVariable = DATETIME()
MyVariable = "Hello World!"
MyVariable = 6
While this may be incredibly flexible, it has its downside. First of all, from a readability perspective, it’s far better to create three different variables to hold each of these values, rather than reusing the same variable. Second, and more importantly, weak typing allows bugs to sneak through. For example, if you store an integer value in MyVariable, and then attempt to run the following code, you’ll get an “Operator/operand mismatch” error at runtime:
REPLACE CustomerName WITH "Customer " + MyVariable IN Customer
You would probably notice this bug pretty quickly when you
run the code—but that’s
the problem—“when you run the code”. What if the code never gets run until it’s
in the end-user’s hands?
In contrast, C# is a strongly typed language (VB .NET is also a strongly typed language, but C# is more strongly typed. See Chapter 4, “Introduction to Visual Basic .NET” for details). In the world of variables, strong typing means that you must declare the type of all variables. For example, the following code creates a date variable named MyDate, a string variable named MyString, and an integer variable named MyInteger:
DateTime MyDate;
string MyString;
int MyInteger;
If you do not declare the type of a variable, the C# compiler gives you an error and exits without finishing the compilation of your application.
Another common error in Visual FoxPro coding that causes bugs is using a variable without declaring it first. For example, the following code doesn’t declare MyVariable before using it:
MessageBox("Hello World" + MyVariable, 0+48, "Weak Typing Demo")
The Visual FoxPro compiler does not catch this kind of error.
However, when this
code is executed at runtime, your end users see a message such as “Variable
‘MyVariable’ is not found”.
In contrast, C# does not allow you to use variables unless they have been declared and initialized first. For example, if you create the following code:
string MyString;
MessageBox.Show(MyString, "Strong Typing Demo");
the compiler displays the error “Use of unassigned local variable ‘MyString’”.
To change these lines of code
so they work properly, you need to assign an initial value
to MyString:
string MyString = "I love strong Typing!";
MessageBox.Show(MyString, "Strong Typing Demo");
C#’s strong typing also applies to variables that store object references. This aspect of strong typing is covered in Chapter 5, “Object Orientation in C# and VB .NET”.
The practical value I’ve seen in my coding boils down to this—in Visual FoxPro, when I create a page worth of code, invariably there are a few bugs. I can’t find those bugs until I step through the code line by line. With .NET languages, I can write the same amount of code and the compiler will catch a majority of the syntax bugs (sorry, no compiler will catch all of the bugs in your application logic!).
A simple C# program
Although this chapter is not about object-orientation, you need to know the basics of creating a simple program and a simple class in order to understand how the basic constructs of the C# language work in context. So, you will create the obligatory “Hello World” program now. The call to Console.WriteLine displays “Hello .NET World!” in a .NET console application:
using System;
class MyFirstCSharpProgram
{
public static int
(
Console.WriteLine("Hello .NET World!");
return 0;
}
}
There are a few things to note about this code. Every C# program must have a Main method. This method is called when the program is first executed and it must return nothing (void) or an integer. Optionally, you can specify that the Main method accept a string array parameter. If any command-line parameters are sent when the program is executed, they are placed into this array:
using System;
class MyFirstCSharpProgram
{
public static int
{
// Here is a comment
Console.WriteLine("Hello .NET World"); //Here is another comment
// Process any parameters
if (args.Length > 0)
{
// Build a string containing all parameters
String Parms = "";
foreach (string parameter in args)
{
Parms += parameter + " ";
}
// Display the parameters
Console.WriteLine("\nParameters: " + Parms);
}
return 0;
}
}
The code I’ve placed in this sample for processing parameters contains some C# features I haven’t covered yet, such as array handling and foreach loops. You will find information on these features later in this chapter.
C# syntax
In this section, I’ll give you an overview of C#’s syntax compared to Visual FoxPro’s. I’ll start out by showing you the two things that take the most getting used to in C#.
Case sensitivity
Visual FoxPro is a case-insensitive language. The following code declares a variable “MyString” and assigns it a value. In the next line, I use that variable, but I refer to it as “mystring” (all lowercase). In Visual FoxPro, the two names refer to the same variable.
MyString = "Visual FoxPro is case-insensitive"
MESSAGEBOX(mystring, 0+48, "Case insensitive")
C# is a case-sensitive language. “MyString” and “mystring” refer to two completely different variables. In addition, all keywords are in lower case. If you enter a keyword with mixed case, the compiler flags it as an error. Some developers have a hard time getting used to C#’s case sensitivity. However, if you already write case-sensitive code in Visual FoxPro, it’s not as big an issue.
Semicolons and multi-line statements
In Visual FoxPro, you don’t need to put an ending character after each statement. However, if a single statement continues over multiple lines, you need to add a semi-colon, which is Visual FoxPro’s continuation character:
MESSAGEBOX("This command continues " + ;
"to another line", 0+48, "Continuation Character")
This is the opposite of how C# works. As you can see by looking at the code sample in the previous section, all C# statements must end in a semicolon. This allows a single statement to continue to the next line without a continuation character. For example:
MessageBox.Show("This command continues " +
"to another line without a continuation character");
For Visual FoxPro developers using C#, this can be a little irritating at first, but it doesn’t take long before you’re typing a semi-colon without even thinking about it.
Code placement
In Visual FoxPro, you place code in classes or in standalone functions, procedures, and programs. This allows you to do a mix of both procedural and object-oriented programming.
In C#, all code must be contained within classes or structures which are similar to classes. Structures are discussed in detail in Chapter 5, “Object-Orientation in C# and Visual Basic .NET”. Given a choice between the two approaches, I think C#’s approach is better. VFP’s approach may be more flexible, but it can, and often does, promote poor object-oriented programming practices.
Grouping statements together
The convention in Visual FoxPro for grouping statements together is to use a beginning and ending keyword. For example, you group all the members of a class together within DEFINE CLASS and ENDDEFINE keywords. You group code contained in class methods within PROCEDURE and ENDPROC or FUNCTION and ENDFUNC keywords:
DEFINE CLASS
PROCEDURE MyProcedure
ENDPROC
FUNCTION MyFunction
ENDFUNC
ENDDEFINE
C# uses curly braces consistently to group code together. Here’s a code sample that defines a class named CodeGroupingDemo and it contains two methods named MyMethod1 and MyMethod2:
public class CodeGroupingDemo
{
public void MyMethod1()
{
}
public void MyMethod2()
{
}
}
Although at first you may find this style of coding difficult to read, it is less verbose than Visual FoxPro (and VB .NET for that matter), it means less typing, and it’s consistent throughout the language.
Comments
In Visual FoxPro, you use the familiar asterisk (*) to indicate a comment at the beginning of a line. You can also use a double ampersand (&&) to add a comment at the end of a line.
C# uses two forward slashes consistently to indicate a comment either at the beginning of a line or at the end of a line of code. For multi-line comments, it uses a forward slash and asterisk (/*) at the beginning of the first comment line and an asterisk and forward slash (*/) at the end of the last comment line:
public class CommentDemo
{
/* Multi-line comment
Here's the second line */
// Comment
public void MyCommentedMethod() // Another comment
{
}
}
C# has a very cool feature that allows you to document your code using XML. See the “XML Documentation” section at the end of this chapter for details.
Namespaces
All classes in .NET belong to a namespace. Remember that namespaces are not a physical grouping of classes, such as a project or a class library in Visual FoxPro. They are simply a naming convention that logically groups classes together. For example, all of the source code associated with this book belongs to the namespace HW.NetBook.Samples. For more information on namespaces, see Chapter 1, “Introduction to .NET”.
To assign a class to a namespace, all you have to do is place the class within the curly braces of a namespace declaration:
namespace HW.NetBook.Samples
{
public class MyDemoClass
{
}
public class MyOtherDemoClass
{
}
}
Since a namespace is not a physical designation, you can place code in different physical source files or assemblies and assign them to the same namespace. This is different from Visual FoxPro, where a class is designated by its physical location—either a class library or a PRG file.
In Visual FoxPro, before you can instantiate a class, you have to SET CLASSLIB or SET PROCEDURE to the class library or PRG file that contains your class definitions. Similarly, in C#, you must specify that you are “using” the namespace to which a class belongs. The following code specifies that it is using two different namespaces, System and System.Windows.Forms:
using System;
using System.Windows.Forms;
namespace HW.NetBook.Samples
{
}
When you declare that you are using the System namespace, it does not give you automatic access to the namespaces that are “below” the System namespace such as System.Windows.Forms. You must explicitly declare each namespace you are using. The using declaration tells C# where to find classes that are referenced within the code below it.
Defining a simple class
As I promised, I won’t go into too much object-orientation in this chapter, but in order to understand the rest of the sample code in this chapter, you need to at least understand how to define a simple class and a simple method.
Here is the simplest class definition in C# (not much fat here):
class MyFirstCSharpClass
{
}
Below is the simple class with a single, simple method. Notice I’ve put it in the context of a namespace (HW.NetBook.Samples) and have referenced the System.Windows.Forms namespace. This is necessary because the MessageBox class belongs to this namespace.
using System.Windows.Forms;
namespace HW.NetBook.Samples
{
public class MyFirstCSharpClass
{
public void SayHello()
{
MessageBox.Show("Hello .NET World!", "C#");
}
}
}
The default base class
In Visual FoxPro, the term “parent class” is used to specify the class from which a class is derived. In the .NET world, the term “base class” is used instead. In VFP, the term ‘base class’ refers to the top-level Visual FoxPro classes (such as textbox, combobox, custom, container, and so on). The reason I bring this up is because in the definition of MyFirstCSharpClass, no parent or base class was specified.
In C#, if you don’t specify otherwise, a class is assumed to be derived from the Object class. The Object class is the topmost class in the .NET hierarchy (the queen mother of all base classes). Every class in the .NET Framework can trace its heritage back to the Object class.
Defining class methods
You’ve already seen an example of a simple class method. Here’s the official syntax for a class method:
[modifiers] returnType MethodName([parmType parmName])
{
// Method body
}
In C#, both the return value’s type and the parameter’s types must be explicitly specified. This is in keeping with C#’s strongly typed nature. Methods that return nothing have a return type of void.
Declaring variables
Variables declared within methods are local variables (there is no other kind). This means they are only visible within the method they are declared. Based on this, you don’t have to specify a scope (local, private, public) when declaring a variable.
To declare a variable, specify its type, followed by its name:
int Count; // Declare an integer variable named "Count"
Count = 5; // Assign Count the value of 5
You can also declare a variable and assign it a value in a single command:
// Declare an int variable named Height and assign it a value of 6
int Height = 6;
If you want to declare multiple variables of the same type in a single statement, simply separate them with commas:
int Top = 5, Left = 39;
Fields
As mentioned in the previous section, variables declared at the method level are known as local variables. However, as shown in the following code, variables declared at the class level are known as fields:
public class FieldsAndLocalVars
{
string Test1 = "Test1"; // Declares a field
public void ShowFieldsAndVars()
{
string Test2 = "Test2"; // Declares a local var
MessageBox.Show("Displaying Field " + Test1); // Display the field
MessageBox.Show("Displaying Local Variable " + Test2); // Display the field
}
}
You might think at first that fields are equivalent to Visual FoxPro’s properties, but they’re not. In addition to fields, C# classes can also have properties which are discussed in Chapter 5, “Object-Orientation in C# and Visual Basic .NET”. For now, just think of fields as variables defined at the class level that accessible to all methods in the class.
One other point to note is you can reference fields the same way you reference local variables. You don’t need a this qualifier in C# as you do in Visual FoxPro. In the previous example, you could have referenced the Test1 field as this.Test1, but it’s not required.
![]()
After teaching a good number of C# classes, I highly recommending using “this” to preface members. Since C# is case-sensitive, using “this” allows IntelliSense to kick in and allow you to select members from a list rather than having to type them manually, with the potential of typing them incorrectly.
If you declare a local variable with the same name as a field in the containing class, the local variable, while in scope, hides the field. In this situation, if you need to refer to the field, you must use a this prefix before the field name.
Field modifiers
A field modifier is a keyword used to amend a field declaration. For example, there are five accessibility modifiers you can apply to fields (Table 1) that specify the visibility of a field:
Table 1. Field modifiers allow you to specify the visibility of your fields
|
Modifier |
Description |
|
public |
Access is not restricted |
|
internal |
Access is limited to the current project |
|
protected |
Access is limited to the containing class or subclasses |
|
protected internal |
Access is limited to the current project or to subclasses |
|
private |
Access is limited to the containing class |
It’s considered good object-oriented form to declare fields as private. To promote this practice, if you don’t specify a modifier, C# considers a field private by default. If you want to allow other classes to access this field, you can create a protected or public property for this purpose (see the “Properties” section in Chapter 5, “Object-Orientation in C# and Visual Basic .NET” for details).
Value and reference types
.NET makes a strong distinction between value types and reference types. Value type variables store their data directly and reference type variables store the address where their associated data can be found. Reference variables are actually pointers dressed up in an object—but you can’t access the pointer directly. To understand this concept more clearly, you need to learn how C# allocates memory behind the scenes.
Understanding the stack and the heap
There are two places where the .NET runtime allocates memory for your data types—the stack and the heap. The stack is an area of memory used to store value types that are a fixed length. This includes basic data types such as integers, boolean, long, float, double, and character. Figure 1 provides a conceptual view of how this works. When you declare the integer variable “x”, the runtime allocates space for the variable on the stack. When you assign a value to the variable, the .NET runtime stores the value into the space it already allocated on the stack.
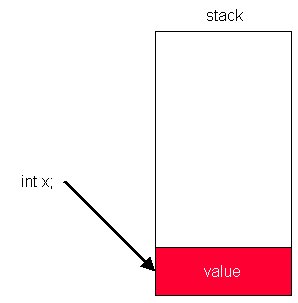
Figure 1. When you declare a value-type variable, the .NET runtime allocates space for the variable on the stack. When you assign a value to the variable, the value is stored in the space already allocated on the stack.
What happens when you copy one value variable to another value variable as shown here?
int x;
int x = 5;
int y = x;
This creates two copies of the same data on the stack. When you declare variable x it allocates space for the variable on the stack. When you assign variable x a value of 5, it stores a 5 in the allocated space for variable x on the stack. When you assign x to y, it allocates space for variable y on the stack and copies the value 5 from variable x into the space allocated for variable y. This gives you two copies of the same data on the stack.
The heap is an area of memory used to store reference type data such as classes, arrays, and strings. When you declare a reference type variable, the runtime allocates space for the reference variable on the stack—the same as it does for a value type variable. However, when you instantiate the reference type object (see Figure 2), rather than storing the object’s data on the stack, it is stored on the heap, and a pointer to the address of the object’s data is stored in the reference variable located on the stack.

Figure 2. When you declare a reference variable, the .NET runtime allocates space for the variable itself on the stack. However, when you instantiate the object, it stores the object’s data on the heap and stores a pointer to the heap data in the reference variable on the stack.
What happens when you copy one reference variable to another reference variable?
Invoice Inv;
Inv = new Invoice();
Invoice Inv2 = Inv;
This creates two references to the same data located on the heap. When you declare the variable Inv, the runtime allocates space for the reference variable on the stack. When you instantiate the Invoice object, it stores the object’s data on the heap and stores a pointer to the Invoice object data in the Inv variable. When you copy the Inv variable to the Inv2 variable, it first allocates space for the Inv2 variable on the stack. Afterwards, it adds a pointer to the same Invoice data pointed to by the Inv variable.
Value and reference type performance
Primitive base types such as integers, bool, decimal, and char are value types and provide better performance because you don’t have the overhead of creating an object on the stack every time you use one of these types.
The string type
The string class is a reference type; although from all outward appearances, the commands you use to manipulate strings make them seem like value types.
You can assign a value to a string variable using a string literal enclosed in double quotes:
string Caption = ".NET for VFP Developers";
Unlike Visual FoxPro, you can’t use single quotes or square brackets to delimit strings. You concatenate strings in C# the same way as in VFP—by using a plus (+) sign:
string Title = "Sir"
string Name = Title + "Laurence Olivier";
The next logical question is “How do I create a string literal that contains double quotes such as Louis “Satchmo” Armstrong?” This requires the use of character escapes.
Table 2 shows a list of special characters called character escapes that you can add to a string. For example to add a line break to a string, you use the \n character escape. The following code adds a new line between the city/state and the zip code:
string CityStateZip = "
To answer the original question, you can display double quotes contained within a string by using the double quote escaped character \":
string ManlyMen = "Louis \"Satchmo\" Armstrong";
Table 2. This table shows a list of common character escapes, or special characters, you can add to your strings.
|
Escaped character |
Description |
|
\a |
Alarm (bell) |
|
\t |
Tab |
|
\r |
Carriage return |
|
\n |
New line |
|
\” |
Double quote |
You tell C# to ignore escaped characters in a string by prefixing the string with an @ sign:
string Folder = @"c:\temp”;
Assigning one string to another
The .NET runtime treats strings differently than other reference types. At first, when you assign the value of one string to another string:
string State1 = "
string State2 = State1;
it acts as expected. This code creates two variables on the stack,
State1 and State2, and it points both variables to the same “
However, if you change the first string:
string State1 = "Sunny
the .NET runtime creates a new string object on the heap and stores a reference to the new data in the State1 variable located on the stack while State2 still points to the old data on the heap. Armed with this information, you can make better choices about how you manipulate strings so as not to create excess string data on the heap. For example, if you need to concatenate a number of strings together in a loop, it’s best to use the .NET StringBuilder class instead of using strings. The StringBuilder class has an Append method to concatenate strings together:
StringBuilder StrBuilder = new StringBuilder;
StrBuilder.Append("
StrBuilder.Append("
StrBuilder.Append("
MessageBox.Show(StrBuilder.ToString());
Enumerations
C# lets you define your own complex value types. One of these value types is enumerations (the other is structures, covered in Chapter 5, “Object Orientation in C# and VB .NET”).
Enumerations are a convenience feature of C# that allow you to group related integer-based constants together. You can think of them as an array of constants. There is no Visual FoxPro equivalent to enumerations, but it’s easy to see how they can be very useful.
The following code lists a group of constant definitions found in the FoxPro.h include file (located in the Visual FoxPro home directory). These constants define all the possible values for a VFP cursor’s “Buffering” setting:
#DEFINE DB_BUFOFF 1
#DEFINE DB_BUFLOCKRECORD 2
#DEFINE DB_BUFOPTRECORD 3
#DEFINE DB_BUFLOCKTABLE 4
#DEFINE DB_BUFOPTTABLE 5
When you use one of these constants in a command, such as CursorSetProp(), you often have to open up the FoxPro.h file to see what the possible values are. Here’s where enumerations can help.
In C#, you can define an enumeration that groups together all the possible values for the Buffering setting:
public enum Buffering
{
BufOff = 1,
BufLockRecord = 2,
BufOptRecord = 3,
BufLockTable = 4,
BufOptTable = 5
}
You access an enumeration by referring to its name and specifying the desired member. The compiler converts it to its associated integer value:
Buffering.BufOptRecord
As shown in Figure 3, enumerations hook into VS .NET IntelliSense. When you type the name of the enumeration and a period, IntelliSense shows you a list of all possible values in the enumeration.
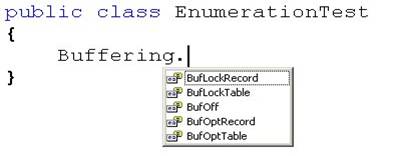
Figure 3. Enumerations hook into VS .NET IntelliSense, making it easy to select the proper value from a qualified list.
Even though enumerations are integer-based, the compiler complains if you try to store an enumeration to an integer variable as shown here:
int BufferMode = Buffering.BufOptRecord;
The compiler complains that it can’t implicitly convert “Buffering” to an integer. Although you can use a cast to explicitly convert the enumeration value to an integer, (see the “Casting” section later in this chapter) you can also get around this by specifying the variable as the type “Buffering”:
Buffering BufferMode = Buffering.BufOptRecord;
Although enumerations are integer types by default, you can specify them as byte, sbyte, short, ushort, int, uint, long, or ulong instead. For example:
public enum Buffering : long
In this context, : long specifies that the Buffering class is derived from the type long. For details on subclassing and inheritance, see Chapter 5, “Object Orientation in C# and Visual Basic.NET”.
Arrays
There are many similarities between arrays in Visual FoxPro and in C#. One of the big differences is arrays in C# are treated as objects with methods and properties. Another difference is Visual FoxPro allows you to mix different types of data in an array (integers, strings, dates, etc), but in C# all array elements must be of the same type.
![]()
You can get around the limitation of array elements having to be of the same type by declaring the array contains items of the type “Object”, which is the base type of all classes in the .NET Framework.
A third difference is that C# arrays are zero-based, meaning the first array element is zero (0). In Visual FoxPro, the first array element is one (1).
Declaring arrays
In C#, arrays are declared the same way as other variables, except you add square brackets [] between the variable type and the variable name. For example, the following statement declares an integer array named “KidsAges”:
int [] KidsAges;
You can also declare an array and size it in one step:
string [] KidsNames = new string[3];
![]() Once
you declare the length of an array, you can’t resize it. If you want an array
whose size is changable at run time, use the ArrayList object instead, found in
the System.Collections namespace. See the .NET Help file for details.
Once
you declare the length of an array, you can’t resize it. If you want an array
whose size is changable at run time, use the ArrayList object instead, found in
the System.Collections namespace. See the .NET Help file for details.
You determine the length of any array dimension by calling the array’s GetLength method and passing the desired array dimension:
MessageBox.Show("Number of kids = " + KidsNames.GetLength(0));
Storing values to arrays
You set initial values of array elements when you declare the array:
string [] KidsMiddleNames = {"Christopher","Mark","James"};
Or you can store values in the array elements after declaring the array:
string [] KidsNames = new string[3];
KidsNames[0] = "
KidsNames[1] = "Timothy";
KidsNames[2] = "Alexander";
Sorting arrays
To easily sort the elements of an array, you call the Array class’s Sort method:
Array.Sort(KidsNames);
You reverse the sort order by calling the Array class’s Reverse method:
Array.Reverse(KidsNames);
Multidimensional arrays
All of the arrays you’ve seen so far have only one dimension. Visual FoxPro allows you to create both one and two-dimensional arrays. C# goes a step further and allows you to create multidimensional arrays—arrays with three or more dimensions! However, unless you have special requirements, you probably won’t need more than a two-dimensional array.
Multidimensional arrays are either rectangular (every row has the same number of columns) or jagged (each row can have a different number of columns). Visual FoxPro has rectangular arrays, but does not have jagged arrays.
Defining multidimensional rectangular arrays
You declare an array as multidimensional and rectangular by adding one or more commas within the square brackets of the array declaration. Each comma you add specifies an additional array dimension. Here is the definition of a two-dimensional, rectangular array with two columns and three rows:
string[,] ArrayKids = { {"Jordan", "McNeish"},
{"Timothy", "McNeish"},
{"Alexander", "McNeish"} };
Defining jagged arrays
A jagged array is an “array of arrays”. They are multidimensional, but, unlike rectangular arrays, each row can have a different number of columns. You define a jagged array by adding an extra set of square brackets for each dimension. In the following example, the jagged array has three elements in its first dimension. Its second dimension has a different size for each row. The first row has three columns, the second row has two columns, and the third row has one column:
string[][] Musicians = new string [3][];
Musicians[0] = new string[] {"Stevie", "Ray", "Vaughn"};
Musicians[1] = new string[] {"Jimi", "Hendrix"};
Musicians[2] = new string[] {"Bono"};
Type conversions
When working with strongly typed languages, converting between different data types is an important consideration. C# provides both implicit and explicit type conversion.
![]()
For a list of C# data types, and a comparison between C#, VB. NET and VFP data types, check out “Appendix C – Data Type Comparison”.
Implicit type conversions
C# implicitly converts some values from one type to another. In the following example, C# automatically converts a short value to an integer and then to a double:
short x = 10;
int y = x;
double z = y;
Table 3 lists the types that can be implicitly (automatically) converted in C#.
Table 3. Types that can be implicitly converted in C#
|
From Type |
To Type |
|
byte |
ushort, short, uint, int, ulong, long, float, double, decimal |
|
sbyte |
short, int, long, float, double, decimal |
|
short |
int, long, float, double, decimal |
|
ushort |
uint, int, ulong, long, float, double, decimal |
|
char |
ushort, uint, int, ulong, long, float, double, decimal |
|
int |
long, float, double, decimal |
|
uint |
long, ulong, float, double, decimal |
|
long |
float, double, decimal |
|
ulong |
float, double, decimal |
|
float |
double |
Explicit type conversion using casts
If the compiler refuses to implicitly convert a value from one type to another, you use a cast instead. As shown in the following example, you specify that you want to cast a value from one type to another by prefixing the value to be converted with the destination type in parentheses. This code converts an integer to a byte (which the compiler will not do implicitly):
int x = 20;
byte y = (byte)x;
Converting to string
If you need to convert a value to a string, the Object class has a ToString method (inherited by all classes in the .NET Framework) that returns the string representation of the object. So, to get a string representation of an integer, you do the following:
int i = 10;
string s = i.ToString();
Using Parse to convert strings
If you need to convert strings to other value types, you use the Parse method of the desired destination type. For example, if you want to convert a string to an integer, you use the Parse method of the int type:
string StringAmt = "100";
int IntAmt = int.Parse(StringAmt);
If you want to convert string value to long, you use the Parse method of the long type:
string StringAmt = "100";
long IntAmt = long.Parse(StringAmt);
You can also convert strings to boolean values using Parse. However, the string value must be either “True” or “False” (case insensitive) or you will get a runtime error stating “string was not recognized as a valid boolean”.
Boxing and unboxing values
Boxing describes the process of converting a value type to a reference type. Unboxing describes converting the value of a reference type back to a value type.
Boxing occurs implicitly when you store an integer type into an object:
int i = 10;
object o = i;
Figure 4 demonstrates what happens when this code is executed. In the first line, space for int “i” is allocated on the stack and a value of 10 is assigned to the variable. In the second line, a reference variable for object “o” is allocated on the stack, and the value of 10 is copied from integer “i” to the space allocated on the heap for object “o”’s data.
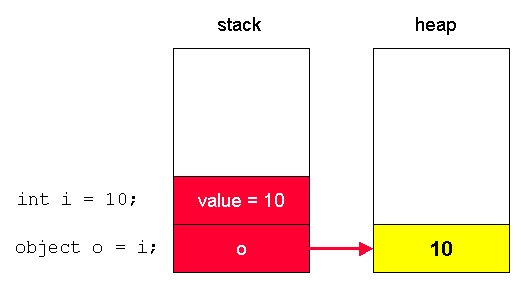
Figure 4. Value types can be implicitly boxed when you store the value of an integer (or other value type) into an object.
Unboxing only occurs explicitly. You can only unbox a variable that has been previously boxed. For example:
// Boxing
int MyInteger = 10;
object MyObject = MyInteger;
// Unboxing
int MyUnboxedInt = (int)MyObject;
The is operator
You determine if an object is a specific type by using the is operator. This is useful in situations where a method receives a parameter of a generic object type and wants to determine its specific type. For example, the following method receives a parameter of type object. It then checks to see if it is of type MyClass1:
public void
CheckClass(object testObject)
{
if (testObject is MyClass1)
{
MessageBox.Show("TestObject is MyClass1",
"is operator");
}
else
{
MessageBox.Show("TestObject is not MyClass1",
"is operator");
}
}
if statement
C#’s if statement is similar to Visual FoxPro’s IF…ENDIF statement. If the expression in the parentheses following the if evaluates to true, the code within curly braces is executed. Optionally, you can add an else statement to the if that gets executed if the condition expression evaluates to false. C# also allows you to nest if statements.
You don’t need to add the curly braces if there is only one statement following the if or else, however it’s considered good form to do so.
bool HavingFun = true;
if (HavingFun)
{
MessageBox.Show("We are having fun!","if demo");
}
else
{
MessageBox.Show("We are NOT having fun","if demo");
}
switch statement
The C# switch statement is equivalent to Visual FoxPro’s DO CASE statement. Based on the value of the expression, one of the case statements is selected for execution. You can specify a default case, which is the same as VFP’s OTHERWISE clause. If the switch expression does not match any of the cases, control is passed to the default case. If no default case is present, control passes to the first command after the end of the switch.
testValue int = 2;
switch (testValue)
{
case 1:
MessageBox.Show("testValue = 1","switch");
break;
case 2:
MessageBox.Show("testValue = 2","switch");
break;
case 3:
case 4:
MessageBox.Show("testValue = 3 or 4","switch");
break;
default:
MessageBox.Show("testvalue is not 1,2,3 or 4",
"switch");
break;
}
As shown in the previous example, you cannot fall through one case to another unless a case is empty. This means you must specify one of the following jump statements:
· break – indicates the end of a case and control is passed to the statement following the switch.
· goto – specifies control be passed to a specific case (e.g. “goto case 2”) or to the default case (e.g. “goto default”).
· return – indicates the end of a case and terminates the execution of the current method.
for loop
C# for loops are equivalent to Visual FoxPro’s FOR…ENDFOR command. It iterates through a loop while a particular condition is true.
In the parentheses that follow the for statement, there are three different items. The first is the initializer (e.g. i=0;). You place any variables to be initialized in this part of the statement, although it’s most common to specify a single variable to be initialized. The second part of the parenthetical statement is the expression to be evaluated (e.g. i < 4). This expression is evaluated before the loop is executed. The third part of the parenthetical statement is the iterators (e.g. i++). This is the expression used to increment or decrement the loop counter.
In C#, the ++ operator increments a variable and the -- operator decrements a variable. For more information on C# operators, see “Appendix A – Language Comparison Tables”
int i;
string Message = "";
for (i=0; i < 4; i++)
{
Message += "Message " + i + "\n";
}
MessageBox.Show(Message, "For
while loop
The C# while loop is equivalent to Visual FoxPro’s DO…WHILE loop. It is a pre-test loop, which means if the condition evaluates to false, the loop is not executed at all. While loops are often used to repeat a block of code for an undetermined number of times.
bool Condition = true;
while (Condition)
{
// This loop only executes once
int i = 1;
MessageBox.Show("While loop count " + i, "while loop");
i++;
Condition = false;
}
do loop
The C# do loop is similar to C#’s own while loop, except the condition is checked at the end of the iteration rather than at the beginning. This means the loop is always executed at least once. This is different than Visual FoxPro’s DO…WHILE loop, which evaluates at the top of the loop.
bool Condition = false;
do
{
// This loop only executes once because the condition
// is tested at the end of the loop
int i = 1;
MessageBox.Show("Do While loop count " + i, "do...while loop");
i++;
} while(Condition);
You exit a do loop by using the break, goto, or return statements.
foreach loop
The C# foreach loop executes a group of statements for each element in an array or item in a collection. It is equivalent to Visual FoxPro’s FOR EACH command.
string VersionList = "";
string[] VSNetVersions = {"Standard","Professional",
"
foreach (string Version in VSNetVersions)
{
VersionList += "VS .NET " + Version
+ "\n";
}
MessageBox.Show(VersionList,"ForEach loop");
XML Documentation
C# has a very cool feature that allows you to document your code using XML.
If you type three forward slashes in a row in the line immediately preceding a user-defined type (such as a class, structure, enumeration, delegate, or interface) or preceding a member (such as a field, property or method), an XML documentation template is automatically inserted where you can add your comments. For example, suppose you have the following C# class:
public class CommentDemo2
{
public string GetString(int value)
{
return value.ToString();
}
}
If you enter three forward slashes on the line before the
start of the class definition and preceding the method definition, the
following XML documentation template is added to
your code:
/// <summary>
///
/// </summary>
public class CommentDemo2
{
public string GetString(int value)
{
/// <summary>
///
/// </summary>
/// <param name="value"></param>
/// <returns></returns>
return value.ToString();
}
}
You enter a description of your class between the <summary> tag preceding the class definition and a description of your method in the <summary> tag preceding the method definition. Notice that C# is smart enough to create XML tags for parameters and return values. You can also place descriptions in the <param> and <returns> tags. For example:
/// <summary>
/// Comment Demo class
/// </summary>
public class CommentDemo2
{
/// <summary>
/// Converts an integer value to a string
/// </summary>
/// <param name="value">Integer value to be converted</param>
/// <returns>Converted string value</returns>
public string GetString(int value)
{
return value.ToString();
}
}
So what does placing your comments in XML format do for you? The C# development environment in Visual Studio .NET can read your XML documentation and automatically convert it to “comment web pages”!
To build these web pages, open your C# solution in VS .NET and select Tools | Build Comment Web Pages from the menu. This displays the Build Comment Web Pages dialog (Figure 5). This dialog allows you to specify whether you want to create comment web pages for your entire solution or for selected projects. You can even add it to your “Favorites” in your Web browser.

Figure 5. You can build comment web pages for all projects in your solution or for a single project.
When you click OK, web comment pages are generated for you. When it’s done, you’ll see a Code Comment Web Report displayed in a tab of Visual Studio .NET (Figure 6).
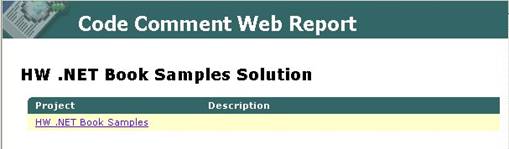
Figure 6. After building comment web pages, a Code Comment Web Report page is displayed that lists all of the projects for which you have generated web pages.
If you click the project hyperlink, a web page displays a list of all namespaces in your project. If you expand the namespace node, a list of classes belonging to the namespace appears. Selecting a particular class displays information about the class and all of its members, derived from the XML documentation you have inserted in your C# source code (Figure 7).
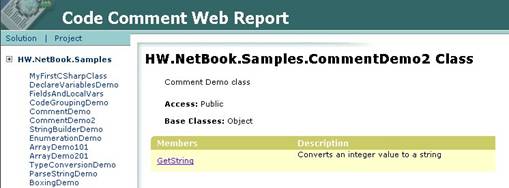
Figure 7. The comment web pages display information about classes derived from the XML documentation you have inserted in your C# source code.
If you click on a member name such as a method, it displays details regarding the method’s parameters and return values (Figure 8).
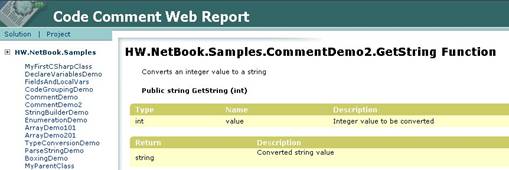
Figure 8. Comment web pages also display details regarding a method’s parameters and return value.
Comment web pages are a great addition to the Visual Studio .NET environment because, not only are they cool, they encourage developers to document their code!
Unsafe Code
C# has an advanced feature that is not available in Visual Basic .NET—the ability to create unsafe code.
Unsafe code is often misconstrued as being unmanaged code. As mentioned in Chapter 1, “Introduction to .NET”, unmanaged code is code that executes outside of the CLR and not able to take direct advantage of .NET services such as garbage collection. An example of running unmanaged code is calling a method on an object in a Visual FoxPro COM server.
In contrast, unsafe code is still managed code, but it allows you to access memory directly by means of pointers. The term unsafe doesn’t necessarily mean your code is a danger to itself and to you. It simply means the runtime cannot verify that it is safe.
So, why would you want to write unsafe code? There are a few reasons. The most common reason is to improve performance. When you are able to access memory addresses using pointers rather than reference variables, you are going through one less layer, which provides a performance advantage. If you have time-critical portions of your application where you want to wring out the highest possible speed, you may consider creating unsafe code.
Another reason you may want to create unsafe code is to access a legacy DLL, such as a Windows API call or a legacy COM DLL that calls for a pointer to be passed as a parameter.
For more information on creating unsafe code in C#, check out the MSDN article Unsafe at the Limit by Eric Gunnerson of Microsoft:
http://msdn.microsoft.com/library/default.asp?url=/library/en-us/dncscol/html/csharp10182001.asp
C# as an international, industry standard language
Microsoft has done something of great interest with the
C# language. In October of 2000, Microsoft submitted C# for review to the
European Computer Manufacturers Association (ECMA), an international standards
organization, hoping to make it an industry standard language. On
What does this mean for Microsoft and the C# developer? First of all, it means that C# and the CLI are official standards administered by ECMA, although Microsoft retains the right to decide who gets to license the technology. In addition, although there are a number of theories stating that Microsoft has done this “just for show” (Sun Microsystems submitted their Java programming language to the ECMA, then pulled it back again), ultimately, it means that you may be able to write programs in C# that run on non-Windows operating systems such as Linux, Unix and the Palm—something that has been a key feature of Java since its inception. This is similar to the capabilities you have today for creating a C++ application for multiple platforms.
Conclusion
Hopefully this chapter proved useful in giving you a good overview of C#’s syntax, data types, conversions, conditional, and flow of control statements. Although the use of curly braces and semicolons may throw you at first, many developers are surprised at how easy it is to learn C# and how straightforward it is to use.
Although I’ve covered the basics of C# syntax in this
chapter, you can learn more from books such as Professional C# - Second
Edition, by Wrox Publishing.