Chapter
6
Tour of the .NET Base Classes
Although a lot of heat is generated over which .NET programming language is easier to use and learn, ultimately THE biggest learning curve is not C# or Visual Basic .NET—it’s the .NET Framework. This chapter takes you on a tour of some of the more interesting and useful classes and shows you how to use them in your applications.
There are over 2,000 classes in the .NET Framework (compared to Visual FoxPro’s 35 base classes), making for a fairly steep learning curve when you are first learning about .NET. Many of the most important .NET classes are covered in detail in other chapters of this book. However, in this chapter, you will learn some details about classes that are also very important, but are not covered in detail elsewhere.
This chapter will cover the classes by namespace so you also get a feel for the organization of classes in .NET, but it will not cover every namespace in the framework. First of all, there’s only so much I can cover in a chapter within the scope of this book, and secondly, a number of namespaces contain classes you will not normally use on a regular basis (for example the .NET classes you can use to write your own compiler).
![]()
As mentioned in Chapter 1, “Introducing .NET”, before you can use a class in your code, first you need to make sure you reference its associated namespace (by means of the “using” directive in C# and the “Imports” directive in Visual Basic .NET).
The System namespace
The System namespace contains quite a few classes that you use frequently and have already been introduced in previous chapters, such as the base value types—Boolean, Byte, Char, Decimal, Integer, and so on (Figure 1). The following sections shows a few other classes belonging to the System namespace that are also of interest.
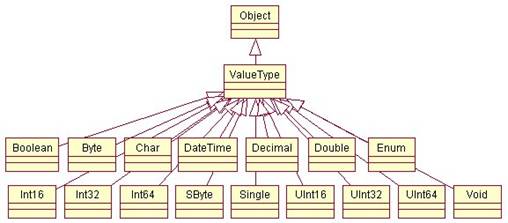
Figure 1. The System namespace contains many frequently used classes such as the base value type classes shown in this UML class diagram.
The String class—working with strings
Chapter 3, “Introduction to C#” and Chapter 4,
“Introduction to Visual Basic .NET”,
provide some basic information regarding the string data type. This section
further explores
its capabilities.
![]()
The string alias in C# and the String alias in Visual Basic .NET are both shortcuts that refer to the System.String class.
Parsing strings
The String class provides a number of methods that allow you to parse strings. This is different than Visual FoxPro, which has a variety of independent functions you use to parse strings. The String class brings all of this functionality together in a single class.
To determine the starting position of one or more characters within a string, you use the String class’s IndexOf method, which finds the first occurrence or the LastIndex method, which finds the last occurrence. You can also specify the starting character position and number of characters searched.
Here’s an example in C#:
string MyString = "<GBAddress>
int DotsIndex = MyString.IndexOf("..."); // returns 41
int LastIndex = MyString.LastIndexOf('<'); // returns 44
And in Visual Basic .NET:
Dim MyString As String = _
"<GBAddress>
Dim DotsIndex As Integer = MyString.IndexOf("...") ' returns 41
Dim LastIndex As Integer = MyString.LastIndexOf("<"c) ' returns 44
You can also determine if a string starts or ends with a specified string.
In C#:
string MyString = "<GBAddress>
bool IsStart = MyString.StartsWith("<GBAddress>"); // returns true
bool IsEnd = MyString.EndsWith("</GBAddress>"); // returns true
In Visual Basic. NET:
Dim MyString As String = _
"<GBAddress>
Dim IsStart As Boolean = MyString.StartsWith("<GBAddress>") ' returns True
Dim IsEnd As Boolean = MyString.EndsWith("</GBAddress>") ' returns True
To retrieve a substring of another string, you use the String class’s Substring method. You specify just a starting position or both a starting position and number of characters.
In C#:
string MyString = "<GBAddress>
// Returns "
string SubString = MyString.Substring(MyString.IndexOf('>')+1, 10);
In Visual Basic .NET:
Dim MyString As String = _
"<GBAddress>
' Returns "
Dim SubString As String = MyString.Substring(MyString.IndexOf(">"c) + 1, 10)
Padding and Trimming strings
You pad strings by using the String class’s PadLeft and PadRight methods. By default, these methods pad a string with spaces on the left or the right to make the string the total specified length. Alternately, you can pass a second character parameter that specifies a different pad character. In the following example, the PadLeft method is used to add five spaces to the left side of the Unpadded string. The PadRight method is then used to add five periods to the right of the string.
Here’s the code in C#:
string Unpadded = "Once upon a time";
// Returns " Once upon a time"
string PadLeft = Unpadded.PadLeft(Unpadded.Length + 5);
// Returns "Once upon a time ."
string PadRight = Unpadded.PadRight(Unpadded.Length + 5)+ ".";
Here’s the code in Visual Basic .NET:
Dim Unpadded As String = "Once upon a time"
' Returns " Once upon a time"
Dim PadLeft As String = MyString.PadLeft((MyString.Length + 5))
' Returns "Once upon a time ."
Dim PadRight As String = MyString.PadRight((MyString.Length + 5)) + "."
You trim characters from the beginning or end of a string (or from both) by using the String class’s TrimStart, TrimEnd, and Trim methods. If you don’t pass a parameter to these trim methods, they trim spaces from the string. Otherwise, you specify an array of one or more characters to be trimmed from the string.
Here’s an example in C#:
string MyPaddedStr = " I've been padded!!!!!";
// Returns "I've been padded!!!!!"
string TrimStart = MyPaddedStr.TrimStart();
char[] TrimChr = {'!'};
// Returns " I've been padded"
string TrimEnd = MyPaddedStr.TrimEnd(TrimChr);
MyPaddedStr = " I've been padded ";
// Returns "I've been padded"
string TrimAll = MyPaddedStr.Trim();
And here it is in Visual Basic .NET:
Dim MyPaddedStr As String = " I've been padded!!!!!"
' Returns "I've been padded!!!!!"
Dim TrimStart As String = MyPaddedStr.TrimStart()
Dim TrimChr As Char = "!"c
' Returns " I've been padded"
Dim TrimEnd As String = MyPaddedStr.TrimEnd(TrimChr)
MyPaddedStr = " I've been padded "
' Returns "I've been padded"
Dim TrimAll As String = MyPaddedStr.Trim()
Manipulating strings
You can insert, remove, and replace characters in a string or convert a string to uppercase or lowercase by using the corresponding Remove, Replace, Convert, ToUpper, and ToLower methods as shown in the following example.
In C#:
string MyString = "<GBAddress>
int DotsIndex = MyString.IndexOf("..."); // Returns 41
// Returns "<GBAddress>
string NewString = MyString.Insert(DotsIndex, " our fathers");
// Returns "<GBAddress>
string RemoveStr = MyString.Remove(DotsIndex, 3);
// Returns "<GBAddress>
string ReplaceStr = MyString.Replace("...", " etc.");
// Returns "<gbaddress>
string Lower = MyString.ToLower();
// Returns "<GBAddress>
string Upper = MyString.ToUpper();
And in Visual Basic .NET:
Dim MyString As String = _
"<GBAddress>
Dim DotsIndex As Integer = MyString.IndexOf("...") ' Returns 41
' Returns "<GBAddress>
Dim NewString As String = MyString.Insert(DotsIndex, " our forefathers")
' Returns "<GBAddress>
Dim RemoveStr As String = MyString.Remove(DotsIndex, 3)
' Returns "<GBAddress>
Dim ReplaceStr As String = MyString.Replace("...", " etc.")
' Returns "<gbaddress>
Dim Lower As String = MyString.ToLower()
' Returns "<GBAddress>
Dim Upper As String = MyString.ToUpper()
The Environment class – platform and environment information
The Environment class has some very useful static properties and methods for retrieving information about the current environment and platform where your application is running. For example, the following code gets the current directory, machine name, operating system version, system directory, domain name, and user name from properties of the Environment class, and then displays them in a message box.
In C#:
string EnvironMsg;
EnvironMsg = "Current Directory: " +
Environment.CurrentDirectory + "\n" +
"MachineName: " + Environment.MachineName + "\n" +
"OS Version: " + Environment.OSVersion + "\n" +
"System Directory: " + Environment.SystemDirectory + "\n" +
"Domain name: " + Environment.UserDomainName + "\n" +
"User name: " + Environment.UserName + "\n";
MessageBox.Show(EnvironMsg, "Environment class");
In Visual Basic .NET:
Dim EnvironMsg As String
EnvironMsg = "Current Directory: " & Environment.CurrentDirectory & _
ControlChars.Lf & "MachineName: " & Environment.MachineName & _
ControlChars.Lf & "OS Version: " & Environment.OSVersion.ToString() & _
ControlChars.Lf & "System Directory: " & Environment.SystemDirectory & _
ControlChars.Lf & "Domain name: " & Environment.UserDomainName & _
ControlChars.Lf & "User name: " & Environment.UserName & ControlChars.Lf
MessageBox.Show(EnvironMsg, "Environment class")
You can also use the Environment class to retrieve a list of logical drives.
In C#:
string DriveList = "Logical drives: \n";
string[] Drives = Environment.GetLogicalDrives();
foreach (string Drive in Drives)
{
DriveList += Drive + "\n";
}
MessageBox.Show(DriveList, "Environment class");
In Visual Basic .NET:
Dim DriveList As String = "Logical drives: " + ControlChars.Lf
Dim Drives As String() = Environment.GetLogicalDrives()
Dim Drive As String
For Each Drive In Drives
DriveList += Drive + ControlChars.Lf
MessageBox.Show(DriveList, "Environment class")
The Environment class also contains methods that allow you to retrieve command line arguments and environment variables. For more information on the Environment class, see the .NET Help topic “Environment Class”.
DateTime structure
The DateTime structure is used to represent a date and time-of-day. DateTime has a number of static properties and methods you use to get date and time-related information. For example, the following code uses the DateTime structure to get the current date, current time, number of days in October 1960 (my birth month/year), and to determine if 2002 is a leap year.
In C#:
string DateTimeMsg;
DateTimeMsg = "Current Date: " + DateTime.Today + "\n" +
"Current DateTime: " + DateTime.Now + "\n" +
"Days in month for Oct '60: " + DateTime.DaysInMonth(1960,10) + "\n" +
"Is 2002 a leap year: " + DateTime.IsLeapYear(2002);
And in Visual Basic .NET:
Dim DateTimeMsg As String
DateTimeMsg = "Current Date: " + DateTime.Today.ToString() + _
ControlChars.Lf + "Current DateTime: " + _
DateTime.Now.ToString() + ControlChars.Lf + _
"Days in month for Oct '60: " + _
DateTime.DaysInMonth(1960, 10).ToString() + ControlChars.Lf + _
"Is 2002 a leap year: " + DateTime.IsLeapYear(2002).ToString()
You can also instantiate an instance of the
DateTime structure, passing a date and time that you want to work with in the
constructor. The following code passes my birth date and time,
Here’s the code in C#:
DateTime DateTimeObj = new DateTime(1960,10,9,1,10,0,0);
DateTimeMsg = "
DateTimeMsg += "Date: " + DateTimeObj.Date + "\n" +
"Day: " + DateTimeObj.Day + "\n" +
"Day-of-week: " + DateTimeObj.DayOfWeek + "\n" +
"Day-of-year: " + DateTimeObj.DayOfYear + "\n" +
"Month: " + DateTimeObj.Month + "\n" +
"Time-of-Day: " + DateTimeObj.TimeOfDay + "\n" +
"Year: " + DateTimeObj.Year + "\n";
DateTime DateTime64 = DateTimeObj.AddYears(64);
DateTimeMsg += "When I'm 64: " + DateTime64.Year;
MessageBox.Show(DateTimeMsg, "DateTime structure");
Here’s the code in Visual Basic .NET:
Dim DateTimeObj As New DateTime(1960, 10, 9, 1, 10, 0, 0)
DateTimeMsg = "
DateTimeMsg += "Date: " + DateTimeObj.Date.ToString() + _
ControlChars.Lf + "Day: " + DateTimeObj.Day.ToString() + _
ControlChars.Lf + "Day-of-week: " + DateTimeObj.DayOfWeek.ToString() + _
ControlChars.Lf + "Day-of-year: " + DateTimeObj.DayOfYear.ToString() + _
ControlChars.Lf + "Month: " + DateTimeObj.Month.ToString() + _
ControlChars.Lf + "Time-of-Day: " + DateTimeObj.TimeOfDay.ToString() + _
ControlChars.Lf + "Year: " + DateTimeObj.Year.ToString() + _
ControlChars.Lf
Dim DateTime64 As DateTime = DateTimeObj.AddYears(64)
DateTimeMsg += "When I'm 64: " + DateTime64.Year.ToString()
MessageBox.Show(DateTimeMsg, "DateTime structure")
The DateTime structure has many other methods you can use to add and subtract dates and times, as well as methods for converting to other data types.
You can also check out the System.TimeSpan structure when working with time intervals rather than a specific date and time.
The Math class
The Math class performs common mathematical as well as logarithmic and trigonometric functions. The following code demonstrates using the Math class to round numbers (Round), determine the larger of two numbers (Max), the smaller (Min), and raise a number to a specified power (Pow).
Here’s the code in C#:
string MathMsg;
double Value, Result;
int MaxValue, MinValue;
Value = Math.Round(1.23, 1); // Returns 1.2
MaxValue = Math.Max(7, 5); // Returns 7
MinValue = Math.Min(7, 5); // Returns 5
Result = Math.Pow(12, 3); // Returns 1728.0
Here’s the code in Visual Basic .NET:
Dim MathMsg As String
Dim Value, Result As Double
Dim MaxValue, MinValue As Integer
Value = Math.Round(1.23, 1) ' Returns 1.2
MaxValue = Math.Max(7, 5) ' Returns 7
MinValue = Math.Min(7, 5) ' Returns 5
Result = Math.Pow(12, 3) ' Returns 1728.0
There are many other math functions you can perform using the Math class such as determining sign, cosine, logarithm, square root, and so on.
The System.Collections namespace
The System.Collections namespace contains classes that contain collections of objects. Figure 2 shows some of the classes that define collections of queues, arrays, hash tables, and dictionaries.
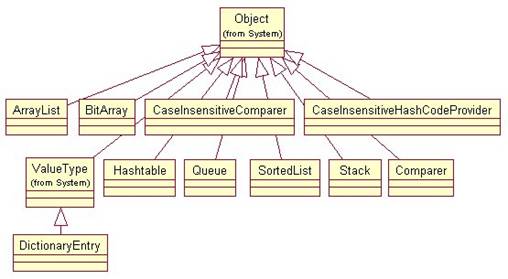
Figure 2. The System.Collections namespace contains classes that contain collections of objects such as queues, arrays, hash tables, and dictionaries.
The ArrayList class
The ArrayList class is an object-oriented array that can be dynamically resized at runtime. This is particularly useful in C# where an array’s dimensions cannot be changed. The ArrayList contains a variety of methods you use to manipulate array elements.
To add elements to an ArrayList, you use the Add method, specifying the item to be added. You can also use the Insert method to insert an element at a specified index.
Here’s the code in C#:
ArrayList ArryList = new ArrayList();
ArryList.Add("Moe");
ArryList.Add("Larry");
ArryList.Add("Curly");
ArryList.Insert(2, "Bob");
And in Visual Basic .NET:
Dim ArryList As New ArrayList()
ArryList.Add("Moe")
ArryList.Add("Larry")
ArryList.Add("Curly")
ArryList.Insert(2, "Bob")
This code produces elements in the following order:
Moe
Larry
Curly
Bob
You use the Remove method or the RemoveAt (specifying the index of the element to be removed) methods to remove elements from an ArrayList.
In C#:
ArryList.Remove("Bob");
ArryList.RemoveAt(2);
In Visual Basic .NET:
ArryList.Remove("Bob")
ArryList.RemoveAt(2)
This code produces elements in the following order:
Moe
Larry
You can access an element (get its value or set its value) at a specified index.
In C#:
ArryList[1] = "Shemp";
In Visual Basic .NET:
ArryList(1) = "Shemp"
This code sets the ArrayList elements to the following:
Moe
Shemp
You find the index of the first occurrence of a value by calling the IndexOf method. You find the index of the last occurrence of a value by calling the LastIndexOf method. The following code adds two duplicate values to an ArrayList, one at the beginning and one at the end, and then uses IndexOf and LastIndexOf to get their indexed location.
Here’s the code in C#:
ArryList.Insert(0, "Curly");
ArryList.Add("Curly");
int FirstIndex = ArryList.IndexOf("Curly");
int LastIndex = ArryList.LastIndexOf("Curly");
And here’s the code in Visual Basic .NET:
ArryList.Insert(0, "Curly")
ArryList.Add("Curly")
Dim FirstIndex As Integer = ArryList.IndexOf("Curly")
Dim LastIndex As Integer = ArryList.LastIndexOf("Curly")
This code produces elements in the following order:
Curly
Moe
Shemp
Curly
You sort the elements in an ArrayList by calling the Sort method. You can reverse the order by calling the Reverse method. This code is the same in C# and Visual Basic .NET:
ArryList.Sort();
ArryList.Reverse();
The Capacity property specifies the number of elements an ArrayList can contain (the default value is 16). The Count property specifies the actual number of elements in the array. If the Count exceeds the Capacity, the Capacity is automatically doubled to accommodate the new array element. If you want to set the capacity to the actual number of elements, you use the TrimToSize method.
For more information on the capabilities of the ArrayList class, see the .NET Help topic “ArrayList Class”.
Comparer and CaseInsensitiveComparer classes
The Comparer class performs a case-sensitive comparison of two objects of the same type. The CaseInsensitiveComparer class performs a case-insensitive comparison of two objects of the same type. Each class has a Compare method you call and pass the two objects to be compared. It returns a –1 if the first value is less than the second value, a zero if the two objects are equal, and a 1 if the first value is greater than the second value.
The following example shows the comparison of the same two strings using each class.
In C#:
int CompValue1 = Comparer.Default.Compare("
int CompValue2 =
CaseInsensitiveComparer.Default.Compare("
In Visual Basic .NET:
Dim CompValue1 As Integer =
Comparer.Default.Compare("
Dim CompValue2 As Integer =
CaseInsensitiveComparer.Default.Compare("
The Comparer class returns a minus 1 indicating
that “
The HashTable class
So far, the collections you have examined only allow you to store the equivalent of a single array column. This can be somewhat limiting when you have multiple elements of the same value you want to distinguish in a unique way. This is where the HashTable class comes to the rescue.
The HashTable class allows you to create a
collection of key-and-value pairs organized based on the hash of the key. The
following example creates a HashTable and adds three key-value pairs to it.
Afterwards, it retrieves the value “
Here’s the code in C#:
// Create the Hash Table and add three key-value pairs
Hashtable HTable = new Hashtable();
HTable.Add("a1", "Apples");
HTable.Add("a2", "
HTable.Add("a3", "Pears");
// Get a value based on a key
string Item = (string)HTable["a2"];
And here it is in Visual Basic .NET:
' Create the Hash Table and add three key-value pairs
Dim HTable As New Hashtable()
HTable.Add("a1", "Apples")
HTable.Add("a2", "
HTable.Add("a3", "Pears")
' Get a value based on a key
Dim Item As String = CStr(HTable("a2"))
Notice when the string value is retrieved from the HashTable in the last line of code, it must be cast to a string. Why is this necessary since it was added to the HashTable as a string? Because each key-value pair comprises a single element of a HashTable and the element is of the type DictionaryEntry.
The Queue class
The Queue class provides a first-in, first-out collection of objects. For example, you can use this class to process messages in the order they were received. The following code adds messages to the Queue class using the Enqueue method and retrieves and removes objects in first-in, first-out order using the Dequeue method.
In C#:
Queue QueueTest = new Queue();
QueueTest.Enqueue("
QueueTest.Enqueue("
QueueTest.Enqueue("
string MessageList = "You have " + QueueTest.Count + " messages:\n\n";
while (QueueTest.Count > 0)
{
MessageList += QueueTest.Dequeue() + "\n";
}
MessageBox.Show(MessageList, "Queue class");
In Visual Basic .NET:
Dim QueueTest As New Queue()
QueueTest.Enqueue("
QueueTest.Enqueue("
QueueTest.Enqueue("
Dim MessageList As String = "You have " & QueueTest.Count.ToString() & _
" messages:" & ControlChars.Lf & ControlChars.Lf
While QueueTest.Count > 0
MessageList += QueueTest.Dequeue().ToString() & ControlChars.Lf
End While
MessageBox.Show(MessageList, "Queue class")
Figure 3 shows the resulting message box displayed by this code.
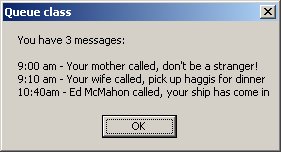
Figure 3. The Queue class is a first-in, first-out collection of objects. You can, for example, use it to process messages in the order they were received.
The Stack and SortedList classes
The Stack and SortedList classes represent two additional types of collections. The Stack class is similar to the Queue class, except it is a last-in, first-out collection. You add items to the Stack class by using the Push method. You retrieve and remove items from the Stack class by using the Pop method.
The SortedList class is a cross between a HashTable and an Array. You access an item in a SortedList using its key, as you do in HashTables. You can also access an item by passing its index to the GetByIndex and SetByIndex methods, as you do in an Array.
![]()
The System.Collections.Specialized namespace also contains more
specialized collections such as a string collection, a linked list dictionary,
and other strongly-typed collections.
The System.EnterpriseServices namespace
If you’re building n-tier, distributed .NET applications, you’ll definitely use some of the classes found in the System.EnterpriseServices namespace. These classes provide access to COM+ services, including queued components, COM+ events, transaction services, and something you can’t get with either Visual FoxPro or Visual Basic 6—object pooling.
![]()
COM+ services is still the primary Microsoft technology for hosting components, both COM and .NET, and the .NET Framework fully supports COM+. For more information on COM+, see the Hentzenwerke book “What’s New in Visual FoxPro 7” (chapter 14, “Playing in the COM+ Sandbox”).
The main classes in the System.EnterpriseServices namespace are show in Figure 4.
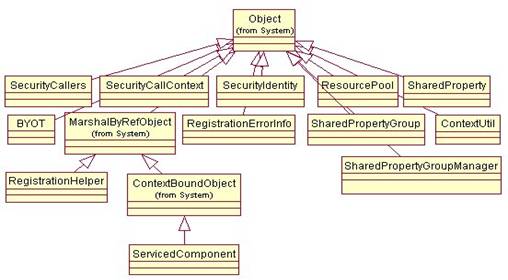
Figure 4. The classes in the System.EnterpriseServices namespace provide COM+ services access to your .NET components.
A description of all the enterprise services
classes is beyond the scope of this book,
but the following sections show you the basics of using some of the classes to
configure
an assembly for COM+ services and specifically, object pooling. This involves
the
following steps:
· Configuring an assembly to use COM+ services – Before an assembly can use COM+ services, you need to set some special attributes on the assembly.
· Deploying the assembly – You must install the assembly in the Global Assembly Cache (GAC).
· Configuring a class to use object pooling – You must specify special attributes for each class that you want to pool.
The following sections explain each of these steps in detail.
Configuring an assembly for COM+ services
To configure an assembly to use COM+ services requires that you set four assembly attributes: ApplicationActivation, ApplicationID, ApplicationName, and Description. These attributes are set in your solution’s AssemblyInfo.cs file (C#) or AssemblyInfo.vb file (VB .NET).
Here’s an example in C#:
using System.EnterpriseServices;
[assembly: ApplicationActivation(ActivationOption.Server)]
[assembly: ApplicationName(".NET for VFP Developers samples")]
[assembly: Description(".NET for VFP Developers book samples")]
[assembly: ApplicationID("1B55DB81-11CC-46b9-B989-11A5784D8E26")]
And in Visual Basic .NET:
Imports System.EnterpriseServices
<Assembly: ApplicationActivation(ActivationOption.Server)>
<Assembly: ApplicationID("1B55DB81-11CC-46b9-B989-11A5784D8E26")>
<Assembly: ApplicationName(".NET for VFP Developers samples")>
<Assembly: Description(".NET for VFP Developer book samples")>
First of all, notice that you need to add a reference to the System.EnterpriseServices namespace to your AssemblyInfo file as shown in the first line of the sample code. However, before you can do this, you must first add a reference to the System.EnterpriseServices .NET component in the Solution Explorer (this DLL is not automatically added to a project by VS .NET). To add this reference, right-click on your project’s References node in the Solution Explorer, and select Add Reference… from the shortcut menu. In the Add Reference dialog, select “System.EnterpriseServices” from the list of components on the .NET tab, click the Select and the OK button.
The ApplicationActivation attribute needs to be set to either Library or Server (using the ActivationOption enumeration) depending on the type of COM+ application you are creating. The ApplicationName and Description attributes can be set to whatever descriptive text you want to give them.
The ApplicationID attribute must be set to globally unique identifier (GUID). You can generate your own GUID by using the GuidGen.exe tool that comes with Visual Studio .NET (located in the Common7\Tools folder). Just run GuidGen.exe and in the Create Guid dialog (Figure 5), select 4. Registry Format. Click the Copy button, to copy the new GUID to the clipboard, and then paste this new value into your AssemblyInfo file. You need to remove the curly braces that bracket the GUID.
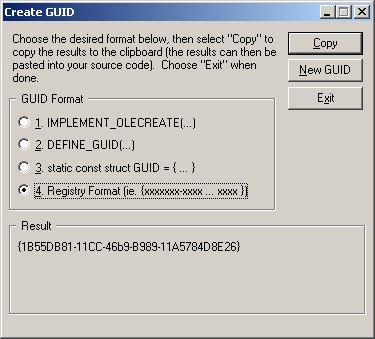
Figure 5. The GuidGen.exe tool allows you to generate globally unique identifiers (GUIDs) that you can use to create unique application IDs for your assemblies.
Deploying the assembly
Deploying an assembly that uses COM+ services involves the following steps:
· Create a strong name for the assembly
· Register the assembly in the global assembly cache (GAC)
· If your assembly is going to be used by non .NET clients, you need to register the assembly with COM+ services using the RegSvcs.exe tool that comes with Visual Studio .NET.
Detailed instructions on creating a strong name for an assembly and registering it in the GAC are covered in Chapter 1, “Introducing .NET” under the “Creating and installing shared assemblies” section. If you need to register your assembly using RegSvcs.exe, you do so using the following command line syntax:
RegSvcs <component name> [COM+ Application name] [TypeLibrary.tlb]
The first parameter is the name of your .NET component. The second parameter (optional) allows you to assign a name to your COM+ application. The third parameter (also optional) allows you to specify the name of the type library generated by RegSvcs.
Configuring a class for object pooling
To indicate that you want an object to be pooled, there are three main steps you need to take. The first step is to derive your class from the .NET ServicedComponent class that belongs to the System.EnterpriseServices namespace. All classes that use COM+ services must be derived from this class.
The second step is to specify an ObjectPool attribute for the class you want to pool. The following example specifies that object pooling is enabled, the minimum pool size is 1, the maximum pool size is 75, and the creation timeout is 45 seconds (if you don’t specify values for these parameters, they are set to the COM+ defaults—minimum pool size of 0, a maximum pool size of 1,048,576, and a creation timeout of 60 seconds).
Here’s the code in C#:
[ObjectPooling (Enabled=true, MinPoolSize=1, MaxPoolSize=75, CreationTimeout=45)]
public class Executant : ServicedComponent
{
}
And here’s the code in Visual Basic .NET:
<ObjectPooling(Enabled:=True, MinPoolSize:=1, MaxPoolSize:=75, _
CreationTimeout:=45)> Public Class Executant
Inherits ServicedComponent
End Class 'Executant
The third step is implementing the three methods inherited from the ServicedComponent class—CanBePooled, Activate, and Deactivate. Clients use the CanBePooled method to determine if an object can be pooled. The Activate method is called by COM+ whenever an object is taken from the pool and activated, so you can place initialization code in here. The Deactivate method is called by COM+ whenever an object is placed back on the pool, so you can place cleanup code in here.
Here’s an example in C#:
[ObjectPooling (Enabled=true, MinPoolSize=1, MaxPoolSize=75, CreationTimeout=45)]
public class Executant : ServicedComponent
{
/// Returns a boolean value indicating if the object can be pooled
protected override bool CanBePooled()
{
return true;
}
/// This method is called by COM+ services each time the object
/// is taken from the pool and activated
protected override void Activate()
{
}
/// This method is called by COM+ services each time the object
/// is placed back into the pool
protected override void Deactivate()
{
}
public DataSet ReadXmlFileToDataSet(string xmlFile)
{
DataSet ds = new DataSet();
ds.ReadXml(xmlFile);
return ds;
}
}
And here it is in Visual Basic .NET:
<ObjectPooling(Enabled:=True, MinPoolSize:=1, MaxPoolSize:=75, _
CreationTimeout:=45)> Public Class Executant
Inherits ServicedComponent
'/ Returns a boolean value indicating if the object can be pooled
Protected Overrides Function CanBePooled() As Boolean
Return True
End Function 'CanBePooled
'/ This method is called by COM+ services each time the object
'/ is taken from the pool and activated
Protected Overrides Sub Activate()
End Sub 'Activate
'/ This method is called by COM+ services each time the object
'/ is placed back into the pool
Protected Overrides Sub Deactivate()
End Sub 'Deactivate
Public Function ReadXmlFileToDataSet(ByVal xmlFile As String) As DataSet
Dim ds As New DataSet()
ds.ReadXml(xmlFile)
Return ds
End Function 'ReadXmlFileToDataSet
End Class 'Executant
The System.IO namespace
The System.IO namespace contains classes that allow you to read and write to files and data streams, as well as classes for working with directories and paths (Figure 6).
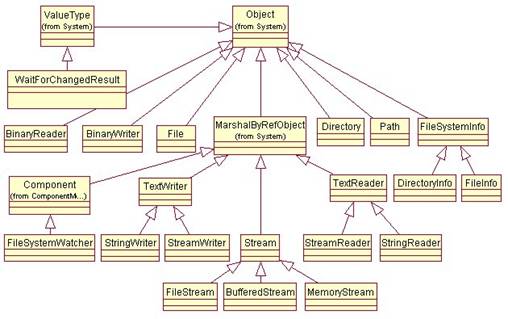
Figure 6. They System.IO namespace contains classes that allow you to read and write files and data streams.
The Directory and DirectoryInfo classes
If you need to create, manipulate, or retrieve directory information, the Directory class provides this capability. The Directory class has static methods that allow you to:
· Create directories
· Get and set the current working directory
· Delete a directory and its contents
· Determine whether a directory exists
· Retrieve a list of subdirectories
· Retrieve a list of files in a specified directory
· Move a file or directory and its contents to a new location
For example, the following code retrieves and displays the current working directory, sets the current directory to “c:\” and displays it, and then restores the original directory.
Here’s the code in C#:
string SaveDir;
// Save the current directory
SaveDir = Directory.GetCurrentDirectory();
MessageBox.Show("The current directory is: " + SaveDir);
// Set the current directory to c:\ and display the current directory
Directory.SetCurrentDirectory("c:\\");
MessageBox.Show("The current directory now is: " +
Directory.GetCurrentDirectory());
// Restore the original directory
Directory.SetCurrentDirectory(SaveDir);
And here it is in Visual Basic .NET:
Dim SaveDir As String
' Save the current directory
SaveDir = Directory.GetCurrentDirectory()
MessageBox.Show(("The current directory is: " + SaveDir))
' Set the current directory to c:\ and display the current directory
Directory.SetCurrentDirectory("c:\")
MessageBox.Show(("The current directory now is: " + _
Directory.GetCurrentDirectory()))
' Restore the original directory
Directory.SetCurrentDirectory(SaveDir)
The DirectoryInfo class performs many of the same functions as the Directory class. The difference between them is the Directory class performs a security check when each method is called (to determine if sufficient permissions exist to execute the requested method), and the DirectoryInfo class does not. If you are going to reuse an object to check directories multiple times, you should consider using the DirectoryInfo class because you may not need to continually recheck security.
The File, FileInfo classes
The File class allows you to manipulate files and create FileStream objects. The File class has static methods that allow you to:
· Copy an existing file to a new file
· Create files
· Delete files
· Determine if a file exists
· Move files
· Open files
· Read and set file attributes
In the following example, the code checks to see if a file exists, and if so, deletes it:
In C#:
if (File.Exists("c:\\test.txt"))
{
File.Delete("c:\\test.txt");
}
And in Visual Basic .NET:
If File.Exists("c:\test.txt") Then
File.Delete("c:\test.txt")
End If
The difference between FileInfo and File is the same as DirectoryInfo vs. Directory. The File class performs the security check and the FileInfo class does not.
Writing and Reading files with StreamWriter and StreamReader
If you want to create a file and add text to it, the StreamWriter class is a great tool for the job. For example, when you use the File class’s CreateText method to create a new file, it returns an instance of a StreamWriter class you can use to add text to the file.
In the following code, a new text file named text.txt is created using File.CreateText, which returns a StreamWriter object. This object is then used to write three new lines of text to the file. Afterwards, the StreamWriter’s Close method is called, which closes the StreamWriter and the associated text file.
Here’s the code in C#:
StreamWriter StrWriter = File.CreateText("c:\\test.txt");
StrWriter.WriteLine("Use case diagrams");
StrWriter.WriteLine("Activity diagrams");
StrWriter.WriteLine("Sequence diagrams");
StrWriter.Close();
Here’s the code in Visual Basic .NET:
Dim StrWriter As StreamWriter = File.CreateText("c:\test.txt")
StrWriter.WriteLine("Use case diagrams")
StrWriter.WriteLine("Activity diagrams")
StrWriter.WriteLine("Sequence diagrams")
StrWriter.Close()
The StreamReader class is great for reading text from a file. In the following code, a text file is opened using File.OpenText, which returns a StreamReader object. You use the methods of the StreamReader to read the text from the file. In this case, the ReadToEnd method is used to read all of the text in the file into the FileText variable.
Here’s the code in C#:
StreamReader StrReader = File.OpenText("c:\\test.txt");
string FileText = StrReader.ReadToEnd();
Here’s the code in Visual Basic .NET:
Dim StrReader As StreamReader = File.OpenText("c:\test.txt")
Dim FileText As String = StrReader.ReadToEnd()
You can use other methods in the StreamReader class to read just a portion of the text from a file. For example, the Read method reads the next character or set of characters from the stream, and the ReadLine method reads a line of characters from the stream.
The Path class
The Path class allows you to manipulate file or directory path strings including functionality similar to Visual FoxPro’s JustPath(), JustStem(), JustExt(), and JustFName() functions. With the Path class you can do the following to a file or path string (among other things):
· Change a file extension
· Get just the directory
· Get just the extension
· Get just the file name
· Get a full path
· Generate a unique file name and create a zero-byte file with that name on disk
The following code takes a fully qualified path and file name, breaks it down into each of its parts, and displays it.
In C#:
string PathString = @"c:\Program Files\Microsoft Visual Studio .NET\readme.htm";
string Dir = Path.GetDirectoryName(PathString);
string Ext = Path.GetExtension(PathString);
string FileName = Path.GetFileName(PathString);
string Stem = Path.GetFileNameWithoutExtension(PathString);
MessageBox.Show("Path: " + PathString + "\n\n" +
"Directory: " + Dir + "\n" +
"Extension: " + Ext + "\n" +
"File Name: " + FileName + "\n" +
"Stem: " + Stem);
In Visual Basic .NET:
Dim PathString As String = _
"c:\Program Files\Microsoft Visual Studio .NET\readme.htm"
Dim Dir As String = Path.GetDirectoryName(PathString)
Dim Ext As String = Path.GetExtension(PathString)
Dim FileName As String = Path.GetFileName(PathString)
Dim Stem As String = Path.GetFileNameWithoutExtension(PathString)
MessageBox.Show(("Path: " + PathString + ControlChars.Lf + _
ControlChars.Lf + "Directory: " + Dir + ControlChars.Lf + _
"Extension: " + Ext + ControlChars.Lf + "File Name: " + _
FileName + ControlChars.Lf + "Stem: " + Stem))
The output of this message box is shown in Figure 7.
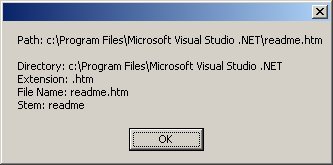
Figure 7. The Path class allows you to extract the directory, extension, file name, and stem from a path string.
The FileSystemWatcher class
Many applications have a need to perform a particular action when something changes in the file system. Often, this takes the form of waiting for a particular file to appear in a specified directory. The FileSystemWatcher class is a great class for this and other scenarios. Not only can you watch the file system of a local computer, you can also watch files on a network drive or a remote computer.
You set the Filter property of the FileSystemWatcher class to the name of the file you want to watch. If you set the Filter property to an empty string, it watches for all files. You set the Filter to watch for a specific type of file by specifying an asterisk and a file extension, for example “*.xml”.
The FileSystemWatcher class can watch for a variety of changes, including the attributes of a file or folder, the name of a file or directory, the last date/time a file or folder was written to, the size of a file or folder, and so on (Figure 8).

Figure 8. The FileSystemWatcher class can watch for a variety of changes including changes in attributes, the last write date and time, the size of a file or directory, and the name of a file.
The events you can watch for are change, create, delete, and rename. In order to respond to these events, you must add event handlers to the FileSystemWatcher’s Changed, Created, Deleted, and Renamed events. For example, in the following code, the WatchForFile method configures a FileSystemWatcher to watch for any .xml files created in the c:\ directory. It adds an event handler named OnCreated to the FileSystemWatcher’s Created event. Also notice the watcher’s EnableRaisingEvents property must be set to true before it begins watching.
Here’s the code in C#:
public class FileSystemWatcherDemo
{
public void WatchForFile()
{
// Configure the FileSystemWatcher
FileSystemWatcher Watcher = new FileSystemWatcher();
Watcher.Path = "c:\\";
Watcher.Filter = "*.xml";
Watcher.NotifyFilter = NotifyFilters.FileName
// Add an event handler to the Created event
Watcher.Created += new FileSystemEventHandler(OnCreated);
// Start watching!
Watcher.EnableRaisingEvents = true;
}
// Event handler for FileSystemWatcher Created event
public static void OnCreated(object source, FileSystemEventArgs e)
{
MessageBox.Show("New file created: " + e.Name);
}
}
Here’s the code in Visual Basic .NET:
Public Sub WatchForFile()
' Configure the FileSystemWatcher
Dim Watcher As New FileSystemWatcher()
Watcher.Path = "c:\"
Watcher.Filter = "*.xml"
Watcher.NotifyFilter = NotifyFilters.FileName
' Add an event handler to the Created event
AddHandler Watcher.Created, AddressOf OnCreated
' Start watching!
Watcher.EnableRaisingEvents = True
End Sub 'WatchForFile
' Event handler for FileSystemWatcher Created event
Public Shared Sub OnCreated(ByVal [source] As Object, _
ByVal e As FileSystemEventArgs)
MessageBox.Show(("New file created: " + e.Name))
End Sub 'OnCreated
You can implement the FileSystemWatcher class in a wide variety of places. For example, you can creat a console application that sits on a server, waiting for XML files to be copied into a specific directory. These XML files might contain data that needs to be imported into your system. When an XML file is copied into the directory, the FileSystemWatcher object alerts the event handler, which imports the XML data, and then moves the file to a “processed” directory.
The System.Net namespace
The System.Net namespace contains a wide variety of classes to Web-enable your .NET applications (Figure 9). I can’t do justice to these classes in this short section, but I will go over a few of the main classes.

Figure 9. The System.Net namespace contains classes that allow you to Web-enable your .NET applications.
Downloading and uploading with the WebClient class
You can use the WebClient class to upload and download data from the Internet. The following example shows how to use the WebClient’s OpenRead method to open a file (in this case, the default web page on a web site) and read through the text with a stream reader.
In C#:
string Text = "Downloaded text:\n\n";
int i;
WebClient WClient = new WebClient();
Stream strm = WClient.OpenRead("http://www.oakleafsd.com");
StreamReader StrmReader = new StreamReader(strm);
for (i=0; i < 10; i++)
{
Text += StrmReader.ReadLine() + "\n";
}
strm.Close();
MessageBox.Show(Text, "System.Net classes");
In Visual Basic .NET:
Dim Text As String = "Downloaded text:" & ControlChars.Lf & ControlChars.Lf
Dim i As Integer
Dim WClient As New WebClient()
Dim strm As Stream = WClient.OpenRead("http://www.oakleafsd.com")
Dim StrmReader As New StreamReader(strm)
For i = 0 To 9
Text += StrmReader.ReadLine() & ControlChars.Lf
Next i
strm.Close()
MessageBox.Show(Text, "System.Net classes")
To upload data, you use the WebClient’s UploadFile method to upload a file or UploadData method to upload binary data. The following example uses UploadFile to upload a file named MyFile.xml.
In C#:
WebClient WClient = new WebClient();
WClient.UploadFile("http://mywebsite.com", "MyFile.xml");
In Visual Basic .NET:
Dim WClient As New WebClient()
WClient.UploadFile("http://mywebsite.com", "MyFile.xml")
Note that you can only upload files using this method if you have permissions on the server. If you don’t have permissions, you will get a WebException error when you try to upload.
The Dns and IPHostEntry classes
The Dns class communicates with your default DNS server to provide some basic domain name functionality. In the following example, the Dns class’s Resolve method is called, passing a domain name, and an IPHostEntry object is returned. The IPHostEntry class acts as a container for host address information. As shown in the code below, you iterate through the IPHostEntry’s AddressList to get information on the addresses it contains.
Here’s the code in C#:
IPHostEntry IPHost = Dns.Resolve("www.oakleafsd.com");
string IPList = "";
foreach (IPAddress IP in IPHost.AddressList)
{
IPList += IP.Address + "\n";
}
MessageBox.Show("www.oakleafsd.com\n\n" +
"Address List: " + IPList +
"Host name: " + IPHost.HostName);
Here’s the code in Visual Basic .NET:
Dim IPHost As IPHostEntry = Dns.Resolve("www.oakleafsd.com")
Dim IPList As String = ""
Dim IP As IPAddress
For Each IP In IPHost.AddressList
IPList += IP.Address.ToString() & ControlChars.Lf
Next IP
MessageBox.Show(("www.oakleafsd.com" & ControlChars.Lf & ControlChars.Lf & _
"Address List: " & IPList & "Host name: " & IPHost.HostName))
The System.Timers namespace
The System.Timers namespace contains only three classes—the main class is the Timer class, which functions similar to timers in Visual FoxPro.
![]() There
is a Timer class in each of the System.Timers, System.Threading, and
System.Windows.Forms namespaces, so you need to qualify the Timer class name
with the namespace if you have referenced more than one of these in your code.
The System.Timers Timer class is used to generate recurring events in your
application. The System.Threading Timer class is used to call methods at
specified intervals. The System.Windows.Forms Timer should be used in Windows
Forms applications. See the .NET Help file for more information on each of
these classes.
There
is a Timer class in each of the System.Timers, System.Threading, and
System.Windows.Forms namespaces, so you need to qualify the Timer class name
with the namespace if you have referenced more than one of these in your code.
The System.Timers Timer class is used to generate recurring events in your
application. The System.Threading Timer class is used to call methods at
specified intervals. The System.Windows.Forms Timer should be used in Windows
Forms applications. See the .NET Help file for more information on each of
these classes.
In the following code, the StartTimer method sets the Interval of the timer to 2000ms (2 seconds), registers an event handler named OnElapsed with the timer’s Elapsed event, and then sets the timer’s Enabled property to true. After two seconds, the Elapsed event fires, calling the OnElapsed event handler which shuts off the timer by setting its Enabled property to false, and then displays a message to the user.
Here is the code in C#:
public class TimerDemo
{
System.Timers.Timer MyTimer = new System.Timers.Timer();
public void StartTimer()
{
this.MyTimer.Interval = 2000;
this.MyTimer.Elapsed += new ElapsedEventHandler(OnElapsed);
this.MyTimer.Enabled = true;
}
/// <summary>
/// Event handler for the timer's Elapsed event
/// </summary>
public void OnElapsed(object source, ElapsedEventArgs e)
{
MyTimer.Enabled = false;
MessageBox.Show("Timer has fired at: " + e.SignalTime, "Timer class");
}
}
And here is the code in Visual Basic .NET:
Public Class TimerDemo
Private MyTimer As New System.Timers.Timer()
Public Sub StartTimer()
Me.MyTimer.Interval = 2000
AddHandler Me.MyTimer.Elapsed, AddressOf OnElapsed
Me.MyTimer.Enabled = True
End Sub 'StartTimer
'/ <summary>
'/ Event handler for the timer's Elapsed event
'/ </summary>
Public Sub OnElapsed(ByVal source As Object, ByVal e As ElapsedEventArgs)
MyTimer.Enabled = False
MessageBox.Show("Timer has fired at: " + e.SignalTime, "Timer class")
End Sub 'OnElapsed
End Class 'TimerDemo
Conclusion
This chapter really just scratches the surface of the
.NET Framework’s namespaces and base classes. To learn more about each
namespace and their associated classes, check out the .NET Help topic “.NET Framework Class Library in Visual
Studio”, which covers different categories of namespaces.