Chapter
9
Building .NET Windows Forms Applications
Microsoft has placed a tremendous emphasis on .NET being a platform to create, consume, and deploy XML Web Services. Unfortunately, it caused many developers among the uninitiated to believe that .NET is only for building applications that access the Internet. I’ve heard the question over and over again: “Why should I use .NET if I’m not creating Web applications”? This chapter aims to dispel this notion.
You can use .NET to create standard, Windows desktop applications (known in .NET as Windows Form or WinForm applications). Truth be told, you can quite happily create C# and Visual Basic .NET applications that never think twice about the Internet. However, should you decide to provide Web access to your desktop applications, all the tools are ready and waiting for you.
This chapter shows you how to take advantage of Visual Studio .NET to create Windows Forms Applications. You’ll be amazed at how easy it is to do things you could never do in Visual FoxPro (or things you had to kludge). Most importantly, you’ll see how to use business objects in a Windows Forms application.
Creating a Windows Forms application
In this chapter you will learn about Windows Forms applications by building a simple Windows Forms application and taking a look behind the scenes each step of the way. Chapter 2, “Visual Studio .NET” showed the very basics of creating a Windows application. This chapter takes you beyond the basics and explores the process in greater detail.
A Windows Forms application typically contains a main application form, a main menu, toolbars, a variety of forms, code files containing business object classes, and references to external .NET assemblies. In this walk-through you’ll see how each element is used in a .NET Windows Forms application.
To create a new Windows Forms application:
1. From the Visual Studio .NET Start Page, click the New Project button.
2. In the New Project dialog look in the Project Types pane on the left and select Visual C# to create a C# Windows application or Visual Basic .NET to create a VB .NET Windows application. Then in the Templates pane on the right, select Windows Application.
3. In the Name text box, enter the name you want to give your new Windows application. In this example I’ll enter “Simple Windows Application”.
4. Make sure the Location box contains the directory you want to create your new application in and click OK.
At this point, VS .NET creates a new application for you, using the Windows Application template you selected. After a few moments, a new form named Form1 is displayed in design mode in the Visual Studio .NET IDE (Figure 1).
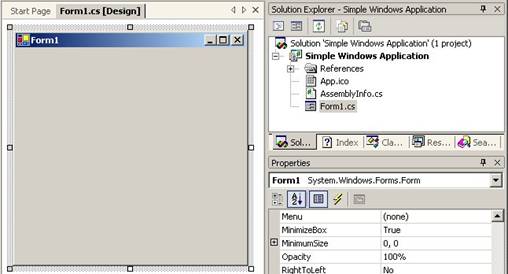
Figure 1. Visual Studio .NET creates a Windows application from the template you select in the New Project dialog.
You may be wondering what this form is for—is it supposed to
be a login form or maybe just one of the forms in the application? By default,
this form is meant to be your main application desktop, more or less equivalent
to the main Visual FoxPro window. Take a
look behind the scenes by right-clicking on Form1 and selecting View Code from the
shortcut menu.
Because namespaces are handled a bit differently in C# versus Visual Basic .NET, I’ll talk about namespaces for each language separately. If you’re using C#, notice the namespace declaration at the top of the code file:
namespace Simple_Windows_Application
This is the namespace automatically created by Visual Studio .NET when you created the new project—it’s basically the project name with spaces replaced by underscores. Before going any further, change the namespace to something more meaningful. Microsoft recommends that you use the “Company.Product” naming convention for your namespaces. For example, the following namespace specifies the company HW (Hentzenwerke), the product NetBook (.NET for VFP Developers Book), and I’ve added an extra “.Samples” section to indicate these are the samples for the book:
namespace HW.NetBook.Samples
Now you need to change the project’s default namespace to the same namespace. The default namespace specifies the namespace that is used for all new code files added to the project. To change the default namespace, right-click on your project in the Solution Explorer and select Properties from the shortcut menu. In the Property Pages dialog, expand the Common folder in the left pane and select General. Change the Default Namespace (Figure 2) to the new namespace, “HW.NetBook.Samples”.
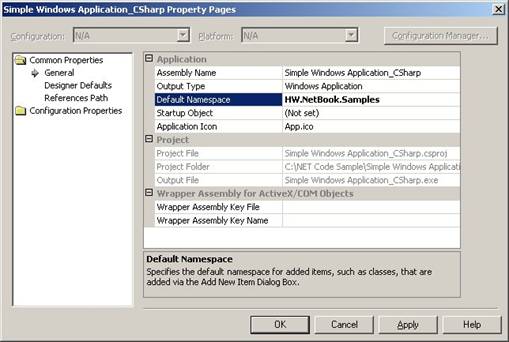
Figure 2. You change your project’s default, or root namespace, in the project’s Property Pages dialog.
Namespaces in Visual Basic .NET
If you’re using Visual Basic .NET, there is no namespace declaration in the Form1.vb code file—that’s because VB .NET handles namespaces differently than C#. In VB .NET there is the concept of a root namespace for each project, which is different than C#’s default namespace. This root namespace acts as a prefix for any namespace you declare within a code file. For example, if the project’s root namespace is “HW.NetBook.Samples”, and you specify an additional “Business” namespace, the full namespace is “HW.NetBook.Samples.Business”.
To set the VB .NET project’s root namespace, right-click on the project and select Properties from the shortcut menu to launch the Property Pages dialog (Figure 3). In the Root namespace text box, enter “HW.NetBook.Samples”, and click OK to save changes.
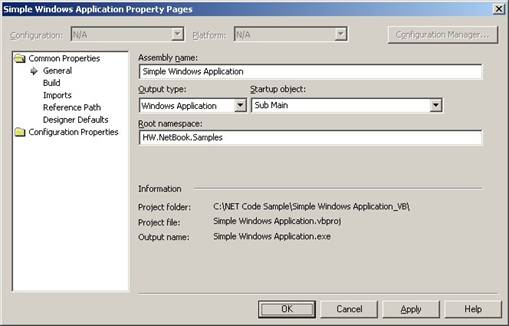
Figure 3. You change a Visual Basic .NET project’s root namespace in the Property Pages dialog.
If you created a C# Windows Forms application, scroll down to the bottom of the code file and you will see the following method declaration:
static void
{
Application.Run(new Form1());
}
As mentioned in chapter 3, “Introduction to C#”, all C#
programs must have a static method named
If you’re using C#, the compiler automatically finds the class with the Main method at compile time. If you’re using Visual Basic .NET, you must specify in your project’s Property Pages dialog which object in your application is the startup object.
The ability to change your startup object is useful when you are creating a more robust application with an application object that you want to instantiate first. After doing some application startup processing, you can instantiate your main application form. For now, I’ll leave this method in the Form1 class.
Within the Main method, there is the following code:
Application.Run(new Form1());
The Application object belongs to the System.Windows.Forms namespace. Its static Run method runs an application message loop that processes messages from the operating system to your application. In this line of code, a new instance of the Form1 class is passed as a parameter to the Run method. This causes the message processing to begin and the main application form to be made visible. If you leave out this line of code the application will start up and immediately exit—similar to Visual FoxPro’s READ EVENTS.
Behind the scenes with Visual Basic .NET
If you created a Visual Basic .NET Windows application, you will not see a Main method declaration in the form’s code as you do in C#. What’s going on here?
In a VB .NET Windows application, Form1 is specified as the startup object by default; however, a form-level Main method is not exposed in the source code. Behind the scenes, the Visual Basic .NET compiler inserts a Main method into the IL code to satisfy .NET’s requirement that all programs must have a Main method. This model was chosen to help simplify VB .NET Windows Forms applications.
If you don’t want a form to be the first object instantiated in your VB .NET application, you can create a new class and add a Main method to it. For example:
Public Class MainClass
Shared Sub
Application.Run(New Form1())
End Sub
End Class
Next, you need to change the startup object from Form1 to your Main method. Right-click on your project and select Properties from the shortcut menu to launch the Property Pages dialog (Figure 3). In the left pane, expand the Common Properties folder and select General. In the Startup object combo box, change the selection from “Form1” to “Sub Main”.
Modifying the main application form
To learn more about .NET forms, click Form1 in design mode and bring up the Properties Window. Follow these steps to change some key properties of the form:
1. Change the form’s Text property from “Form1” to “My Simple WinForm Application”. When you press Enter or move off the Text property, the caption of the form changes to the new text.
2. Scroll to the top of the Properties Window and find the (Name) property to specify the name of the form class. Change the (Name) property to MainAppForm.
3. Go to the Size property in the Properties Window and change the size to 640, 480. Note that if you expand the Size property by clicking on the plus sign (+) you can change just the Height or just the Width of the form.
4. Select the IsMdiContainer property and set its value to “True”. “MDI” stands for Multiple Document Interface. An MDI form can contain child forms. If you don’t set this property to “True”, any child forms you launch will exist outside of the main application form. Note when you change this property to “True”, the back color of the form changes to the “Application Background” color in your Windows color scheme (on my computer, it’s dark grey).
5.
Now change the WindowState property. The default value
is “
Before compiling and running the application, you need to make one more change to the Form1 code file. When you changed the name of the form class from “Form1” to “MainAppForm”, it changed the name of the class in the code file. However it did not change the name of the form class being passed to Application.Run(). Go back to the Main method and change the call to the Application class’s Run method as follows.
In C#:
Application.Run(new MainAppForm());
In Visual Basic .NET, rather than adding this line of code, right-click on the project and select Properties from the shortcut menu. In the Property Pages dialog’s Startup object combo box, select “MainAppForm”, and then click OK to close the dialog.
Next, for the sake of consistency, go to the Solution Explorer, right-click on the Form1 source code file, select Rename from the shortcut menu, and change the name from “Form1.cs” to “MainAppForm.cs” (in C#) or from “Form1.vb” to “MainAppForm.vb” (in Visual Basic .NET).
Now you’re ready to compile the application. To do so, select Build | Build Solution from the main menu. To run the application, select Debug | Start from the menu or press the F5 shortcut key. Your main application form should fill the entire screen. To close the application, click the close button on the upper right side of the form.
Creating a main application menu
At this point, you need to create a main application menu where you launch other application forms you build later on. In Visual Studio .NET, you add a menu to any form in your application. To add a menu to your main application form, select the form in design mode, and then drag and drop a MainMenu class from the VS .NET Toolbox onto the form. If the Toolbox is not visible, select View | Toolbox from the main menu.
When you drop the menu on the form, rather than showing up on the form’s design surface, it is displayed in the component tray beneath the form (Figure 4).
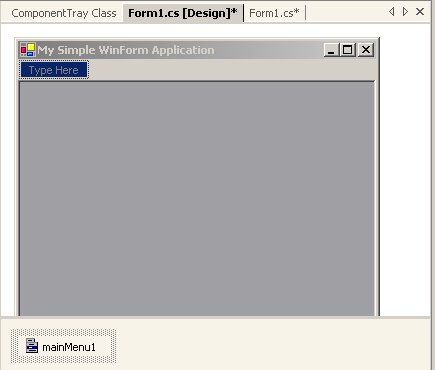
Figure 4. When you add a menu to a form, it is displayed in the component tray beneath the form rather than on the form’s design surface.
If you’ve ever struggled with Visual FoxPro’s menu designer, you’re going to like the menu designer in VS .NET. To kick the tires a bit, add a few menu pads and menu bars using the menu designer.
To create a File menu pad, click in the rectangle labeled Type Here at the top of the form, and enter the text “&File” as shown in Figure 5. The “&” indicates the “F” is the menu item’s access key. At run time, pressing ALT+F selects this menu pad. When you add a new menu item Visual Studio .NET automatically gives it a generic name such as “menuItem1”. It’s best if you change this name to something more meaningful, such as “FilePad”. To do this, select the menu item, bring up the Properties Window, and set the value of the (Name) property to “FilePad”.
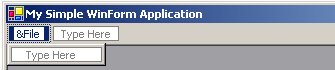
Figure 5. You indicate the access key of a menu item by placing an ampersand in front of it.
Next, add an Exit menu bar to the File menu pad. To do this, click in the rectangle labeled Type Here below the File pad and enter the text “E&xit”. Next, change the name of the new menu bar to “FileExitBar” in the Properties Window.
Add a second menu pad called Customers by clicking in the Type Here box to the right of the File menu pad, entering the text “&Customers”, and changing the name of the menu pad to “CustomersPad”. Add a menu bar to this pad by clicking in the Type Here box beneath the pad, entering the text “&Orders”, and changing the name of the menu bar to “CustomerOrdersBar”. This bar will be used to launch a Customer Orders form that you will create later in this chapter.
Most applications have a Window menu pad containing a list of all forms open on the desktop. In Visual FoxPro, you had to write code adding a menu bar to the Window menu pad whenever a new form was instantiated. In Visual Studio .NET, all you have to do is add a menu bar with the text “Window” and set a single property in the Property Window. To create the Windows menu pad, click in the Type Here box to the right of the Customers menu pad and enter the text “&Window”. In the Properties Window, change the name of the menu pad to “WindowsPad”. Next, change the value of the MdiList property from False to True. If this property is set to True, when an MDI child form is instantiated at run time, a corresponding menu bar is automatically added to this menu pad.
At this point, your menu system looks good, but doesn’t do much (other than the Windows menu pad). Now add some code to the Exit menu bar that closes the application when the user selects it at run time. To do this, double-click on the Exit menu bar and the following code is automatically added to your form.
In C#:
private void FileExitBar_Click(object sender, System.EventArgs e)
{
}
And in Visual Basic .NET:
Private Sub FileExitBar_Click(ByVal sender As System.Object, ByVal e As System.EventArgs) Handles FileExitBar.Click
End Sub
This code is a form-level method acting as an event handler for the FileExitBar’s Click() event. Any code you place in this method is automatically executed at run time when a user selects File | Exit from the menu.
![]()
When you double-click on any user interface control, VS .NET automatically adds event handler code for the control’s default event. The default event for a menu bar is Click().
What mechanism automatically calls this event handler when the Click event of the menu bar is executed? When you double-clicked the FileExitBar in the menu designer, it actually adds another line of code to your form that is hidden in the code editor. To see this code, scroll up in the code editor until you see a rectangle containing the text “Windows Form Designer generated code” (Figure 6), and expand this node.
![]()
Figure 6. The Visual Studio .NET Form and Menu Designers automatically add “behind-the-scenes” code to your form
As you can see, the Form and Menu Designer have been adding plenty of “behind-the-scenes” code to your form as you’ve been creating new menu items and setting form properties. The C# editor hides less of this code than the Visual Basic .NET editor which hides just about everything. Take a look at some of this form-level code to see what’s going on.
First, look at the form’s constructor code. This code is not hidden in C#, but is hidden in Visual Basic .NET.
Here’s the C# form constructor code:
public MainAppForm()
{
//
// Required for Windows Form Designer support
//
InitializeComponent();
//
// TODO: Add any constructor code after InitializeComponent call
//
}
Here’s the Visual Basic .NET form constructor code:
Public Sub New()
MyBase.New()
'This call is required by the Windows Form Designer.
InitializeComponent()
'Add any initialization after the InitializeComponent() call
End Sub
In each constructor method, a call is made to a form-level method named InitializeComponent. By default, this method is hidden in both C# and Visual Basic .NET.
Here are the first few lines of code in C#:
private void InitializeComponent()
{
this.mainMenu1 = new System.Windows.Forms.MainMenu();
this.FilePad = new System.Windows.Forms.MenuItem();
this.FileExitBar = new System.Windows.Forms.MenuItem();
private System.Windows.Forms.MenuItem CustomersPad;
private System.Windows.Forms.MenuItem CustomerOrdersBar;
this.WindowPad = new System.Windows.Forms.MenuItem();
And here they are in Visual Basic .NET:
<System.Diagnostics.DebuggerStepThrough()> Private Sub InitializeComponent()
Me.MainMenu1 = New System.Windows.Forms.MainMenu()
Me.FilePad = New System.Windows.Forms.MenuItem()
Me.FileExitBar = New System.Windows.Forms.MenuItem()
Me.CustomersPad = New System.Windows.Forms.MenuItem()
Me.CustomerOrdersBar = New System.Windows.Forms.MenuItem()
Me.WindowsPad = New System.Windows.Forms.MenuItem()
As you see by looking at this code, Visual Studio .NET added a form-level, private variable for the main menu and each menu item. When the form is instantiated and the constructor method calls this InitializeComponent method, an instance of each menu class is created and stored in these form-level variables.
As you look down through the rest of the code in the InitializeComponent method, you see code added by the Menu Designer and Form Designer that changes the values of menu and form properties. For example, at the bottom of each method, you find the following code setting various form properties.
In C#:
this.AutoScaleBaseSize = new System.Drawing.Size(5, 13);
this.ClientSize = new System.Drawing.Size(640, 480);
this.IsMdiContainer = true;
this.Name = "MainAppForm";
this.Text = "My Simple WinForm Application";
this.WindowState = System.Windows.Forms.FormWindowState.Maximized;
In Visual Basic .NET:
Me.AutoScaleBaseSize = New System.Drawing.Size(5, 13)
Me.ClientSize = New System.Drawing.Size(640, 480)
Me.IsMdiContainer =
True
Me.Menu = Me.MainMenu1
Me.Name = "MainAppForm"
Me.Text = "My Simple WinForm Application"
Me.WindowState = System.Windows.Forms.FormWindowState.Maximized
This approach is very different from the Visual FoxPro form and menu designers. In Visual Studio .NET, ultimately, every object you add to a form or a menu is implemented as code in the form’s associated code file. In design view, Visual Studio .NET interprets the code into a representation you work with visually on a form.
Getting back to the real reason you began looking at the form’s code, if you look at the C# code, you find the following line:
this.FileExitBar.Click += new System.EventHandler(this.FileExitBar_Click);
This code links the Exit menu bar’s Click event with the form-level FileExitBar_Click event handler method shown earlier. The FileExitBar_Click method is registered as an event handler (using the += operator) with the FileExitBar’s Click event, establishing a link between the two.
Now, look at the corresponding Visual Basic .NET code. You may be surprised to find this code is not located in the InitializeComponent method. This is because VB .NET establishes event handlers differently by using the “Handles” keyword. The code you’re looking for is actually found right in the FileExitBar_Click method declaration:
Private Sub FileExitBar_Click(ByVal sender As System.Object, ByVal e As System.EventArgs) Handles FileExitBar.Click
End Sub
The Handles keyword indicates the FileExitBar_Click method handles the FileExitBar.Click event.
Now that you have a basic understanding of how this works, it’s time to add code to the event handler that closes the application when the user selects File | Exit from the menu.
Here’s the code in C#:
private void FileExitBar_Click(object sender, System.EventArgs e)
{
this.Close();
}
And here’s the code in Visual Basic .NET:
Private Sub FileExitBar_Click(ByVal sender As System.Object, ByVal e As System.EventArgs) Handles FileExitBar.Click
Me.Close()
End Sub
![]()
For more information on events, event handlers, and delegates, see Chapter 5, “Object-Orientation in C# and Visual Basic .NET”.
Now it’s time to test out your new menu. From the Build menu, select Build Solution. Next, press F5 to start the application. If everything’s working properly, your main application form should maximize to fill your computer monitor, and you should have a main menu containing File, Customers, and Window menu pads. When you select File | Exit from the menu, your application should exit. You can also exit the application by clicking the close button [X] at the top right corner of the application window.
When you add another form to the project later in this chapter, you will revisit the menu system to verify the Window menu pad is working properly.
![]()
For more information on creating menus, see the .NET Help topic “Adding Menu Enhancements to Windows Forms”.
Adding a new form to the project
To demonstrate the capabilities of Windows Forms and Visual Studio .NET, you’ll create a “Customer Orders” form that allows you to view, edit, and create customer orders.
First, you need to add a new form to the project. Right-click on the project and select Add | Add Windows Form from the shortcut menu. In the Add New Item dialog, change the form name to “CustomerOrdersForm.cs” (in C#) or “CustomerOrdersForm.vb” (in Visual Basic .NET), and click the Open button. This opens the new form in design mode.
Go to the Properties Window and change the Size to 580, 420 (this makes the form a good size for the controls you will add later on), change the Text property to “Customer Orders”, and change the StartPosition property to “CenterScreen” (for information on the other settings of the StartPosition property, see the .NET Help topic “FormStartPosition Enumeration”). “CenterScreen” automatically centers the form in the middle of the screen.
The .NET TabControl is equivalent to Visual FoxPro’s page frame control. I recommend adding a TabControl to the form to give yourself an idea of how to use it in your applications. The easiest way to add the control is to double-click on it in the Toolbox, which automatically adds the control to the upper left corner of the form. Next, go to the Properties Window, change the TabControl’s Name property to TabControl, change its Size to 580,420, and set its TabStop property to False.
You may have noticed that, by default, the TabControl doesn’t have any tabs. To add tabs, select the TabPages property in the Properties Window, click the ellipses button (…) to launch the TabPage Collection Editor (Figure 7), and click the Add button to add the first page. This displays a Properties sheet in the right pane of the dialog you can use to edit properties of the tab page.
Change the Text property to “List” and change the Name property to “ListPage”. Add a second tab and set its Text property to “Properties” and the Name property to “PropertiesPage”. Afterwards, click OK to close the dialog.
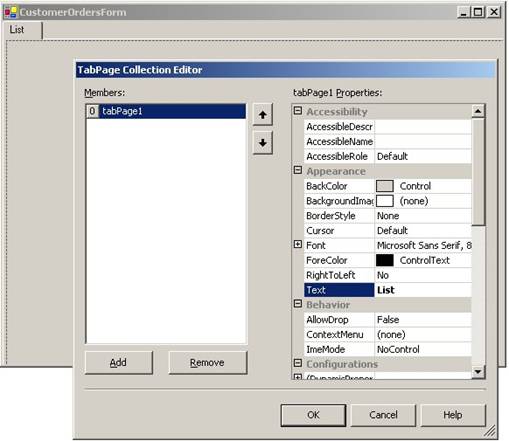
Figure 7. The TabPage Collection Editor allows you to add, remove, and modify tab pages in the TabControl.
Adding controls to the List page
In this section, you’ll add a few controls to the List page—a text box that allows you to enter a customer ID and a DataGrid that displays all orders for the specified customer. You can drag and drop controls any place on the form that, but if you want to end up with a form looking like the one shown in this chapter’s figures, you should set location and size of controls as specified.
First, click on the List page of the tab control. Add a label to the page by double-clicking on the Label item in the Toolbox (or by dragging and dropping it on the form). Go to the Properties Window and change the label’s Text property to “Customer ID:” and its Name property to “lblCustomerID”. Change its Location property to 25,25.
Next, add a text box control to the form from the Toolbox. Set its Name property to txtCustomerID and remove all characters from its Text property. Set the Location property to 100,22. Finally, set the text box’s CharacterCasing property to “Upper”. This causes the text box to automatically uppercase all characters as they are typed (the Customer IDs in the Northwind database are all uppercased).
Add a DataGrid control to the form, set its Name property to “grdOrders”, its Location property to 25,65, and its Size property to 425, 275.
Finally, add three Buttons to the form and set their properties as shown in Table 1.
Table 1. Properties of Customer Orders form buttons
|
Name |
Text |
Location |
|
btnNew |
&New |
475, 85 |
|
btnDelete |
&Delete |
475, 125 |
|
btnClose |
&Close |
475, 285 |
When you’re done, the List page should look like Figure 8.
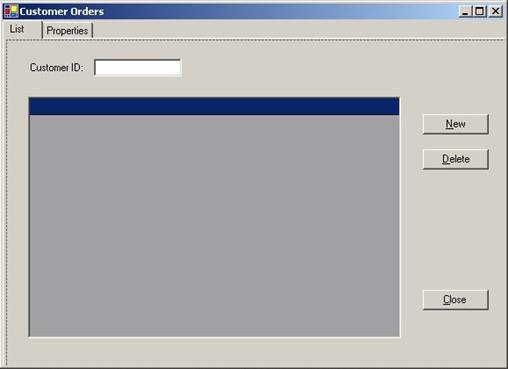
Figure 8. The Customer Orders form List page allows you to view orders for a specified customer.
Now add code to respond to the Close button’s click event and close the form. First double-click on the Close button, which adds a btnClose_Click event handler method to the form. You just need to add a single line of code to this method to close the form.
In C#:
private void btnClose_Click(object sender, System.EventArgs e)
{
this.Close();
}
And in Visual Basic .NET:
Private Sub btnClose_Click(ByVal sender As System.Object, _
ByVal e As System.EventArgs) Handles btnClose.Click
Me.Close()
End Sub
Before adding any controls to the Properties page, I’ll first get to something a little more interesting—adding code to the form that displays all orders for a customer when the user enters a Customer ID.
Accessing data by means of business objects
Many of the .NET samples available in books, magazines, and on-line articles place data access code directly in the user interface. As mentioned in Chapter 8, “.NET Business Objects”, a far better approach is performing all data access and manipulation using business objects. In this section, you will apply what you learned in the previous chapter and create business objects to use with the Customer Orders form.
First, you need to add two files to your Windows Forms project that are found in the sample code for this book. If you’re working with C#, add the files Business.cs and Data.cs to your project. To add these files to your project, open the Solution Explorer, right-click on the project, and select Add | Add Existing item from the shortcut menu. In the Add Existing Item dialog, navigate to the directory containing these files and add them to the project.
If you’re working with Visual Basic .NET, copy the existing Business.vb and Data.vb files from the samples directory into your project’s root directory using Windows Explorer. Afterwards, add the files to your project as mentioned above. Next, change the namespace in the Business.vb file to:
Namespace Business
And change the namespace in the Data.vb file to:
Namespace Data
Now you need to create an Orders business object that retrieves data from the SQL Server Northwind database’s Orders table. To do this, open the Solution Explorer, right-click your project, and select Add | Add New Item from the shortcut menu. In the Add New Item dialog’s right pane, select Code File. Next, change the code file name to “OrdersBusiness.cs” (in C#) or “OrdersBusiness.vb” (in Visual Basic .NET) and click the Open button. This opens an empty code file in the IDE.
At the top of the code file, enter the following code to define a new Orders business object class.
In C#:
using System.Data;
namespace HW.NetBook.Samples.Business
{
public class Orders : BusinessObject
{
public Orders()
{
this.TableName = "Orders";
}
// Returns a DataSet containing all orders for the specified customer
public DataSet GetOrdersByCustomerID(string custID)
{
custID = custID.ToUpper();
return this.GetDataSet("SELECT * FROM Orders WHERE CustomerID = '" +
custID + "'");
}
/// Returns a DataSet containing the specified order
public DataSet GetOrderByOrderID(int orderID)
{
return this.GetDataSet("SELECT * FROM Orders WHERE OrderID = " +
orderID);
}
}
}
And in Visual Basic .NET:
Imports System.Data
Namespace Business
Public Class Orders
Inherits BusinessObject
Public Sub New()
Me.TableName = "Orders"
End Sub 'New
' Returns a DataSet containing all orders for the specified customer
Public Function GetOrdersByCustomerID(ByVal custID As String) _
As DataSet
custID = custID.ToUpper()
Return Me.GetDataSet(("SELECT * FROM Orders WHERE CustomerID = '" _
+ custID + "'"))
End Function 'GetOrdersByCustomerID
' Returns a DataSet containing the specified order
Public Function GetOrderByOrderID(ByVal orderID As Integer) As DataSet
Return Me.GetDataSet(("SELECT * FROM Orders WHERE OrderID = " & _
orderID.ToString()))
End Function 'GetOrderByOrderID
End Class 'Orders
End Namespace 'Business
Next, add a reference to the following namespaces to the top of the code file. These references tell the compiler where to find the .NET DataSet class as well as your business object classes.
In C#:
using System.Data;
using HW.NetBook.Samples.Business;
And in Visual Basic .NET:
Imports System.Data
Imports HW.NetBook.Samples.Business
Now you need to add code to the form’s Load event that instantiates the Orders business object when the form is first loaded. Add the following private field declaration at the top of the CustomerOrdersForm class declaration. This new field will hold a reference to the Orders business object when it’s instantiated. While you’re at it, also add a private variable named dsOrder to hold the Orders DataSet returned from the Orders business object.
In C#:
public class CustomerOrdersForm : System.Windows.Forms.Form
{
private Orders OrdersObj;
private DataSet dsOrders;
And in Visual Basic .NET:
Public Class CustomerOrdersForm
Inherits System.Windows.Forms.Form
Private OrdersObj As Orders
Private dsOrders As DataSet
Next, double-click on the form’s title bar in the Form
Designer to automatically
add event handler code to the form’s code file. Next, add code that
instantiates the Orders business object.
In C#:
private void CustomerOrdersForm_Load(object sender, System.EventArgs e)
{
/// Instantiate the Orders business object
this.OrdersObj = new Orders();
}
And in Visual Basic .NET:
Private Sub CustomerOrdersForm_Load(ByVal sender As Object, _
ByVal e As System.EventArgs) _
Handles MyBase.Load
'/ Instantiate the Orders business object
Me.OrdersObj = New Orders()
End Sub
Now you need to add code to call the Orders business object when a user enters a value in the Customer ID text box. In Visual FoxPro, you may have placed this code in the Valid event of the text box. In .NET, you can place this code in the text box’s Validating event.
![]()
In .NET, user control focus events occur in the following order: Enter, GotFocus, Leave, Validating, Validated, LostFocus
The text box control’s default event is TextChanged, so you can’t double-click on the text box to automatically add event handler code to the form. If you’re using C#, you do this through the Properties Window. Make sure the Customer Orders form is displayed in design mode and select the text box. Go to the Properties Window and click the button with the lightning bolt icon (the Events button). This displays all the events for the text box.
If you double-click on the Validating event (Figure 9), VS .NET automatically adds event handler code to the form and displays the name of the event handler method in the second column of the Properties Window (in this case, txtCustomerID_Validating). Remember, in C# code is added both to the bottom of the form’s code file as well as within the “hidden” area of the form’s code. If you want to delete both sets of related code, in the Properties Window right-click on the event and select Reset from the shortcut menu. Visual Studio .NET automatically removes both sets of code for you!
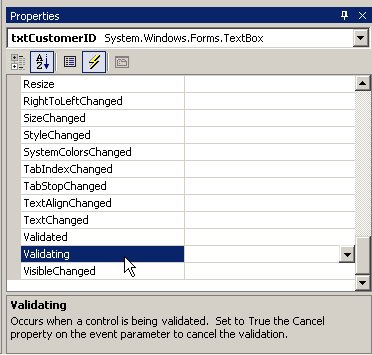
Figure 9. Double-clicking on a user interface control event in the Properties Window automatically adds event handler code for that event to the form.
If you are using Visual Basic .NET you can add an event handler to your
code by using the combo boxes at the top of the code editor. Just select the
control in the left combo box you want to create an event handler for and
select the desired event in the right combo box. When you do this, Visual Basic
.NET automatically adds event handler code to your form.
At this point, you can add code to the Validating event handler that calls the Orders business object with the specified Customer ID, gets the returned DataSet, and stores it in the form-level private variable dsOrder.
Here’s the code in C#:
private void txtCustomerID_Validating(object sender,
System.ComponentModel.CancelEventArgs e)
{
/// Get all orders for the specified customer
dsOrders= this.OrdersObj.GetOrdersByCustomerID(this.txtCustomerID.Text.Trim());
}
And here it is in Visual Basic .NET:
Private Sub txtCustomerID_Validating(ByVal sender As Object, _
ByVal e As System.ComponentModel.CancelEventArgs) _
Handles txtCustomerID.Validating
'/ Get all orders for the specified customer
dsOrders = Me.OrdersObj.GetOrdersByCustomerID(Me.txtCustomerID.Text.Trim())
End Sub
At this point, you have data and you have user interface controls, but now you need to bring the two together so you can display and edit the data—this requires data binding.
In Visual FoxPro, you could bind user interface controls to data by setting the ControlSource, RecordSource, or RowSource of a control to a cursor, field, or object property.
In a Windows Forms application, you can bind a user interface control to a DataSet, Array, ArrayList, or any collection that implements the IList interface (for information on implementing interfaces, see chapter 5, “Object-Orientation in C# and Visual Basic .NET”).
Simple data binding involves binding a single property of a user interface control to a single data value. Controls that support simple data binding usually only display one value at a time such as text boxes, check boxes, and radio buttons. Binding a text box to the property of an object is an example of simple data binding. Another example is binding a text box to a single column in a DataTable.
Simple-bound controls contain a collection of Binding objects stored in a ControlBindingsCollection. Each binding object represents an individual property bound to an individual data source value. This collection is accessible through the control’s DataBindings property. You use the DataBindings.Add method to add a Binding object to a control dynamically at run time. You will see an example of this in the “Adding controls to the Properties tab” section later in this chapter.
Complex data binding involves binding a control to a collection, such as a DataSet, Array, or ArrayList. Controls that support complex data binding can display more than one value at a time—this includes DataGrids, combo boxes, and list boxes. You will see examples of complex data binding with DataGrids and combo boxes later in this chapter.
Data binding controls at run time
You can data bind controls at either design time or run time. Visual Studio .NET has visual tools for adding a data source to a form and binding user interface controls to that data source. However, as you might imagine, using these VS .NET data binding tools creates a hard-coded monolithic application. However, this book is showing you best practices, so I won’t use these tools in this chapter, but will show you how to bind data dynamically at run time instead.
The following code sample shows the txtCustomerID_Validating method with two new lines of code (shown in grey). The first new line calls the DataGrid’s DataBindings.Clear method. This clears any existing data binding for the grid, which is necessary because this code gets run every time the user enters a new Customer ID. The second new line of code calls the grid’s SetDataBinding method, passing the Orders DataSet and the Orders business object’s TableName property (which is set to “Orders”).
In C#:
private void txtCustomerID_Validating(object sender,
System.ComponentModel.CancelEventArgs e)
{
/// Get all orders for the specified customer
 dsOrders=
this.OrdersObj.GetOrdersByCustomerID(this.txtCustomerID.Text.Trim());
dsOrders=
this.OrdersObj.GetOrdersByCustomerID(this.txtCustomerID.Text.Trim());
}
And in Visual Basic .NET:
Private Sub txtCustomerID_Validating(ByVal sender As Object, _
ByVal e As System.ComponentModel.CancelEventArgs) _
Handles txtCustomerID.Validating
'/ Get all orders for the specified customer
dsOrders = Me.OrdersObj.GetOrdersByCustomerID(Me.txtCustomerID.Text.Trim())


End Sub
At this point, you’re almost ready to test what you’ve done so far, but first you need to add code to launch your form when the user selects Customers | Orders from the menu. To do this, open the MainAppForm class in design mode by double-clicking MainAppForm.cs or MainAppForm.vb file in the Solution Explorer (if it’s not already open). Next, click on the Customers menu pad and double-click the Orders menu bar below it. This adds a CustomerOrdersBar_Click event handler method to the form (if you remembered to change the name of your menu bar). Add the following code to instantiate and show the form.
In C#:
private void CustomerOrdersBar_Click(object sender, System.EventArgs e)
{
/// Instantiate the form, set its MdiParent and show the form to the user
CustomerOrdersForm OrdersForm = new CustomerOrdersForm();
OrdersForm.MdiParent = this;
OrdersForm.Show();
}
And in Visual Basic .NET:
Private Sub
CustomerOrdersBar_Click(ByVal sender As System.Object, _
ByVal e As System.EventArgs) Handles CustomerOrdersBar.Click
'/ Instantiate the form, set its MdiParent and show the form to the user
Dim OrdersForm As New CustomerOrdersForm()
OrdersForm.MdiParent = Me
OrdersForm.Show()
End Sub
The first line of code instantiates the Customer Orders form. The second line of code stores a reference to the main application form in the Order form’s MdiParent property. This is necessary if you want the Order form to be contained within the main application form. If you do not set this property, the Order form can be positioned outside the confines of the main form. The last line of code makes the form visible to the user.
Compiling and running the form
Now you’re ready to compile and run the form. You can perform each of these steps separately or you can just run the form (which is what I usually do). Press F5 (the shortcut key for the Debug | Start menu bar) and Visual Studio .NET first compiles the solution and then runs the application. If there are any errors, VS .NET displays a warning dialog asking if you still want to run the application. You should select No and fix the problems first before running it again. Although you can select Yes, since the compiler encountered an error, you will be running the last successfully compiled version of the application instead.
When the main application form appears, select Customers | Orders from the menu to launch the form. To test that the form and business object are working properly, enter the text “QUEEN” in the Customer ID box and press the Tab key. The grid should display a list of all orders for the customer (Figure 10). If everything works properly, you have permission to pump your fist in the air and do the .NET “dance of joy”.
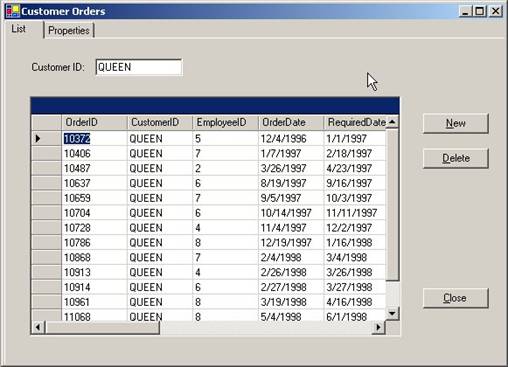
Figure 10. Entering a Customer ID in the text box and pressing Tab sends a request to the Orders business object, which returns a DataSet that displays in the DataGrid.
While you’re still flush with the feeling of success, click the Windows menu pad to see that a menu bar for your Customer Orders form has automatically been added (Figure 11).
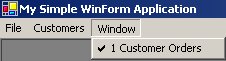
Figure 11. When you set a menu pad’s MdiList property to True, a menu bar is added to the pad for each form that is open in the application.
After the initial euphoria wears off, you will probably notice that the data in the grid isn’t formatted as nicely as you’d like it to be. First of all, the color scheme of the DataGrid could use some improvement, and secondly, the DataGrid shows all columns in the DataSet (which you probably don’t want to do). Select File | Exit to close down the application, and you can take care of these issues.
There are several very cool features available in Visual Studio .NET that simplify making your DataGrid look great, including a number of features you probably wish were in Visual FoxPro.
Setting the DataGrid’s color scheme
Open the CustomerOrders form in design mode (if it isn’t already), select the DataGrid on the List page, and then go to the Properties Window. At the bottom left corner of the Properties Window is an Auto Format link label (Figure 12). Click on this label to launch the DataGrid Auto Format dialog (Figure 13).
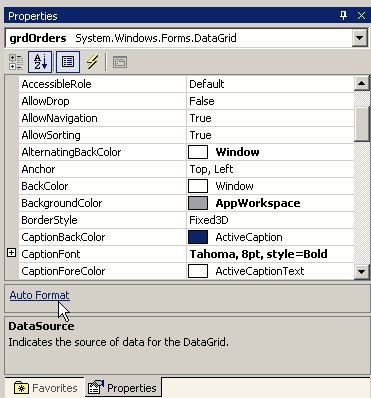
Figure 12. Select the Auto Format link label to
launch the DataGrid Auto
Format dialog.
The Auto Format dialog gives you over a dozen different DataGrid style formats to select from—similar to Microsoft Word’s auto format dialog allowing you to select a style for a table. As you click on different formats in the list box, a preview of the style displays on the right. I’ve selected the “Professional 4” style, which displays DataGrid elements in different shades of blue and displays the grid items in alternating back color! After selecting the desired style, click OK and VS .NET will change several DataGrid properties in the Properties Window to match the style you have selected. The DataGrid on the Customer Orders form also changes appearance accordingly.
![]() If
you want to see the changes that have been made for you, press F4 to give the
Properties Window focus, and then press Ctrl+Z repeatedly—this “undoes” each of
the property changes one by one. You can then press Ctrl+Y repeatedly to
reapply the changes.
If
you want to see the changes that have been made for you, press F4 to give the
Properties Window focus, and then press Ctrl+Z repeatedly—this “undoes” each of
the property changes one by one. You can then press Ctrl+Y repeatedly to
reapply the changes.
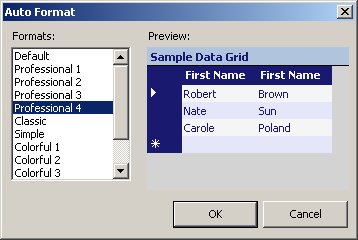
Figure 13. The Auto Format dialog gives you over
a dozen different Data Grid
styles to select from and automatically sets properties on the DataGrid to
match
the selected style.
Applying a TableStyle to the DataGrid
While changing the color scheme greatly improves the general appearance of the DataGrid, it hasn’t done anything to change the column headers, and for that matter, which columns appear in the DataGrid. To change this, you need to apply a TableStyle to the grid. A TableStyle allows you to specify the display format of a given DataSet table (DataTable) in the DataGrid—this includes both visual style as well as which columns appear. You can create a different TableStyle for each different table you want to display in the DataGrid.
To create a TableStyle, select the DataGrid on the Customer
Orders form and go to the Properties Window. Select the TableStyles property in
the Properties Window and click
the ellipses button (…) to launch the DataGridTableStyle
Collection Editor (Figure 14). Click the Add button to add a new
TableStyle to the grid and change the Name
property to “OrdersTableStyle”. Next, change the MappingName
property to “Orders”, which specifies that the TableStyle you are creating is
only applied to a DataTable named Orders.
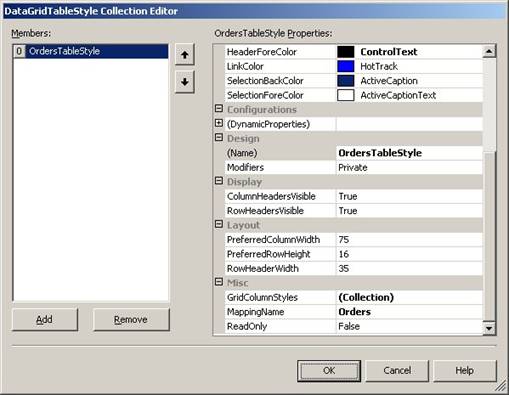
Figure 14. The DataGridTableStyle Collection Editor allows you to create a style for each table displayed in a DataGrid—including which columns should appear.
One down side of creating this TableStyle, is it overrides the style settings you applied to the grid using the Auto Format dialog. To get these back, you must manually set the colors properties to the values shown for the DataGrid in the Properties Window! You can either type these in manually or use the color picker (Figure 15). You can find the colors assigned by the Auto Format dialog on the Web tab of the color picker.
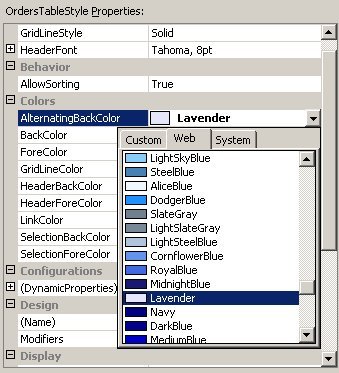
Figure 15. The Web tab of the color picker dialog allows you to pick some of the more interesting colors such as the colors automatically set by the AutoFormat dialog
There are a number of interesting style properties you can set in this editor, but for now, you will just use it to specify the columns in the DataSet you want to appear in the DataGrid.
Next, scroll to the bottom of the editor’s Properties pane on the right and select the GridColumnStyles property. Click the ellipses button (…) to launch the DataGridColumnStyle Collection Editor (Figure 16). This editor lets you create a column style for each column you want displayed in the DataGrid.
If you click the small down arrow to the right of the Add button, a shortcut menu displays giving you the option of specifying the type of column you want to add. The “DataGridTextBoxColumn” selection adds a DataGrid column that can host a text box control. The “DataGridBoolColumn” selection adds a DataGrid column that can host a check box control. These are the only two types of column controls available in the editor.
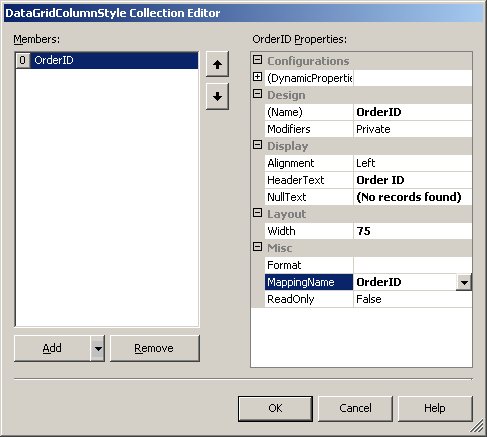
Figure 16. The DataGridColumnStyle Collection Editor lets you specify details about each column you want to appear in a DataGrid.
At this point, click the Add button to add a DataGridTextBoxColumn. In the Properties pane on the right, change the value of the Name property to “OrderID”. Change the HeaderText property to “Order ID” and set the NullText property to “(None)”. This is the text that appears when no orders are returned in the DataSet for the specified Customer ID. Set the Width Property to 50 and set the MappingName to “OrderID”. The MappingName property specifies the name of the DataSet column that the DataGrid column is bound to.
Next, add the three additional columns and set the properties listed in Table 2. When you’re done, click OK to close each dialog.
Table 2. Properties of DataGrid columns
|
Name |
HeaderText |
NullText |
Width |
MappingName |
|
OrderDate |
Date |
|
75 |
OrderDate |
|
ShipName |
Name |
|
175 |
ShipName |
|
ShipCountry |
Country |
|
75 |
ShipCountry |
At this point, compile and run the Customer Orders form again. Your DataGrid should look like Figure 17.
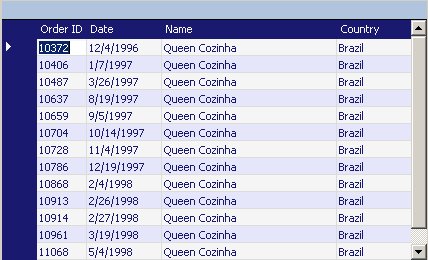
Figure 17. The Visual Studio .NET design tools allow you to easily build professional looking DataGrids.
Adding controls to the Properties tab
In this section, you’re going to add several text boxes to the Properties tab to demonstrate simple data binding in .NET. In design mode, click on the Properties tab of the Customer Orders form and add the label and textbox controls listed in Table 3. Note the space left at the top of a form for adding a toolbar later in this chapter.
Table 3. Name, text, location, and size of controls on Properties tab
|
Control |
Text |
Location |
Size |
|
LblOrderID |
Order ID: |
25,60 |
Autosize |
|
txtOrderID |
|
100,57 |
100,20 |
|
lblName |
Name: |
225,60 |
Autosize |
|
txtName |
|
275,57 |
260,20 |
|
lblAddress |
Address: |
25,91 |
Autosize |
|
txtAddress |
|
100,88 |
328,20 |
|
lblCity |
City: |
25,124 |
Autosize |
|
txtCity |
|
100,122 |
175,20 |
|
lblRegion |
Region: |
290,124 |
Autosize |
|
txtRegion |
|
347,122 |
185,20 |
|
lblPostalCode |
Postal Code: |
25,160 |
Autosize |
|
txtPostalCode |
|
100,157 |
107,20 |
|
lblCountry |
Country: |
290,160 |
Autosize |
|
txtCountry |
|
347,157 |
185,20 |
Next, add the code shown in grey to the txtCustomerID_Validating event handler. This code clears any data binding for the controls and calls the DataBindings.Add method on each text box. The name of the property you want to data bind is the first parameter passed to the Add method; in this case the Text property. The second parameter specifies the DataSet you are binding to and the third parameter indicates the DataTable and column name.
Here’s the code in C#:
private void txtCustomerID_Validating(object sender,
System.ComponentModel.CancelEventArgs e)
{
/// Get all orders for the specified customer
dsOrders= this.OrdersObj.GetOrdersByCustomerID(this.txtCustomerID.Text.Trim());
/// Clear all data bindings
 this.grdOrders.DataBindings.Clear();
/// Data bind the grid
string OrderTable = OrdersObj.TableName;
this.grdOrders.SetDataBinding(dsOrders, OrderTable);
![Text Box: DataTable dtOrders = dsOrders.Tables[OrderTable];
this.txtOrderID.DataBindings.Add("Text", dsOrders, OrderTable+".OrderID");
this.txtName.DataBindings.Add("Text", dsOrders, OrderTable+".ShipName");
this.txtAddress.DataBindings.Add("Text", dsOrders, OrderTable+".ShipAddress");
this.txtCity.DataBindings.Add("Text", dsOrders, OrderTable+".ShipCity");
this.txtRegion.DataBindings.Add("Text", dsOrders, OrderTable+".ShipRegion");
this.txtPostalCode.DataBindings.Add("Text", dsOrders,
OrderTable+".ShipPostalCode");
this.txtCountry.DataBindings.Add("Text", dsOrders, OrderTable+".ShipCountry");](NETforVFPDevelopers_Chapter09_files/image033.gif)
}
And here it is in Visual Basic .NET:
Private Sub txtCustomerID_Validating(ByVal sender As Object, _
ByVal e As System.ComponentModel.CancelEventArgs) _
Handles txtCustomerID.Validating
'/ Get all orders for the specified customer
dsOrders = Me.OrdersObj.GetOrdersByCustomerID(Me.txtCustomerID.Text.Trim())
'/ Clear all data bindings
 Me.grdOrders.DataBindings.Clear()
'/ Data bind the grid
Dim OrderTable As String = OrdersObj.TableName
Me.grdOrders.SetDataBinding(dsOrders, OrderTable)
End Sub
Compile and run the application again, and then launch the Customer Orders form. After performing a search, click on the Properties page and the controls should contain the data for the currently selected record in the DataGrid on the List page (Figure 18).
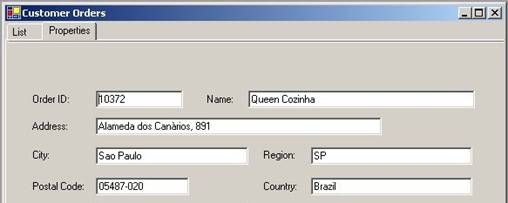
Figure 18. You can bind textbox controls to data using simple binding
Adding a Shipper business object and combo box
In this section, you’ll create a new Shipper business object and then you’ll add a combo box to the form that displays a list of shippers obtained from the new object.
Right-click on the project and select Add | Add New Item from the shortcut menu. In the Add New Item dialog, select Code File in the Templates pane, change the name of the file to “ShipperBusiness.cs” or “ShipperBusiness.vb”, and then click the Open button. This adds the new code file to the project. Next, add the following code to the file. This code defines a new Shipper business object with a single GetShippers method that returns a DataSet containing all shippers.
In C#:
using System.Data;
namespace HW.NetBook.Samples.Business
{
/// Shipper Business Object
public class Shipper : BusinessObject
{
public Shipper()
{
this.TableName = "Shippers";
}
/// Returns a DataSet containing all Shippers
public DataSet GetShippers()
{
return this.GetDataSet("SELECT * FROM Shippers");
}
}
}
And in Visual Basic .NET:
Imports System.Data
Namespace Business
_
'/ Shipper Business Object
Public Class Shipper
Inherits BusinessObject
Public Sub New()
Me.TableName = "Shippers"
End Sub 'New
'/ Returns a DataSet containing all Shippers
Public Function GetShippers() As DataSet
Return Me.GetDataSet("SELECT * FROM Shippers")
End Function 'GetShippers
End Class 'Shipper
End Namespace 'Business
Now add the following line of code (shown in grey) to the top of the CustomerOrdersForm class definition. The code declares a private field that holds a reference to the Shipper business object. You don’t need to store a reference to a Shipper DataSet in a field, because, as you’ll see below, the DataSet is only used when the form first instantiates.
In C#:
public class CustomerOrdersForm : System.Windows.Forms.Form
{
private Orders OrdersObj;
![]() private DataSet dsOrders;
private DataSet dsOrders;
And in Visual Basic .NET:
Public Class CustomerOrdersForm
Inherits System.Windows.Forms.Form
Private OrdersObj As Orders
![]() Private
dsOrders As DataSet
Private
dsOrders As DataSet
Now you need to add code to the form’s Load method that instantiates the Shipper business object.
Here’s the code in C#:
private void CustomerOrdersForm_Load(object sender, System.EventArgs e)
{
/// Instantiate the Orders business object
this.OrdersObj = new Orders();
![]()
}
And here it is in Visual Basic .NET:
Private Sub CustomerOrdersForm_Load(ByVal sender As Object, _
ByVal e As System.EventArgs) _
Handles MyBase.Load
'/ Instantiate the Orders business object
Me.OrdersObj = New Orders()
![]()
End Sub
In this section you will add a combo box control to the Properties tab and learn how to bind data to it. First, select the Customer Orders form Properties tab in the designer, drag a ComboBox control from the Toolbox, and drop it on the form beneath the existing text boxes. Next, drag and drop a label for the combo box onto the form. Set each control’s properties as shown in Table 4.
Table 4. Name, text, location, and size of the Shippers label and combo box
|
Control |
Text |
Location |
Size |
|
lblShippers |
Shippers: |
25,197 |
Autosize |
|
cboShippers |
|
100,192 |
175,21 |
In addition to the properties listed in Table 4, the ComboBox class also has a DropDownStyle property that defines the style of the combo box. The default value of this property is “DropDown” meaning the text box portion of the combo box is editable and the user must click the down arrow to see the other items in the list. In this case, set the value to “DropDownList”, which is similar to the “DropDown” setting except it makes the text box portion of the combo box not editable. This is similar to setting the Style property of a combo box in Visual FoxPro. Now its time to data bind the combo box. Because the list of available shippers is always the same regardless of the customer or order the user is working with, you add code to the form’s CustomerOrdersForm_Load method (which only runs once when the form is first instantiated) to get a DataSet from the Shipper business object and bind it to the Shipper combo box. The new code is highlighted in grey.
Here’s the code in C#:
private void CustomerOrdersForm_Load(object sender, System.EventArgs e)
{
/// Instantiate the Orders business object
this.OrdersObj = new Orders();
/// Instantiate the Shipper business object
this.ShipperObj = new Shipper();
![Text Box: /// Get a DataSet containing all Shippers
DataSet dsShippers = this.ShipperObj.GetShippers();
/// Databind the Shippers combo box to the Shippers DataTable
string ShipperTable = this.ShipperObj.TableName
this.cboShippers.DataSource = dsShippers.Tables[ShipperTable];
this.cboShippers.DisplayMember = "CompanyName";
this.cboShippers.ValueMember = "ShipperID";](NETforVFPDevelopers_Chapter09_files/image042.gif)
}
And here it is in Visual Basic .NET:
Private Sub CustomerOrdersForm_Load(ByVal sender As Object, _
ByVal e As System.EventArgs) _
Handles MyBase.Load
'/ Instantiate the Orders business object
Me.OrdersObj = New Orders()
'/ Instantiate the Shipper business object
Me.ShipperObj = New Shipper()
End Sub
The data-binding portion of this code differs from a DataGrid or a text box. Because a combo box can display more than one item at a time, it has complex data binding. The above code sets the DataSource property to the Shippers table (contained within the dsShippers DataSet). The DisplayMember property specifies which column in the DataTable to display in the combo box, and in this case it is set to the CompanyName column. The ValueMember property specifies which column in the DataTable contains the value, which is set to the ShipperID column.
One more combo box property needs to be data bound—the SelectedValue property. You will bind this property to the ShipVia column of the Orders DataSet. This does two things—first, when editing an existing item it specifies which item in the combo box should be selected. Second, if the user selects a different item in the combo box, the value of the selected item is stored into the ShipVia column of the Orders DataSet.
Because you are binding this property to the Orders DataSet, the data binding code should be placed in the form’s txtCustomerID_Validating event handler. First place this code at the bottom of the method.
Here it is in C#:
this.cboShippers.DataBindings.Add("SelectedValue",dsOrders, OrderTable+"ShipVia")
And here it is in Visual Basic .NET:
Me.cboShippers.DataBindings.Add("SelectedValue", dtOrders, OrderTable+"ShipVia")
Now add this code to the txtCustomerID_Validating event handler to clear the combo box’s data binding. You can place this code directly beneath the code that clears the data binding from other controls.
In C#:
this.cboShippers.DataBindings.Clear();
In Visual Basic .NET:
Me.cboShippers.DataBindings.Clear()
![]() List
boxes are bound the same way as combo boxes, so you can also use the code shown
here to bind a list box instead.
List
boxes are bound the same way as combo boxes, so you can also use the code shown
here to bind a list box instead.
Now you’re ready to test out your combo box. Compile and run the application again. In the List page, enter a Customer ID of “QUEEN” and press the Tab key. Go to the Properties page and click the Shippers combo box—it should look like the one shown in Figure 19.
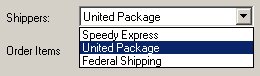
Figure 19. Combo boxes and List Boxes use complex data binding to displays lists containing multiple items.
Adding an OrderItem business object and a DataGrid
In this section you will create a new OrderItem business object and add a DataGrid to show all the order items for the currently selected order. First, you create the new business object.
Right-click on the project and select Add | Add New Item from the shortcut menu. In the Add New Item dialog, select Code File in Templates pane, change the name of the file to “OrderItemBusiness.cs” or “OrderItemBusiness.vb”, and then click the Open button. This adds the new code file to the project. Next, add the following code to the file. This code defines a new OrderItem business object with a single GetOrderItems method that returns a DataSet containing all items for a specific Order ID.
In C#:
using System.Data;
namespace HW.NetBook.Samples.Business
{
/// <summary>
/// Order Item Business Object
/// </summary>
public class OrderItem : BusinessObject
{
public OrderItem()
{
this.TableName = "OrderItems";
}
/// <summary>
/// Returns all Order items for the specified Order ID
/// </summary>
/// <returns>DataSet containing all shippers</returns>
public DataSet GetOrderItems(int OrderID)
{
return this.GetDataSet("SELECT * FROM [Order Details] WHERE OrderID = " +
OrderID);
}
}
}
And in Visual Basic .NET:
Imports System.Data
Namespace Business
'/ <summary>
'/ Order Item Business Object
'/ </summary>
Public Class OrderItem
Inherits BusinessObject
Public Sub New()
Me.TableName = "OrderItems"
End Sub 'New
'/ <summary>
'/ Returns all Order items for the specified Order ID
'/ </summary>
'/ <returns>DataSet containing all shippers</returns>
Public Function GetOrderItems(ByVal OrderID As Integer) As DataSet
Return Me.GetDataSet("SELECT * FROM [Order Details] WHERE OrderID = " _
+ OrderID.ToString())
End Function 'GetOrderItems
End Class 'OrderItem
End Namespace 'Business
To add a DataGrid to the Properties tab drag a DataGrid control from the Toolbox and drop it on the Properties page below the Shippers combo box. Change the name of the grid to grdOrderItems, set the Location property to 25,252, and the Size property to 510,95. Also, add a label to the form, set its Name property to lblOrderItems, AutoSize to True, Location to 25,230, and Text to “Order Items”.
To make the grid look a bit more attractive, generate a style
for the DataGrid as you did with the Orders DataGrid on the List page (select
the DataGrid in the Form Designer and
click the AutoFormat
link label on the Properties Window). For example, I selected the “Colorful 1”
format.
Next, create a new DataGridTableStyle by clicking the TableStyles ellipses
button (…)
in the Properties Window. Change its Name
property to OrderItemTableStyle and its MappingName
property to OrderItems. If you’d like, you can reapply the colors selected
in the previous paragraph because the TableStyle you just created overrides the
Auto
Format settings.
Now you need to add some ColumnStyles to the new TableStyle. In the DataGridTableStyle Collection Editor dialog, scroll down in the Properties pane to the GridColumnStyles, and click the ellipses button (...). Add the GridColumnStyles shown in Table 5.
Table 5. Order Items DataGrid ColumnStyle properties
|
Name |
Text |
Width |
MappingName |
|
ProductColumn |
Product |
|
ProductID |
|
UnitPriceColumn |
Unit Price |
|
UnitPrice |
|
QuantityColumn |
Qty |
|
Quantity |
|
DiscountColumn |
Discount |
|
Discount |
Now you’re ready to add data retrieval and data binding code to the form for the Order Items DataGrid. Although you could place this code in the form’s txtCustomerID_Validating method, that wouldn’t be efficient. If the code is placed in this method, every time the user selects a new record on the List page by navigating in the DataGrid, the code that retrieves all items for the order would be fired—and the user may never go to the Properties page when a particular order is selected in the DataGrid!
A better place for this code is in an event handler for the Properties page’s Enter event, which only fires when the Properties page is activated. Rather than putting the code directly in the Enter event handler, you will put the code in its own form-level method named DisplayOrderItems and simply call it from within the event handler method. This allows the code to be reused from multiple places in the form, which you’ll see is important when you add a toolbar later in this chapter.
Before you do anything else, add two new private fields to the top of the class definition. You can add these directly below the other private fields you have already created.
In C#:
private OrderItem OrderItemObj;
private DataSet dsOrderItems;
In Visual Basic .NET:
Private OrderItemObj As OrderItem
Private dsOrderItems As DataSet
Now you need to add code to the CustomerOrdersForm_Load event handler that instantiates the OrderItem business object.
In C#:
/// Instantiate the Order Item business object
this.OrderItemObj = new OrderItem();
And in Visual Basic .NET:
'/ Instantiate the Order Item business object
Me.OrderItemObj = New OrderItem()
Next, add the following new method to the Customer Order form.
In C#:
/// Displays all order items for the currently selected order
public void DisplayOrderItems()
{
if (dsOrders.Tables[this.OrdersObj.TableName].Rows.Count > 0)
{
/// Get the OrderID value of the currently selected DataRow
DataRowView drView=(DataRowView)this.BindingContext[dsOrders,
"Orders"].Current;
int OrderID = (int)drView["OrderID"];
/// Get all Order Items for the currently selected Order ID
this.dsOrderItems = this.OrderItemObj.GetOrderItems(OrderID);
/// Bind the Order Items grid to the Order Items DataSet
this.grdOrderItems.SetDataBinding(dsOrderItems,
this.OrderItemObj.TableName);
}
else
{
// If there are no Orders, clear the Order Items DataSet
// and DataGrid binding
if (this.dsOrderItems != null)
{
this.dsOrderItems.Clear();
}
this.grdOrderItems.DataBindings.Clear();
}
}
In Visual Basic .NET:
'/ Displays all order items for the currently selected order
Public Sub DisplayOrderItems()
If dsOrders.Tables(Me.OrdersObj.TableName).Rows.Count > 0 Then
'/ Get the OrderID value of the currently selected DataRow
Dim drView As DataRowView = CType(Me.BindingContext(dsOrders, _
"Orders").Current, DataRowView)
Dim OrderID As Integer = CInt(drView("OrderID"))
'/ Get all Order Items for the currently selected Order ID
Me.dsOrderItems = Me.OrderItemObj.GetOrderItems(OrderID)
'/ Bind the Order Items grid to the Order Items DataSet
Me.grdOrderItems.SetDataBinding(dsOrderItems, _
Me.OrderItemObj.TableName)
Else
' If there are no Orders, clear the Order Items DataSet
' and DataGrid binding
If Not (Me.dsOrderItems Is Nothing) Then
Me.dsOrderItems.Clear()
End If
Me.grdOrderItems.DataBindings.Clear()
End If
End Sub 'DisplayOrderItemsEnd Class
This code first checks if there are any rows in the Orders DataSet. If there are, it gets the Order ID of the currently selected row. It does this by getting a DataRowView object from the form’s BindingContext object. The BindingContext object is a form-level object that manages data binding in your form. A DataRowView is an object representing the current DataRow of a DataSet bound to a user interface control. This object has methods that allow you to access the columns of a DataRow as a collection (as shown in the above sample code) and, as you’ll see later, also allow you to control edits to the DataRow.
The next line of code calls the Order Item business object’s GetOrderItems method passing the Order ID of the currently selected order. It then binds the returned Order Item DataSet to the Order Items DataGrid. If there aren’t any rows in the Orders DataSet, the Order Item DataSet is cleared and so are the Order Item DataGrid’s bindings.
Now you need to add code to the page’s Enter event handler to call this method. To do this, click on the Properties page in the Form Designer (make sure you click on the actual page, rather than just on the tab). Next, if you’re using C#, go to the Properties Window and click the Events button (the one with the lightning bolt). Double-click on the Enter event (in the first column of the window) and VS .NET automatically adds a new PropertiesPage_Enter event handler method. If you’re using Visual Basic .NET, go to the code editing Window and select “PropertiesPage” in the combo box at the upper left side of the code editor. Next, select the “Enter” event from the combo box at the upper right side of the code editor—VS .NET automatically adds a new event handler method named PropertiesPage_Enter. Place the following code in this method to call the new DisplayOrderItems method.
In C#:
private void PropertiesPage_Enter(object sender, System.EventArgs e)
{
this.DisplayOrderItems();
}
And in Visual Basic .NET:
Private Sub PropertiesPage_Enter(ByVal sender As Object, _
ByVal e As System.EventArgs) Handles PropertiesPage.Enter
Me.DisplayOrderItems()
End Sub
There’s one problem with placing the code in this event handler. In .NET, the TabPage’s Enter event does not fire when you click on the appropriate tab. It’s not until you set focus to the first control on the TabPage that the Enter event fires. There are a few ways to get around this, but I’m going to demonstrate a tactic that makes use of a .NET class providing functionality near and dear to every Visual FoxPro developer’s heart—the SendKeys class.
The SendKey class—a .NET equivalent to VFP’s KEYBOARD()
The .NET SendKey class offers functionality similar to Visual FoxPro’s KEYBOARD() command. The SendKey class has two static methods for sending keys to an application—the Send method (sends a keystroke to the application and keeps running) and the SendWait method (sends a keystroke to the application and waits for any processes started by the keystroke to be processed before continuing).
In this case you’ll use the SendKey.Send method to send a Tab keystroke to the application, and automatically place focus on the first control available to receive focus on the TabPage. This code needs to be run when the TabControl’s SelectedIndexChanged event fires.
To create an event handler for this event in C#, click on either the List or the Properties page and select the TabControl in the Properties Window. Click on the Events button (if it’s not already selected) to show all events for the TabControl, and then double-click the SelectedIndexChanged event. If you’re using VB. NET, go to the code editor and select the “TabControl” from the combo box at the upper left side of the window, then choose the “SelectedIndexChanged” event from the combo box at the upper right side of the window.
When you perform one of these actions, VS .NET automatically adds an event handler method named tabControl_SelectedIndexChanged to the form. Add the following code to send a Tab keystroke to the application.
In C#:
private void tabControl_SelectedIndexChanged(object sender, System.EventArgs e)
{
/// Whenever a new page is selected, TAB to the first control on the page
SendKeys.SendWait("{TAB}");
}
In Visual Basic .NET:
Private Sub
TabControl_SelectedIndexChanged(ByVal sender As Object, _
ByVal e As System.EventArgs) Handles TabControl.SelectedIndexChanged
SendKeys.SendWait("{TAB}")
End Sub
Now you’re ready to compile and run the form again. If you display orders for a Customer ID of “QUEEN”, your form should look like Figure 20.
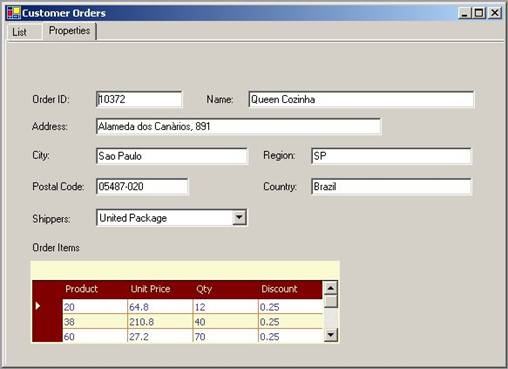
Figure 20. With just a little extra work, you can use business objects for data access in your applications, providing data flexibility and scalability.
Adding a navigation toolbar to the form
Visual Studio .NET makes it very easy to add toolbars to your application. In this section you will add a toolbar to the Properties page of the Customer Orders form allowing you to navigate to different order records.
First, select the Properties tab page. Remember, rather than just clicking the Properties tab itself, you must click in the area below the tab to actually select the page. Next, drag and drop a ToolBar control from the Toolbox onto the form. By default, this docks the empty toolbar at the top of the form. With the toolbar selected, go to the Properties Window and set the toolbar’s Name property to “MainToolbar”.
To add buttons to the toolbar, in the Properties Window click the ellipses button (…) next to the Buttons property to launch the ToolBarButton Collection Editor (Figure 21).
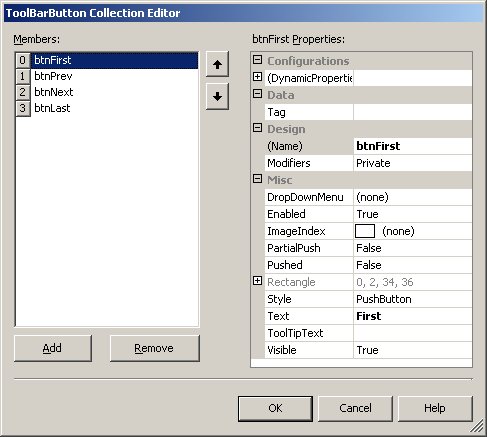
Figure 21. The ToolBarButton Collection Editor provides a visual means for adding toolbar buttons to your toolbars.
To add a button to the toolbar, simply click the Add button and specify a Name and Text property. Add four buttons to the toolbar named btnFirst, btnPrev, btnNext, and btnLast. Set the Text property of these buttons to “First”, “Prev”, “Next”, and “Last” respectively. When you’re done, click the OK button to close the dialog. You should see the four toolbar buttons displayed in the toolbar (Figure 22). Alternately, you can add images to toolbar buttons rather than text, but to make this example easier to work through, you will stick to plain text. For information on adding images to toolbar buttons, see the .NET Help topic “Toolbar Class”.

Figure 22. You can add a navigation toolbar to your form to navigate to different rows in a DataSet.
Now you need to add code to respond to the Click event of each button and navigate to the corresponding record in the Orders DataSet. First, add four new custom methods to the form—First, Previous, Next, and Last. You can place this code at the bottom of your form’s code file (if using C#, make sure the code is within the closing namespace).
Here’s the code in C#:
public void First()
{
this.BindingContext[this.dsOrders, "Orders"].Position = 0;
this.DisplayOrderItems();
}
public void Previous()
{
this.BindingContext[dsOrders, "Orders"].Position--;
this.DisplayOrderItems();
}
public void NextRec()
{
this.BindingContext[dsOrders, "Orders"].Position++;
this.DisplayOrderItems();
}
public void Last()
{
this.BindingContext[dsOrders, "Orders"].Position =
this.dsOrders.Tables[OrdersObj.TableName].Rows.Count - 1;
this.DisplayOrderItems();
}
And here’s the code in Visual Basic .NET:
Public Sub First()
Me.BindingContext(Me.dsOrders, "Orders").Position = 0
Me.DisplayOrderItems()
End Sub 'First
Public Sub Previous()
Me.BindingContext(dsOrders, "Orders").Position -= 1
Me.DisplayOrderItems()
End Sub 'Previous
Public Sub NextRec()
Me.BindingContext(dsOrders, "Orders").Position += 1
Me.DisplayOrderItems()
End Sub 'NextRec
Public Sub Last()
Me.BindingContext(dsOrders, "Orders").Position = _
Me.dsOrders.Tables(OrdersObj.TableName).Rows.Count - 1
Me.DisplayOrderItems()
End Sub 'Last
Next, add a method to the form to enable and disable the navigation buttons based on the position of the BindingContext object referring to the Orders DataSet. For example, if the current record is the first in the DataSet, the First and Previous buttons should be disabled because you’re already at the first record and you can’t navigate to any previous records.
Here’s the code in C#:
public void SetToolbarButtonsEnabled()
{
int Position = this.BindingContext[this.dsOrders, "Orders"].Position;
int Count = this.dsOrders.Tables[OrdersObj.TableName].Rows.Count;
this.btnFirst.Enabled = (Position != 0);
this.btnPrev.Enabled = (Position != 0);
this.btnNext.Enabled = (Position != Count-1);
this.btnLast.Enabled = (Position != Count-1);
}
And here it is in Visual Basic .NET:
Public Sub SetToolbarButtonsEnabled()
Dim Position As Integer = _
Me.BindingContext(Me.dsOrders, "Orders").Position
Dim Count As Integer = _
Me.dsOrders.Tables(OrdersObj.TableName).Rows.Count
Me.btnFirst.Enabled = Position <> 0
Me.btnPrev.Enabled = Position <> 0
Me.btnNext.Enabled = Position <> Count - 1
Me.btnLast.Enabled = Position <> Count - 1
End Sub 'SetToolbarButtonsEnabled
Next you need to add a call to this method from the form’s DisplayOrderItems method. This should be added after the if…else statement so it runs regardless of whether there are rows in the Orders DataSet or not. The following code shows the last half of the method starting with the else statement, with the new line of code shown in grey.
In C#:
else
{
// If there are no Orders, clear the Order Items DataSet
// and DataGrid binding
if (this.dsOrderItems != null)
{
this.dsOrderItems.Clear();
}
this.grdOrderItems.DataBindings.Clear();
![]() }
}
}
In Visual Basic .NET:
Else
'/ If there are no Orders, clear the Order Items DataSet
'/ and DataGrid binding
If Not (Me.dsOrderItems Is Nothing) Then
Me.dsOrderItems.Clear()
End If
Me.grdOrderItems.DataBindings.Clear()
![]() End If
End If
End Sub 'DisplayOrderItemsEnd Class
Now add an event handler for the toolbar’s ButtonClick method to the form to call the new form-level navigation methods. To do this, in the Form Designer, double-click the empty portion of the toolbar. This adds a new event handler method named MainToolbar_ButtonClick. Add the following code to this method, which calls the new First, Previous, Next, and Last methods.
In C#:
private void MainToolbar_ButtonClick(object sender,
System.Windows.Forms.ToolBarButtonClickEventArgs e)
{
// Evaluate the Button property to determine which button was clicked.
switch(this.MainToolbar.Buttons.IndexOf(e.Button))
{
case 0:
this.First();
break;
case 1:
this.Previous();
break;
case 2:
this.NextRec();
break;
case 3:
this.Last();
break;
}
}
In Visual Basic .NET:
Private Sub MainToolbar_ButtonClick(ByVal sender As System.Object, _
ByVal e As System.Windows.Forms.ToolBarButtonClickEventArgs) _
Handles MainToolbar.ButtonClick
' Evaluate the Button property to determine which button was clicked.
Select Case Me.MainToolbar.Buttons.IndexOf(e.Button)
Case 0
Me.First()
Case 1
Me.Previous()
Case 2
Me.NextRec()
Case 3
Me.Last()
End Select
End Sub 'MainToolbar_ButtonClick
Now you’re ready to compile and run the application so you can test the navigation toolbar. After launching the Customer Orders form, enter “QUEEN” in the Customer ID text box and press the Tab key. Next, select the Properties tab, click the different navigation buttons, and watch the form display each of the orders and their associated order items.
So far, the form allows viewing orders for a specified customer, but now in this section, you will add code to update the data. In this example, you will only add code to the form that updates the order header—similar code can be added for saving changes to the order items.
First, select the Properties page on the form and then drag and drop a Button from the Toolbox onto the form. Set its Name property to “btnSave”, its Location to 465, 320, and its Text to “&Save”. Double-click the button in the Form Designer to add an event handler method for the button’s Click event.
In the new btnSave_Click method, add the following code that passes the Orders DataSet back to the SaveDataSet method of the Orders business object and then displays the number of updated records.
Here’s the code in C#:
/// Update the Orders DataSet
private void btnSave_Click(object sender, System.EventArgs e)
{
/// Only run this code if there are records in the DataSet
if (dsOrders.Tables[this.OrdersObj.TableName].Rows.Count != 0)
{
/// Get the current DataRowView
DataRowView drView = (DataRowView)this.BindingContext[dsOrders, "Orders"].Current;
/// End the current edit of the DataRowView
drView.EndEdit();
/// Send the DataSet to the Orders Business object
int RowsUpdated = this.OrdersObj.SaveDataSet(this.dsOrders);
/// Display the number of records updated
MessageBox.Show("Rows updated: " + RowsUpdated);
}
}
And in Visual Basic .NET:
'/ Update the Orders DataSet
Private Sub btnSave_Click(ByVal sender As System.Object, _
ByVal e As System.EventArgs) Handles btnSave.Click
'/ Only run this code if there are records in the DataSet
If dsOrders.Tables(Me.OrdersObj.TableName).Rows.Count <> 0 Then
'/ Get the current DataRowView
Dim drView As DataRowView = _
CType(Me.BindingContext(dsOrders, "Orders").Current, DataRowView)
'/ End the current edit of the DataRowView
drView.EndEdit()
'/ Send the DataSet to the Orders Business object
Dim RowsUpdated As Integer = Me.OrdersObj.SaveDataSet(Me.dsOrders)
'/ Display the number of records updated
MessageBox.Show(("Rows updated: " & RowsUpdated.ToString()))
End If
End Sub 'btnSave_ClickEnd Class 'CustomerOrdersForm
Now you’re ready to test the form’s data updating abilities. Compile and run the application again, then launch the Customer Orders form. You can update the Order records in either the DataGrid or in the simple-bound controls on the Properties page. You can use the navigation toolbar to move to other records in the DataSet and make changes to these too. When you’re done, click the Save button on the Properties page and you should see a dialog showing how many records have been updated.
Resizing and repositioning user interface controls
Now that the form is functional, it’s time to do a little finessing with user interface control positioning and resizing. In Visual FoxPro, if you wanted the controls on a form to be automatically repositioned and resized when the form changed size, you had to write extra logic to do this, which could be somewhat complex. In .NET, it’s as simple as setting a property on a control—specifically, the Anchor property.
All .NET user interface controls have an Anchor property. Click the grdOrders DataGrid on the List page of the Customer Orders form, select the Anchor property combo box in the Properties Window, and a graphic is displayed containing a light grey rectangle in the center and four smaller rectangles on each side of it (Figure 23). The light grey rectangle represents your user interface control. The four small rectangles represent anchors to the top, bottom, left, and right sides of the control’s parent container—which might be a form or a tab page. When one of the smaller rectangles is shown in dark grey, it indicates the user interface control is anchored to the corresponding edge of the parent container.
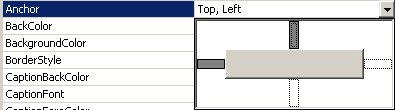
Figure 23. The Anchor property allows you to specify where you want to anchor a user interface control in relation to the edges of a form.
By default, controls are anchored to the Top and Left sides of the parent container. With these settings, when a user grabs the bottom right corner of a form, a control remains anchored to the top and left—which means it doesn’t move and isn’t resized.
On the List page of the Customer Orders form, this is the desired behavior of the Customer ID label and text box. However, you may want different behavior for the New, Delete, and Close buttons. For example, you may want the New and Delete buttons anchored to the Top and Right side of the tab page, and the Close button anchored to the Bottom and Right side of the tab page. In the case of the DataGrid, you probably want it to increase in size rather than change its position when the form is resized.
The first step in setting this up is to specify that the TabControl changes size as the form is resized. To do this, click on either the List or Properties tab in the Form Designer and then click on the Anchor property’s combo box. By default, the Top and Left are already anchored. To get the TabControl to change size in tandem with the form, click once on the right and bottom rectangles. When you do this, these rectangles will change color to dark grey.
Now click on the grdOrders DataGrid on the List page. Select the same right and bottom anchors as you did for the TabControl. Next, select the Close button. Deselect the top and left anchors by clicking on them once. When you do this, the rectangles change color to white with a dotted border. Now select the right and bottom anchors.
Finally, select both the New and Delete buttons simultaneously. You do this by clicking on one button, then hold down the Shift key and click on the other button. Deselect the left anchor and select the right anchor instead. This sets the Anchor property to the same value for both controls.
Now you’re ready to compile and run the application so you can test these settings. After you launch the Customer Orders form, grab any edge of the form and see how the controls are automatically resized and repositioned on the form.
Not only can you build great Internet applications with .NET, you can also build solid Windows Forms applications. The tools in Visual Studio .NET provide many convenience features for rapid application development. The wide variety of .NET user interface classes gives your application a modern, professional look—and makes your application more usable.
If you incorporate business objects into your desktop applications, these can also be reused in your Web Forms applications as shown in the next chapter.