Chapter
11
.NET XML
XML has taken the software world by storm. Everything from configuration files and databases (such as SQL Server) to Microsoft Office and Web Services have the ability to work with XML. In many ways, the .NET Framework was built with XML in mind. This chapter discusses incorporating XML into your .NET applications and also offers an overview of XML base classes for reading, writing, and manipulating XML.
Microsoft has done a good job making .NET and Visual Studio .NET great tools for working with XML. As already mentioned in Chapter 3, “Introduction to C#”, you can create XML comments in your C# source code and build Comment Web pages from them. In addition to this, Visual Studio .NET has an extremely capable tool for working with XML—the XML Designer. This tool makes it easy to create XML files, schemas, and (from the schemas) ADO.NET DataSets.
In addition to design-time tools, the .NET Framework class
library has an entire namespace (System.Xml) containing powerful base classes
that allow you to read, write,
and manipulate XML in just about every way imaginable. Before diving into these
tools, I’ll discuss some fundamentals of XML and direct you to some resources
for learning more of
the basics.
XML basics
Why should you care about XML? When you get down to it, XML is really just a new text-based data format. However, two things make XML a “big deal”.
The first is every major “player” in the software and database worlds has agreed to conform to this standard. This in itself is huge because it breaks down the barriers between software systems written on diverse platforms. For example, you can pass data or other information in XML format from a Microsoft application such as Visual FoxPro or .NET to an application written in a non-Microsoft language such as Java, running on a non-Microsoft UNIX or Linux platform, and be confident that these platforms and languages have tools to easily read and manipulate your XML document.
The second reason is that XML is self-describing. Other text formats such as comma-delimited or tab-delimited files require you to create a separate word processing document describing each field. You then have to write a program to read the text file, translate the data to the proper data type, and store it in your database of choice. This can be a lot of work.
In contrast, an XML document can have a related XML schema (stored “in line” with the data or stored in a separate file) to programmatically determine the structure and content of an XML document at runtime. This means no more writing special programs to import text files into your applications.
This chapter assumes a basic, working knowledge of XML—for more information on the basic structure and syntax of XML, check out the .NET Help topics “Introduction to XML” and “XML Technology Backgrounder”. Another great resource is the MSDN Online XML Developer Center Web site (http://msdn.microsoft.com/xml/default.asp). A good book on the subject is “Inside XML” by Steven Holzner (ISBN 0735710201).
Visual FoxPro 8’s new XML support
Visual FoxPro 8 has added support for XML in a hierarchical format by adding a new XMLAdapter class. This class improves Visual FoxPro’s ability to interoperate with XML produced from .NET DataSets.
As mentioned in Chapter 7, “Data Access with ADO.NET”, a DataSet can contain multiple DataTables and you can create relationships between these tables. VFP 8 has the ability to read hierarchical XML produced from this kind of DataSet and convert it into separate VFP cursors. In cases where the hierarchical XML does not represent a collection of related tables, but is simply a single table representing the result of a multi-table SQL Join command, then this XML is converted into a single Visual FoxPro cursor.
For details on the XMLAdapter class, check the Visual FoxPro 8 Help file.
Introducing the XML Designer
Visual Studio .NET has an XML Designer making it incredibly easy to work with XML documents and XML schemas—even if you’re not an XML expert. Although you can create XML files and schemas using a plain text editor such as Notepad, the visual tools in the XML Designer make you far more productive. You’ll also see later in this chapter how you can work with ADO.NET DataSets in the XML Designer.
The XML Designer has three different viewing modes—XML view, Schema view, and Data view. You’ll see a sample of each of these views in the next section
Manually creating a new XML file and schema
The best way to fully understand how the XML Designer works is to use it. This section takes you through the steps of manually creating a new XML file and schema. In this example you will create an XML file (and an associated schema) containing a partial list of the works of Shakespeare—helping you feel superior in both the technology and literary fields. Here’s an overview of the main steps:
1. Create a new, empty XML file.
2. Create a new, empty Schema file.
3. Use the designer to create the schema.
4. Associate the schema and the XML file.
5. Add data to the XML file.
6. Validate the XML data.
The following sections detail each of these steps.
Creating a new XML file
Add a new, empty XML file to your project as follows:
1. From the Project menu (located in the main menu), select Add New Item. This displays the Add New Item dialog
2. In the Templates pane, select XML File. Change the name of the XML file in the Name text box to “Shakespeare.xml”, and then click the Open button.
This creates a new XML file and automatically opens it in the XML Designer. The new XML file contains only one line—the XML header:
<?xml version="1.0" encoding="utf-8" ?>
This is the XML view of the XML Designer. As you’ll see later in this chapter, XML view gives you IntelliSense, word completion, member lists, and color-coding.
Creating a new schema file
Using the Visual Studio .NET XML Designer to create a schema is similar to using the Table Designer in Visual FoxPro to define the structure of a table. Follow these steps to add a new, empty XML schema file to the project:
1. From the VS .NET main menu, select Project | Add New Item. This launches the Add New Item dialog.
2. In the Templates pane, select XML Schema. Change the name of the schema file in the Name text box to “ShakespeareSchema.xsd”, and then click the Open button.
This creates a new schema file and automatically opens it in
the XML Designer in
Schema view. The schema is blank except for the text, To start, drag objects from the Server
Explorer or the Toolbox to the design surface, or right-click here.
This is what you’ll do in the next section.
Designing the schema
Adding elements to a schema is similar to adding fields in the Visual FoxPro Table Designer—you specify the element name and the type of data it holds. In this example, you will define three elements of a Shakespeare play—its name, category, and number of acts.
Make sure the XML schema you just created is the currently selected tab in the Visual Studio .NET IDE. Next, if your Toolbox is auto-hidden, hover your mouse pointer over the Toolbox button and select the XML Schema tab (Figure 1). If the Toolbox button is not visible, select View | Toolbox from the main menu or type the shortcut key sequence Ctrl+Alt+X.
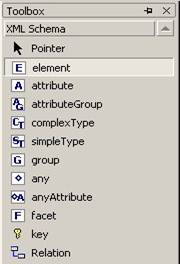
Figure 1. The XML Schema tab of the VS .NET Toolbox contains items you can drag and drop on the XML Designer to create an XML schema.
Table 1 provides a description of each item found in the XML Schema tab.
Table 1. This table describes all of the items in the XML Schema tab of the Toolbox.
|
Item |
Description |
|
element |
An XML element |
|
attribute |
An element attribute |
|
attributeGroup |
An element used to group together a set of attribute declarations to be included as a group into complex type definitions. |
|
complexType |
A complex type that can include other elements or attributes. |
|
simpleType |
A simple type that can only contain text—it can’t contain other elements or have attributes. |
|
group |
An element group used to declare how elements appear in a group. A sequence group declares all elements appear in the specified order, a choice group specifies only one of the elements in the group occurs, and in an all group, all elements occur or none at all. |
|
any |
An element to extend the XML document with elements not specified in the schema. |
|
anyAttribute |
An attribute to extend the XML document with attributes not specified in the schema. |
|
facet |
A facet element to restrict values of XML elements and attributes. Some of the most common facets are: · enumeration – limits an element to a set of acceptable values. · length – restricts an element value to a specific length. · maxLength – restricts the maximum length of an element value. · minLength – restricts the minimum length of an element value. · pattern – restricts the contents of an XML element to the specified pattern (i.e. numbers and/or letters). · whiteSpace –specifies how whitespace characters should be treated. The options are: preserve, replace, and collapse. |
|
key |
Used to specify table columns as primary or unique keys. You need to specify keys to create relations and constraints |
|
Relation |
Allows you to specify relations between elements |
Drag and drop an element from the Toolbox to the design surface. This displays a small grid on the design surface (Figure 2).
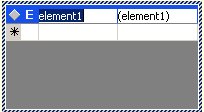
Figure 2. The element grid provides a visual tool for creating schema elements.
Change the default element name from “element1” to “ShakespearePlay”, and then tab to the second column. The text “(ShakespearePlay)” automatically appears in the second column. Don’t change the value of this column (the combo box in this column lists a variety of data types you can specify for elements). Press the TAB key twice to navigate from the first row to the center cell of the second row and Type “Name” in this column. Tab to the third column, open the combo box, and take a quick look at the list of available data types (Figure 3). Close the combo box, leaving “string” as the selected item.
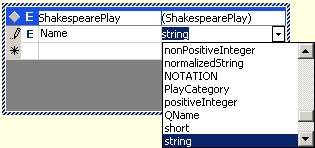
Figure 3. You can select the desired data type of a schema element from a combo box in the XML Designer.
Press the TAB key twice to go to the second column of the third row. Type “Category” in this cell and accept “string” as the default data type. Add one more element to the grid named “NumberOfActs” and set its type to “short”.
To see the results of what you have created so far, click on the XML tab at the bottom left of the XML Designer. This changes the designer to XML view and displays the “behind-the-scenes” raw XML. Within the <xs:schema> element you can see the ShakespearePlay element with Name, Category, and NumberOfActs child elements:
<xs:element name="ShakespearePlay">
<xs:complexType>
<xs:sequence>
<xs:element name="Name" type="xs:string" />
<xs:element name="Category" type="xs:string" />
<xs:element name="NumberOfActs" type="xs:short" />
</xs:sequence>
</xs:complexType>
</xs:element>
To save your changes so far, select File | Save ShakespeareSchema.xsd from the main menu or press Ctrl+S.
Next, create a parent element for ShakespearePlay called “WorksOfShakespeare”. This element is the root node and allows you to have multiple ShakespearePlay records in your XML file belonging to the WorksOfShakespeare element. To create this new parent element, go back to Schema view by clicking the Schema tab at the bottom left of the XML Designer.
Drag another “element” from the Toolbox onto the design surface. Change the default name from “element1” to “WorksOfShakespeare”. When you press TAB, “(WorksOfShakespeare)” is displayed in the data type column; accept this default.
To associate the ShakespearePlay element with the WorksOfShakespeare element, simply drag and drop the ShakespearePlay grid onto the WorksOfShakespeare grid (it’s easiest to grab the design grid by clicking on the diamond in the upper left corner). The XML Designer displays a line between the two design grids representing the parent-child relationship of the data (Figure 4). If you later want to delete this relationship, you do so by manually editing the XML in the XML tab of the designer.
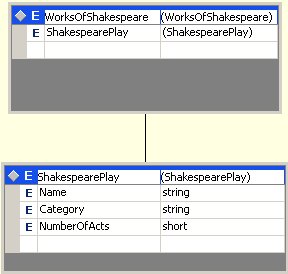
![]() Figure
4. You can create hierarchical relationships between data by dragging and
dropping the design grid containing the child data onto the parent grid.
Figure
4. You can create hierarchical relationships between data by dragging and
dropping the design grid containing the child data onto the parent grid.
You can create a relationship between two elements by right-clicking on one of the elements and selecting Add | New Relation… from the shortcut menu. This launches the Edit Relation dialog allowing you to set a variety of properties defining the relationship.
Next, you need to specify how many ShakespearePlay elements can be added to the WorksOfShakespeare element. To do this, select the ShakespearePlay grid by clicking on the diamond in the upper left corner. Go to the Properties Window and set the maxOccurs property to “unbounded”.
Creating a custom data type
In the previous section, you specified the data type of the Category element as “string”. This indicates that when you create the actual XML data, you can set any string value for the play category. In reality, there are really only a few different categories of Shakespeare plays—Comedy, History, Tragedy, and Romance. To limit the categories to these values, you create a new custom data type called PlayCategory.
Drag and drop a simpleType from the Toolbox onto the XML Designer. This displays another grid on the design surface (Figure 5). Change the default name from “simpleType1” to “PlayCategory” and leave “string” as the data type.
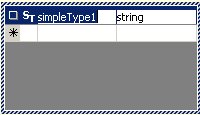
Figure 5. You can define your own custom data types in the XML Designer
Tab to the first column in the second row of the design grid. From the combo box in this cell select the only item available—facet (Figure 6). You can only use facets to build simple types, because simple types cannot include elements or attributes.
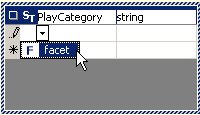
Figure 6. Facets are used to build simple type elements
Press the TAB key again to go to the second column in the
second row. Open the
combo box and take a quick look at the available properties, but leave the
default “enumeration” selected.
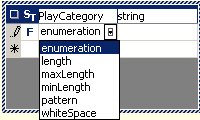
Figure 7. You can specify facet properties such as enumeration, length, maxLength, and minLength.
Next, Tab to the second column and enter “Comedy” as the first enumeration value. Add three more facet enumerations to the grid with the values “History”, “Tragedy”, and “Romance”. When you’re done, your design grid should look like the grid shown in Figure 8. You have now defined all of the possible Shakespearean play categories.
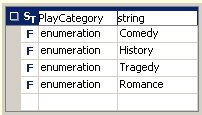
Figure 8. You can create custom enumeration types to limit the data values that can be entered in a particular XML element.
Now go back to the design grid containing the ShakespearePlay element and change the data type of Category from “string” to “PlayCategory” (which now appears in the data type combo box). At this point, save your changes by clicking the Save toolbar button or by typing Ctrl+S. To see what the XML for the schema looks like now, click the XML tab at the bottom left of the XML Designer and you should see the following:
<?xml version="1.0" encoding="utf-8" ?>
<xs:schema id="ShakespeareSchema" targetNamespace="http://tempuri.org/ShakespeareSchema.xsd" elementFormDefault="qualified" xmlns="http://tempuri.org/ShakespeareSchema.xsd" xmlns:mstns="http://tempuri.org/ShakespeareSchema.xsd" xmlns:xs="http://www.w3.org/2001/XMLSchema">
<xs:simpleType name="PlayCategory">
<xs:restriction base="xs:string">
<xs:enumeration value="Comedy" />
<xs:enumeration value="History" />
<xs:enumeration value="Tragedy" />
<xs:enumeration value="Romance" />
</xs:restriction>
</xs:simpleType>
<xs:element name="WorksOfShakespeare">
<xs:complexType>
<xs:sequence>
<xs:element name="ShakespearePlay" maxOccurs="unbounded">
<xs:complexType>
<xs:sequence>
<xs:element name="Name" type="xs:string" />
<xs:element name="Category" type="PlayCategory" />
<xs:element name="NumberOfActs" type="xs:short" />
</xs:sequence>
</xs:complexType>
</xs:element>
</xs:sequence>
</xs:complexType>
</xs:element>
</xs:schema>
Associating the schema with the XML file
Now it’s time to associate the XML file you created earlier with this new XML schema. To do this, double-click the Shakespeare.xml file in the Solution Explorer (or select the Shakespeare.xml tab in the IDE). Next, go to the Properties Window and click the column to the right of the targetSchema property. Select “http://tempuri.org/ShakespeareSchema.xsd” from the combo box (Figure 9).
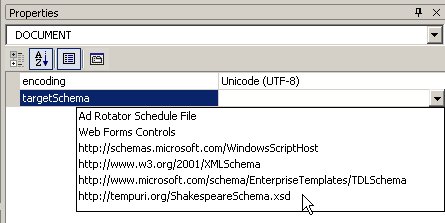
Figure 9. You associate an XML file with a schema by specifying a schema in the targetSchema property of the XML file.
This automatically adds the following WorksOfShakespeare element that references the ShakespeareSchema:
<WorksOfShakespeare xmlns="http://tempuri.org/ShakespeareSchema.xsd">
</WorksOfShakespeare>
As you can see in this XML element, when you create a new schema, Visual Studio .NET creates a default namespace “http://tempuri.org/” (read this as “temp URI”). You can replace this URI with your own URI that includes your company’s web site URL. For example:
<WorksOfShakespeare xmlns="http://www.oakleafsd.com/ShakespeareSchema.xsd">
Adding data to the XML file
This section shows two different ways you can manually add data to the XML file.
The first way is adding data in XML view mode. Position your cursor between the opening and closing tags of the <WorksOfShakespeare> element in the Shakespeare.xml file. Next, press the TAB key for indentation and type the left angled bracket (<). This automatically displays a list of elements available in this context based on the ShakespeareSchema file (Figure 10).

Figure 10. If you have a schema file associated with an XML file, you get IntelliSense in the XML Designer for elements and attributes
At this point in the XML file, the only element available is ShakespearePlay. Select this item from the list and type the right-angled bracket (>). The </ShakespearePlay> end tag is automatically inserted into the XML file for you. Press ENTER to move the end tag to a new line directly below the start tag.
Add an empty line between the start and end tags, position your cursor on the empty line, and press TAB to indent. Next, type the left-angled bracket (<) again. You should see a list of Category, Name, and NumberOfActs elements. Select the Name element from the list and type the right-angled bracket (>). The </Name> end tag is automatically inserted into the XML file for you. Type the text “Othello” (without the quotation marks) between the opening and closing Name tags.
Press the END key and then the ENTER key to go to the next line. Type the left-angled bracket again (<), but this time select the Category element and enter “Tragedy” as the category. Next add a NumberOfActs element and for the data between the tags, enter “5”. When you’re done, your XML file should look like this:
<?xml version="1.0" encoding="utf-8" ?>
<ShakespearePlay xmlns="http://tempuri.org/ShakespeareSchema.xsd">
<Name>Othello</Name>
<Category>Tragedy</Category>
<NumberOfActs>5</NumberOfActs>
</ShakespearePlay>
To see this in Data view, click the Data tab at the bottom of the XML Designer. The Data view consists of two areas—the Data Tables pane on the left and the Data pane on the right (Figure 11).
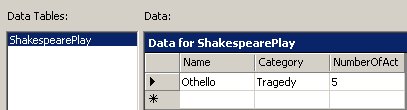
Figure 11. The XML Designer’s Data view allows you to use a design grid to easily add data to an XML file.
The Data Tables pane displays all tables in the XML file. When you select a table, its associated data displays in the Data pane. What’s even better is you can use this data grid for adding data to the XML file! This is the second way you can add data to an XML file from the XML Designer.
For example, add the following records to the grid (all of Shakespeare’s plays have five acts—something you can casually mention to impress your friends at your next “tea and crumpets” party):
Name Category NumberOfActs
---- -------- ------------
The Comedy of Errors Comedy 5
Henry the Fifth History 5
The Tempest Romance 5
To see the XML generated by the records you added to the grid, select the XML tab at the bottom left of the XML Designer. Your XML file should look like this:
<?xml version="1.0" encoding="utf-8" ?>
<WorksOfShakespeare xmlns="http://tempuri.org/ShakespeareSchema.xsd">
<ShakespearePlay>
<Name>Othello</Name>
<Category>Tragedy</Category>
<NumberOfActs>5</NumberOfActs>
</ShakespearePlay>
<ShakespearePlay>
<Name>The Comedy of Errors</Name>
<Category>Comedy</Category>
<NumberOfActs>5</NumberOfActs>
</ShakespearePlay>
<ShakespearePlay>
<Name>Henry the Fifth</Name>
<Category>History</Category>
<NumberOfActs>5</NumberOfActs>
</ShakespearePlay>
<ShakespearePlay>
<Name>The Tempest</Name>
<Category>Romance</Category>
<NumberOfActs>5</NumberOfActs>
</ShakespearePlay>
</WorksOfShakespeare>
Validating XML data
To validate the XML data you added, select XML | Validate XML Data from the menu. If you entered the data correctly, you should see the message “No validation errors were found” in the status bar at the bottom left of Visual Studio .NET IDE.
To check if your enumeration limiting the values of the Category element is working properly, change the value of any category element to “Romantic Comedy”, which is an invalid value. When you select XML | Validate XML Data again, you should get an error in the Task List complaining “The ‘http://tempuri.org/ShakespeareSchema.xsd:Category’ element has an invalid value according to its data type”.
To get rid of this error, simply restore the original value of the category element, save changes, and then run the XML validation again.
Creating ADO.NET Typed DataSets from an XML schema
This section assumes you have read Chapter7, “Data Access with ADO.NET”, which explains what DataSets are and how they are used in .NET applications.
There are two types of DataSets—typed and untyped. The difference is simple—a typed DataSet has an associated XML schema and an untyped DataSet does not. A typed DataSet is a subclass of the .NET DataSet base class. It supplies methods and properties to access data in a type-safe way rather than iterating through collections to get to the data you want, which is much more convenient. For more information on typed and untyped DataSets see the .NET Help topic “Introduction to DataSets”.
Adding a new DataSet to the project
To add a new DataSet to your project, do the following:
1. Select Project | Add New Item from the main menu to display the Add New Item dialog.
2. In the Templates pane, select Data Set. Change the default name of the DataSet in the Name text box to “ClientProjects.xsd” and click the Open button.
This creates a new XML schema file named ClientProjects.xsd and automatically opens it in the XML Designer in Schema view. The schema is blank except for the text, To start, drag objects from the Server Explorer or the Toolbox to the design surface, or right-click here. This schema file is used to define the structure of the DataSet.
Another new code file named ClientProjects.cs (if you’re working with C#) or ClientProjects.vb (if you’re working with Visual Basic .NET) is also added to the project. To see this file, click the Show All Files icon button in the Solution Explorer and expand the ClientProjects.xsd node (Figure 12).
![]()
Figure 12. When you add a DataSet to a project, VS .NET adds a schema file used to define the structure of the DataSet as well as a code file containing the class definition of the DataSet.
This code file contains the actual class definition for the new ClientProjects DataSet, which can be instantiated when finished and used to access and manipulate the specified data. The ClientProjects.xsd file is the schema you will now use to define the structure of the DataSet (the .xsx file is a VS .NET designer layout file that you can ignore).
Adding tables to the DataSet
In this section you will add elements to the schema to represent tables and fields in a DataSet. First, make sure that you have the ClientProjects.xsd tab selected in the IDE, and then follow these steps:
1. Drag and drop an element from the Toolbox onto the schema design surface.
2. Change the default name from “element1” to “Client”. This represents the Client table and next you will define elements to represent fields in the table.
3. Tab to the second column of the second row. Type the string “ClientID” in this column and press the Tab key. This displays the default data type “string” in the third column; accept this default.
4. Add the additional elements as shown in Figure 13 for the Client table.
5. Drag and drop a second element from the Toolbox onto the schema design surface.
6.
Change the default name from “element1” to “Project”.
This represents the
Project table.
7.
Add the additional elements as shown in Figure 13 for
the Project table and
save changes.
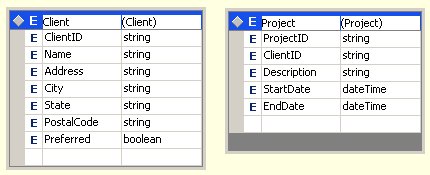
Figure 13. You can create DataSet tables in the XML Designer’s Schema view.
Creating primary keys
To create a primary key in the Client table:
1. Select the ClientID row in the Client design grid by clicking to the left of the “E”. Right-click on the column and select Add | New Key… from the shortcut menu. This launches the Edit Key dialog (Figure 14).
2. Change the name of the key to “ClientIDKey”.
3. Make sure the Element combo box has the “Client” table selected and the Fields combo box has the “ClientID” field selected.
4. Select the Dataset primary key check box and click OK. After the dialog closes, a key icon displays next to the ClientID element indicating it has an associated key.
5. Create a primary key named “ProjectIDKey” for the ProjectID field in the Project table in the same way you created a key on the ClientID field in the Client table.
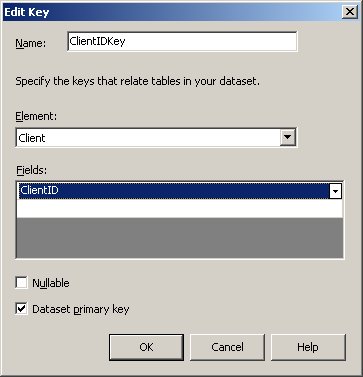
Figure 14. The Edit Key dialog allows you to create keys on fields in tables.
Creating a relationship between the tables
To create a relationship between the Project and Client tables:
1. Right-click anywhere on the Project table and select Add | New Relation… from the shortcut menu to launch the Edit Relation dialog (Figure 15).
2. The default settings shown in the dialog should all be correct. For example, the default relation Name should be “ClientProject”. The Parent element should be set to “Client” and the Child element to “Project”. Make sure your dialog has the same settings as that dialog shown in Figure 15.
3. Click OK to save the relation.

Figure 15. The Edit Relation dialog allows you to create relationships between tables in a DataSet.
When the Edit Relation dialog saves the relation, it displays a relationship link between the Client and Project tables (Figure 16).
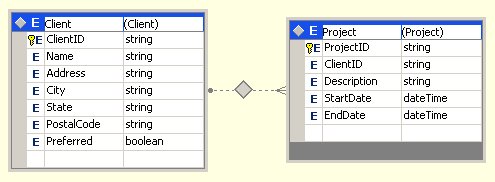
Figure 16. The XML Designer shows key fields and
relationships between tables
in a DataSet.
You can examine the behind-the-scenes XML schema by clicking the XML tab at the bottom of the Designer. Your XML schema should look as follows:
<?xml version="1.0" encoding="utf-8" ?>
<xs:schema id="ClientProjects" targetNamespace="http://tempuri.org/ClientProjects.xsd" elementFormDefault="qualified" attributeFormDefault="qualified" xmlns="http://tempuri.org/ClientProjects.xsd" xmlns:mstns="http://tempuri.org/ClientProjects.xsd" xmlns:xs="http://www.w3.org/2001/XMLSchema" xmlns:msdata="urn:schemas-microsoft-com:xml-msdata">
<xs:element name="ClientProjects" msdata:IsDataSet="true">
<xs:complexType>
<xs:choice maxOccurs="unbounded">
<xs:element name="Client">
<xs:complexType>
<xs:sequence>
<xs:element name="ClientID" type="xs:string" minOccurs="0" />
<xs:element name="Name" type="xs:string" minOccurs="0" />
<xs:element name="Address" type="xs:string" minOccurs="0" />
<xs:element name="City" type="xs:string" minOccurs="0" />
<xs:element name="State" type="xs:string" minOccurs="0" />
<xs:element name="PostalCode" type="xs:string" minOccurs="0" />
<xs:element name="Preferred" type="xs:boolean" minOccurs="0" />
</xs:sequence>
</xs:complexType>
</xs:element>
<xs:element name="Project">
<xs:complexType>
<xs:sequence>
<xs:element name="ProjectID" type="xs:string" minOccurs="0" />
<xs:element name="ClientID" type="xs:string" minOccurs="0" />
<xs:element name="Description" type="xs:string" minOccurs="0" />
<xs:element name="StartDate" type="xs:dateTime" minOccurs="0" />
<xs:element name="EndDate" type="xs:dateTime" minOccurs="0" />
</xs:sequence>
</xs:complexType>
</xs:element>
</xs:choice>
</xs:complexType>
<xs:key name="ClientIDKey" msdata:PrimaryKey="true">
<xs:selector xpath=".//mstns:Client" />
<xs:field xpath="mstns:ClientID" />
</xs:key>
<xs:key name="ProjectIDKey" msdata:PrimaryKey="true">
<xs:selector xpath=".//mstns:Project" />
<xs:field xpath="mstns:ProjectID" />
</xs:key>
<xs:keyref name="ClientProject" refer="ClientIDKey">
<xs:selector xpath=".//mstns:Project" />
<xs:field xpath="mstns:ClientID" />
</xs:keyref>
</xs:element>
</xs:schema>
Notice the Client and Project elements are peers and both are direct children of the ClientProject element, which represents the DataSet. This is because both the Client and Project elements represent a table in the DataSet. Also, notice the ClientIDKey and ProjectIDKey elements are direct children of the ClientProject DataSet allowing the key to control unique values throughout the DataSet.
Creating XML schemas and DataSets from existing data
In the previous sections you learned how to create XML schemas and DataSets from scratch. The following steps show you how to create them from existing data, using the SQL Server Northwind database Products table.
1. In the Solution Explorer, right-click on the project you want to add the XML schema to, and select Add | Add New Item from the shortcut menu. This displays the Add New Item dialog.
2. In the Add New Item dialog, select DataSet in the Templates pane. Change the Name of the DataSet schema to “Products.xsd”.
3. Click the Open button. This adds a new schema file named Products.xsd to your project as well as a new DataSet class stored in the Products.cs (C#) or Products.vb (Visual Basic .NET) file.
4. In the Server Explorer, expand the Data Connections node, and then expand the node for the connection to the Northwind database. If the Server Explorer is not visible, select View | Server Explorer from the main menu.
5. Expand the Tables node (Figure 17). You can also expand the Views or Stored Procedure node if you want to create a DataSet from these instead.
6. Drag and drop the Products table onto the schema design surface. If you only want a subset of fields to appear in the schema, expand the Products node, select the desired fields, and drop them on the schema.
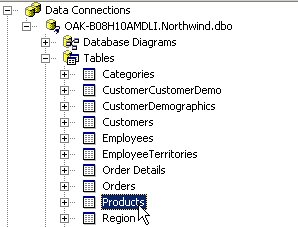
Figure 17. You can drag and drop tables, views, or stored procedures onto the XML Designer in Schema view to create a schema and DataSet from existing data.
After dropping the Products table on the Schema Designer, Visual Studio .NET creates a schema file and associated DataSet from the table.
File types in the XML Designer
The XML Designer allows you to edit a wide variety of XML-based files. Table 2 lists the different viewing modes of the XML Designer and the types of files supported in each mode. Of particular interest to Visual FoxPro developers is the Data mode where you can view XML data in a data grid, much like VFP’s Browse window.
Table 2. This table lists the three XML Designer viewing modes and the files supported in each mode.
|
Viewing mode |
File Types |
|
XML mode – Edit XML in a
text-editing window with IntelliSense, word completion, member lists, and |
.xml – XML files .xsd – XML schema .xslt – Extensible Stylesheet Language (XSL) Transformations .wsdl – Web Services Description Language document .resx – Resource files .tdl – Template Description Language files .wsf – Windows Script Host .hta – HTML Application file .disco – XML Web Service static discovery file .vsdisco – XML Web Service dynamic discovery file .config – Application Configuration file |
|
Schema mode – Create and edit XML schemas and ADO.NET DataSets |
.xsd |
|
Data mode – Modify XML data files in a structured data grid. |
.xml |
The next few sections provide an overview of the XML Designer’s viewing modes. After that you will see practical examples demonstrating how to use the XML Designer in each of these modes.
XML in the .NET Framework
The System.Xml namespace contains dozens of classes that allow you to programmatically work with XML. This section gives you an overview of some of the primary classes to show you the functionality available to your .NET applications.
Reading XML with the XmlTextReader
The XmlTextReader class provides fast, forward-only access to XML data. It can read XML from a file, a stream, or TextReader. A stream is an object used to read data from an outside source into your program and to write data from your program to an outside source—that source can be as diverse as a file, a network connection, or an area of memory. A TextReader is an object that can read a sequential series of characters. The example below shows you how to read XML from a file.
The first step involves loading the XML file into the XmlTextReader object. This is easily done by instantiating an XmlTextReader object and passing the name of the XML document in the class constructor. For example:
In C#:
XmlTextReader ReadXml = new XmlTextReader("..\\..\\chapters.xml");
And in Visual Basic .NET:
Dim ReadXml As New XmlTextReader("..\..\chapters.xml")
There are a variety of methods available for traversing the XML document. Table 3 lists a few of the more common methods.
Table 3. This table lists commonly used methods of the XmlTextReader class
|
XmlTextReader method |
Description |
|
Read |
Reads the next node from the stream. |
|
ReadStartElement |
Checks that the current node is an element and advances to the next. Optionally, you can specify an element name to verify that the current node is an element with the specified name. |
|
ReadEndElement |
Checks that the current node is an end tag and advances to the next node. |
|
ReadElementString |
Returns the data of the current node and advances to the next node. |
To show the context where these methods can be used, here is an example using an XmlTextReader to traverse the Chapters.xml file (one of the XML files you can find in the sample source code for this book) and display its contents in a message box.
In C#:
string ChapterList = "", ChapterID="", ChapterTitle="";
// Open the text file in the XML reader
XmlTextReader ReadXml = new XmlTextReader("..\\..\\chapters.xml");
// Read the root node of the file
ReadXml.ReadStartElement("Book");
while (true)
{
// Read the next chapter starting element
ReadXml.ReadStartElement("chapter");
// Read the chapter's child id element
ChapterID = ReadXml.ReadElementString();
// Read the chapter's child title element
ChapterTitle = ReadXml.ReadElementString();
ChapterList += ChapterID + " - " + ChapterTitle + "\n";
// Read the chapter ending element
ReadXml.ReadEndElement();
// Move to the next node. If it's not a chapter element, exit
ReadXml.Read();
if (ReadXml.Name != "chapter")
{
break;
}
}
// Close the XML document
ReadXml.Close();
// Display the chapter list
MessageBox.Show(ChapterList,"XmlTextReader");
And in Visual Basic .NET:
Dim ChapterList As String = ""
Dim ChapterID As String = ""
Dim ChapterTitle As String = ""
' Open the text file in the XML reader
Dim ReadXml As New XmlTextReader("..\..\chapters.xml")
' Read the root node of the file
ReadXml.ReadStartElement("Book")
While True
' Read the next chapter starting element
ReadXml.ReadStartElement("chapter")
' Read the chapter's child id element
ChapterID = ReadXml.ReadElementString()
' Read the chapter's child title element
ChapterTitle = ReadXml.ReadElementString()
ChapterList += ChapterID + " - " + ChapterTitle + ControlChars.Lf
' Read the chapter ending element
ReadXml.ReadEndElement()
' Move to the next node. If it's not a chapter element, exit
ReadXml.Read()
If ReadXml.Name <> "chapter" Then
Exit While
End If
End While
' Close the XML document
ReadXml.Close()
' Display the chapter list
MessageBox.Show(ChapterList, "XmlTextReader")
This code instantiates an XmlTextReader and calls its ReadStartElement method to read the “Book” root node and advance to the first “chapter” starting element. In the while loop, ReadStartElement is used to read the starting “chapter” element and advance to the next node. The ReadElementString method is used to read the chapter id and title, automatically advancing to the next node with each call. The call to ReadEndElement reads the ending “chapter” element and advances to the next node. The call to the Read method checks if the current node is not a “chapter” node, and if it’s not, the while loop is exited.
For more information on the properties, methods and events of the XmlTextReader class, see the .NET Help topic “XmlTextReader Members”.
Writing XML with the XmlTextWriter
The XmlTextWriter class is useful for programmatically creating an XML document. XmlTextWriter offers fast, forward-only generation of XML. This means, you can use this class to create a new XML document, but not to append XML to an existing document, because the XmlTextWriter overwrites the original contents of the document. For editing capabilities, you need to use the .NET XML DOM. For details, see the “The XML Document Object Model (DOM)” section later in this chapter.
This section will show you how to create a new XML file using the XmlTextWriter class. The first step is identifying the document where the XML is written. This can be done by instantiating an instance of the XmlTextWriter class and passing the name of the XML document in the constructor.
Here is the code in C#:
XmlTextWriter WriteXml = new XmlTextWriter("TestWrite.xml",null);
And in Visual Basic .NET:
Dim WriteXml As New XmlTextWriter("TestWrite.xml", Nothing)
There are a variety of methods available for writing XML. Table 4 lists a few of the more common methods.
Table 4. This table lists commonly used methods of the XmlTextWriter class
|
XmlTextReader method |
Description |
|
WriteStartDocument |
Writes the XML declaration. |
|
WriteEndDocument |
Closes any elements or attributes that have not been closed yet (no ending tags), and then puts the writer back in the Start state. |
|
WriteComment |
Writes out an XML comment containing the specified text. |
|
WriteStartElement |
Writes out the specified start tag. |
|
WriteEndElement |
Closes the last open element. |
|
WriteAttributeString |
Writes an attribute with the specified value to the last element start tag. |
|
WriteElementString |
Writes out the specified element and element data. |
|
Close |
Closes the stream. |
To show the context where these methods can be used, here is an example that uses an XmlTextWriter to create an XML file named TestWrite.xml containing a small part of my family tree. My father is the parent node and my siblings are all child nodes (I couldn’t resist the pun).
In C#:
XmlTextWriter WriteXml = new XmlTextWriter("TestWrite.xml",null);
// Specify the XML formatting
WriteXml.Formatting = Formatting.Indented;
WriteXml.Indentation = 3;
WriteXml.IndentChar = ' ';
// Write the XML declaration
WriteXml.WriteStartDocument(false);
// Write an XML comment
WriteXml.WriteComment("Generated by the XmlTextWriterDemo class");
// Write the root node
WriteXml.WriteStartElement("McNeishSiblings");
// Write an attribute to the root node
WriteXml.WriteAttributeString("father","Phillip William McNeish, Sr.");
// Write sibling nodes
WriteXml.WriteElementString("sibling","Linda Lee");
WriteXml.WriteElementString("sibling","Phillip William, Jr.");
WriteXml.WriteElementString("sibling","Kevin James");
WriteXml.WriteElementString("sibling","Penny Ann");
WriteXml.WriteElementString("sibling","Terri Lynn");
WriteXml.WriteElementString("sibling","Wendy Gale");
WriteXml.WriteElementString("sibling","Matthew William");
// Write the root node ending
WriteXml.WriteEndElement();
// Close the XML document
WriteXml.Close();
And in Visual Basic .NET:
Dim WriteXml As New XmlTextWriter("TestWrite.xml", Nothing)
' Specify the XML formatting
WriteXml.Formatting = Formatting.Indented
WriteXml.Indentation = 3
WriteXml.IndentChar = " "
' Write the XML declaration
WriteXml.WriteStartDocument(False)
' Write an XML comment
WriteXml.WriteComment("Generated by the XmlTextWriterDemo class")
' Write the root node
WriteXml.WriteStartElement("McNeishSiblings")
' Write an attribute to the root node
WriteXml.WriteAttributeString("father", "Phillip William McNeish, Sr.")
' Write sibling nodes
WriteXml.WriteElementString("sibling", "Linda Lee")
WriteXml.WriteElementString("sibling", "Phillip William, Jr.")
WriteXml.WriteElementString("sibling", "Kevin James")
WriteXml.WriteElementString("sibling", "Penny Ann")
WriteXml.WriteElementString("sibling", "Terri Lynn")
WriteXml.WriteElementString("sibling", "Wendy Gale")
WriteXml.WriteElementString("sibling", "Matthew William")
' Write the root node ending
WriteXml.WriteEndElement()
' Close the XML document
WriteXml.Close()
In this code, you first instantiate
the XmlTextWriter, passing the name of the XML file, TestWrite.xml. Next, set
formatting properties on the writer, specifically to create XML with an
indentation of 3 spaces. The WriteStartDocument method is used to write the XML
declaration (i.e. <?xml version="1.0" standalone="no" ?>). Next, a comment is written to
the XML file using the WriteComment method. The WriteStartElement method is
used to create the opening tag of the root node, and WriteAttributeString is
used to add an attribute to the root node. WriteElementString is called
multiple times to add an element for each of my siblings. Finally, the
WriteEndElement method is called to write the root node element ending and
Close is called to close the stream.
Here is what
the resulting XML file looks like:
<?xml version="1.0" standalone="no"?>
<!--Generated by the XmlTextWriterDemo class-->
<McNeishSiblings father="Phillip William McNeish, Sr.">
<sibling>Linda Lee</sibling>
<sibling>Phillip William, Jr.</sibling>
<sibling>Kevin James</sibling>
<sibling>Terri Lynn</sibling>
<sibling>Wendy Gale</sibling>
<sibling>Matthew William</sibling>
</McNeishSiblings>
For more information on the available properties, events and methods of the XmlTextWriter class, see the .NET Help topic “XmlTextWriter Members”.
XSLT Transformation
XSLT (eXtenstible Style Sheet Transforms) is a language that allows you to transform an XML document into another document with a different structure or format. For example, you can transform an XML document into an HTML document for display or into an XML document containing a subset of the original XML data. For more information on XSLT, see the .NET Help topic “XSLT Fundamentals”.
An XSLT file contains transformations that are applied against a file. The XSLT file can be applied to an XML document by an XSLT processor. The .NET XslTransform class located in the System.Xml namespace is such a processor.
In this section, you will create an XSLT file that transforms the Shakespeare.xml file you created earlier in this chapter. The first step involves adding a new XSLT file to your project.
1. Right-click on the project and select Add | Add New Item… from the shortcut menu. This launches the Add New Item dialog
2. In the Templates pane, select XSLT File. Change the Name of the XSLT file to “Shakespeare.xslt” and click the Open button.
This adds a new XSLT file to your project and opens it in the XML Designer. This file contains the following XML, where the <stylesheet> tags mark the beginning and end of the style sheet in the XSLT file:
<?xml version="1.0" encoding="UTF-8" ?>
<stylesheet version="1.0" xmlns="http://www.w3.org/1999/XSL/Transform">
</stylesheet>
Using the XML Designer, manually enter the following into the Shakespeare.xslt file:
<?xml version="1.0" encoding="UTF-8" ?>
<xsl:stylesheet version="1.0" xmlns:xsl="http://www.w3.org/1999/XSL/Transform"> <xsl:template match="/">
<HTML>
<TITLE>Partial List of Shakespeare's Works</TITLE>
<BODY>
<TABLE BORDER="1">
<TR>
<TD><B>Title</B></TD>
<TD><B>Category</B></TD>
<TD><B>Acts</B></TD>
</TR>
<xsl:for-each select="WorksOfShakespeare/ShakespearePlay">
<TR>
<TD><xsl:value-of select="Name" /></TD>
<TD><xsl:value-of select="Category" /></TD>
<TD><xsl:value-of select="NumberOfActs" /></TD>
</TR>
</xsl:for-each>
</TABLE>
</BODY>
</HTML>
</xsl:template>
</xsl:stylesheet>
This file contains a mix of HTML (<TITLE>, <BODY>, <TABLE>) that creates a table with three columns (Title, Category, and Acts), as well as XSLT directives that extract data from the associated XML file and display it in the HTML page.
The text, <xsl: template match="/"> specifies the nodes where the template is applied. In this case, match="/" specifies it is applied to the root node. The <xsl:for-each select="WorksOfShakespeare/ShakespearePlay"> text specifies that a table row (<TR>) is created for each <ShakespearePlay> element found in the XML file that is a child element of the <WorksOfShakespeare> element.
The three xsl:value-of text statements select the values of the <Name>, <Category>, and <NumberOfActs> elements and place them in cells of the table.
Using the XslTransform class
Now that you have an XML file and an associated XSLT file, you can use the .NET XslTransform class to apply the transformation file to the XML file and display the result.
Here’s the code in C#:
XslTransform XslTrans = new XslTransform();
string OutputFile = "TransformOutput.html";
// Load the XSLT file
XslTrans.Load("..\\..\\Shakespeare.xslt");
// Transform the XML file and output it to the specified HTML file
XslTrans.Transform("..\\..\\Shakespeare.xml", OutputFile);
// Display the HTML file in a browser
System.Diagnostics.Process.Start(OutputFile);
Here’s the code in Visual Basic .NET:
Dim XslTrans As New XslTransform()
Dim OutputFile As String = "TransformOutput.html"
' Load the XSLT file
XslTrans.Load("..\..\Shakespeare.xslt")
' Transform the XML file and output it to the specified HTML file
XslTrans.Transform("..\..\Shakespeare.xml", OutputFile)
' Display the HTML file in a browser
System.Diagnostics.Process.Start(OutputFile)
In this code, the call to the Load method loads the Shakespeare.xslt file. Next, a call is made to the Transform method that takes the XML file, applies the XSLT file to it, and sends the output to the specified HTML file. The last line of code calls the .NET Process class’s Start method, which launches the process associated with the extension of the specified file. In this case, the file has an HTML extension, so your default browser is launched, displaying the output file (Figure 18).
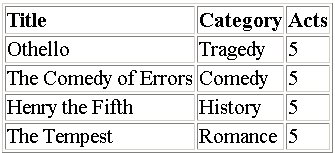
Figure 18.An XSLT file can be used to transform an XML file into HTML for display.
For more information on the XslTransform class, see the .NET Help topic “XSLT Transformations with the XslTransform Class”.
The XML Document Object Model (DOM)
As described previously, the XmlReader and XmlWriter classes provide fast, forward-only access to XML data, however, they cannot edit XML. This is where the XML Document Object Model (DOM) comes into play. The DOM lets you read, manipulate, and modify an XML document. The DOM represents XML in memory as a hierarchy of nodes.
To show you some of the capabilities of the .NET XML DOM, the following code adds a new node to the Shakespeare.xml file. It appends a new Shakespearean play “Hamlet” to the list of plays found in Shakespeare.xml and writes out the XML to a new file named UpdatedPlays.xml.
Here’s the code in C#:
// Load the document
XmlDocument XmlDoc = new XmlDocument();
XmlDoc.Load("..\\..\\Shakespeare.xml");
// Create a new <ShakespearePlay> element
XmlElement Play = XmlDoc.CreateElement("ShakespearePlay");
// Create a new <Name> element and add it to <ShakespearePlay>
XmlElement Name = XmlDoc.CreateElement("Name");
Name.InnerText = "Hamlet";
Play.AppendChild(Name);
// Create a new <Category> element and add it to <ShakespearePlay>
XmlElement Category = XmlDoc.CreateElement("Category");
Category.InnerText = "Tragedy";
Play.AppendChild(Category);
// Create a new <NumberOfActs> element and add it to <Shakespeare>
XmlElement Act = XmlDoc.CreateElement("NumberOfActs");
Act.InnerText = "5";
Play.AppendChild(Act);
XmlDoc.DocumentElement.AppendChild(Play);
// Write out the new XML file
XmlTextWriter TextWriter = new XmlTextWriter("..\\..\\UpdatedPlays.xml",null);
TextWriter.Formatting = Formatting.Indented;
XmlDoc.WriteContentTo(TextWriter);
TextWriter.Close();
Here’s the code in Visual Basic .NET:
' Load the document
Dim XmlDoc As New XmlDocument()
XmlDoc.Load("..\..\Shakespeare.xml")
' Create a new <ShakespearePlay> element
Dim Play As XmlElement = XmlDoc.CreateElement("ShakespearePlay")
' Create a new <Name> element and add it to <ShakespearePlay>
Dim Name As XmlElement = XmlDoc.CreateElement("Name")
Name.InnerText = "Hamlet"
Play.AppendChild(Name)
' Create a new <Category> element and add it to <ShakespearePlay>
Dim Category As XmlElement = XmlDoc.CreateElement("Category")
Category.InnerText = "Tragedy"
Play.AppendChild(Category)
' Create a new <NumberOfActs> element and add it to <Shakespeare>
Dim Act As XmlElement = XmlDoc.CreateElement("NumberOfActs")
Act.InnerText = "5"
Play.AppendChild(Act)
XmlDoc.DocumentElement.AppendChild(Play)
' Write out the new XML file
Dim TextWriter As New XmlTextWriter("..\..\UpdatedPlays.xml", Nothing)
TextWriter.Formatting = Formatting.Indented
XmlDoc.WriteContentTo(TextWriter)
TextWriter.Close()
This code creates an instance of the XmlDocument class and loads the Shakespeare.xml file into it. Next, calling the XmlDocument’s CreateElement method creates a new ShakespearePlay element. Afterwards, child elements (Name, Category, NumberOfActs) are created using the same technique. Each element’s data is defined by setting the XmlElement’s InnerText property. The Play object’s AppendChild method is called to add each child element to the Play element. Finally, an XmlTextWriter is created, and a new XML file, UpdatedPlays.xml, is specified as the file to be written. A reference to the XmlTextWriter object is passed to the XmlDocument’s WriteContentTo method and the updated XML document is written out to the UpdatedPlays.xml file.
For more information on the .NET XML DOM, see the .NET Help topic “XML Document Object Model (DOM)”.
Querying XML data with XPathNavigator
XPath (XML Path Language) is a query language specifically designed to select a subset of elements from an XML document. In the .NET Framework, the XPathNavigator class lets you perform XPath queries on any XML data store that implements the IXPathNavigable interface.
![]()
For more information on XPath, see the .NET Help topic “XPath”.
There are three classes in the .NET Framework that implement this interface: XPathDocument, XmlDocument, and XmlDataDocument. You use the XPathNavigator class to select elements from the XML data stores of these objects. XPathNavigator supplies both forward and backward navigation, but read only access. If you want the ability to edit an XML data store, you need to use the .NET XML DOM instead.
To demonstrate the capabilities of the XPathNavigator class, the following code selects all of the Shakespeare tragedies from the Shakespeare.xml file. If you haven’t been running the sample code in this chapter up to this point, there may only be one tragedy in your XML file, (and hopefully you’ll see the humor in this).
Here is the code in C#:
string PlayList = "";
// Load the document
XPathDocument XmlDoc = new XPathDocument("..\\..\\Shakespeare.xml");
XPathNavigator XPathNav = XmlDoc.CreateNavigator();
// Select all Shakespeare Tragedies
XPathNodeIterator Iterator = XPathNav.Select("descendant::ShakespearePlay[Category='Tragedy']");
// Iterate through all Tragedies
while (Iterator.MoveNext())
{
// Create an iterator for the current <ShakespearePlay> element
XPathNodeIterator PlayIterator =
Iterator.Current.SelectDescendants(XPathNodeType.Element,false);
// Iterate through all child elements of the current <ShakespearePlay>
while (PlayIterator.MoveNext())
{
PlayList += PlayIterator.Current.Value + " ";
}
}
MessageBox.Show(PlayList);
Here is the code in Visual Basic .NET:
Dim PlayList As String = ""
' Load the document
Dim XmlDoc As New XPathDocument("..\..\Shakespeare.xml")
Dim XPathNav As XPathNavigator = XmlDoc.CreateNavigator()
' Select all Shakespeare Tragedies
Dim Iterator As XPathNodeIterator = _
XPathNav.Select("descendant::ShakespearePlay[Category='Tragedy']")
' Iterate through all Tragedies
While Iterator.MoveNext()
' Create an iterator for the current <ShakespearePlay> element
Dim PlayIterator As XPathNodeIterator = _
Iterator.Current.SelectDescendants(XPathNodeType.Element, False)
' Iterate through all child elements of the current <ShakespearePlay>
While PlayIterator.MoveNext()
PlayList += PlayIterator.Current.Value + " "
End While
End While
MessageBox.Show(PlayList)
First in this code, you create an instance of the
XPathDocument class, specifying
in the constructor the XML file to load. Next, you create an XPathNavigator by
calling the XPathDocument object’s CreateNavigator method. A call is made to
the Select method
of the XPathNavigator object, specifying all ShakespearePlay elements with a
Category
set to “Tragedy” should be selected, and the selected elements are stored in an
XPathNodeIterator object.
The first while loop iterates through all the selected ShakespearePlay elements by calling the XPathNodeIterator’s MoveNext method. Within the while loop, a second iterator is created and used by an inner while loop to iterate through all of the elements in the current ShakespearePlay element, building a string to be displayed.
For more information on the XPathNavigator and related classes, see the .NET Help topic “XPathNavigator in the .NET Framework”.
Conclusion
There are a wide variety of classes in the .NET Framework and powerful tools in Visual Studio .NET for working with XML. This chapter just skims the surface of these capabilities, providing an overview of the kinds of things you can do with XML and .NET. I highly recommend checking out the suggested links in this chapter to get a fuller picture of .NET XML so you can take advantage of its power and flexibility in your applications.