Chapter
12
XML Web Services
It’s nearly impossible to pick up a software-related journal these days that doesn’t contain some mention of XML Web Services. This makes it easy to think of Web Services as pure hype, but in reality they may shape the next generation of software applications. XML Web Services are the other half of ASP.NET (the first half is Web Forms). This chapter helps you understand what XML Web Services are, and how you can use them in your .NET applications.
According to Microsoft’s initial marketing push for .NET, XML Web Services are the cornerstone of .NET and the reason for its very existence. In reality, you may use .NET to create both Windows Forms and Web Forms applications without ever creating an XML Web Service. However, there are good reasons why you should consider doing so.
There’s been a lot of interest in the FoxPro community over the fact that Visual FoxPro can both create and consume XML Web Services. In fact, VFP’s Web Service capabilities are what places it under the “.NET umbrella”. Although it’s not a .NET language, Visual FoxPro allows you to create XML Web Services that can be consumed by .NET and it can consume XML Web Services created in .NET.
What is a Web Service?
A Web Service is a code module containing one or more
functions accessible via the
Internet. Desktop applications, Web applications, or even another Web Service
can access Web Services. When you access a Web Service, you are making a
function or method call over the Internet.
Web Services are:
· Language independent – They can be written in virtually any computer language and accessed by code written in any language
· Platform independent – They can run on any operating system and be accessed by client code running on any platform.
· Self-describing – Each Web Service has associated files that describe the services it provides and allows clients to call its methods.
Although most of the software you run is physically located on your own computer, running code on a computer that resides somewhere across the Internet is actually a common occurrence—it happens all the time as you surf the Web, although surfing the Web is not the same as accessing a Web Service. So, first you’ll look at what happens when you surf the Internet, and then see how Web Services takes this approach a step further.
As you navigate to different sites with your browser, you request Web pages located on Web servers across the Internet. Behind the scenes, especially when accessing Web pages with dynamic content, a Web server runs code in response to your request and sends HTML, script code, and so on, back to your computer. In this manner, you’re indirectly running code that resides on a Web server.
When using technologies such as ASP or ASP.NET pages, the code that’s being executed is often stored in methods of business components located on the Web server. For example, in Chapter 10, “Building Web Applications with ASP.NET”, you created a Web Forms application that allowed users to view and edit orders for a specified customer. As shown in Figure 1, when the user enters a Customer ID and clicks the Submit button, the Web server instantiates the Orders business object and calls its GetOrdersByCustomerID method. The Web Server produces an HTML list of customer orders to send back to your browser.
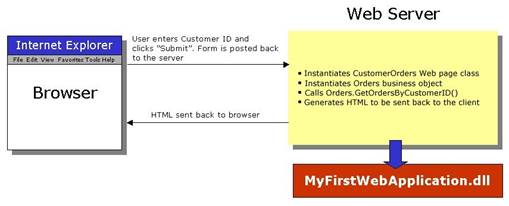
Figure 1. When you access ASP or ASP.NET pages, you are often indirectly causing code to be executed on a Web server.
For the most part, this approach works well. However, XML Web Services let you take this paradigm a step further, giving you greater control. They effectively allow you to call the GetOrdersByCustomerID method of the Orders business object directly. Just think about how useful this is. If you are able to call the method directly, you can retrieve a list of customer orders as an XML string and manipulate it in your own software applications, and even persist it to a local data store. Later in this chapter, you’re going to build a Web Service allowing you to do just that.
This type of Web Service is private by nature, established between business partners. You may have certain clients that you allow to access the Web Service, but you certainly don’t want to provide free access to the rest of the world. In contrast, there are other types of Web Services that are intended for public consumption. For example, Fed-Ex™ has a public Web Service letting you track packages. You simply pass your tracking number to the Web Service and it returns a string containing tracking information.
At this point, you will build an ASP.NET XML Web Service and explore the technologies behind Web Services along the way.
Creating a Customer Orders Web Service
To create a .NET XML Web Service:
1. Launch Visual Studio .NET, and click the New Project button on the Start Page.
2. In the left pane of the New Project dialog (Figure 2), select Visual C# Projects or Visual Basic Projects, depending on the language you want to use. In the Templates pane on the right, select ASP.NET Web Service.
3. Notice
the Name text box is
disabled and contains the text “WebService1”, and
if you’re creating the Web Service on your local machine, the Location text box
contains the text “http://localhost/WebService1”. To change the name of the Web
Service, you must change the name of the directory in the Location text box.
Change the name “WebService1” to “Customer Orders Web Service, and then click
the OK button.
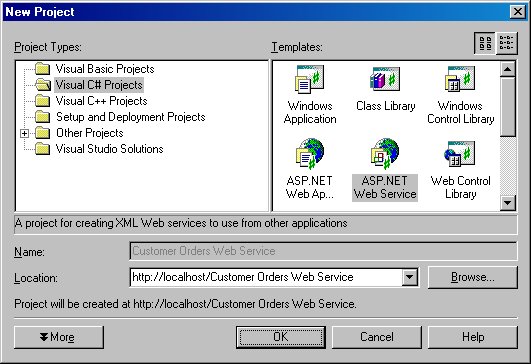
Figure 2. You can choose to create a C# or Visual Basic ASP.NET Web Service in the New Project dialog.
At this point, Visual Studio .NET briefly displays the Creating the Web dialog while it creates a new ASP.NET Web Service from the template you have selected. After a few moments, a new Web Service file is displayed in the IDE (Figure 3).
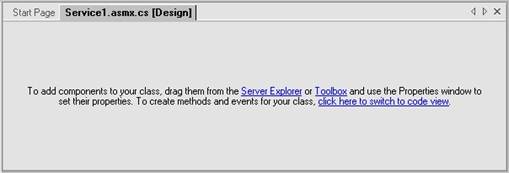
Figure 3. VS .NET automatically creates a Web Service file when you create a new ASP.NET Web Service.
Rename this Web Service file so it’s a little more descriptive. To do this, with the Web Service file selected in design mode, go to the Properties Window and change the Name property from “Service1” to “CustomerOrders” (Figure 4).

Figure 4. You change the name of the Web Service in the Visual Studio .NET Properties Window.
You’ll take a closer look at this file soon, but you need to do a little housekeeping first.
Renaming the project namespace
When you create a new Web Service, ASP.NET automatically sets your project’s namespace to the same name as your project (as it also does when building Windows Forms and Web Forms applications). To change the default namespace in VB .NET, you must first close the CustomerOrders page (you don’t need to do this in a C# project). Next, go to the Solution Explorer and right-click on the project (the second node from the top). From the shortcut menu, select Properties, which launches the Property Pages dialog. In the left pane of the dialog, under the Common Properties folder, select General if it’s not already selected.
If you’re using C#, in the right pane, change the Default Namespace from “Customer_Orders_Web_Service” to “HW.NetBook.Samples”. If you’re using Visual Basic .NET, in the right pane, change the Root namespace to “HW.NetBook.Samples”. When you’re done, click the OK button to save changes.
To change all existing references to the original namespace, from the main menu select Edit | Find and Replace | Replace in Files. In the Replace In Files dialog’s Find what text box, enter “Customer_Orders_Web_Service”. In the Replace with text box, enter “HW.NetBook.Samples”, (make sure you enter this with the exact case shown here). Click the Replace All button. This launches a warning dialog—simply press OK to ignore the warning. When the find and replace is finished, it displays a dialog indicating how many occurrences were replaced. If you’re using C#, it should say “4 occurrence(s) replaced”. If you’re using Visual Basic .NET, it should say “2 occurrence(s) replaced”. Click the OK button to close these dialogs.
Web Service virtual directories
When you use Visual Studio .NET to create a Web Service, it automatically creates a virtual directory for you.
![]()
For more information on virtual directories, see Chapter 10, “Building Web Applications with ASP.NET”.
This virtual directory contains your new Web Service project and related files (Figure 5). However, as with Web Forms applications, the actual Solution file is stored in a subfolder of the “My Documents\Visual Studio Projects\” directory. Again, this means when you reopen your Web Application after restarting Visual Studio, you will find your solution in this folder.
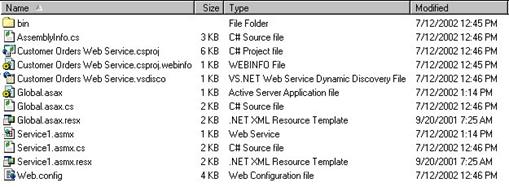
Figure 5. Visual Studio .NET places a variety of files in your Web Service’s virtual directory.
Before taking a closer look at these files first take a behind-the-scenes look at the Web Service file.
A closer look at the Web Service file
You can view a Web Service file in either design view or code view. To switch to code view, you select the click here to switch to code view hyperlink on the page or right-click the file and select View Code from the shortcut menu. When you do this, you should see the following class definition in C#:
public class CustomerOrders: System.Web.Services.WebService
{
public CustomerOrders ()
{
//CODEGEN: This call is required by the ASP.NET Web Services Designer
InitializeComponent();
}
// WEB SERVICE EXAMPLE
// The HelloWorld() example service returns the string Hello World
// To build, uncomment the following lines then save and build the project
// To test this web service, press F5
// [WebMethod]
// public string HelloWorld()
// {
// return "Hello World";
// }
}
And in Visual Basic .NET:
Public Class CustomerOrders
Inherits System.Web.Services.WebService
' WEB SERVICE EXAMPLE
' The HelloWorld() example service returns the string Hello World.
' To build, uncomment the following lines then save and build the project.
' To test this web service, ensure that the .asmx file is the start page
' and press F5.
'
'<WebMethod()> Public Function HelloWorld() As String
' HelloWorld = "Hello World"
' End Function
End Class
As you can see, this code defines a class named CustomerOrders derived from the .NET Framework’s System.Web.Services.WebService class. Also notice the method that is commented out at the bottom of the class definition. As described in the comments above it, you can uncomment this code and then build and run this sample Web Service, which you will do in the next section
Running the “Hello World” Web Service
To run the sample “Hello World” Web Service, select all of the commented code in the HelloWorld method (including the WebMethod attribute), and then click VS .NET’s Uncomment icon button (Figure 6). Alternately, to uncomment code, you can select Edit | Advanced | Uncomment Selection from the main menu.

Figure 6.You can use the “Uncomment” button to uncomment selected lines of code.
To save, build, and run the Web Service in one step, just press the F5 button. After a few moments, a Web Service help page displays in your Web browser. This page lists all of your Web Service methods and gives you a link to Service method help pages that allow you to test your Web Service methods (very cool!).
What’s nice about this is the page is generated and displayed for any user who tries to call your Web Service without the proper parameters. You can try this for yourself by typing the URL of your Web Service into your browser’s Address box. For example:
http://localhost/Customer Orders Web Service/Service1.asmx
The upper portion of the Web Service help page (Figure 7) displays the name of your Web Service (CustomerOrders), and a single HelloWorld operation—this is the method that you just uncommented. It also displays a warning about changing the default namespace of your Web service—you’ll do this a bit later.
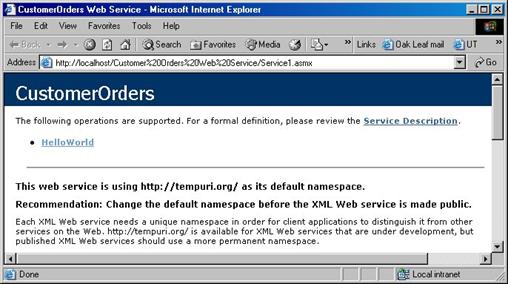
Figure 7. Visual Studio .NET creates a Web Service help page customized to your Web Service.
To test the Web Service, click the HelloWorld hyperlink. This displays the Service method help page (Figure 8), which includes a description of the operation and an Invoke button that allows you to test the Web Service.
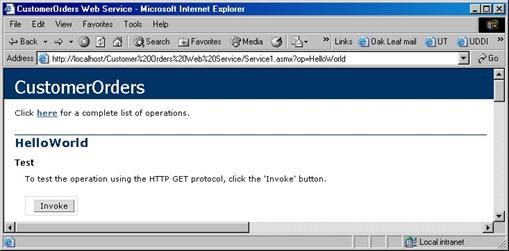
Figure 8. The Service method help page displays a description of the operation and an Invoke button that allows you to call the Web Service method.
At this point, click the Invoke button. Behind the scenes, the Service method help page calls the HelloWorld test method and displays the return value in a new browser window (Figure 9).
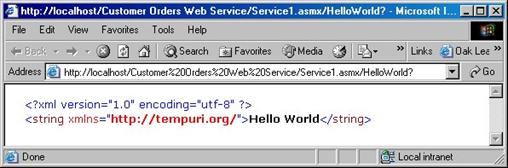
Figure 9. The Service method help page launches another browser window that displays the return value passed back from the Web Service method.
As you can see, although the code in the HelloWorld method returns a simple string, it is converted into XML when it returns to the Web Service caller. At this point, close the Browser window, so you can work further with the Web Service project.
Web Service project files
Now that you’ve created a simple .NET Web Service, take a quick look at the files within a Web Service project.
The global.asax file automatically added to your Web Service project by Visual Studio .NET is exactly the same as the global.asax file that it includes in new Web Forms projects. The same is also true of the Web.config file. If you create a new Web Service project and compare these files to a new Web Forms project, you’ll find no differences. For more information on these files, see Chapter 10, “Building Web Applications with ASP.NET”.
The vsdisco file
There is one file you’ll find in Visual Studio .NET Web Service projects you won’t find in a Web Forms application—the vsdisco file. This file is a Web Services discovery file used by Visual Studio .NET as it searches through folders on your development Web server looking for available XML Web Services.
If you look in the Solution Explorer, you will see a file named “Customer Orders Web Service.vsdisco”. If you double-click this file, VS .NET opens it in the IDE. By default, it contains the following XML data:
<?xml versio_="1.0" encodi_g="utf-8" ?>
<dynamicDiscovery xmlns="urn:schemas-dynamicdiscovery:disco.2000-03-17">
<exclude pa_u104
?="_vti_cnf" />
<exclude
pa_h="_vti_pvt" />
<exclude pa_u104
?="_vti_log" />
<exclude pa_u104
?="_vti_Ucript" />
<exclude pa_h="_vti_txt" />
<exclude pa_u104 ?="Web References" />
</dynamicDiscovery>
As you can see, the file contains a <dynamicDiscovery> root node with several <exclude> child nodes. The <exclude> nodes contain a relative path to folders VS .NET should not search when it’s going through the directories on your Web server looking for Web Services.
For more information, see the .NET Help topic “Deploying XML Web Services in Managed Code”.
Using business objects
Now it’s time to reference and use the business objects
you created in Chapter 9, “Building .NET Windows Forms Applications”. Again,
there are a number of ways to accomplish
this, but the easiest method is adding the business object source code files to
the Web
Service project.
To add these source code files, right-click on your Web Service project in the Solution Explorer and select Add | Add Existing Item from the shortcut menu. In the Add Existing Item dialog, navigate to the “Simple Windows Application” directory you created in the previous chapter, and select the three business object source code files (Figure 10). These are Business.cs, Data.cs, and OrdersBusiness.cs. If you created a Visual Basic .NET Windows Forms application, these files will have a “vb” extension rather than a “cs” extension. After selecting all three files, click the Open button.
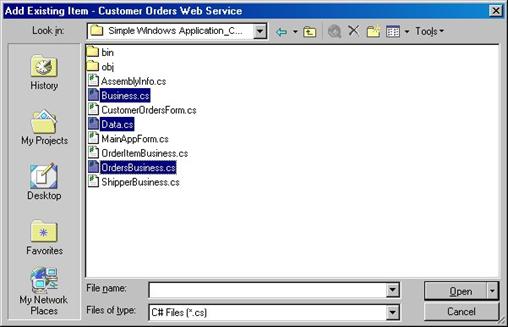
Figure 10. You can add files belonging to one .NET project to any other .NET project
After clicking the Open button, the three files should be listed in the Solution Explorer.
![]()
Typically, with business objects that are going to be used from multiple projects, you should create a separate Class Library project in Visual Studio .NET and add your business object source code files to this project. You can then compile a DLL containing just your business object classes. This DLL can then be referenced from multiple projects
Creating custom Web methods
Now, you’re ready to add to the WebService file a
custom Web method that instantiates and calls a method of the Orders business
object. First, go back to the code-behind file (Service1.asmx.cs or
Service1.asmx.vb), and comment out the HelloWorld method you previously
uncommented. Make sure you also comment out the line containing “[WebMethod]”.
For more information on this attribute, see the section “The WebMethod attribute” later in this
chapter.
Next, add the following namespace reference to the top of the code-behind file so you can access the Orders business object class.
In C#:
using HW.NetBook.Samples.Business;
In Visual Basic .NET:
Imports HW.NetBook.Samples.Business
Now, add the following method to the bottom of the CustomerOrders WebService class definition—make sure it’s directly below the commented out Hello World Web Method.
In C#:
[WebMethod (Description="Returns orders for the specified customer")]
public DataSet GetOrdersByCustomerID(string custID)
{
// Instantiate the Orders business object
Orders OrderObj = new Orders();
// Call its GetOrdersByCustomerID method
return OrderObj.GetOrdersByCustomerID(custID);
}
In Visual Basic .NET:
<WebMethod(Description:="Returns orders for the specified customer")> _
Public Function GetOrdersByCustomerID(ByVal custID As String) As DataSet
' Instantiate the Orders business object
Dim OrderObj As New Orders()
' Call its GetOrdersByCustomerID method
Return OrderObj.GetOrdersByCustomerID(custID)
End Function 'GetOrdersByCustomerID
This Web method instantiates the Orders business object and calls its GetOrdersByCustomerID method, passing the custID value it receives from the client calling the Web Service. Notice the method specifies a DataSet as the return value. Even though the return value is specified to be a DataSet, if you call the Web Service, you actually get the DataSet returned in XML format.
Unfortunately, Visual FoxPro 7 cannot work with the XML returned from a Web Service in this fashion (this should be fixed in Visual FoxPro 8). If you want to create a Web Service that a Visual FoxPro 7 client can consume, you explicitly convert the DataSet to XML and return the XML string from the Web Service method as shown in the following code (for this example, I leave the GetOrdersByCustomerID method returning a DataSet as shown above).
In C#:
[WebMethod (Description="Returns orders for the specified customer")]
public string GetOrdersByCustomerID(string custID)
{
// Instantiate the Orders business object
Orders OrderObj = new Orders();
// Call its GetOrdersByCustomerID method
DataSet dsOrders = OrderObj.GetOrdersByCustomerID(custID);
return dsOrders.GetXml();
}
And in Visual Basic .NET
<WebMethod(Description:="Returns orders for the specified customer")> _
Public Function GetOrdersByCustomerID(ByVal custID As String) As String
' Instantiate the Orders business object
Dim OrderObj As New Orders()
' Call its GetOrdersByCustomerID method
Dim dsOrders As DataSet = OrderObj.GetOrdersByCustomerID(custID)
Return dsOrders.GetXml()
End Function
Before taking a closer look at what happens behind the scenes with the Web Service, first look at the WebMethod and WebService attributes.
The WebMethod attribute
If you place a WebMethod attribute directly above a method declaration, the method is exposed by Visual Studio .NET as a public method of the XML Web Service. A WebService class can have multiple methods, but only those that possess the WebMethod attribute are exposed as part of the Web Service.
As you can see in the new method you created, the WebMethod attribute also allows you to specify a method description. Table 1 lists other properties of the WebMethod attribute that you can also set.
Table 1. WebMethod
properties
|
Property |
Description |
Default |
|
BufferResponse |
Specifies if ASP.NET should buffer the entire response before sending it to the client. |
true |
|
CacheDuration |
Specifies if the result set of each unique parameter set should be cached, and if so, for how many seconds. |
0 |
|
Description |
Gives a description for the Web Service method. |
“” |
|
EnableSession |
Specifies if session state is enabled for a Web Service method. |
false |
|
MessageName |
Specifies an alias for an overloaded method name. |
“” |
|
TransactionOption |
Specifies transaction options for a Web Service method. Possible values are: · Disabled · Not Supported · Supported · Required · RequiresNew |
Disabled |
For more information on each of these properties, see the .NET Help topic “Using the WebMethod Attribute”.
The WebService attribute
As shown in Figure 7 earlier in this chapter, when you run the HelloWorld Web Service, the Web Service test page displays a warning about changing the name of the Web Service’s namespace from “http://tempuri.org/” to your own, unique namespace. To do this, you need the WebService attribute.
The WebService attribute is applied to a Web Service by placing it directly above the Web Service class definition. For example, place the following attribute definition above the CustomerOrders WebService class definition.
In C#:
[WebService(Namespace="http://servername/xmlwebservices/",
Description="Customer Orders Web Service")]
In Visual Basic .NET:
<WebService(Namespace:="http://servername/xmlwebservices/", _
Description:="Customer Orders Web Service")> _
The first part of the WebService attribute declaration specifies the Namespace property. Specifying this value replaces the Web Service’s default “http://tempuri.org/” namespace. When creating a Web Service, you can specify your own unique URL by using the Namespace property. As shown in the second line of the declaration, you can also specify a Description property, which provides a description for the entire Web Service class.
Running the Customer Orders Web Service
Now you’re ready to run the Customer Orders Web Service. To do this, press the F5 key to save all changes, compile the Web Service application, and run it. When your browser is launched, you should see the Web Service help Page shown in Figure 11.
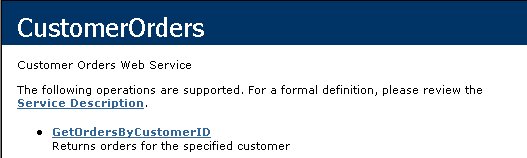
Figure 11. The WebService and WebMethod attributes allow you to specify descriptions (and other properties) for your Web Service and its methods.
Notice the top of the page displays the name of the Web Service class, “CustomerOrders”. Beneath the name is the description you supplied in the WebService attribute. At the bottom of the page is the GetOrdersByCustomerID along with the description you supplied in the WebMethod attribute.
If you click on the GetOrdersByCustomerID link, the Service method help page is displayed (Figure 12).

Figure 12. The Service method help page displays a user input control for each parameter of your Web Service method.
As you can see, the Service Method help page displays an input text box for each parameter of a Web Service method. In this case, you just have one—custID. Enter the value “QUICK” in the custID text box, and then click the Invoke button. A new browser window displays the XML returned from the method (Figure 13).

Figure 13. The Service method help page launches a second browser window that contains the XML returned from the CustomerOrders Web Service.
The Web Services Description Language (WSDL) file
Now that you’ve created and tested a Web Service, you can take a closer look behind the scenes at some of the standards that make XML Web Services possible. I’ll start with the Web Services Description Language (WSDL) file.
A Web Service’s WSDL file (pronounced “wis-dle”) is roughly equivalent to a COM server’s type library. Remember, a type library describes the classes and methods publicly available in a COM server. In the same way, a WSDL file (also known as a service description document) describes the public classes and methods available in a Web Service.
Type libraries work great for COM servers, but they are Microsoft-specific—and Web Services are not. So, when the W3C committee chose a format to describe Web Services, they chose XML—a widely accepted, platform-neutral, extensible standard. WSDL defines an XML grammar for describing Web Services.
If you want to view your Web Service’s WSDL file, you do so from the Web Service help page (Figure 11). If you click the Service Description link, it launches a browser window that displays your Web Service’s WSDL file (Figure 14).
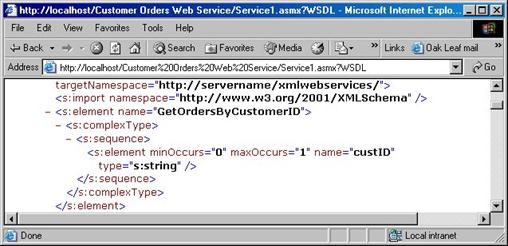
Figure 14. Visual Studio .NET automatically generates a WSDL file for your Web Services.
As shown in Figure 14, the WSDL file contains information on each public method, along with the method’s parameters and return value (not shown in the figure). By default, when you create a Web Service in Visual Studio .NET, your WSDL file is dynamically generated. You can also create a WSDL file, place it on your Web server, and make its location known to your customers (or the general public) so they can download the file and determine how to access your Web Service.
A full explanation of the structure and contents of a WSDL file is beyond the scope of this book. For more information, see the .NET Help topic “XML Web Service Description”, which also contains a link to the WSDL specification (http://www.w3.org/TR/wsdl).
SOAP
Another XML-based standard key to Web Services is Simple Object Access Protocol (SOAP). SOAP is a protocol for exchanging structured and type information on the Web.
You can actually view some of the SOAP formatting for your Web Service from the Service Method Help Page. For example, here is the SOAP request and response shown on the GetOrdersByCustomerID Service Method Help Page.
Here is the SOAP request:
POST /Customer%20Orders%20Web%20Service/Service1.asmx HTTP/1.1
Host: localhost
Content-Type: text/xml; charset=utf-8
Content-Length: length
SOAPAction: "http://servername/xmlwebservices/GetOrdersByCustomerID"
<?xml version="1.0" encoding="utf-8"?>
<soap:Envelope xmlns:xsi="http://www.w3.org/2001/XMLSchema-instance" xmlns:xsd="http://www.w3.org/2001/XMLSchema" xmlns:soap="http://schemas.xmlsoap.org/soap/envelope/">
<soap:Body>
<GetOrdersByCustomerID xmlns="http://servername/xmlwebservices/">
<custID>string</custID>
</GetOrdersByCustomerID>
</soap:Body>
</soap:Envelope>
And here is the SOAP response:
HTTP/1.1 200 OK
Content-Type: text/xml; charset=utf-8
Content-Length: length
<?xml version="1.0" encoding="utf-8"?>
<soap:Envelope xmlns:xsi="http://www.w3.org/2001/XMLSchema-instance" xmlns:xsd="http://www.w3.org/2001/XMLSchema" xmlns:soap="http://schemas.xmlsoap.org/soap/envelope/">
<soap:Body>
<GetOrdersByCustomerIDResponse xmlns="http://servername/xmlwebservices/">
<GetOrdersByCustomerIDResult>
<xsd:schema>schema</xsd:schema>xml</GetOrdersByCustomerIDResult>
</GetOrdersByCustomerIDResponse>
</soap:Body>
</soap:Envelope>
For more information on the SOAP standard, check out the .NET Help topic “XML Web Service Wire Formats”, which contains a link to the W3C Web site (http://www.w3.org/soap).
Consuming Web Services
As mentioned earlier in this chapter, desktop applications, Web applications, or other Web Services can consume Web Services. In this section, you will create a desktop application that accesses the Customer Orders Web Service.
The ability to access a Customer Orders Web Service from a desktop application can be extremely useful. For example, if you have placed orders with one of your suppliers, it would be great to call a Web Service on your supplier’s Web site that allowed you to retrieve all of your orders and display them within one of your own desktop applications. This is good for your supplier, because they don’t have to pay a humanoid to research the information and send it to you. It’s also good for you, because not only can you display this information in your own custom application, you can now manipulate and store the information in your own database.
Before going any further, close your Web Service application. Next, to create a new Windows Application, from the Start Page of VS .NET, click the New Project button. In the left pane of the New Project dialog, select either Visual C# Projects or Visual Basic Projects. In the Templates pane on the right, select Windows Application. In the Name text box, enter “WinForms Web Service Consumer”, and specify the desired location for your new project in the Location text box (Figure 15). When you’re done, click the OK button to create your new Windows application.
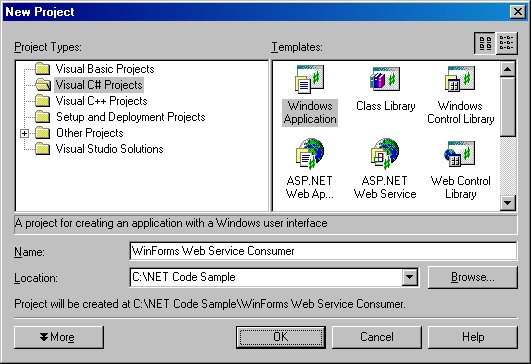
Figure 15. You can consume a Web Service from a Windows application (shown here), a Web Forms application, or another Web Service.
When Visual Studio .NET finishes creating your new project, you see a new form named “Form1” in the IDE. You will use this form to display the user interface controls and call the Web Service. This is different than what you did in Chapter 9, “Building .NET Windows Forms Applications”, because in this case, you just need a bare bones application to call your Web Service. First, you need to make a few changes to the form. With the form selected in the IDE, go to the Properties Window, change the Name property to “WebServiceConsumerForm”, the Size property to 640, 260, and the Text property to “Web Service Consumer”.
Now you need to perform one additional step, which is different depending on whether you’re using C# or Visual Basic .NET. In C#, right-click on the form and select View Code from the shortcut menu. At the bottom of the code-behind file, find the line of code that calls Application.Run:
Application.Run(new Form1());
And change it to:
Application.Run(new WebServiceConsumerForm());
In Visual Basic .NET, go to the Solution Explorer, right-click the project node (second from the top), and select Properties from the shortcut menu. This launches the Property Pages dialog. In the left pane, under the Common Properties node, select General. In the right pane, change the Startup Object to “WebServiceConsumerForm”, and then click OK to save the change.
Now select Form1 in design mode and drag and drop a DataGrid control from the VS .NET Toolbox onto the form. If the Toolbox is not visible in the IDE, select View | Toolbox from the main menu. Change the DataGrid properties to the values shown in Table 2.
Table 2. DataGrid properties
|
Property |
Value |
|
Name |
grdOrders |
|
Location |
40, 30 |
|
Size |
550, 140 |
Next, drag a Button from the VS .NET Toolbox to the form and set its properties to the values shown in Table 3.
Table 3. Button properties
|
Property |
Value |
|
Name |
btnCallWS |
|
Location |
345, 195 |
|
Size |
100, 23 |
|
Text |
Call Web Service |
Next, drag and drop a TextBox from the Toolbox onto the form and sets its properties to the values shown in Table 4.
Table 4. Text Box properties
|
Property |
Value |
|
Name |
txtCustomerID |
|
Location |
185, 195 |
|
Size |
135, 20 |
|
Text |
(empty string) |
When you’re done, your form should look like the form shown in Figure 16.
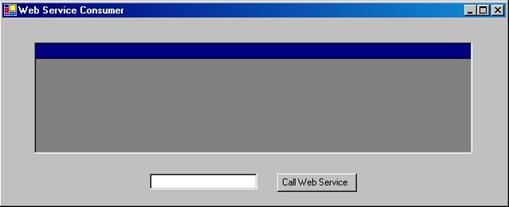
Figure 16. This Windows form is used to access the Customer Orders Web Service.
Adding a reference to the Web Service
Now it’s time to add a reference to the Customer Orders Web Service to your project. To do this, go to Solution Explorer, right-click the References node, and select Add Web Reference from the shortcut menu (Figure 17).

Figure 17. You can add a reference to a Web Service to your project by right-clicking References in the Solution Explorer and selecting Add Web Reference from the shortcut menu.
Selecting this option launches the Add Web Reference dialog. The left pane of the dialog displays information about the UDDI Directory. You’ll look at this later, but for now, you just want to reference the local Customer Orders Web Service.
The Address combo box at the top of the dialog allows you to select a previously used Web Service or enter a URL and file name for the Web Service you want to reference. In this case, you want to enter a reference to your Web Service’s .asmx file:
http://localhost/Customer Orders Web Service/Service1.asmx
When you enter this URL and press enter, it shows the familiar Web Service help page displaying a description of the Web Service and its operations (Figure 18). In the right pane, there are View Contract and View Documentation hyperlinks. If you click the View Contract link, it displays the WSDL file in the dialog’s left pane. If you click the View Documentation link, it displays any extra documentation you created for your Web Service.
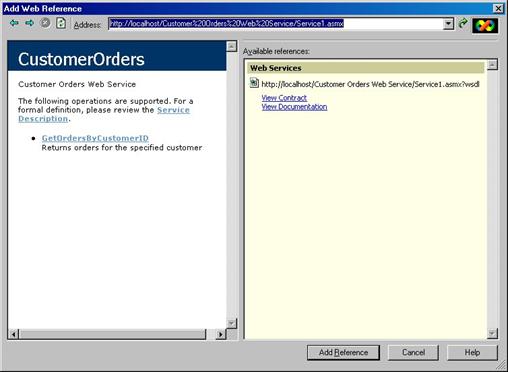
Figure 18. The Add Web Reference dialog allows you to search for Web Services you can reference in your .NET projects.
To add a reference to the Customer Orders Web Service to your project, click the Add Reference button. If you look in the Solution Explorer, you can see this adds a new localhost node containing three new files (Figure 19). Visual Studio.NET uses the name of this node as part of the namespace for the Web Service so, rename it to something more informative. To do this, right-click on the localhost node, select Rename from the shortcut menu, and then rename the node from “localhost” to “CustomerOrdersWebService”.
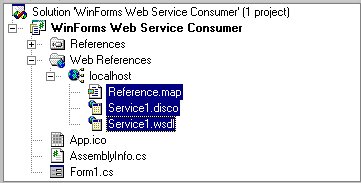
Figure 19. Adding a Web Reference to your project adds three new files to your project.
Now, take a closer look at the files added to the project. In order to see all of the file detail, click the Show All Files button at the top of the Solution Explorer (Figure 20).
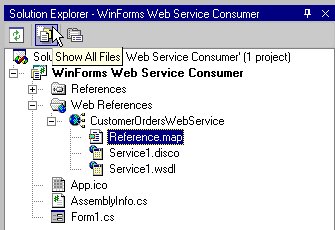
Figure 20. Click the Show All Files button to display all file detail in your project.
Expand the CustomerOrdersWebService node, and you’ll see three files. Reference.map is an XML file that maps URLs to local cached copies of the Service1.disco and Service1.wsdl files. Service1.disco is a Web Service discovery file. For more information on .disco files, see the “Web Services Discovery” section later in this chapter. Service1.wsdl is a local copy of the Customer Orders Web Service WSDL file.
If you expand the Reference.map node, you’ll see a file named Reference.cs (or Reference.vb). Open this file by double-clicking it and you’ll see the definition of a class named CustomerOrders based on the .NET Framework’s SoapHttpClientProtocol class.
In C# (shown partially):
public class CustomerOrders :
System.Web.Services.Protocols.SoapHttpClientProtocol
{
...
}
And in Visual Basic .NET (shown partially):
Public Class CustomerOrders
Inherits System.Web.Services.Protocols.SoapHttpClientProtocol
...
End Class
This is a proxy class you can use to call methods on the Customer Orders Web Service. When you call a Web Service method, you don’t actually call the method on a Web Service’s object directly. Rather, you instantiate a local proxy class (based on the .NET Framework’s SoapHttpClientProtocol class) that passes the call on to the Web Service (Figure 21).
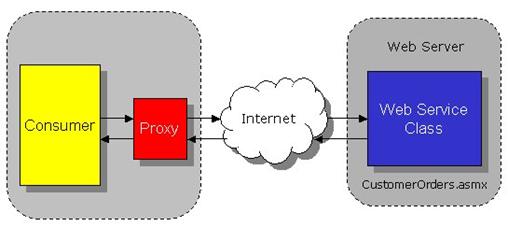
Figure 21. When you add a Web Service reference to your project, VS .NET automatically creates a local proxy class that you can use to indirectly call methods of the Web Service.
Calling the Web Service
Now you’re ready to add code to the form to call the Web Service. To do this, select the Form1.cs [Design] tab (or Form1.vb), and double-click the Call Web Service button. This adds a new btnCallWS_Click event handler method to the form.
Before adding code to this method, go to the top of the form and add a reference to the CustomerOrders proxy class’ namespace.
In C#:
using WinForms_Web_Service_Consumer.CustomerOrdersWebService;
And in Visual Basic .NET:
Imports WinForms_Web_Service_Consumer.CustomerOrdersWebService
Now, go back to the bottom of the code-behind file and add code to the btnCallWS_Click event handler method.
In C#:
private void btnCallWS_Click(object sender, System.EventArgs e)
{
// Instantiate the Web Service proxy class
CustomerOrders CustomerOrdersWS = new CustomerOrders();
// Call the Web Service and store the returned DataSet into dsOrders
DataSet dsOrders =
CustomerOrdersWS.GetOrdersByCustomerID(this.txtCustomerID.Text);
// Bind the DataSet to the Orders DataGrid
this.grdOrders.SetDataBinding(dsOrders, dsOrders.Tables[0].TableName);
}
And in Visual Basic .NET:
Private Sub btnCallWS_Click(ByVal sender As System.Object, _
ByVal e As System.EventArgs) Handles btnCallWS.Click
' Instantiate the Web Service proxy class
Dim CustomerOrdersWS As New CustomerOrders()
' Call the Web Service and store the returned DataSet into dsOrders
Dim dsOrders As DataSet = _
CustomerOrdersWS.GetOrdersByCustomerID(Me.txtCustomerID.Text)
' Bind the DataSet to the Orders DataGrid
Me.grdOrders.SetDataBinding(dsOrders, dsOrders.Tables(0).TableName)
End Sub 'btnCallWS_Click
In this method, the first line of code instantiates the CustomerOrders Web Service proxy object. The next line calls the Web Service, passing the value stored in the Customer ID text box, and storing the return value in the dsOrders DataSet. The last line of code binds the DataSet to the DataGrid.
Running the Customer Orders Web Service consumer
Now it’s time to run the Customer Orders Web Service consumer project. To do this, press F5, and Visual Studio .NET automatically saves all changes, compiles the project, and runs it. To test the Web Service, once the form displays, enter the text “QUICK” in the text box, and then click the Call Web Service button (Figure 22).
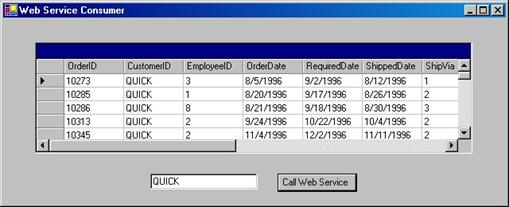
Figure 22. The Web Service Consumer form calls
the Customer Orders Web
Service to retrieve the orders for the specified customer, and then displays
them
in the DataGrid.
If this is the first time your Web server has started up, it will take several seconds before any records are displayed in the DataGrid. However, subsequent calls should respond far more quickly (you can try other customer IDs such as “QUEEN”, “OCEAN”, and “CHOPS”).
Before continuing to the next section, close the Web Service Consumer form to avoid any conflicts.
Web Services Discovery
Do you want to be discovered or not? If your Web Service is of a private nature, you probably don’t. You will only inform your business associates of its existence and not tell the rest of the world. However, you may want to create a Web Service intended for public consumption. How can others learn about your Web Service and the details of how to call its methods? This is accomplished by a process called discovery.
Discovery with UDDI
Universal Description, Discovery, and Integration (UDDI) is a registry that allows you to locate Web Services. If you have a Web Service you want to make public, you register information about your Web Service in the UDDI directory, and others can learn about your Web Service by searching the UDDI registry.
As you saw earlier in this chapter, when you add a Web Reference to your project, Visual Studio .NET provides an interface you can use to search the UDDI directory. Let’s go back to this form and use it to search the UDDI directory.
Right-click the Add References node in the Solution Explorer and select Add Web Reference from the shortcut menu. This displays the Add Web Reference dialog (Figure 23).
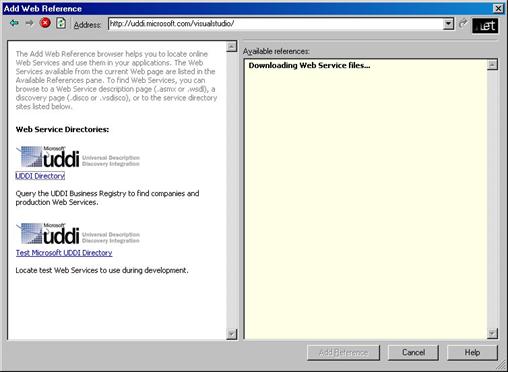
Figure 23. The Add Web Reference dialog allows you to search the UDDI directory for Web Services exposed on the Internet.
In the left pane there are two hyperlinks. The UDDI Directory link allows you to search for “real, live” Web Services, and the Test Microsoft UDDI Directory link allows you to search for “test” Web Services. Click the UDDI Directory link and the message “Downloading Web Service Files” appears in the right pane. After several seconds, the UDDI Search Tool is displayed in the left pane (Figure 24).
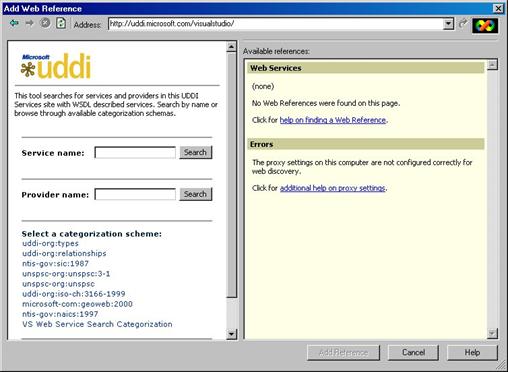
Figure 24. The UDDI search tool allows you to search for Web Services by name or by category.
The UDDI search tool allows you to search for Web Services by
Service name, Provider Name, or category. For example, type the word “weather”
into the Service Name text
box and click the Search
button. As of the writing of this book, several weather Web Services registered
with UDDI are displayed in the left pane of the Add
Web Reference dialog
(Figure 25).

Figure 25. There are multiple weather services registered with UDDI.
Pick the “Weather Retriever” Web Service from the list (if you don’t see this specific Web Service, just choose another one). Expand the node of the “Weather Retriever” Web Service and you will see a more detailed description of the Web Service (Figure 26). The Service Description details that this Web Service retrieves Weather information based on a specific zip code. Also, notice the link displayed under “Interface definitions” references an .asmx file. It tells you that this is a .NET Web Service (although it doesn’t have to be a .NET Web Service to work properly in this example!)
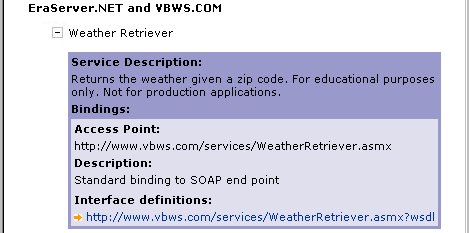
Figure 26. Clicking the Interface definitions link enables the Add Reference button, allowing you to add a Web Service reference to your project.
Adding a Web Service reference from UDDI
If you click the Interface definitions link, the message “Downloading Web Service files…” appears in the right pane. After several seconds, the Web Services WSDL file appears in the left pane, and the Add Reference dialog is enabled. Click the Add Reference button to add a reference to the Weather Fetcher Web Service to your project. When you do this, Visual Studio .NET adds three files to your project. Notice the URL for the Web Service is shown in reverse order (Figure 27).
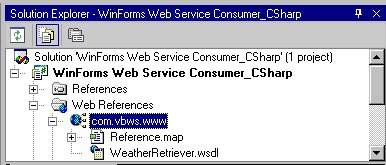
Figure 27. The URLs for Web References added to your project by Visual Studio.NET are shown in reverse order.
When you added the local Customer Orders Web Service to the project, you renamed the “localhost” node to something more descriptive because it is used as the namespace of the Web Service proxy class. However, with this public Web Service, leave the name “as is” because it provides a unique namespace.
Next, you’ll add some user interface controls to your project’s Form1 that allow you to call the Weather Retriever Web Service and display its results. Drag and drop the controls listed in Table 5 from the Visual Studio.NET Toolbox onto the form and set the corresponding properties listed in the table.
Table 5. Weather Web Service user interface controls
|
Control |
Property |
Value |
|
GroupBox |
|
|
|
|
Name |
grpWeather |
|
|
Location |
40, 249 |
|
|
Size |
540, 165 |
|
|
Text |
Weather |
|
Label |
|
|
|
|
Name |
lblZipCode |
|
|
AutoSize |
True |
|
|
Location |
80, 30 |
|
|
Text |
Zip Code: |
|
TextBox |
|
|
|
|
Name |
txtZipCode |
|
|
Location |
145, 28 |
|
|
Size |
135, 20 |
|
|
Text |
(empty string) |
|
Button |
|
|
|
|
Name |
btnCallWS2 |
|
|
Location |
305, 28 |
|
|
Size |
100, 23 |
|
|
Text |
Call Web Service |
|
TextBox |
|
|
|
|
Name |
txtWeather |
|
|
Location |
25, 70 |
|
|
MultiLine |
True |
|
|
Size |
490, 75 |
Calling the Web Service
Now you are ready to add code to the form that calls
the Web Service and displays the
result. Double-click the btnCallWS2 button to automatically add a new event
handler
method named btnCallWS2_Click to the form’s code-behind file. Before adding
code to
this method, go to the top of the code-behind file and add a reference to the
Web Service proxy object’s namespace.
In C#:
using WinForms_Web_Service_Consumer.com.vbws.www;
And in Visual Basic .NET:
Imports WinForms_Web_Service_Consumer_Visual_Basic.com.vbws.www
Now add the following code to the btnCallWS2_Click method at
the bottom of the
code-behind file.
In C#:
private void btnCallWS2_Click(object sender, System.EventArgs e)
{
// Instantiate the WeatherRetriever Web Service proxy
WeatherRetriever WeatherRetrieverWS = new WeatherRetriever();
// Call the Web Service's GetWeather method
CurrentWeather WeatherReport =
WeatherRetrieverWS.GetWeather(this.txtZipCode.Text);
// Display the results
this.txtWeather.Text = WeatherReport.Conditions + "\r\n" +
"Temperature: " + WeatherReport.CurrentTemp + "\r\n" +
"Humidity: " + WeatherReport.Humidity + "\r\n" +
"Barometer: " + WeatherReport.Barometer + "\r\n" +
"Barometer Direction: " + WeatherReport.BarometerDirection;
}
And in Visual Basic .NET:
Private Sub btnCallWS2_Click(ByVal sender As System.Object, _
ByVal e As System.EventArgs) Handles btnCallWS2.Click
' Instantiate the WeatherRetriever Web Service proxy
Dim WeatherRetrieverWS As New WeatherRetriever()
' Call the Web Service's GetWeather method
Dim WeatherReport As CurrentWeather = _
WeatherRetrieverWS.GetWeather(Me.txtZipCode.Text)
' Display the results
Me.txtWeather.Text = WeatherReport.Conditions & ControlChars.CrLf & _
"Temperature: " & WeatherReport.CurrentTemp & ControlChars.CrLf & _
"Humidity: " & WeatherReport.Humidity & ControlChars.CrLf & _
"Barometer: " & WeatherReport.Barometer & ControlChars.CrLf & _
"Barometer Direction: " & WeatherReport.BarometerDirection
End Sub
Running the Web Service consumer
Now you’re ready to run the Web Service. To do this, just press F5 to save all changes, compile the project, and run the application. When the form is displayed, enter a zip code in the Zip Code text box (for example, “22903”), and then click the Call Web Service button. After several seconds, you should see the weather report for the specified zip code displayed in the text box at the bottom of the form (Figure 28).
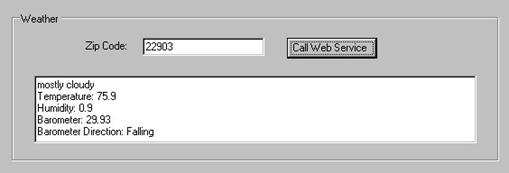
Figure 28. This form demonstrates how to call a public Web Service discovered by means of UDDI.
Conclusion
As you see from this chapter, Microsoft has made it very easy to both publish and consume Web Services in Visual Studio.NET. Although you may not initially find a use for Web Services in your application, as they become more and more mainstream, and as new, reliable Web Services become more prevalent, you may find they give your desktop and Web applications a level of interoperability they’ve never had before.