Chapter
13
Error Handling and Debugging in .NET
Error handling in .NET is quite a bit different than error handling found in previous versions of VFP. However, both .NET and Visual FoxPro 8 have try…catch…finally blocks that provide a far more powerful and flexible way to handle errors in your application. This chapter also discusses Visual Studio .NET’s debugging tools. As you’ll see, many are similar to Visual FoxPro’s; some are better, and some are not!
Errors are part and parcel of software applications. However, in weakly typed languages such as Visual FoxPro, you are more likely to create code containing bugs than in strongly typed languages that find far more errors at compile time. However, even the best of compilers can’t find all of the logic errors you have in your code. In addition, problems can occur at runtime that have nothing to do with bugs in your code. At times resources are locked or unavailable, files become corrupt, and remote servers can go down. Your code needs to be able to handle all of these scenarios.
This is where error handling and debugging tools come to the rescue. This chapter discusses .NET error handling as well as Visual Studio .NET’s debugging tools that help you identify errors in your .NET applications.
Common errors vs. exceptions
There are errors and there are exceptions. Errors are common problems that occur in an application from which the application can easily recover. For example, a user may enter an invalid value and your application can display a message warning them of this. A connection to a database may have been left open and the application can simply close it.
In contrast, exceptions, as suggested by their name, are uncommon or exceptional errors from which the application cannot recover. For example, you may not be able to connect to the application’s database—this is exceptional, because the application is not be able to run properly without access to the data. A programmer may have passed an invalid value to a method—this is exceptional (hopefully!) and the method is not able to run.
In the case of common error handling, you should write defensive code that expects the expected and gracefully handles the problem. In the case of exceptions, you need to do something more. The following sections describe exception handling in .NET.
.NET Exceptions
In the .NET world, an exception is an object created when an error occurs in your application (this is also known as throwing an exception). The .NET Framework contains hundreds of different exception classes created when specific types of errors occur. With so many different exception classes, it’s not practical that you become intimately familiar with each and every one. Figure 1 shows just a few of the exception classes you commonly encounter and Table 1 gives a brief description of each of these classes. As you get more experience writing .NET applications, you learn about the most common exceptions quickly enough!
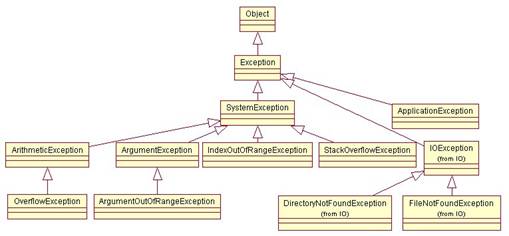
Figure 1. Common .NET Exception classes.
Table 1. Common Exception class descriptions
|
Property |
Description |
|
System.Exception |
The base class for all other exception classes. |
|
System.ApplicationException |
The base class for all custom exception classes you create. |
|
System.SystemException |
The base class for all predefined exceptions in the System namespace. |
|
System.ArithmeticException |
The base class for arithmetic, casting, or conversion operation errors. |
|
System.OverflowException |
The exception thrown when there is an overflow in arithmetic, casting, or conversion operation. |
|
System.ArgumentException |
The exception thrown when an invalid argument is passed to a method. |
|
System.IndexOutOfRangeException |
The exception thrown when an attempt is made to access an array element that is out of the bounds of the array. |
|
System.StackOverflowException |
The exception thrown when the stack overflows with too many pending method calls. This can occur if you have a recursive, infinite loop in your code. |
|
System.IO.IOException |
The base class for all I/O exceptions. |
|
System.IO.DirectoryNotFoundException |
The exception thrown when a directory cannot be found. |
|
System.IO.FileNotFoundException |
The exception thrown when a file cannot be found. |
Exceptions can be thrown by either the .NET Common Language Runtime or by an executing application. Some examples of CLR exceptions include ExecutionEngineException, StackOverflowException, and OutOfMemoryException. These exceptions are usually of such a critical nature that the application cannot recover from them. For more information, see the .NET Help topics for each of these classes.
Catching exceptions with try…catch…finally
.NET provides structured exception handling in the form of try…catch…finally blocks in both C# and Visual Basic .NET that allow you to catch and respond to exceptions thrown in your application. These blocks should be used to catch exceptions—not common errors. Here is a template showing how these try…catch…finally blocks are structured.
In C#:
try
{
// Contains regular application code
}
catch
{
// Contains error handling code
}
finally
{
// Contains any cleanup code needed to close resources such
// as files and connections that were opened in the try block
}
And in Visual Basic. NET:
Try
' Contains regular application code
Catch
' Contains error handling code
Finally
' Contains any cleanup code needed to close resources such
' as files and connections that were opened in the try block
End Try
The following sections explain what the try, catch, and finally blocks are and how they can be used in your applications.
The try block
You can surround any code that has the potential to cause an exception with a try block. A good example is trying to create a connection to a database. For any number of reasons, including the possibility that the database server is down, you may encounter an error when you attempt to connect to a database.
The catch block
As mentioned previously, when an error occurs in your application, a corresponding exception class representing that specific error is instantiated. The catch block allows you to get a reference to this exception object and respond accordingly. The catch block only executes if an exception occurs.
The catch
block is optional. However, if you
don’t have a catch block, your try block must have an associated finally block, which is discussed in the next
section. If you
don’t have a catch block
associated with a try
block, the runtime searches up the stack to find the next suitable catch block. See the
“Nested try blocks”
section later in this chapter for
details.
The finally block
The finally block gives you a place to insert cleanup code that is executed whether or not an error is encountered in the try block. The finally block, although useful in many cases, is optional—if you don’t have any specific cleanup code that needs to be run, you can leave it out. However, if you leave out the finally block, your try block must have an associated catch block.
A real-world example
Here’s a real-world example showing how to use the try…catch…finally blocks when accessing data. This method connects to the SQL Server Northwind database and runs the “Ten Most Expensive Products” stored procedure. The result set is stored in a data reader that is iterated to build a string and displayed using the MessageBox class.
In C#:
public void TryCatchDemo()
{
SqlDataReader dr = null;
// Create the connection string & configure the connection and command objects
string ConnectString = "server=(local);uid=sa;pwd=;database=NorthWind;";
SqlCommand Cmd = new
SqlCommand("Ten Most Expensive Products",
Cmd.CommandType = CommandType.StoredProcedure;
try
{
// Open the connection and execute the stored procedure
Conn.Open();
dr = Cmd.ExecuteReader();
// Get all records in the result set
string Products = "";
while (dr.Read())
{
// Access the data in the current row
Products += dr.GetString(0) + ", " + dr.GetDecimal(1) + "\n";
}
MessageBox.Show(Products, "try...catch...finally demo");
}
catch (Exception e)
{
// Log the Exception
ExceptionLog.Log(e);
}
finally
{
// Close the data reader and connection
if (dr != null)
{
dr.Close();
}
Conn.Close();
}
}
And in Visual Basic .NET:
Public Sub TryCatchDemo()
Dim dr As SqlDataReader = Nothing
' Create the connection string and configure
' the connection and command objects
Dim ConnectString As String = _
"server=(local);uid=sa;pwd=;database=NorthWind;"
Dim
Dim Cmd As New
SqlCommand("Ten Most Expensive Products",
Cmd.CommandType = CommandType.StoredProcedure
Try
' Open the connection and execute the stored procedure
Conn.Open()
dr = Cmd.ExecuteReader()
' Get all records in the result set
Dim Products As String = ""
While dr.Read()
' Access the data in the current row
Products += dr.GetString(0) + ", " & _
dr.GetDecimal(1).ToString() & ControlChars.Lf
End While
MessageBox.Show(Products, "try...catch...finally demo")
Catch e As Exception
' Log the Exception
ExceptionLog.LogError(e)
Finally
' Close the data reader and connection
If Not (dr Is Nothing) Then
dr.Close()
End If
Conn.Close()
End Try
End Sub 'TryCatchDemo
There are several lines of code at the top of the method outside of the try…catch…finally blocks. These lines of code are not trouble spots, so they can safely reside outside of the try block. Within the try block is code with the potential for error. This is where a connection to SQL Server is opened, the stored procedure is executed, and the result set is processed.
If everything goes smoothly
If no errors are encountered in the try block, the finally block is executed, which performs cleanup by closing the data reader and the connection object.
If an error occurs
What if an error occurs (for example, the specified stored procedure doesn’t exist) on the line of code that executes the stored procedure?
In C#:
dr = Cmd.ExecuteReader();
In Visual Basic .NET:
dr = Cmd.ExecuteReader()
When the error occurs, control is immediately passed to the catch block. Remember the CLR instantiates an exception object when an error occurs—this is also known as “throwing an exception”. The catch block is the mechanism the CLR uses to pass a reference to this object. If you look at the code, you’ll see the catch block declares a parameter of the type “Exception” named “e”.
In C#:
catch (Exception e)
In Visual Basic .NET:
Catch e As Exception
This is how the CLR passes the exception object to the catch block.
Within the catch block is a single line of code that passes the exception object reference to the static Log method of the ExceptionLog class (one of your custom sample classes). This method logs the error for future reference. Check out the “Logging Errors” section later in this chapter for information on extracting and logging error information from this exception object.
![]()
In reality, if a critical error occurred during an operation similar to the one in the sample, you probably wouldn’t catch the error at this level. Depending on the context where the code is called, you may want to let the client code catch the error instead and respond accordingly.
Remember, if an exception is thrown, the finally method is still executed. This means the cleanup code that closes the data reader and connection object is executed after the catch block is run. This ensures you don’t leave a connection to the database open. Notice the code performs a check to see if the data reader object dr is null.
In C#:
finally
{
// Close the data reader and connection
if (dr != null)
{
dr.Close();
}
Conn.Close();
}
And in Visual Basic .NET:
Finally
' Close the data reader and connection
If Not (dr Is Nothing) Then
dr.Close()
End If
Conn.Close()
This check is necessary, because if an error occurs while executing the stored procedure, the data reader may not be returned and the variable may be null.
After the finally block is executed, control is passed to the end of the finally block. This is what you want, because if the stored procedure did not execute correctly, you don’t want to continue processing. This is different from Visual FoxPro 7, where the Error event executes and control is passed back to the line immediately following the code that generated an error.
![]()
Visual FoxPro 8 introduces Try…Catch structured exception handling to the FoxPro language. For details, see the VFP 8 Help file.
Catching specific exceptions
The previous example shows how you can use the catch block to catch all exceptions. However, there may be times where you would like to catch specific exceptions and handle them differently. The following code sample shows how to do this.
In C#:
public void CatchOverFlow()
{
long MyLong = 3000000000;
int MyInteger;
try
{
// Store the value of MyDouble into MyInteger
checked
{
MyInteger = (int)MyLong;
}
}
catch(OverflowException e)
{
// Do additional processing…
MessageBox.Show("Caught an arithmetic overflow exception.", "Catch demo");
// Catch a specific exception
ExceptionLog.LogError(e);
}
catch(Exception e)
{
// Catch the generic exceptions
ExceptionLog.LogError(e);
}
finally
{
// Cleanup code
}
}
In Visual Basic .NET:
Public Sub CatchOverFlow()
Dim MyLong As Long = 3000000000
Dim MyInteger As Integer
Try
' Store the value of MyDouble into MyInteger
MyInteger = CInt(MyLong)
Catch e As OverflowException
' Do additional processing
MessageBox.Show("Caught an arithmetic overflow exception.", "Catch demo")
' Catch a specific exception
ExceptionLog.LogError(e)
Catch e As Exception
' Catch the generic exceptions
ExceptionLog.LogError(e)
Finally
' Cleanup code
End Try
End Sub 'CatchOverFlow
The code within the try block takes the value of MyLong and casts it to an integer. However, since the largest positive value an integer can hold is a 2,147,483,647, this code generates an exception.
Notice the C# code contains a checked block surrounding the code that stores the value of MyLong into MyInteger, but the Visual Basic .NET code does not:
checked
{
MyInteger = (int)MyLong;
}
In C#, an arithmetic overflow condition does not automatically cause an exception to be thrown. If you want an exception to be thrown, you need to surround the code with a checked block. In Visual Basic .NET, you don’t have a choice—an exception is always thrown when an overflow condition is encountered. Alternately, you can tell the C# compiler you want all code checked by using the “/checked” compiler option.
Notice there are two catch blocks in this code. The first catch block is specifically checking for an OverflowException error and the second block is checking for a generic Exception. If code in the try block generates an exception other than an OverflowException, it is caught by the second catch block.
The OverflowException catch block has a placeholder for “Do additional processing”. In the real world, you could change the default exception message to something more informative. The technique for doing this is discussed later in this chapter under the “System.Exception” section.
Catching all exceptions
If an exception is not caught in a catch block, the Common
Language Runtime catches it
for you. If this happens, an un-user friendly message is displayed and
your program terminates. The best way to avoid a situation where your code does
not catch an error is to
use nested try blocks.
Nested try blocks
Nested try blocks allow you to bracket one try block with another that sits at a higher level. Here is some sample code demonstrating how this works.
In C#:
public void NestedTry()
{
try
{
try
{
int x;
int y = 0;
// Divide 100 by 0 (throws an exception)
x = 100 / y;
}
catch (OverflowException e)
{
ExceptionLog.LogError(e);
}
finally
{
// cleanup
}
}
catch (Exception e)
{
ExceptionLog.LogError(e);
}
finally
{
// cleanup
}
}
And in Visual Basic .NET:
Public Sub NestedTry()
Try
Try
Dim x As Integer
Dim y As Integer = 0
' Divide 100 by 0 (throws an exception)
x = CInt(100 / y)
Catch e As OverflowException
ExceptionLog.LogError(e)
Finally
' cleanup
MessageBox.Show("Running the inner finally block")
End Try
Catch e As Exception
ExceptionLog.LogError(e)
Finally
' cleanup
End Try
End Sub 'NestedTry
The inner try block contains code that divides 100 by the variable y, which contains the value zero. Running this code throws a DivideByZeroException. Notice, however, the inner catch block only checks for an OverflowException. In this situation, the .NET runtime determines there is no catch block for the exception that was thrown and does the following:
1. Runs the inner finally block associated with the inner catch.
2. Searches for a suitable catch block further up the stack.
3. When it finds the outer catch block that checks for any exception, it executes the code within it.
4. Executes the outer finally block.
Although this sample code nests try
blocks within a single method, you can nest them
at any level in your application calling chain. In fact, it’s a good idea to
bracket your entire application in a try
block as a final check for any unhandled exceptions within
your application.
For example, in C#:
static void
{
try
{
Application.Run(new MainAppWindow());
}
catch (Exception e)
{
ExceptionLog.LogError(e);
}
finally
{
// Cleanup
}
}
And in Visual Basic .NET:
Shared Sub
Try
Application.Run(New MainAppWindow())
Catch e As Exception
ExceptionDisplay.ShowError(e)
ExceptionLog.LogError(e)
Finally
' cleanup
End Try
End Sub
With your application bracketed this
way, you can be sure that all uncaught exceptions are intercepted and logged. However,
if an exception is not caught until it gets to this point, the application
stops executing. In contrast, if you catch an exception at the point it occurs
(or some layer between the actual error and the topmost try…catch…finally block),
then application execution passes to the associated finally
block and application
execution continues.
At times, you may not know how to handle an exception at the level where the error occurs. For example, you may have a library of classes used by a variety of applications. Because you don’t know the context where a particular class is used, you often don’t know how to properly respond to exceptions. In cases like this, you should allow the calling code to handle any exceptions that may occur. However, you may still want to catch generic exceptions and throw your own custom exception objects to provide the calling code with more specific information.
Throwing your own exceptions
Not all exceptions are automatically generated by the .NET runtime. Some are the result of perfectly valid .NET code that simply won’t work. For example, the contents of a file may have become corrupt, a particular file may not exist, or it may be locked. If you detect error conditions within your application, you can manually throw exceptions from within your code.
For example, the following class contains a method called IsBirthMonth, which accepts an integer and determines if it is my birth month (October). The code checks to see if the value of the month parameter is between 1 and 12. If it’s not, an exception is thrown—specifically an ArgumentOutOfRangeException, which is one of the .NET Framework’s exception classes.
In C#:
public class ThrowExceptionDemo
{
public bool IsBirthMonth(int month)
{
bool BirthMonth = false;
if (! (month >= 1 && month <= 12))
{
throw new ArgumentOutOfRangeException();
}
if (month == 10)
{
BirthMonth = true;
}
return BirthMonth;
}
}
In Visual Basic .NET:
Public Class ThrowExceptionDemo
Public Function IsBirthMonth(month As Integer) As Boolean
Dim BirthMonth As Boolean = False
If Not(month >= 1 And month <= 12) Then
Throw New ArgumentOutOfRangeException()
End If
If month = 10 Then
BirthMonth = True
End If
Return BirthMonth
End Function 'IsBirthMonth
End Class 'ThrowExceptionDemo
If you have an application-level try…catch…finally block in place, the block would catch this exception.
Displaying and Logging Errors
Up to this point I’ve glossed over how to respond to exceptions that are caught by simply calling ExceptionLog.LogError. In this section I’ll show you how to retrieve error information from an Exception object and display or log the error. Before doing this, first take a closer look at the System.Exception class.
System.Exception
As mentioned previously, all exception classes—both the .NET Framework classes and your own custom exceptions—are derived from the System.Exception class. Table 2 contains a list of the Exception class’s public properties with a brief description of each.
Table 2. System.Exception properties
|
Property |
Description |
|
HelpLink |
Specifies a Uniform Resource Name (URN) or Uniform Resource Locater (URL) link to the Help file associated with the exception. Example: “file:///C:/Applications/MyHelp.html#MyError1 |
|
Message |
The text of the error message. |
|
Source |
Specifies the name of the object that caused the error. |
|
TargetSite |
Specifies the method that threw the exception. |
|
StackTrace |
Contains a string detailing the call stack at the time the exception occurred. |
|
InnerException |
Specifies a previous exception that caused the current exception. If there is no previous exception, this property is null. |
One of the most important properties of the Exception object is Message. This property contains the text of the error message. The .NET runtime supplies a default message that is stored in this property. For example, the default message displayed when the IsBirthMonth method throws its exception is:
"Specified argument was out of the range of valid values."
You can override this default message by specifying a different message in the constructor of the exception class. The ArgumentOutOfRangeException class has four different constructors you can choose. The constructor signature I’ve selected in this example expects three parameters:
· Parameter Name
· Actual Value
· Message
Here’s the modified code in C#:
throw new ArgumentOutOfRangeException("month",
month,"Values for month must be between 1-12");
And in Visual Basic .NET:
Throw New ArgumentOutOfRangeException("month", _
month, "Values for month must be between 1-12")
Now when this exception is thrown, the default message is:
" Values for month must be between 1-12."
This is much more descriptive than the generic “argument out of range” message.
Displaying exception information
To see the value of an exception object’s message property (and other properties), the following sample code uses a class with a static method named “ShowError”.
In C#:
public class ExceptionDisplay
{
public static void ShowError(Exception e)
{
MessageBox.Show("Error information\n\n" +
"Message: " + e.Message + "\n"
+
"Source: " + e.Source +
"\n" +
"TargetSite: " + e.TargetSite + "\n" +
"Stack trace: " + e.StackTrace,
"Exception demo");
}
}
And in Visual Basic .NET:
Public Class ExceptionDisplay
Public Shared Sub ShowError(ByVal e As Exception)
MessageBox.Show("Message: " & e.Message & ControlChars.Lf & _
ControlChars.Lf & "Source: " & e.Source & ControlChars.Lf & _
ControlChars.Lf & "TargetSite: " & e.TargetSite.ToString() & _
ControlChars.Lf & ControlChars.Lf & "Stack trace: " & _
ControlChars.Lf & e.StackTrace, "Exception demo")
End Sub 'ShowError
End Class 'ExceptionDisplay
Here is a modified version of the IsBirthMonth method containing a catch block that calls this new static method.
In C#:
public bool IsBirthMonth(int month)
{
bool BirthMonth = false;
try
{
if (! (month >= 1 && month <= 12))
{
throw new ArgumentOutOfRangeException("month",
month,"Values for month must be between 1-12");
}
}
catch (ArgumentOutOfRangeException e)
{
ExceptionDisplay.ShowError(e);
}
finally
{
if (month == 10)
{
BirthMonth = true;
}
}
return BirthMonth;
}
And in Visual Basic .NET:
Public Function IsBirthMonth(ByVal month As Integer) As Boolean
Dim BirthMonth As Boolean = False
Try
If Not (month >= 1 And month <= 12) Then
Throw New ArgumentOutOfRangeException("month", _
month, "Values for month must be between 1-12")
End If
Catch e As ArgumentOutOfRangeException
ExceptionDisplay.ShowError(e)
ExceptionLog.LogError(e)
Finally
If month = 10 Then
BirthMonth = True
End If
End Try
Return BirthMonth
End Function 'IsBirthMonth
If you run this code from the book’s sample application, you’ll see the message box shown in Figure 2.
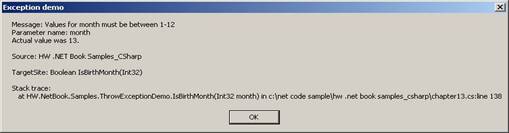
Figure 2. Important information can be gleaned from the properties of an exception object.
As you can see, the Message property contains a three-part string that includes the error message, the parameter name, and the actual value, each shown on their own line.
If you do not set the Source property, it defaults to the name of the assembly where the error occurred—in this case, “HW .Net Book Samples_CSharp”, or if you’re using Visual Basic .NET, “HW .Net Book Samples_Visual Basic”.
The TargetSite property contains a string specifying the method that threw the exception, in this case “IsBirthMonth”. As shown, it also includes the type of the parameter and the type of the return value.
The StackTrace property provides information regarding the methods in execution at the time the exception is thrown. As seen in Figure 2, the example only lists a single class and method—the ThrowExceptionDemo class and the IsBirthMonth method. It also lists the source code file and line number where the error was thrown.
Logging exception information
Typically, you should create a way to save exception information to some type of log file. In this section, you’ll see a few easy ways to do this.
Figure 3 contains a UML class diagram of an ExceptionLog class. This is a custom class found in this chapter’s sample code that allows you to save exception information to an XML log file. Saving exceptions as XML gives you the ability to easily read and manipulate the exception data using either .NET run time or design time tools.
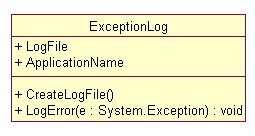
Figure 3. The ExceptionLog class found in this chapter’s sample code provides a means to save errors to a log file.
The ExceptionLog’s LogFile property specifies the name of the XML log file. The ApplicationName property identifies the name of the application that generated the exception. Specifying the name of the application lets you save exception data from multiple applications into a single exception log.
The ExceptionLog’s CreateLogFile method creates a new log file with the name given in the LogFile property.
Here is the code for this method in C#:
public static void CreateLogFile()
{
// Create an XmlTextWriter, specifying the name of the new XML log file
XmlTextWriter xtw = new XmlTextWriter(LogFile, null);
// Write the XML declaration at the top of the file
xtw.WriteStartDocument();
// Add a comment to the file indicating the date/time created
xtw.WriteComment("Log file created: " + DateTime.Now);
// Add an empty <EventLog> element
xtw.WriteStartElement("EventLog");
xtw.WriteEndElement();
// Close the stream
xtw.Close();
}
And in Visual Basic .NET:
Public Shared Sub CreateLogFile()
' Create an XmlTextWriter, specifying the name of the new XML log file
Dim xtw As New XmlTextWriter(LogFile, Nothing)
' Write the XML declaration at the top of the file
xtw.WriteStartDocument()
' Add a comment to the file indicating the date/time created
xtw.WriteComment(("Log file created: " + DateTime.Now.ToString()))
' Add an empty <EventLog> element
xtw.WriteStartElement("EventLog")
xtw.WriteEndElement()
' Close the stream
xtw.Close()
End Sub 'CreateLogFile
This method uses an XmlTextWriter to create the new XML log file, and then writes:
· The XML declaration at the top of the file.
· A comment indicating the date and time the file was created.
· An empty <EventLog> element.
![]() For more information about
using the XmlTextWriter class and other XML classes referenced in this chapter,
see Chapter 11, “.NET XML”.
For more information about
using the XmlTextWriter class and other XML classes referenced in this chapter,
see Chapter 11, “.NET XML”.
Now take a look at the code in the ExceptionLog’s LogError method.
In C#:
public static void LogError(Exception e)
{
// If the log file doesn't exist, create it
if (!File.Exists(LogFile))
{
CreateLogFile();
}
// Open the log file
XmlDocument XmlDoc = new XmlDocument();
XmlDoc.Load(LogFile);
// Create a new Exception element
XmlElement ExceptionEntry = XmlDoc.CreateElement("Exception");
// Create a new DateTime element
XmlElement DateTimeChild = XmlDoc.CreateElement("DateTime");
DateTimeChild.InnerText = DateTime.Now.ToString();
ExceptionEntry.AppendChild(DateTimeChild);
// Create an Application element
XmlElement ApplicationChild = XmlDoc.CreateElement("Application");
ApplicationChild.InnerText = ApplicationName;
ExceptionEntry.AppendChild(ApplicationChild);
// Create a new Message child element
XmlElement MessageChild = XmlDoc.CreateElement("Message");
MessageChild.InnerText = e.Message;
ExceptionEntry.AppendChild(MessageChild);
// Create a new Source child element
XmlElement SourceChild = XmlDoc.CreateElement("Source");
SourceChild.InnerText = e.Source;
ExceptionEntry.AppendChild(SourceChild);
// Create a new TargetSite child element
XmlElement TargetSiteChild = XmlDoc.CreateElement("TargetSite");
TargetSiteChild.InnerText = e.TargetSite.ToString();
ExceptionEntry.AppendChild(TargetSiteChild);
// Create a new Stacktrace child element
XmlElement StackTraceChild = XmlDoc.CreateElement("StackTrace");
StackTraceChild.InnerText = e.StackTrace;
ExceptionEntry.AppendChild(StackTraceChild);
// Add the entire ExceptionEntry to the XML document
XmlDoc.DocumentElement.AppendChild(ExceptionEntry);
// Write out the updated XML file
XmlTextWriter xtw = new XmlTextWriter(LogFile, null);
xtw.Formatting = Formatting.Indented;
XmlDoc.WriteContentTo(xtw);
xtw.Close();
}
And in Visual Basic .NET:
Public Shared Sub LogError(ByVal e As Exception)
' If the log file doesn't exist, create it
If Not File.Exists(LogFile) Then
CreateLogFile()
End If
' Open the log file
Dim XmlDoc As New XmlDocument()
XmlDoc.Load(LogFile)
' Create a new Exception element
Dim ExceptionEntry As XmlElement = XmlDoc.CreateElement("Exception")
' Create a new DateTime element
Dim DateTimeChild As XmlElement = XmlDoc.CreateElement("DateTime")
DateTimeChild.InnerText = DateTime.Now.ToString()
ExceptionEntry.AppendChild(DateTimeChild)
' Create an Application element
Dim ApplicationChild As XmlElement = XmlDoc.CreateElement("Application")
ApplicationChild.InnerText = ApplicationName
ExceptionEntry.AppendChild(ApplicationChild)
' Create a new Message child element
Dim MessageChild As XmlElement = XmlDoc.CreateElement("Message")
MessageChild.InnerText = e.Message
ExceptionEntry.AppendChild(MessageChild)
' Create a new Source child element
Dim SourceChild As XmlElement = XmlDoc.CreateElement("Source")
SourceChild.InnerText = e.Source
ExceptionEntry.AppendChild(SourceChild)
' Create a new TargetSite child element
Dim TargetSiteChild As XmlElement = XmlDoc.CreateElement("TargetSite")
TargetSiteChild.InnerText = e.TargetSite.ToString()
ExceptionEntry.AppendChild(TargetSiteChild)
' Create a new Stacktrace child element
Dim StackTraceChild As XmlElement = XmlDoc.CreateElement("StackTrace")
StackTraceChild.InnerText = e.StackTrace
ExceptionEntry.AppendChild(StackTraceChild)
' Add the entire ExceptionEntry to the XML document
XmlDoc.DocumentElement.AppendChild(ExceptionEntry)
' Write out the updated XML file
Dim xtw As New XmlTextWriter(LogFile, Nothing)
xtw.Formatting = Formatting.Indented
XmlDoc.WriteContentTo(xtw)
xtw.Close()
End Sub 'LogError
This method first checks to see if the exception log file exists. If the file doesn’t exist, it makes a call to the CreateLogFile method, which creates a new file. Next, it opens the log file in an instance of the XmlDocument class and creates a new <Exception> element. Afterwards, it adds DateTime, Application, Message, Source, TargetSite, and StackTrace child elements. Finally, it writes out the log file using an XmlTextWriter object in conjunction with the XmlDocument.WriteContentTo method.
Here’s an example of a single entry in the XML Exception log file:
<?xml version="1.0"?>
<!--Log file created: 6/30/2002 9:59:50 AM-->
<Exception>
<DateTime>6/30/2002 11:22:03 AM</DateTime>
<Application>HW .NET Sample app</Application>
<Message>Values for month must be between 1-12
Parameter name: month
Actual value was 13.</Message>
<Source>HW .NET Book Samples_CSharp</Source>
<TargetSite>Boolean IsBirthMonth(Int32)</TargetSite>
<StackTrace> at HW.NetBook.Samples.ThrowExceptionDemo.IsBirthMonth(Int32 month) in c:\net code sample\hw .net book samples_csharp\chapter13.cs:line 139</StackTrace>
</Exception>
</EventLog>
In a real-world application, you may prefer to write your errors to a Windows 2000 event log on a local or remote computer rather than to an XML log file. One advantage of doing this is being able to use the Windows Event Viewer to view, search, archive, export, and maintain event logs. Check out the .NET Help topic “Logging Application, Server, and Security Events” for information on how to do this.
Creating your own custom exception classes
If there is an existing .NET Framework exception class that fits your needs, Microsoft recommends you use that class when throwing your own exceptions. For example, in the ThrowException demo class earlier in this chapter, the IsBirthMonth method used the .NET Framework’s ArgumentOutOfRangeException class to indicate if an invalid month was passed to the method. This class was used because it perfectly suited the situation. However, if you run into a situation where there isn’t an existing class that suits your needs, the .NET Framework provides the System.ApplicationException class specifically designed for the purpose of allowing you to create your own custom exception classes.
Deriving exceptions from the .NET System.ApplicationException class gives you a way to distinguish between exceptions defined in the .NET Framework and custom exceptions you define. ApplicationException has four different overloaded constructor methods as shown in Table 3.
Table 3. ApplicationException constructor methods
|
Method |
Description |
|
public ApplicationException() |
Simple constructor |
|
public ApplicationException(string); |
Constructor with error message |
|
public ApplicationException(string, Exception) |
Constructor with an error message and a reference to the inner exception that caused the original exception |
|
public ApplicationException(SerializationIfnfo, StreamingContext); |
Deserialization constructor |
The .NET Help topic, “Best Practices for handling exceptions”, states that when you create your own exception classes you should implement at least the first three constructors shown in Table 3. The fourth constructor is a deserialization constructor and is optional. Implementing this constructor allows your custom exceptions to be passed from one machine to another. In this chapter, you will only implement the first three. For information on implementing the serialization constructor, see the on-line article by Eric Gunnerson of Microsoft at the following URL:
http://msdn.microsoft.com/library/default.asp?url=/library/en-us/dncscol/html/csharp08162001.asp
The following sample code demonstrates defining a custom exception class derived from ApplicationException.
![]()
Microsoft recommends you always end exception class names with the word “Exception” as they have done in the .NET Framework. This provides consistency and makes it easy for others to identify your exception classes.
In C#:
public class ConfigurationFileNotFoundException : ApplicationException
{
public ConfigurationFileNotFoundException()
{
}
public ConfigurationFileNotFoundException(string message)
: base(message)
{
}
public ConfigurationFileNotFoundException(string message, Exception inner)
: base(message, inner)
{
}
}
In Visual Basic .NET:
Public Class ConfigurationFileNotFoundException
Inherits ApplicationException
Public Sub New()
End Sub 'New
Public Sub New(ByVal message As String)
MyBase.New(message)
End Sub 'New
Public Sub New(ByVal message As String, ByVal inner As Exception)
MyBase.New(message, inner)
End Sub 'New
End Class 'ConfigurationFileNotFoundException
Here is an example of code that throws this custom exception. It checks if a particular configuration file exists and if it doesn’t, the ConfigurationFileNotFoundException is thrown.
In C#:
public class CustomExceptionDemo
{
public void OpenDbcConfigFile()
{
if (!File.Exists("mmconfigx.xml"))
{
throw new ConfigurationFileNotFoundException("Application configuration file not found.");
}
}
}
And in Visual Basic .NET:
Public Class CustomExceptionDemo
Public Sub OpenAppConfigFile()
If Not File.Exists("mmconfigx.xml") Then
Throw New ConfigurationFileNotFoundException( _
"Application configuration file not found.")
End If
End Sub 'OpenAppConfigFile
End Class 'CustomExceptionDemo
Again, if you can find an existing .NET exception class that suits your needs use it. Otherwise, feel free to create your own custom exceptions based on the ApplicationException class.
![]() Throughout this chapter,
there are several tips for exception handling “best practices”. In addition to
these suggestions, I highly recommend the .NET Help topic “Best Practices for
Handling Exceptions”.
Throughout this chapter,
there are several tips for exception handling “best practices”. In addition to
these suggestions, I highly recommend the .NET Help topic “Best Practices for
Handling Exceptions”.
Debugging your application
The rest of this chapter is devoted to the variety of tools available in Visual Studio .NET for debugging your applications. I’ll take a look at each of these tools and show you the basics of how to use each.
Setting and clearing breakpoints
One of the most important debugging tools is the ability to set breakpoints in your application. Visual Studio .NET makes it easy to set breakpoints and step through the code in your application. You’ll find .NET’s approach to breakpoints is similar to Visual FoxPro’s, but with some additional features.
The easiest way to set a breakpoint is clicking in the left column of the code-editing window next to the line where you want to break (Figure 4). You can easily clear the breakpoint by clicking again in the left column at the same location.

Figure 4. Clicking in the left column of the code-editing window allows you to easily set and clear breakpoints.
Another easy way to set a breakpoint is to right-click on a line of code and select Insert Breakpoint or New Breakpoint from the shortcut menu.
Using the Breakpoints window
The Breakpoints window contains a list of all breakpoints currently set in your application (Figure 5). To launch the Breakpoints window, select Debug | Windows | Breakpoints from the main menu or type Ctrl+Alt+B.
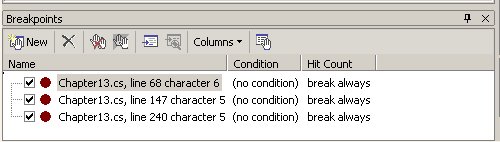
Figure 5. The Breakpoints window shows you all
the breakpoints currently set in
your application.
By default, there are three columns displayed in the Breakpoints window—Name, Condition, and Hit Count. You can specify additional or different columns by clicking the Columns button at the top of the Breakpoints window and selecting or deselecting columns from the list. Notice the name column includes the source code file name, the line number and the character position. Although you don’t normally care about the character position, you do care if you have multiple commands on a single line and want to know which command the breakpoint refers to.
You can enable or disable a breakpoint by checking or clearing the check box in the Name column. To view the source code line associated with a breakpoint, double-click on the breakpoint or right-click on the breakpoint and select Go To Source Code from the shortcut menu. You can also clear all breakpoints or disable all breakpoints by clicking the corresponding buttons at the top of the Breakpoints window.
Creating new breakpoints
To add a new breakpoint using the Breakpoints window, click the New button at the top of the window to launch the New Breakpoint dialog (Figure 6).
The New Breakpoint dialog allows you to set breakpoints:
· When program execution reaches a specified location in a function.
· When program execution reaches a specified line number in a file.
· When program execution reaches the instruction at the specified address.
· When the value of a variable changes.
For additional information on each of these options, click the Help button on the corresponding page of the New Breakpoint dialog.
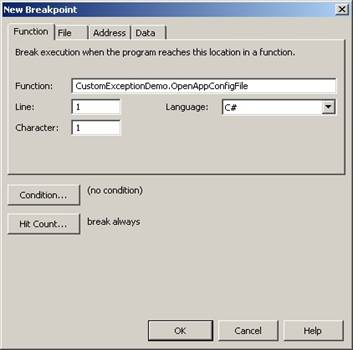
Figure 6. You can create new breakpoints for a function, file, address, or data (variables) using the New Breakpoint dialog.
If you click the Condition button, it launches a Breakpoint Condition dialog (Figure 7) allowing you to specify a break that occurs when a condition is true or has changed.
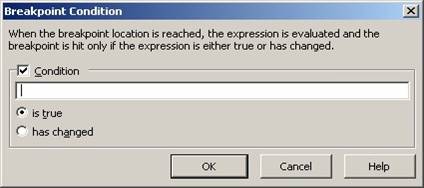
Figure 7. The Breakpoint Condition dialog allows you to specify a condition that is true or has changed before a breakpoint is hit.
If you click the Hit Count… button, it launches the Breakpoint Hit Count dialog (Figure 8). This dialog lets you specify how many times a breakpoint is hit before program execution breaks. You can set a specific count, a multiple of a count, or a hit count greater than or equal to a specified value.
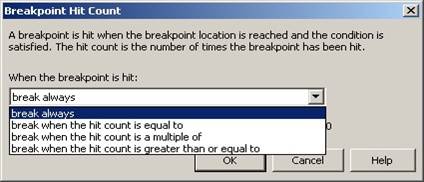
Figure 8. The Breakpoint Hit Count dialog lets you specify a count for the number of times a breakpoint is hit before program execution breaks.
Editing existing breakpoints
To edit an existing breakpoint, select the breakpoint you want to edit, and click the Properties button (the button to the far right) at the top of the Breakpoints window. This launches the same dialog described when creating a new breakpoint. You can also right-click a breakpoint and select Properties from the shortcut menu.
Deleting existing breakpoints
To delete an existing breakpoint, select the breakpoint you want to delete, and click the Delete button (the second from the left) at the top of the Breakpoints window. You can also right-click on a breakpoint and select Delete from the shortcut menu.
Ignoring breakpoints
If you want to start your application but ignore all existing breakpoints, you can do so by pressing Ctrl+F5 or by selecting Debug | Start Without Debugging from the main menu.
Navigating through code in the debugger
When you run your application and hit a breakpoint, Visual Studio .NET automatically opens the associated source code file, highlights the line where the break occurred, and displays an arrow in the left column of the code editing window (Figure 9).

Figure 9. VS .NET shows you the line of code where a break occurs.
At this point, you can choose Step Into, Step Over, or Step Out from the Debug menu to navigate through your code. You can also use the shortcut keys, which are F11 (Step Into), F10 (Step Over), and Shift+F10 (Step Out). These have the same meaning as in the Visual FoxPro debugger.
To navigate to a different line, possibly even a line earlier in the stack, right-click on the line and select Set Next Statement. This feature is invaluable when you’re debugging your application and want to rerun or completely skip over code.
If you page up or down in the source code so you can’t see the stack pointer arrow in the left column, or if you’re editing another source code file and want to go back to the next line to be executed, simply right-click in the code-editing window and select Show Next Statement from the shortcut menu.
Another option that’s extremely handy is the ability to continue program execution up to a given line and then break—but without setting an actual breakpoint. To do this, right-click on the line of code you want to stop at, and select Run to Cursor from the shortcut menu. This causes application execution to continue until it hits the selected line, at which point it breaks again.
To resume normal program execution after stopping for a breakpoint, you can simply press F5 or click the Continue button (Figure 10) at the top of the Visual Studio .NET IDE.

Figure 10. Click Continue to resume program execution after hitting a breakpoint.
Examining values in the Watch window
When your program is running, you can use the Watch window to view the values of variables and expressions, as well as edit the value of a variable. The Watch window in VS .NET is similar to Visual FoxPro’s, but with some additional features.
To launch the Watch window, you must first run your application and be in break mode. Once your application is running, from the Debug menu choose Windows | Watch, and select Watch1, Watch2, Watch3, or Watch4. If you’ve ever filled up your Watch window in Visual FoxPro, you’ll be glad to see four different Watch windows in VS .NET you can use to avoid the clutter of too many watch values in a single window.
As with Visual FoxPro, the VS .NET Watch windows persist their values from one VS .NET session to another. This means if you specify a Watch value, close Visual Studio .NET, and restart, your values still show up in the Watch window.
Although you can manually type variables or expressions into a Watch window, you can also easily add watch values by dragging and dropping selected text in the code-editing window into a Watch window. For example, if you set a breakpoint in this chapter’s sample code (Chapter13.cs or Chapter13.vb) in the ThrowExceptionDemo.IsBirthMonth method at the line of code that calls ExceptionLog.LogError, you can drag the variable “e” from the source code, and drop it into a Watch window. If you do this, the variable “e” is displayed in the Watch window (Figure 11) along with its associated value and type. If you want to change the value of the variable “e”, simply click on the text in the Value column and enter a new value.

Figure 11. You can examine the values of variables and expressions and change the values of variables in one of VS .NET’s four Watch windows.
Notice there is a plus sign in the Name column next to the variable “e”. Whenever you enter the name of an object variable or array into the Watch window, a tree control appears next to the variable name. You expand and contract this tree control to show or hide additional values (such as properties) of the object.
In Visual FoxPro, you can double-click in the column to the left of a Watch value to specify program execution to break when the value of the variable or expression changes. In VS .NET, you do this through the Breakpoints window (see the “Using the Breakpoints window” section earlier in this chapter for details).
The QuickWatch window
Visual Studio .NET also has a QuickWatch window (Figure 12) you can use as an alternate to the Watch windows if you want to view or edit a variable or expression quickly. QuickWatch is a modal dialog, so if you want to look at a value and step through code to see how the value changes, you need to use the Watch window instead.
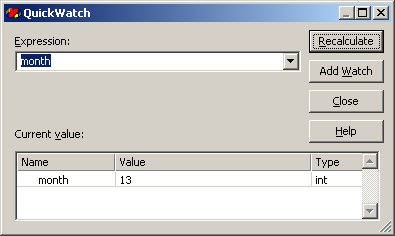
Figure 12. The QuickWatch window allows you to easily view variables and expressions and edit variable values.
To launch the QuickWatch window, the debugger must be in break mode, and then select Debug | QuickWatch from the menu or press Ctrl+Alt+Q.
When you click the Recalculate button, it evaluates the variable or expression you have entered in the Expression text box and displays it in the Current value. If you click the Add Watch button, the expression or variable is automatically added to the Watch window.
The Command window
Expecting Visual Studio .NET Command Window to be similar to Visual FoxPro’s Command Window, is like renting a Bruce Willis action-adventure DVD and finding out they’ve accidentally put “Pee-Wee’s Big Adventure” in the box instead! Unfortunately, the VS .NET Command Window is nothing in comparison to Visual FoxPro’s Command window. Take a closer look at its functionality (or lack thereof) and you’ll see what I mean.
The Command Window (Figure 13) is used to issue commands or to debug and evaluate expressions. To launch the Command Window, select View | Other Windows | Command Window from the main menu or simply press Ctrl+Alt+A.
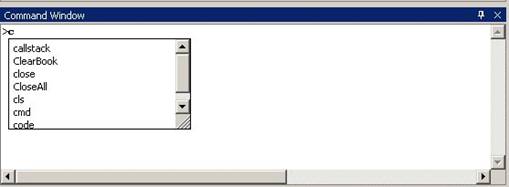
Figure 13. The Visual Studio .NET Command Window has a long way to go to be as capable as the Visual FoxPro Command Window.
There are two different Command Window modes—Command mode and Immediate mode. You know you’re in Command mode if the greater than symbol appears as a command prompt. You know you’re in Immediate mode if the title of the window is Command Window – Immediate. If you’re in Command mode, you switch to Immediate mode by typing “immed” and pressing Enter. If you’re in Immediate mode you go to Command mode by entering “>cmd” in the Command Window.
Command mode
When working in Command mode, you can enter IDE commands directly into the Command Window, bypassing the VS .NET menu system. If you’re expecting to instantiate objects from the Command Window you’ll be sadly disappointed—this capability is non-existent.
There are a number of predefined command aliases you can enter in the Command Window to save time. For example, if you enter “nav” in Command mode, it automatically brings up the VS .NET browser in the IDE. If you enter the letter “k” in Command mode, it displays the call stack. If you want to evaluate expressions while in Command mode, you use the eval command. For example, entering the following command displays a string containing the current date and time:
eval DateTime.Today.ToString()
For a list of all pre-defined VS .NET command aliases, see the .NET Help topic “Pre-defined Visual Studio Command Aliases”. You can also type “alias” in the Command Window and it shows you all of the aliased commands. For more information on Visual Studio commands and instructions on creating your own aliases, see the .NET Help topic “Visual Studio Commands”.
Immediate mode
The Immediate mode of the Command Window allows you to issue commands, debug, and evaluate expressions, as well as view and change the values of variables while debugging.
For example, while debugging a program, you can enter the following command in Immediate mode to determine if the mmconfig.xml file exists in the current directory:
File.Exists("mmconfig.xml")
If the file exists, it displays “true” in the Command Window (Figure 14). Otherwise, it displays “false”.
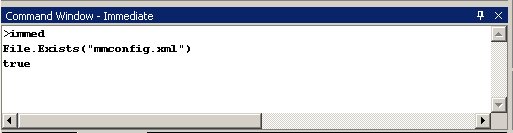
Figure 14. You can enter commands to be executed in the Immediate mode of the Command window.
The Call Stack window
The Call Stack window (Figure 15) allows you to see functions on the call stack as well as any parameters and their values. For example, if you set a breakpoint in the sample code’s ThrowExceptionDemo.IsBirthMonth method on the line that calls ExceptionLog.LogError, the Call Stack window shows you the fully qualified class name, the method name, the type and value of the parameter (int month = 13), and the line number.
To see the Call Stack window, when your application is in Break mode, select Debug | Windows | Call Stack from the main menu or press Ctrl+Alt+C.

Figure 15. The Call Stack window allows you to see functions on the call stack as well as parameters and their values.
If you double-click on another function in the call stack, it highlights the associated source code in the code-editing window of the IDE (Figure 16).

Figure 16. Double-clicking on another function other than the next statement to be executed opens the associated source code in the IDE.
If you want to hide some of the information displayed, right-click on the Call Stack window and clear the checkbox next to the information you want to hide. For example, if you don’t want to see line numbers in the Call Stack window, clear the Show Line Numbers option.
The Autos window
In C#, the Autos window (Figure 17) displays variables used in the current statement or in the previous statement. The name “Autos” is derived from the fact that the debugger identifies these variables for you automatically. In Visual Basic .NET, the Autos window displays variables used in the current statement, as well as three statements before and after the current statement.
To launch the Autos window when your application is in Break mode, select Debug | Windows | Autos from the main menu or type Ctrl+Alt+V, A (press Ctrl+Alt+V, release, and press the letter “A”).

Figure 17. The Autos window shows variables used in the proximity of the current statement.
Note the variables in the Autos window change accordingly if you select a different function in the Call Stack window. You change the value of variables in the Autos window by double-clicking the Value column and entering the new value.
The Locals window
The Locals
window (Figure 18) displays variables local to the current execution
location.
To launch the Locals
window, when your application is running, select Debug
| Windows | Locals from the main menu or type Ctrl+Alt+V, L
(press Ctrl+Alt+V, release, and press the letter “L”).

Figure 18. The Locals window displays all local variables visible in the current execution context and allows you to change their associated values.
As with other Debug windows, you change the value of variables in the Locals window by double-clicking the Value column and entering a new value. The variables displayed in the Locals window change accordingly if you select a different function in the Call Stack window.
The This/Me windows
The This/Me (Figure 19) windows allow you to view the members of the object associated with the current method. It’s called the This window in C# (and C++) and the Me window in VB .NET. To launch the window, when your application is running, select Debug | Windows | This (or Me) from the main menu or by typing Ctrl+Alt+V, T (press Ctrl+Alt+V, release, and press the letter “T”).
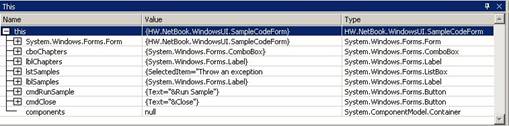
Figure 19. The This/Me windows allow you to view the members of the object associated with the current method.
The Modules window
The Modules window (Figure 20) provides detailed information about each DLL and EXE used by your program.

Figure 20. The Modules window provides a list of all DLLs and EXEs used by your program.
To view the Modules window, select Debug | Windows | Modules from the main menu, or type Ctrl+Alt+U. You click on any column to sort the items in the list.
Miscellaneous debug windows
There are a variety of other debug windows listed in Table 4 that are also available to you. For more information on each of these windows, check the .NET Help file.
Table 4. Miscellaneous debug windows
|
Method |
Description |
|
Memory window |
Allows you to view large buffers, strings, and other data that do not display well in Watch or Variable windows. |
|
Disassembly window |
Allows you to view your source code in assembly language. |
|
Registers window |
Allows you to view the values stored in CPU registers. |
|
Exceptions window |
Allows you to change the way the debugger handles specific exceptions or categories of exceptions. |
|
Threading window |
Allows you to view and control threads in a multi-thread program. |
Tracing and Instrumenting your applications
You can add tracing and debugging information to a .NET application that lets you monitor its execution while you’re developing the application and also after you’ve deployed it. The .NET Framework provides Trace and Debug classes with methods allowing you to get information about code coverage, performance profiling, and also allow you to create Assert statements, similar to ASSERTs in Visual FoxPro. These classes can be used in both .NET Windows applications as well as ASP.NET applications.
The Trace and Debug classes are the same except the procedures and functions of the Trace class are compiled into release builds of your application and those of the Debug class are not.
Code tracing and debugging
The Debug and Trace classes can be used during development to display messages in the Output window of Visual Studio .NET. For example, the following code uses the WriteLine method of the Debug and Trace classes.
In C#:
using system.diagnostics;
public class DebugDemo
{
public void MyMethod()
{
Debug.WriteLine("Debug.WriteLine output");
Trace.WriteLine("Trace.WriteLine output");
}
}
And in Visual Basic .NET:
Import System.Diagnostics
Public Class DebugDemo
Public Sub MyMethod()
Debug.WriteLine("Debug.WriteLine output")
Trace.WriteLine("Trace.WriteLine output")
End Sub 'MyMethod
End Class 'DebugDemo
This code displays the messages “Debug.WriteLine output” and “Trace.WriteLine output” in the Output window (Figure 21).
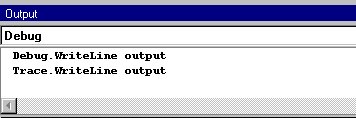
Figure 21. The Debug and Trace WriteLine methods allow you to display messages in the VS .NET Output window.
When you compile a release build of your application, you can
specify that you do not want to include debug information in your final
executable. For more information, see the .NET Help topic “Compiling
Conditionally with Trace and Debug”.
Trace listeners
When you are developing your application, all Debug and Trace information is written to the VS .NET Output window. However, in a deployed application, you need to specify an output target for this information called a trace listener.
Trace listeners come in the following flavors:
· TextWriterTraceListener – Sends output to a TextWriter or other Stream class.
· EventLogTraceListener – Sends output to an event log.
· DefaultTraceListener (the default) – Sends output to Visual Studio .NET’s Output window.
The following code demonstrates how to implement a TextWriterTraceListener.
In C#:
// Creates the Trace Log text file (or open it if it already exists)
FileStream TraceLog = new FileStream("TraceLog.txt",
FileMode.OpenOrCreate);
// Creates the Trace Listener
TextWriterTraceListener TextListener = new
TextWriterTraceListener(TraceLog);
// Add the Listener to the Listeners collection
Trace.Listeners.Add(TextListener);
Debug.WriteLine("Debug.WriteLine
TextWriterListener test: " +
DateTime.Now);
Trace.WriteLine("Trace.WriteLine TextWriterListener test: " +
DateTime.Now);
// Flush the output of the TextListener
TextListener.Flush();
// Remove the Listener from the Listeners collection
Trace.Listeners.Remove(TextListener);
In Visual Basic .NET:
' Creates the Trace Log text file (or open it if it already exists)
Dim TraceLog As New FileStream("TraceLog.txt", FileMode.OpenOrCreate)
' Creates the Trace Listener
Dim TextListener As New TextWriterTraceListener(TraceLog)
' Add the Listener to the Listeners collection
Trace.Listeners.Add(TextListener)
Debug.WriteLine(("Debug.WriteLine TextWriterListener test: " & _
DateTime.Now.ToString()))
Trace.WriteLine(("Trace.WriteLine TextWriterListener test: " & _
DateTime.Now.ToString()))
' Flush the output of the TextListener
TextListener.Flush()
' Remove the Listener from the Listeners collection
Trace.Listeners.Remove(TextListener)
The first line of code creates a new FileStream for a text file named TraceLog.txt. The second parameter in the FileStream constructor uses the FileMode enumeration to indicate the TraceLog.txt file should be opened if it already exists or created if it does not. The second line of code creates a new TextWriterTraceListener object, passing a reference to the TraceLog FileStream. The third line adds the listener to the Trace object’s Listeners collection. Typically this initialization code occurs someplace in your application startup.
The next two lines of code write out Debug and Trace messages. In a real application, you can have any number of these calls to Debug or Trace throughout your application. These messages are written out to the TraceLog.txt file (Figure 22). In addition, they are still written to the VS .NET Output window. This is because VS .NET automatically adds a DefaultTraceListener to the Trace object’s Listener collection behind the scenes.

Figure 22. A TextWriterListener can output your Debug and Trace information to a text file.
The last two lines of code flush the TextListener and remove it from the Trace object’s Listener collection. You can do this at any point in the application when you want to stop writing messages to the trace log file.
Additional Debug and Trace methods
The Debug and Trace classes have additional methods you can use for writing output to listeners. Table 5 lists these different methods and how they are used.
Table 5. Miscellaneous debug windows
|
Method |
Description |
|
Assert |
Checks for a condition and displays a message (or the call stack) if the condition is false. |
|
Fail |
Emits an error message. |
|
Write |
Writes information to the trace listeners in the Listener collection. |
|
WriteIf |
Writes information to the trace listeners in the Listener collection if a condition is true. |
|
WriteLine |
Writes information to the trace listeners in the Listener collection. Similar to the Write method, but writes out the message on a new line. |
|
WriteLineIf |
Writes information to the trace listeners in the Listener collection if a condition is true. Similar to WriteIf, but writes out the message on a new line. |
For more information on using these methods, see the .NET Help topic “Adding Trace Statements to Application Code”.
Error handling in ASP.NET applications
When it comes to handling errors in ASP.NET applications, there are a few additional settings you should know about found in your application’s web.config file.
Debug mode
By default, when you create a new ASP.NET application, the web.config file Visual Studio .NET generates specifies that your application runs in debug mode. Here’s the debug setting contained within the compilation tag:
<compilation
defaultLanguage="c#"
debug="true"
/>
When debug mode is set to true, you get additional debugging information when your ASP.NET application encounters errors. Although setting this to true is useful for debugging, you also incur a huge performance penalty. So when you actually deploy your application, you should set debug to “false”.
Custom error messages
The web.config file also contains a setting that specifies the users who should see user-friendly messages and the users who should see error details that include a stack trace. This setting is found in the customErrors element:
<customErrors
mode="RemoteOnly"
/>
The three possible values for this setting are:
· On – Always display user-friendly error messages.
· Off – Always display detailed error messages.
· RemoteOnly – Display user-friendly error messages to users not running on the local Web server, otherwise, display detailed error messages.
The default value for this setting is “RemoteOnly”.
ASP.NET tracing
In order to see trace output in an ASP.NET application, you need to turn on tracing, which is typically done at the application-level in the web.config file. The trace setting can be found within the trace element:
<trace
enabled="false"
requestLimit="10"
pageOutput="false"
traceMode="SortByTime"
localOnly="true"
/>
To turn on tracing, set the enabled property to “true”. If
the pageOutput property is set
to “true”, the trace output is displayed at the bottom of each ASP.NET page. If
it’s set to “false”, trace output is saved in a file named “trace.axd” found in
your Web application’s
root directory.
Conclusion
There are a number of advancements in .NET’s error handling and debugging capabilities making it easier to detect and fix bugs in your software. With the exception (no pun intended) of the Command Window, you’ll find Visual Studio .NET’s debugging tools more advanced and capable than those of Visual FoxPro. In the final analysis, it’s up to you as the developer to learn how to use these tools well to provide your end-users with solid, well-debugged code.