Chapter 2
Controlling the
Properties Window
When creating forms and classes, the Properties Window is a major player. VFP 9 includes many improvements to this tool, from more control over fonts to the ability to add custom editors for properties.
Since its introduction in VFP 3, the Properties Window (known to most VFP developers as the Property Sheet, the term we’ll use throughout this chapter) has seen mostly minor changes. Each new version brought a few tweaks. VFP 9 ups the ante significantly. Minor changes include more control over fonts and the addition of icons to the items. More significantly, the Property Sheet now includes a Favorites tab, and provides a mechanism to let you customize its behavior.
Cosmetic changes
No doubt, the first thing you’ll notice when you open
VFP 9’s Property Sheet is that each
item now includes an icon to the left of its name. The icons are the same as
those used elsewhere in VFP (including IntelliSense’s List Members and the
Procedure dropdown in
the method editor).
The next thing likely to hit your eye is that there are more colors than before. In VFP 8, everything in the Property Sheet is black, except for properties, events, and methods (PEMs) of ActiveX controls, which are blue by default, but can be changed. VFP 9 separates the Property Sheet colors into five groups described in Table 1. You can change the color for the first four groups, but the Default color is always black.
Table 1. The Property Sheet now lets you use up to five different colors.
|
Color group |
Includes |
|
ActiveX Color |
PEMs of any ActiveX controls. |
|
Non-Default Properties Color |
PEMs set at the current level of the class hierarchy. |
|
Custom Properties Color |
PEMs added at any level other than the current level of the class hierarchy. |
|
Instance Properties Color |
PEMs added at the current level of the class hierarchy |
|
Default |
All other PEMs, that is, built-in PEMs not set at this level of the class hierarchy. |
To change the color of any group, right-click the Property Sheet and choose the appropriate setting.
![]()
To see the Property Sheet’s shortcut menu, don’t right-click the
main body
of the Property Sheet (the part where the PEMs are listed). Instead,
right-click the border area, the tabs, the object dropdown, or the Property
Description section.
The color groups are not mutually exclusive. For example, an instance property or a custom property might also be non-default. The rules are as follows:
· PEMs added at the current level of the class hierarchy use the Instance Properties setting, whether they’re changed or not.
· Other PEMs changed at the current level, whether they’re inherited or built-in, use the Non-Default Properties setting. This includes PEMs of ActiveX controls.
· Custom PEMs inherited from the parent class and not changed at this level use the Custom Properties setting. This includes PEMs of ActiveX controls.
· PEMs of ActiveX controls not changed at any level of the class hierarchy use the ActiveX color.
· All remaining PEMs are shown in black.
In addition to colors, the VFP 9 Property Sheet gives you control over the font and font size. In VFP 8 and earlier versions, the shortcut menu gives you three choices: Small Font (the default), Medium Font, and Large Font. VFP 9 replaces those choices with a single Font… item; choose it to bring up the Font picker dialog. Figure 1 shows the Property Sheet after changing the font to 12-point Tahoma bold.
The figure points out one interesting side effect of changing the font. Normally, changed properties are in bold and read-only properties are in italics. It turns out, however, those property attributes actually toggle the specified characteristics. So, in Figure 1, where the specified font is bold, the Caption property, which has been assigned at this level, is not bold. Similarly, if you specify an italic font for the Property Sheet, read-only properties are shown as not italic.
Specifying property values
In VFP 8 and earlier versions, the Property Sheet can accept no more than 255 characters for a property value. The introduction of the CursorAdapter class in VFP 8 and the need to specify its CursorSchema property made this limit a significant problem. In VFP 9, the limit has been raised to 8,191 characters.
In addition, earlier versions couldn’t handle extended characters, like CHR(13) and CHR(10) (carriage return and line feed, respectively) in the Property Sheet. When you wanted to include them in a property, you had to specify it as an expression, such as “Line 1” + CHR(13) + CHR(10) + “Line 2”. VFP 9 accepts these values. (This change was undoubtedly made to accommodate the _MemberData property, discussed in “Customizing the Property Sheet” later in this chapter.)
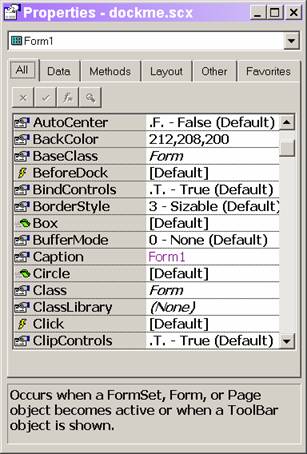
Figure 1. VFP 9 lets you specify the font to use in the Property Sheet.
Despite the new limit, some properties, like Caption and Alias, are limited to 255 characters by their nature. The same properties don’t accept extended characters.
To enter long property values or extended characters, you can’t just type the value in as usual. You have to use either the Zoom dialog or the Expression Builder. To make the process easier, a Zoom button has been added to the group of buttons above the list of properties. (See Figure 1.) In addition, the Zoom dialog is much larger in VFP 9 than in earlier versions.
To store longer property values and extended characters, the technique for parsing classes and forms has changed. As a result, classes and forms that include properties exceeding the limit or using extended characters cannot be opened in earlier versions of VFP. However, forms and classes created in VFP 9 that don’t use long property values or extended characters can be opened in earlier versions.
The new format applies to the Properties memo field of the record in the SCX or VCX that represents the object in question. This field stores a list of the properties assigned in the Property Sheet in the form:
Property = Value
When the value is more
than 255 characters or contains any of the extended characters, the format
changes. The equal sign is followed by a space, and then 517 instances of
CHR(1). After that, the length of the value is stored as an 8-byte character
string. The length is followed by the actual value.
Another change makes it easier to get values into the Property Sheet in the first place. In earlier versions, when you add a custom property using the New Property dialog, you have to remember to switch to the Property Sheet and set the initial value for the property. In VFP 9, the New Property dialog (shown in Figure 2) includes an editbox to specify the initial value.
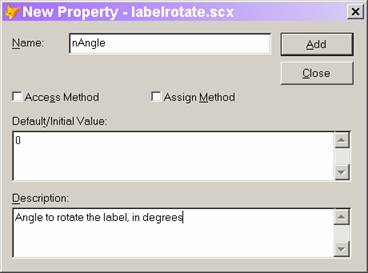
Figure 2. The New Property dialog lets you specify the initial value of the property you’re adding, so you don’t have to remember to set it in the Property Sheet.
![]()
Although the caption says “Default/Initial Value,” the value you specify is only an initial value. That is, it specifies the property value when the form or class is created, but not the value you get if you choose Reset to Default in the Property Sheet.
Customizing the Property Sheet
The biggest change relating to the Property Sheet in VFP 9 is the ability to customize the contents in a number of ways. All of the customization is tied to a new, optional, property, _MemberData, which contains an XML string. You can set _MemberData manually or use the new MemberData Editor.
What kind of things can you do with _MemberData? First,
_MemberData controls the new Favorites tab. For each property, event, or method
(PEM) of a class or form, you can indicate whether it should be on the
Favorites tab. _MemberData also lets you specify capitalization for custom
PEMs. In earlier versions of VFP, once you add a property or method, it appears
in lower-case on the Property Sheet and in IntelliSense. With _MemberData, you
can specify the way it appears. Finally, for properties, you can specify
a “property editor” to use for entering the property’s initial value.
Unlike other properties, _MemberData is not included in new forms and classes automatically. You have to add it. (This is actually analogous to the Builder property you can add to a class to specify a custom builder.) However, the MemberData Editor can add it for you automatically.
The structure of _MemberData
_MemberData is an XML string containing VFP data (in the same format created by CursorToXML(), surely no coincidence). Between the <VFPData> and </VFPData> tags, there’s one element, called memberdata, for each PEM with customization specified. The element has an attribute for each customization item for that PEM. For example, here’s the _MemberData string for a form with a custom property, lFlag, and a custom method, MyMethod, capitalized as shown here, and with the AutoCenter property added to the Favorites page:
<VFPData><memberdata name="autocenter" type="property" favorites="True"/><memberdata name="lflag" type="property" display="lFlag"/><memberdata name="mymethod" type="method" display="MyMethod"/></VFPData>
The definition for the memberdata element includes six attributes, as shown in Table 2. The schema is open, however, so you can add custom attributes and use them at runtime. Note that capitalization is significant in the _MemberData string, both for the attribute names and for True/False values. It appears not to matter for the value of the type attribute.
Table 2. The memberdata element for each property, event, or method includes a subset of these attributes.
|
Attribute |
Values |
Purpose |
|
name |
|
Contains the name of the PEM. Required. |
|
type |
“property” “event” “method” |
Contains the type of PEM. Required. |
|
display |
|
Contains the name as it should display in the Property Sheet and with IntelliSense. Must be the same string as the name; only the capitalization can vary. Applies only to custom PEMs. |
|
favorites |
“True” “False” |
Indicates whether the PEM is included on the Favorites page. |
|
override |
“True” “False” |
Indicates whether settings unspecified at this level should be inherited from the parent class (False) or draw their values from the default settings for this PEM (True). |
|
script |
|
Contains VFP code to run as a Property Editor. (See “Creating property editors” later in this chapter.) |
![]()
The Property Sheet is sorted alphabetically using a case-sensitive sort. That’s why custom properties, which always displayed in lower-case, are listed at the bottom. If the display attribute you specify for a PEM begins with an upper-case letter, that PEM will be sorted in with the native PEMs.
The behavior of the override attribute is somewhat non-intuitive. For attributes specified at the current level, it’s irrelevant. They have whatever value you assign at the current level. Override applies only to attributes you don’t specify at the current level, and determines where those attributes get their values.
For example, consider a command button class (cmdTopLevel) with two custom properties: cMyFirstProp and cMySecondProp. In the button class, both have display and favorites attributes. The MemberData XML for the class is:
<VFPData>
<memberdata name="cmyfirstprop" type="property" display="cMyFirstProp" favorites="True"/>
<memberdata name="cmysecondprop" type="property" display="cMySecondProp" favorites="True"/>
</VFPData>
With these settings,
both properties appear on the Favorites page and they’re capitalized as you’d
want them.
Now consider a subclass
(cmdMiddleLevel). Suppose you set the override attribute for cMySecondProp to
True, but also specify the display attribute. The MemberData XML for this class
is:
<VFPData>
<memberdata name="cmysecondprop" type="property" display="cMySecondProp" override="True"/>
</VFPData>
There’s nothing
specified for cMyFirstProp, so it draws its behavior from the parent class.
That means cMyFirstProp appears on the Favorites page (and the property is
capitalized as cMyFirstProp). However, with override set to True, cMySecondProp
uses only the settings provided at this level. So, it doesn’t appear on the
Favorites page, though it’s still properly capitalized, because that attribute
is specified for this class.
Now consider a subclass
of cmdMiddleLevel, called cmdBottomLevel. If you change none of the attributes
at this level (that is, specify nothing for _MemberData), cFirst inherits its
behavior from cmdTopLevel, so it appears on the Favorites page. cSecond
inherits from cmdMiddleLevel and does not appear in Favorites.
![]()
The Developer Downloads for
this chapter, available at www.hentzenwerke.com,
include Chapter2.VCX, a class library
that contains the cmdTopLevel, cmdMiddleLevel, and cmdBottomLevel classes
described here.
Setting attributes globally
In addition to customizing a particular PEM in a particular class, you can specify that some customization applies to a PEM in every form or class with that PEM. For example, by default, the Caption and Anchor properties appear on the Favorites page.
Information about global customization is not stored in the _MemberData property of individual forms or classes, but in the IntelliSense table (referenced by the _FoxCode system variable and by default, FoxCode.DBF in the directory indicated by HOME(7)). PEM customization items have “E” in the Type field, the name of the PEM in the Abbrev field, and a MemberData string in the Tip field. For example, the default IntelliSense table contains a record for the Caption property, with the values shown in Table 3.
Table 3. You can specify custom behavior globally by adding records to the IntelliSense table. Here, the Caption property is added to the Favorites page and a custom property editor is specified.
|
Field |
Value |
|
Type |
E |
|
Abbrev |
Caption |
|
Expanded |
|
|
Cmd |
{CaptionScript} |
|
Tip |
<VFPData><memberdata name="caption" type="property" favorites="True" script="DO (_CODESENSE) WITH 'RunPropertyEditor','','caption'"/></VFPData> |
|
Data |
|
You’re not stuck with the global customization for a PEM; to override it in a particular form or class, just change it in the _MemberData string for that PEM in the form or class.
Inheriting _MemberData
_MemberData can be inherited either through the inheritance hierarchy or the containership hierarchy. The rules make sense, but they’re different from those for other properties. Here’s the order VFP will use to search for a memberdata attribute. Once it finds a value for a particular attribute, VFP stops searching.
· The _MemberData property of the object itself.
· The _MemberData property of classes in the inheritance hierarchy for the object, working upwards in the normal way.
· The _MemberData property of any containers, working upwards through the containership hierarchy.
· Any global memberdata settings, stored in the IntelliSense table.
For a given PEM, each attribute may be found in memberdata at
a different point in
the list.
![]()
Although memberdata can be “inherited” through the containership hierarchy, you can’t add the _MemberData property to an object once you put it on a form or class. (That’s because you can’t ever add a property to a contained object.) However, if a contained object already has a _MemberData property, you can edit it for the instance on the form or class.
The MemberData Editor
Once you understand the structure of MemberData, it’s not hard to specify it, but it’s tedious enough that you’re not likely to do so. That’s especially true for global member data, where you have to modify the IntelliSense table.
Fortunately, there’s an alternative. VFP 9 includes a new tool called the MemberData Editor, available from the Form or Class menu. The MemberData Editor (Figure 3) handles all the heavy lifting involved in adding the _MemberData property and populating it.
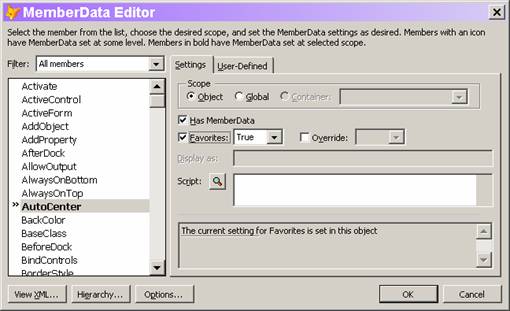
Figure 3. The MemberData Editor makes it easy to customize the Property Sheet.
The MemberData Editor lists all PEMs of the form or class in alphabetical order. PEMs with customization are shown in bold (like AutoCenter in Figure 3). You can limit the display in the list using the Filter dropdown. Filters include custom members only, custom members added in this class, native members only, and favorites only.
To customize a PEM, choose it in the list and select the Has MemberData checkbox. Next, specify the attributes you want. Table 4 shows the relationship between the controls in the MemberData Editor and the _MemberData attributes.
Table 4. The items in the MemberData Editor map to the attributes of the _MemberData string.
|
Control(s) |
Attribute |
Notes |
|
Object/Global/Container |
None |
Determines whether the settings for this PEM are stored in the local _MemberData property (Object), the IntelliSense table (Global), or in the container’s _MemberData property (Container). |
|
Has member data |
None |
Indicates the PEM has member data. Provides a one-click way to remove all customization for a PEM. |
|
Favorites checkbox and dropdown |
favorites |
Determines whether this PEM appears on the Favorites page. The checkbox indicates whether the memberdata element for this PEM has the favorites attribute. The dropdown specifies the setting for that attribute. |
|
Override checkbox and dropdown |
override |
Determines whether unspecified settings at this level use the inherited settings or the defaults. The checkbox indicates whether the memberdata element for this PEM has the override attribute. The dropdown specifies the setting for the attribute. |
|
Display as |
display |
Specifies the capitalization for this PEM. |
|
Script |
script |
Specifies the code for a property editor for this property. (See “Creating property editors” later in this chapter.) |
If a control on a form or class is selected when you open the MemberData Editor, the tool attempts to edit _MemberData for that control. If the control’s class doesn’t have a _MemberData property, you get a warning, after which the MemberData Editor opens showing the PEMs for the object, but saving any changes you make to the _MemberData property of the containing form or class.
![]()
Be aware that “global” here really means global. If you change any settings when scope is set to global, the corresponding record in the IntelliSense table is modified or deleted and your customizations change or disappear for every form and class with the specified PEM.
The Description Pane (the disabled editbox near the bottom) shows you the current settings for the selected PEM. It indicates, for each attribute with memberdata at some level, which setting is in control. Figure 3 shows the simplest case, with the attribute set at the local level. The listing can also indicate a global setting, a setting drawn from a container (in which the container is named), and a setting inherited from a parent class (in which case, the parent class is named).
Two buttons on the MemberData Editor also help you see exactly what settings apply. Click View XML to see the string that will be stored to the object’s _MemberData property if you click OK. Click Hierarchy… for a detailed look at each level in the inheritance and containership hierarchy that affects the currently selected PEM, as well as the result, the settings that will be used for that PEM.
Listing 1 shows the result for the Caption property of the cmdMiddleLevel class in Chapter2.VCX.
Listing 1. When you click Hierarchy… in the MemberData Editor, you see each setting that has an effect on the selected PEM’s memberdata.
Class - cmdmiddlelevel
<memberdata name="cmysecondprop" type="property" display="cMySecondProp" override="True"/>
Class - cmdtoplevel of chapter2.vcx
<memberdata name="cmysecondprop" type="property" display="cMySecondProp" override="True"/>
Effective settings:
<memberdata name="cmysecondprop" type="property" display="cMySecondProp" override="True"/>
Adding custom attributes
In addition to specifying the standard memberdata attributes, the MemberData Editor lets you define and specify your own attributes. While VFP itself won’t use your custom attributes, they give you a place to store information (even code) for a class and have that information always present whatever you do with the class.
The user-defined page of the MemberData Editor (Figure 4) lets you add custom attributes. The page is available for a PEM only if Has MemberData is checked. Click the Add button to add an attribute—an input box appears for you to specify the name. Once you do that, use the Value textbox to provide the attribute’s value.

Figure 4. The User-Defined page of the MemberData Editor allows you to add custom attributes, which you can use to ensure information travels with a class.
What can you do with custom attributes? Here’s one example. While you can specify a property editor for a custom property (see “Creating Property Editors” later in this chapter), you can’t force people to use it. So imagine having an attribute called Valid that contains an expression determining the validity of the property’s value. Of course, you need code to look for the attribute and evaluate the expression—you could put such code in a project hook. Here’s a simple example of code to do so in the BeforeBuild method:
LPARAMETERS cOutputName, nBuildAction, lRebuildAll, lShowErrors, lBuildNewGuids
#DEFINE CRLF CHR(13) + CHR(10)
LOCAL oFile, aObj[1], cMembData, lFileResult, lResult
LOCAL cProblems
lResult = .T.
FOR EACH oFile IN This.oProject.Files
DO CASE
CASE INLIST(oFile.Type, "K", "V")
* Open without running code
IF oFile.Type="K"
MODIFY FORM (oFile.Name) NOWAIT
ELSE
MODIFY CLASS (oFile.Name) NOWAIT
ENDIF
cProbs = "Validity checking " + oFile.Name + CRLF
* Grab memberdata
ASELOBJ(aObj, 1)
IF PEMSTATUS(aObj[1],"_MemberData",5)
cMembData = aObj[1]._MemberData
* Convert to cursor
XMLTOCURSOR(cMembData, "__MembData")
* Look for Valid specs
SELECT __MembData
IF TYPE("__MembData.Valid") <> "U"
* At least one item has a Valid attribute, so process it.
lFileResult = .T.
SCAN
IF NOT EMPTY(__MembData.Valid)
cValidExpr = __MembData.Valid
* Substitute for "This"
cValidExpr = STRTRAN(cValidExpr, "This", "aObj[1]")
IF NOT EVALUATE(cValidExpr)
cProbs = cProbs + "Failed test: " + __MembData.Valid + CRLF
lFileResult = .F.
ENDIF
ENDIF
ENDSCAN
ENDIF
ENDIF
* Close the form or class
OTHERWISE
* Do nothing
ENDCASE
cProbs = cProbs + CRLF
lResult = lResult AND lFileResult
ENDFOR
IF NOT lResult
MESSAGEBOX(cProbs)
ENDIF
RETURN lResult
This simple version
doesn’t drill down to check for a Valid attribute at another level of the
inheritance or containership hierarchy, but should give you a sense of the
possibilities offered by custom attributes.
![]()
The project hook described
above is included in Chapter2.VCX in the Developer Downloads for this chapter,
available from www.hentzenwerke.com
Customizing the MemberData Editor
The Options button on the MemberData Editor lets you control several aspects of its behavior. When you click it, the MemberData Options dialog (Figure 5) opens. The settings there are remembered between invocations of the MemberData Editor, and between classes. They’re stored in the Resource table (by default, FoxUser.DBF in the directory specified by HOME(7)); the relevant record’s ID field contains “MEMBERDATAED” while the Name field is “MemberDataEditor”.
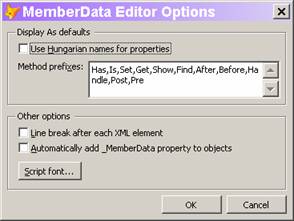
Figure 5. You can control the behavior of the MemberData Editor using the settings in the Options dialog.
The Display As defaults section simplifies the
task of setting capitalization through the display attribute. When Use
Hungarian names for properties is selected and you check Has
Member Data for a property, its name is shown in the Display
as textbox with the
first letter in lowercase and the second letter in uppercase; this is useful
for those of us who use the first letter of a property name to specify the type
and begin the actual name with the second character.
It’s not unusual for many method names to begin with one of just a few words. Method prefixes lets you specify a list of strings that should be seen as words at the beginning of a method and capitalized appropriately. That is, when a method name begins with one of the specified strings, the suggested Display as value capitalizes the first letter of that string and the first letter following the string. For example, using the default settings (shown in Figure 5), the suggested capitalization for a method named isnumeric would be “IsNumeric”.
The Other options section lets you control appearances. If you select the Line break after each XML element checkbox, the XML created for _MemberData puts the memberdata element for each PEM on a separate line in the XML string. For example, with this setting selected, the _MemberData string shown in “The structure of _MemberData” section would appear as:
<VFPData>
<memberdata name="lflag" type="property" display="lFlag"/>
<memberdata name="mymethod" type="method" display="MyMethod"/>
</VFPData>
Newly created forms and
classes don’t have a _MemberData property. The MemberData Editor adds it as
needed. However, you may prefer for each form or class to have the property; if
so, select the Automatically add _MemberData property to objects checkbox. When that item is selected, a record
is added to your IntelliSense table that automatically adds the _MemberData
property to each form or class as you create or open it.
Finally, the Script
font button lets you set
the font used for the Script editbox on the Member Data page. Note that the
font you choose isn’t used for the window that opens when you click the Zoom
button for the script; that’s controlled by your setting for PRG files on the
IDE tab of the VFP Options dialog.
When you click the OK button and at least one PEM has local
customization specified, the MemberData Editor checks whether the current form
or class has a _MemberData property, adds it if necessary, and generates the
appropriate string. At the same time, any global customization specified is
handled by adding records to the table specified by _FoxCode.
Replacing the
MemberData Editor
Like many other
tools in the VFP development environment, the MemberData Editor is written in
VFP. (In fact, it was written by Doug Hennig, one of the authors of this book.)
That means you can replace it with your own tool if you prefer.
However, the mechanism
for replacing the MemberData Editor is different than for
other tools written in VFP. Rather than providing a system variable (like
_GenMenu or _CodeSense), the MemberData Editor is hooked into the Builder
system. The table that
drives the built-in Builder system (by default, Builder.DBF in the Wizards
directory) contains a record for the MemberData Editor that points to
MemberDataEditor.APP in the VFP
home directory.
If you prefer to use
another MemberData Editor, you have several choices. Once you create or acquire
another application to serve this purpose, you can put it in the VFP home
directory and name it MemberDataEditor.APP. (Of course, if you choose to name
your replacement MemberDataEditor.APP, you should probably save a copy of the
version that comes with VFP 9.) Alternatively, you can modify the record in the
Builder table to point to the application you want to use. A third choice is to
add another record to Builder.DBF for your editor; and then, when you invoke
the MemberData Editor, you’re prompted to choose between the editor provided
and your custom version.
Finally, as with the
other VFP tools written in VFP, the source code for the MemberData Editor comes
with VFP. (Look in the XSource.ZIP file located in VFP’s Tools\XSource
directory.) If you just want to make minor changes, your best bet may be to
modify the source code and build a custom version of the tool.
Playing favorites
While you can add PEMs to the Favorites tab using the MemberData Editor, there’s actually an easier way. Right-click any PEM in the Property Sheet and choose Add to Favorites. Doing so automatically generates the appropriate MemberData string, adding the _MemberData property, if necessary.
Removing a PEM from the
Favorites page isn’t quite as easy; there’s no Remove from Favorites item on
the shortcut menu. You have to edit the _MemberData string directly or use the
MemberData Editor.
Creating property
editors
While a Favorites
page and displaying the names of custom PEMs as you want them are both useful,
the truly exciting feature enabled by _MemberData is the ability to create
custom property editors.
A number of VFP’s
built-in properties provide a mechanism for choosing a value other than simply
typing it in. For example, the various color properties (such as BackColor) use
the Color Picker, while the Icon and Picture properties use a special version
of the Open dialog (the same as the GetPict() function). You invoke these
editors by clicking the ellipsis (...) button next to the textbox (called the
“Property settings box” in Help) in the Property Sheet. In VFP 9, you can
create your own dialogs or call on built-in dialogs for any property.
VFP 9 includes two
property editors, both defined globally in FoxCode.DBF for the relevant
property. The first uses the InputBox() function to let you specify a Caption.
It’s designed so you can use it for other properties as well. (See “Using
IntelliSense for property editors” later in this chapter.)
The second Property
Editor is for the new Anchor property. Anchor requires a numeric value,
computed by adding the values of the appropriate settings. The Anchor Editor
(AnchorEditor.App in the VFP home directory) lets you choose the settings you
want and test them. Details of both the Anchor property and the Anchor Editor
are discussed in Chapter 13, “Forms and Controls.”
A Property Editor is,
essentially, a builder, though it’s generally focused on one or a few
properties, where a builder addresses many properties of a control. Like a builder,
a Property Editor has to do the heavy lifting involved in setting properties at
design-time in its code. It receives no parameters and must figure out what
object it’s addressing and what property it’s intended to change. (For global
property editors, IntelliSense offers a somewhat smarter alternative; see
“Using IntelliSense for property editors” later in this chapter.)
Use the ASELOBJ()
function to figure out which object you’re working on. There’s one
complication; if the property belongs to a form or container class rather than
a control, ASELOBJ() doesn’t find a selected object. In that case, you need to
call it again, passing 1 for the optional second parameter, so it can find the
form or container. This code finds the selected control, if there is one, and
the form or container, if no control is selected. If it can’t find either, it
gives up:
IF ASELOBJ(aControl) = 0
IF ASELOBJ(aControl, 1) = 0
RETURN
ENDIF
ENDIF
After executing this code (if it doesn’t issue RETURN), aControl[1] contains an object reference to the selected control, form, or container. (In fact, if multiple objects are selected, the array contains references to all of them.)
Unfortunately, there’s no generic way to figure out which property called the Property Editor, so you have to hard code the property name. Listing 2 shows a Property Editor for a custom nEmphasisColor property; it brings up the Color Picker dialog.
Listing 2. This Property Editor lets you use the Color Picker to choose a value for a custom property called nEmphasisColor.
LOCAL aControl[1],
nColor
IF ASELOBJ(aControl) = 0
IF ASELOBJ(aControl, 1) = 0
RETURN
ENDIF
ENDIF
* Grab default value
IF VARTYPE(aControl[1].nEmphasisColor) = "N"
nColor = aControl[1].nEmphasisColor
ELSE
nColor = 0
ENDIF
nColor = GETCOLOR(nColor)
aControl[1].nEmphasisColor = nColor
RETURN
Clearly, a Property
Editor is most useful for items that can’t be easily typed in, like RGB color
values. Another such item is the second parameter to the MessageBox() function,
which specifies the icon and buttons to use. Figure 6 shows a form that lets you make your choices and
computes the value to pass. A Property Editor that calls on this form is shown
in Listing 3; it’s connected to a property called
nMessageBoxParam. (Of course, if the parameter form is in a different directory
than the form you’re creating, the DO FORM command needs to include the
appropriate path.)
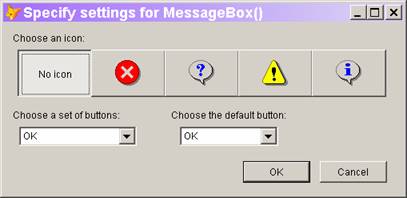
Figure 6. Calculating the second parameter for MessageBox() is complicated. A Property Editor like this one makes it much easier.
Listing 3. Using the form in Figure 6 as a Property Editor is simple.
LOCAL aControl[1],
nParam
IF ASELOBJ(aControl) = 0
IF ASELOBJ(aControl, 1) = 0
RETURN
ENDIF
ENDIF
DO FORM MessageboxParams WITH aControl[1].nMessageBoxParams TO nParam
aControl[1].nMessageboxParams = nParam
![]()
The Developer Downloads for
this chapter, available from www.hentzenwerke.com,
include MessageBoxParams.SCX (the
form in Figure 6) and PropertyEditors.SCX, a form that demonstrates
the Color Picker Property Editor and the Property Editor for
MessageBox() parameters.
Using IntelliSense for
property editors
Defining a
Property Editor every time you need it would get tedious enough that you’d do
it only for the most complicated properties. Fortunately, the VFP team included
an alternative approach that takes advantage of the existing IntelliSense
script system.
In addition to the new
“E” record in the FoxCode table to support global _MemberData, the IntelliSense
engine was enhanced with a method called RunPropertyEditor; this method lets
you execute the code in a script record (type “S”) as a Property Editor.
The Property Editor for
the Caption property uses this mechanism, so we’ll examine it to see how it
works. The “E” record for Caption has “{CaptionScript}” in the Cmd field. The
Tip field contains:
<VFPData><memberdata name="caption" type="property" favorites="True" script="DO (_CODESENSE) WITH 'RunPropertyEditor','','caption'"/>
</VFPData>
The key item there is
the script attribute, with the value:
DO (_CODESENSE) WITH 'RunPropertyEditor','','caption'
This line runs the IntelliSense engine, telling it to execute its RunPropertyEditor method and pass “caption” to that method. RunPropertyEditor finds the type “E” record in FoxCode corresponding to the parameter it receives. If the Cmd field of that record contains the name of a script record, the method locates that script record and executes the contents of the script record’s Data field. For the Caption record, therefore, RunPropertyEditor looks for a record in FoxCode with Type = “S” and Abbrev = “CaptionScript”. There is such a record; its Data field contains the code in Listing 4, which receives the property name as a parameter, finds all selected controls (or the form or container if no control is selected), prompts the user for a new caption, and then assigns the new value to the specified property of each selected object.
Listing 4. This script (which comes with VFP 9) uses InputBox() to prompt for a new string value.
#DEFINE IBOX_CAPTION
"Caption Property Editor"
#DEFINE IBOX_TEXT "Enter value for property: "
#DEFINE USER_CANCEL "__usercancelled__"
LPARAMETERS tcProp
LOCAL ARRAY laObjs[1]
LOCAL lcRetVal, lnCnt, loCtl,lcDefValue, lnSuccess
IF ASELOBJ( laObjs)=0
IF ASELOBJ( laObjs,1)=0
RETURN
ENDIF
ENDIF
lcDefValue=IIF(ALEN( laObjs,1)=1,laObjs[1].&tcProp,"")
lcRetVal=INPUTBOX(IBOX_TEXT + tcProp, IBOX_CAPTION, lcDefValue, 0, ;
"", USER_CANCEL)
IF lcRetVal==USER_CANCEL
RETURN
ENDIF
FOR lnCnt = 1 TO ALEN( laObjs,1)
loCtl = laObjs[lnCnt]
IF PEMSTATUS( loCtl, tcProp, 5 )
loCtl.&tcProp = lcRetVal
ENDIF
ENDFOR
This two-record architecture
makes it easy to use a single Property Editor (defined in a type “S” record)
for many different properties. For example, to use the CaptionScript for the
Name property, add a type “E” record for Name with “{CaptionScript}” in the Cmd
field and specify this line as the script for Name (using the MemberData
Editor):
DO (_CODESENSE) WITH 'RunPropertyEditor','','name'
Note that the line of
code is identical to the one used for Caption, except for the
final parameter.
You can apply the same
mechanism to other property editors. For example, you might want to make the
MessageBox() parameters Property Editor available as a script. To do so, first
add a record to the FoxCode table, with the values in Table 5.
Table 5. To create a new script record for the MessageBox() parameters, add a record to FoxCode with these settings.
|
Field |
Value |
|
Type |
“S” |
|
Abbrev |
“MessageScript” |
|
Cmd |
“{}” |
|
Data |
LPARAMETERS tcProp LOCAL ARRAY laObjs[1] LOCAL lnRetVal, lnCnt, loCtl,lnDefValue, lnSuccess IF ASELOBJ( laObjs)=0 IF ASELOBJ( laObjs,1)=0 RETURN ENDIF ENDIF lnDefValue=IIF(ALEN( laObjs,1)=1,laObjs[1].&tcProp,0) lnRetVal =0 DO FORM "d:\writing\books\newin9\code\chapter2\MessageBoxParams.SCX" ; WITH lnDefValue to lnRetVal FOR lnCnt = 1 TO ALEN( laObjs,1) loCtl = laObjs[lnCnt] IF PEMSTATUS( loCtl, tcProp, 5 ) loCtl.&tcProp = lnRetVal ENDIF ENDFOR |
![]()
Debugging IntelliSense scripts is difficult. If a script contains any compile-time errors, it will fail to run without any messages. If you’re having trouble getting a script to run, try copying it to a PRG and compiling to find your errors. In addition, tracing may or may not work with property editors; in some cases, issuing SYS(2030,1) prior to running your Property Editor may work.
Once you have the script record set up, add a record to FoxCode for each property name you want to be able to set with this script. Table 6 shows an example, for a property called nMessageParam. You can set up type “E” records that use the same script for as many properties as you want. Unfortunately, there doesn’t appear to be a way to call on a script record without adding a type “E” record; it would handy to be able to create MemberData at the class level (ideally, using the MemberData Editor) that calls RunPropertyEditor to use a property editor defined in the IntelliSense table.
Table 6. To use the MessageBox() parameters
script, add a record like this
to FoxCode.
|
Field |
Value |
|
Type |
“E” |
|
Abbrev |
nMessageParam |
|
Cmd |
{MessageScript} |
|
Tip |
<VFPData><memberdata name="nmessageparam" type="property" display="nMessageParam" script="DO (_CODESENSE) WITH 'RunPropertyEditor','','nmessageparam' "/> </VFPData> |
![]()
The Developer Downloads for this chapter, available at www.hentzenwerke.com, include AddMessageScript.PRG, a program that adds the records needed for the MessageBox() parameter Property Editor to the IntelliSense table.
The bottom line
FoxPro developers spend a lot of their time working in
the Property Sheet. With VFP 9, working there is easier and more configurable.
We expect the FoxPro community to create
and make available a number of property editors that will smooth your way
through form and class definition.
Updates and corrections for this chapter can be found on Hentzenwerke’s website, www.hentzenwerke.com. Click “Catalog” and navigate to the page for this book.