Chapter 3
Writing Code
No matter how good the visual tools, the vast majority of our
work as FoxPro developers involves writing code. VFP 9 makes that task easier
with a number of enhancements. Perhaps most welcome is the ability to use
IntelliSense inside the
WITH clause.
Day in and day out, VFP developers write code. We write code in PRG files, in the Command Window, in the method editor, in stored procedures, in memo fields, and many other places. Over the years, more and more tools to support writing code have been added, including such things as color-coded syntax, IntelliSense, Document View, and Code References. While code support isn’t a major goal for VFP 9, several new or enhanced features make it easier than ever to work with code.
IntelliSense improvements
The addition of IntelliSense in VFP 7 increased the odds of getting code right in the first place. VFP 9 makes IntelliSense even more useful by offering support for it in the memo editor and inside the WITH and FOR EACH clauses. In addition, VFP 9 saves your IntelliSense settings between sessions, so you can configure it once and keep it that way. Perhaps most intriguing, IntelliSense is now supported at run-time.
Enable IntelliSense in memo fields
It’s not unusual to store code in memo fields. In fact, most of the VFP tools themselves have at least one memo field that stores code. In VFP 8 and earlier, IntelliSense doesn’t work in the memo field editor. VFP 9 adds support for IntelliSense there, providing it both at design-time and run time. (See “Give your users IntelliSense” later in this chapter for more on IntelliSense at run time.)
To turn on IntelliSense in a memo field, turn on syntax coloring for the field (right-click, Properties, and select Syntax coloring—if Word wrap is selected, you have to unselect it before the Syntax coloring check box is enabled). Once you turn syntax coloring and IntelliSense on for a given memo field, that information is stored in your resource file (by default, FoxUser.DBF) and persists for the specified field. (The syntax coloring requirement applies only in the design-time environment. When you offer IntelliSense at run time, syntax coloring does not have to be on.)
You can make syntax coloring and IntelliSense the default for all memo fields on the IDE page of the Options dialog (Figure 1). Choose Memo Fields from the Type dropdown list, and then check Syntax coloring. You can override this setting for individual memo fields by unchecking Syntax coloring in the Properties dialog for the specific field.
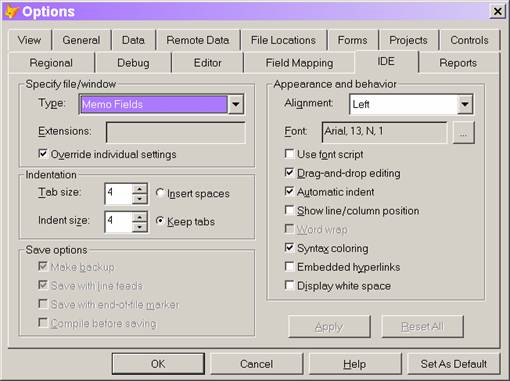
Figure 1. To make IntelliSense the default for memo fields, use the IDE page of the Options dialog and turn on syntax coloring for memo fields.
IntelliSense in WITH and FOR EACH commands
The WITH and FOR EACH commands offer shortcuts when
writing code that works
with objects. In earlier versions of VFP, however, WITH has a weakness; it
doesn’t support IntelliSense for the object named in the WITH statement. To get
IntelliSense for the loop variable of a FOR EACH, you have to declare the
variable as the appropriate type ahead
of time.
VFP 9 provides a way to turn IntelliSense on inside these constructs. In both cases, the secret is to tell the editor the type of object you’re addressing, and the syntax for both commands has been expanded to do so. The new syntax for WITH is:
WITH Object [ AS Class [ OF ClassLibrary ] ]
Commands
ENDWITH
For example, if you’re
in a method of a control on a form based on the VFP form class, you could
write:
WITH ThisForm AS Form
Then, when you hit the
period, the list of properties, events, and methods (PEMs) for the form class
appears, as in Figure 2.
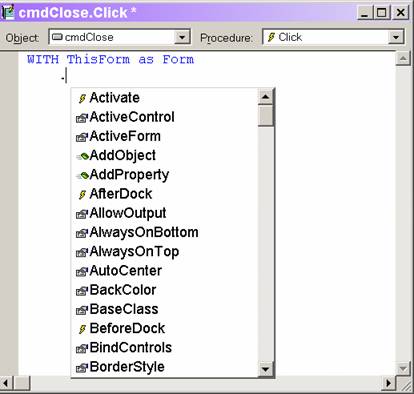
Figure 2. When you specify the class of the object you’re using in WITH, you get IntelliSense inside the WITH command.
If the object is based on a custom class rather than a base class, you need to specify the class name and class library, like this:
WITH This.oRegistry as Registry OF HOME() + "\ffc\registry.vcx"
For an Automation object, you need to specify the server and object, such as:
WITH oDoc AS Word.Document
However, most Automation objects need to be registered with the IntelliSense Manager in order to have IntelliSense for their objects. (Use the Type Libraries button on the Type page of the IntelliSense Manager, available from the Tools menu.)
In addition to allowing you to specify the class of a named object, WITH now understands THIS at design-time, so you get the list of PEMs when you type the period inside:
WITH This
.
However, WITH does not support THISFORM. So, you can’t use WITH THISFORM inside a control and get IntelliSense in the WITH, unless you add the AS clause to specify the form class. Similar syntax is used in the FOR EACH command. You can specify the class and, if necessary, the class library for the variable used to control the loop, and then have IntelliSense available for that variable inside the loop. The same rules used for the WITH apply for specifying the class:
· For VFP base classes, use just the name of the class.
· For VFP subclasses, use the name of the class and the class library, providing an appropriate path.
· For Automation objects, use the server name and class.
In Figure 3, the loop is controlled by oDoc, which is defined as Word.Document. Inside the loop, pressing “.” after oDoc brings up the list of PEMs for a Word document.
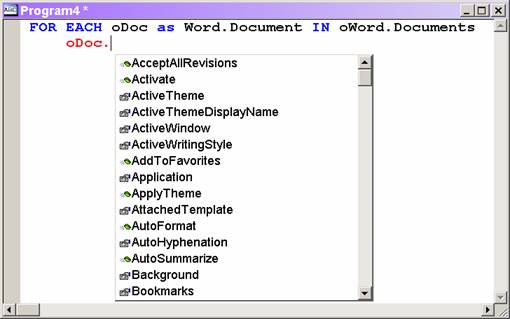
Figure 3. By defining the class of the variable controlling a FOR EACH loop, you enable IntelliSense for that variable inside the loop.
![]()
With the FOR EACH command, you can get the same effect by declaring the loop variable to be of the appropriate class prior to the loop.
Saving IntelliSense settings
The VFP IntelliSense Manager and the _VFP.EditorOptions property let you control the behavior of IntelliSense. However, in VFP 8 and earlier, some settings are not remembered from one VFP session to the next.
Most significantly, when you turn off IntelliSense, using either the Enable IntelliSense check box in the IntelliSense Manager or by setting _VFP.EditorOptions to omit the “L” and “Q” options, the setting lasts only until you shut down VFP and restart it. At that point, IntelliSense is turned on again. To turn off IntelliSense permanently (something we do not recommend), you have to set _VFP.EditorOptions in a startup program.
VFP 9 is smarter about this. It assumes that if you turn off IntelliSense or make some settings manual, you mean it.
Give your users IntelliSense
One of the coolest things about VFP’s brand of IntelliSense is its extensibility. VFP 9 lets us take advantage of that feature to offer IntelliSense to the people who use our applications.
To include IntelliSense in an application, point the _FoxCode variable to an IntelliSense table in your code. The table can be the one that comes with VFP or a custom table containing shortcuts for your application. (If you use VFP’s FoxCode table or any scripting, you should probably also set the _CodeSense system variable to point to FoxCode.App and make sure you distribute FoxCode.App with your application.) You can even provide a tool to allow your users to define their own shortcuts.
Not every type of IntelliSense item is supported at run time. Table 1 shows the item types supported and what they cover. Script items can't be triggered directly (that's normal for IntelliSense), but are executed when triggered by other items.
Table 1. Run-time IntelliSense supports only a subset of the items found in an IntelliSense table.
|
Item type |
Purpose |
|
C |
Command items. Expands the command as indicated and shows the tip for the command. Runs any specified script. |
|
F |
Function items. Expands the function name, and shows the tip for the function, including moving the highlight as parameters are entered. Runs any specified script. |
|
S |
Script items. Runs the script, inserting the result if there is one. |
|
U |
User items. Performs the specified substitution, including executing associated scripts. |
Run-time IntelliSense applies only to the program editor (MODIFY COMMAND), file editor (MODIFY FILE), and memo windows. Unlike design-time, you do not have to turn on Syntax Coloring to use IntelliSense at runtime. Unfortunately, you can’t turn on IntelliSense in edit boxes.
Consider using a custom IntelliSense table to provide shortcuts for phrases your users often need. By making it easy to enter boilerplate text, you increase the chance of users getting it right.
Background compilation
The first time you start typing in VFP 9, you may be baffled to see your code underlined. As you continue to type, the underlines go away…until you start the next line. The underlines are part of a new feature in VFP called background compilation. As you type, the VFP compiler checks to see whether what you’ve typed so far is syntactically valid. Until it is, it uses a special highlight (underlines, by default) to let you know.
You can control the appearance of background compilation in several ways. The Editor page of the Options dialog offers a dropdown (see Figure 4) where you can choose how syntactically invalid code is to appear. Table 2 shows the four options.
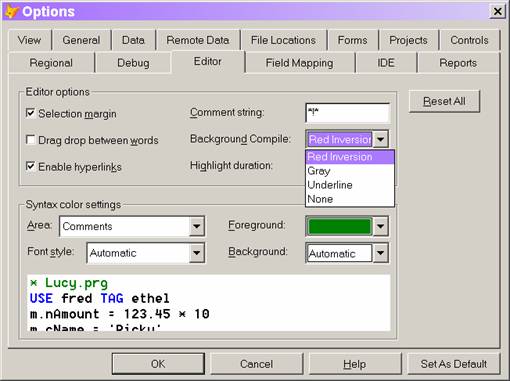
Figure 4. Use the Background Compile dropdown on the Editor page to control the coloring used for code that can’t yet compile.
Table 2. You have four options for background compilation, including turning it off.
|
Option |
Effect |
|
Red Inversion |
Shows invalid syntax in red, but valid keywords change to pink. |
|
Gray |
Shows invalid syntax in gray, including valid keywords. |
|
Underline |
Underlines invalid syntax, including valid keywords. |
|
None |
Invalid syntax uses the regular syntax coloring settings. |
As soon as what you type forms a valid command, the colors change to whatever is specified for Syntax color settings on the same page of the Options dialog.
Background compilation occurs only with syntax coloring on. You control the use of syntax coloring on the IDE page of the Options dialog. It’s controlled separately for each type of window. You can also control syntax coloring for an individual window using that window’s Properties dialog.
Overall, our view is that, for experienced VFP developers, this feature isn’t terribly useful. For newcomers, along with IntelliSense, it probably helps in coming up to speed. We suspect that eventually, all of us will turn background compilation off.
Print selected text
In VFP 8 and earlier, the Selection option button of the Print dialog is disabled. VFP 9 enables it when text is selected. This means you can print just some text from a program, memo field, or method without having to copy and paste the selected text into another window or application.
To use the Print dialog, you need to choose File | Print from the menu. Clicking the printer icon on the Standard toolbar prints the entire file.
Copy code with formatting
VFP 5 introduced syntax coloring. VFP 8 added the ability to print code in color. In VFP 9, you can take your syntax coloring with you when you copy code from VFP to another application.
When you copy from a code editor, including the Command Window, the highlighted text is placed on the clipboard as RTF (rich text format). If you paste into another application capable of dealing with RTF, the font used in the editor and syntax coloring are preserved.
We’re of two minds about this behavior. It’s great if you’re posting code into, say, an online discussion, but for those of us who write about VFP regularly, it’s inconvenient. Fortunately, the VFP team understood this distinction and gave us control over the behavior. Include "X" in the EditorOptions property of _VFP to turn off RTF copying.
Find the highlighted text
The last editing-related change is a minor one, but very elegant. If text is highlighted when you open the Find dialog, the first highlighted word is placed in the Look for text box, so you don’t have to do a copy and paste. It’s highlighted in the text box, so if it’s not what you want, it’s easy to overwrite it with the right search string. Figure 5 demonstrates this; note that the highlighted string is trimmed before it’s put into the text box.
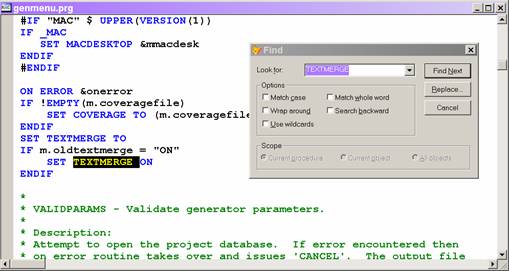
Figure 5. When you open the Find dialog, highlighted text is automatically inserted as the string to search for.
Better editing
While none of the changes in editing are revolutionary, all of them simplify the daily task of writing code. Together with the various improvements described in Chapter 1, “Project Manager Improvements,” Chapter 2, “Controlling the Property Sheet,” and Chapter 4, “Better Tools,” they show the VFP team’s commitment to making our day-to-day work easier.
Updates and corrections for this chapter can be found on Hentzenwerke’s website, www.hentzenwerke.com. Click “Catalog” and navigate to the page for this book.