Chapter 4
Better Tools
Visual FoxPro has a long tradition of providing developers with tools that increase productivity so you can bring applications to market quicker. Visual FoxPro 9 continues this tradition in grand style.
The overhaul of the Report Designer seems to be the central focus for most developers in VFP 9. The Report Designer is the tool that garnered the biggest share of resources and definitely has a big impact for developers from a productivity viewpoint, and for end-user applications. However, it is not the only tool in Visual FoxPro that is better than in previous versions. This chapter focuses on the changes to the other IDE components, and shows you some of the changes we think will have a big impact on your productivity and the day-to-day development experience with Visual FoxPro.
Microsoft adds new settings to the Options dialog in each new version of Visual FoxPro, and Visual FoxPro 9 is no different.
The View page now has the setting to control the IntelliSense dropdown list count (formerly on the Editor page). You can use List display count to increase or decrease this setting from the default of 15 as low as 5 or as high as 200.
The File Locations page has new entries for the Menu Designer, Report Builder, Report Output, and Report Preview. These settings are related to the new _MENUDESIGNER hook for the Menu Designer discussed in detail later in this chapter, and the new Report System features hooked in by the _REPORTBUILDER, _REPORTOUTPUT, and _REPORTPREVIEW system variables (discussed in Chapter 5, “Enhancements in the Reporting System,” Chapter 6, “Extending the Reporting System at Design Time,” and Chapter 7, “Extending the Reporting System at Run Time”).
The IDE page has one simple change, the new option of selecting Project from the Specify file/window dropdown (Figure 1). We discuss additional options for setting the Project Manager font in Chapter 1, “Project Manager Improvements.”
The Reports page (Figure 2) is where Microsoft made the most changes to the Options dialog. All the changes to this page of the dialog reflect the new report system functionality. The Report Engine behavior dropdown allows you to configure the SET REPORTBEHAVIOR command to 80 for report functionality compatible with VFP 8 and earlier, or 90, which uses the object-assisted features included with Visual FoxPro 9. The impact of this new command is discussed in Chapter 7, “Extending the Reporting System at Run Time.”
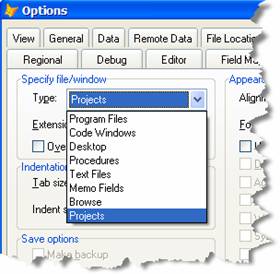
Figure 1. The IDE page of the VFP Options dialog
is where you set the font for
all projects.
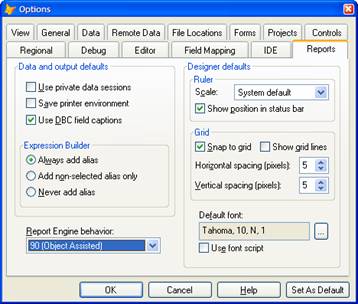
Figure 2. The Reports page of the Options dialog is where Microsoft made the most changes, specifically to support the new Reporting System.
Redirect Options dialog output
One of the little known tricks we often demonstrate to Visual FoxPro developers is the ability to send the Option dialog settings to code. The code is only generated if you hold down the Shift key when you click the OK button on the Options dialog. Prior to Visual FoxPro 9, this output was created in the Command Window. The output is now redirected to the Debug Output window if it is open. If the Debug Output window is not open, the code is not generated. The advantage of this new output location is simply not adding extra code to the Command Window because the code is retained between VFP sessions. Also, it’s easy to save the contents of the Debug Output window to a file. The shortcut menu has a “Save As,” so you don’t have to cut and paste.
Microsoft made significant improvements to the View and
Query designers in Visual FoxPro 8. The Visual FoxPro 9 upgrade includes one
important enhancement and one major change
in behavior.
Spaces in table and view names in FROM clause
The one enhancement to the View/Query designer centers on creating SQL Selects with spaces in either the base table or the base view name. Here is an example of a remote view to the SQL Server Northwind database using the “Current Product List” view.
SELECT Current_product_list.ProductID, ;
Current_product_list.ProductName ;
FROM dbo."Current Product List" Current_product_list ;
WHERE Current_product_list.ProductName LIKE ?vp_ProductName ;
ORDER BY Current_product_list.ProductName
You must have an alias for the base table/view and the alias
cannot have spaces in
the name.
Visual FoxPro 8 allows you to create a local and remote view
with spaces in the base table/view name. Error 36, “Command contains
unrecognized phrase/keyword”, occurs
when the view is reopened in the designer and you attempt to save the view
again. The
View Designer now opens without an error and does not trigger the error when
the view
is saved again.
Macro expansion based SQL clauses
The behavior change with the View Designer involves views using macro expansion in the SQL Select clauses for local views. Microsoft has changed the way developers need to structure the SQL Select code to include one or more macro expansion variables inside the view. The macro expansion is performed when the view is opened. The design of such views allows developers to use one view for many different conditions (WHERE and HAVING clause for filtering, ORDER BY sorting, GROUP BY aggregation) instead of maintaining one view for every condition on the same set of base tables. It enables developers to create “on-the-fly” queries and still maintain the views in a database container.
![]()
Microsoft is on record stating views were not designed to support macro substitution for any clause. Developers have tried this and made it work and have implemented applications relying on this behavior. The View Designer behavior change discussed in this section demonstrates that Microsoft is not responsible for undocumented behavior, and your use of it might break code in your applications.
![]()
The Developer Downloads for this chapter, available from www.hentzenwerke.com, include a database with views that include macro expansion clauses and some programs to create and use the macro expansion views. The database is called ViewDesignerChanges.DBC, and the programs are called CreateMacroSubViews.PRG and TestMacroSubViews.PRG.
The big change with respect to macro expansion in view clauses is the way you store the macro expansion variable inside the DBC. This technique changed with the release of Visual FoxPro 8 and again with Visual FoxPro 9. Prior to Visual FoxPro 8, you had to ensure the macro variable was not declared or in scope when you created the view with code like this:
CREATE SQL VIEW AuthorsWithFlexibleClauses2 AS ;
SELECT Authors.Authors_Pk, ;
Authors.cLastName, ;
Authors.cFirstName, ;
Authors.cCountry;
FROM viewdesignerchanges!Authors ;
WHERE &?lcWhere ;
Note that the macro expansion variable is prefixed in the code with “&?.” In VFP 8, Microsoft changed the rules so developers needed to remove the question mark normally used for view parameters:
CREATE SQL VIEW AuthorsWithFlexibleClauses2 AS ;
SELECT Authors.Authors_Pk, ;
Authors.cLastName, ;
Authors.cFirstName, ;
Authors.cCountry;
FROM viewdesignerchanges!Authors ;
WHERE &lcWhere ;
In Visual FoxPro 9, the rules change again. Macro expansion has reverted to the same style as Visual FoxPro 7 (both the ampersand and question mark). This means all existing views created or saved in Visual FoxPro 8 need the question mark added back in. If you skipped Visual FoxPro 8, you will not have to change a thing if you implemented macro expansion based views.
No matter how you create the views, the first step in Visual FoxPro 9 is to declare memory variables for each of the macro expansions you plan on including in your view. This is completely different from any previous version of Visual FoxPro. If you are using the View Designer or a third-party view editor, you can create PUBLIC memory variables in the Visual FoxPro Command Window. If you create the view programmatically, you can declare the memory variables directly in the code. The variable is a character data type and must contain Visual FoxPro syntax that compiles cleanly. The variable or variables must be in scope when the view is saved.
The View Designer does not support the process of saving a view with macro expansion in a straightforward manner. If you use the View Designer you set up the entire view, skipping any of the normal designer pages associated with the macro expansion clause. Once the view is completely defined, switch to the SQL code editor. Add the macro expansion clauses and remain in the SQL code editor. Save the view by clicking the save button on the Visual FoxPro toolbar or File | Save on the menu. When you close the SQL code editor, you are presented with a syntax error. Click the OK button and another message is displayed (Figure 3) asking if you want the designer to reload the SQL code editor based on content from the View Designer. At this point the view is saved, so answering yes does not harm anything. Make sure when you close the SQL code editor (Figure 4) the second time do not save your changes; otherwise they will overwrite the saved view.
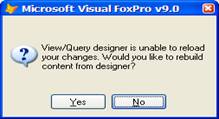
Figure 3. The View Designer will choke on the macro-substitution any time you try to close the SQL code editor window.
You might find it easier to create the views programmatically, or use one of the third-party view editors available. Listing 1 shows how to create the view programmatically, and Listing 2 shows how you can use the macro-substituted views in your applications.
Listing 1. You have to ensure the variables substituted in the view are declared and in scope when the view is created. This code is a shortened version of the view generation code found in CreateMacroSubViews.PRG.
CLOSE DATABASES ALL
OPEN DATABASE ViewDesignerChanges
PUBLIC lcWhere
lcWhere = ".T."
PUBLIC lcOrderBy
lcOrderBy = ".T."
CREATE SQL VIEW AuthorsWithFlexibleClauses2 AS ;
SELECT Authors.Authors_Pk, ;
Authors.cLastName, ;
Authors.cFirstName, ;
Authors.cCountry;
FROM viewdesignerchanges!Authors ;
WHERE &?lcWhere ;
ORDER BY &?lcOrderBy
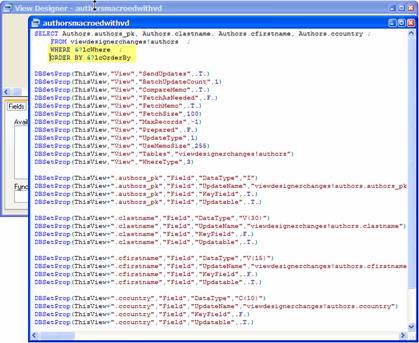
Figure 4. Add the macro expansion clauses (highlighted) after you set up the rest of the view so you can take advantage of the designer to set all the basic properties.
Opening views that use
macro expansion does not change. Declare the variables used in the macro
expansion, assign appropriate values to the variables, and open the view. Also
remember the memory variables need to be in scope during any REQUERY().
Listing 2. This code sample shows how you can use macro-substitution to have a single view retrieve a completely different set of records from the same base table.
LOCAL lcWhere, ;
lcOrderBy
IF USED("curAuthorsWithSInName")
USE IN (SELECT("curAuthorsWithSInName"))
ENDIF
IF USED("curUsAuthors")
USE IN (SELECT("curUsAuthors"))
ENDIF
IF USED("curCanadianAuthors")
USE IN (SELECT("curCanadianAuthors"))
ENDIF
lcWhere = "cLastName LIKE [S%]"
lcOrderBy = "Authors.cFirstName"
USE ViewDesignerChanges!AuthorsWithFlexibleClauses IN 0 ALIAS curAuthorsWithSInName
SELECT curAuthorsWithSInName
BROWSE NORMAL
lcWhere = "cCountry = [USA]"
lcOrderBy = "Authors.cLastName, Authors.cFirstName"
USE ViewDesignerChanges!AuthorsWithFlexibleClauses IN 0 ALIAS curUsAuthors
SELECT curUsAuthors
BROWSE NORMAL
lcWhere = "cCountry = [CANADA]"
lcOrderBy = "Authors.cLastName, Authors.cFirstName"
USE ViewDesignerChanges!AuthorsMacroedWithVD IN 0 ALIAS curCanadianAuthors
SELECT curCanadianAuthors
BROWSE NORMAL
USE IN (SELECT("curAuthorsWithSInName"))
USE IN (SELECT("curUsAuthors"))
USE IN (SELECT("curCanadianAuthors"))
USE IN (SELECT("authors"))
RETURN
![]()
One technique recommended
by developers who deploy macro expansion based views is to adopt a naming
convention and consistently name the clauses with the same memory variable.
Then declare the variables as part of your VFP startup program if you have one.
If you use the View
Designer to make changes, a syntax error is displayed when you open the view
each time and the view is opened in the SQL code editor. You can make changes
and save the changes, but only in the code.
Class Designer and Form Designer changes
The Class and Form Designers might just be the tools most often used by Visual FoxPro developers. Any changes that enhance the usability or increase productivity with these designers usually have a big impact.
Class/Form Designer Tab Order selection
There have been two different ways to change the tab order of controls in the Form and Class Designers since VFP 3.0. Some developers prefer By List, some developers prefer the Interactive method, and some of you prefer to use one under certain circumstances and the other under different circumstances. If you like to change frequently, you might find toggling between the two styles a tedious task. Prior to Visual FoxPro 9, there were two ways to toggle your tab order method; you could either use the Options dialog, or write some code to toggle the Windows Registry entry.
Visual FoxPro 9 extends the Tab Order menu option found on the View pad (Figure 5). Your selection in the Visual FoxPro Options dialog no longer toggles the menu option, and you have to select which one you want to use each time you set the tab order.
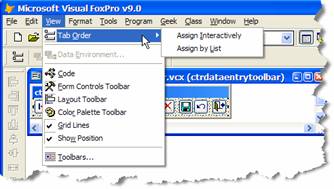
Figure 5. The Form Designer and Class Designer allow you to select which style of Tab Ordering you want from the View Menu.
If you use the Form Designer Toolbar, the button for Tab Order on the toolbar respects the current setting of the Tab Order selected on the Options dialog.
Keyboard shortcuts for adjusting object spacing
Sometimes the simple things in life are the most enjoyable. Visual FoxPro has a number of alignment and object spacing tools included on the Layout toolbar and the Format menu. Specific to Visual FoxPro 9 are some new keystroke combinations (see Table 1) to assist with adjusting the space between objects.
Table 1. There are two new keyboard combinations to adjust the space between the objects.
|
Keystroke |
Adjustment |
|
Alt+Arrow Key |
Adjusts the space in the direction of the arrow key between the objects by one pixel. |
|
Alt+Ctrl+Arrow Key |
Adjusts the space between the selected objects by one grid scale in the direction of the arrow key. This is similar to snap-to-grid movement. |
One small, but helpful change to the Data Environment Designer is the display of the database container (DBC) and the full path to the database container in the Visual FoxPro status bar (Figure 6) when you add a table or view to the data environment. The trick to displaying the database container is to drop down the Database combobox. Obviously you need SET STATUS BAR ON to observe this functionality.
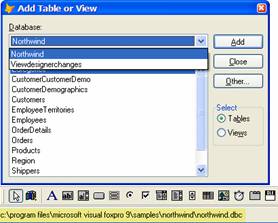
Figure 6. The database container (highlighted) is displayed in the VFP status bar when the Database dropdown is opened.
Enhancements to title bar descriptions
If you have several classes or forms open in the designer and want to add a new property or method, or want to work with the Edit Property/Method, how do you tell what class or form you are working with when you open one of the various dialogs associated with the designer? You hope you can see the front most designer, but often it is hidden under several code windows. Visual FoxPro 9 adds the form file name (if working with a form) or the class library and class name (if working with a class) to the title bar of the dialog box. These four dialogs have this addition:
· New Property
· New Method
· Edit Property/Method
· Class Info
The Fox Team listened to a common request from developers with respect to the Document View (Figure 7). You can now sort the list by name (object name / member name) in addition to the default sort by location. Previously, the Sort By Name was only available when you worked with programs (PRG).
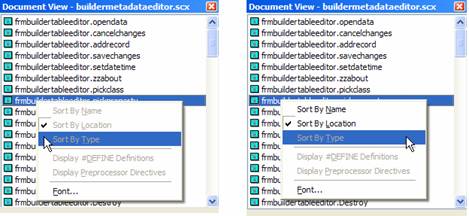
Figure 7. In VFP 9, more sort options are enabled in Document
View (seen on
the right).
Builders registered in the Builder.DBF file and marked deleted respect the current setting of SET DELETED. If you have SET DELETED OFF, the Builder Selection dialog operates like previous versions of VFP (displaying builders deleted in the registration table). The behavior change is more apparent if you have SET DELETED ON. If you have one builder registered for an object type, and it’s deleted, no builder runs for that object type; if you have multiple builders registered for the same object type, any builders marked deleted do not show up in the Builder list. This means developers can remove builders without the need to PACK the builder registration table.
Integrate your own menu designer
The Menu Designer has been slightly enhanced over the years to add icons to the menu and let you move menu items from one pad to another, but the basic interface has not changed dramatically. Developers have asked for enhancements to the designer to make it easier to use. Instead of dedicating the resources to overhaul the Menu Designer, Microsoft decided to expose a hook to allow developers to run their own customized designer. We do not anticipate the majority of developers will go out and write a menu designer taking advantage of this functionality, but we know of at least one and expect other third-party developers to create menu designers that do take advantage of this feature.
The hook is centered on a new system variable called _MENUDESIGNER. This system variable should be set to the program, application, or executable you want run instead of the standard Menu Designer. You set this in the Visual FoxPro Options dialog (Figure 8) on the File Locations page, or by programmatically setting the _MENUDESIGNER system variable via the Config.FPW, during the execution of your start up program or directly in the Command Window.
_MENUDESIGNER = "d:\WLC
The advantage of this implementation is the ability to switch between a custom menu designer and the native designer. If you specify a custom menu designer, none of the native features are available until you reset the system variable to the null string.
_MENUDESIGNER = SPACE(0)
Obviously you can toggle the setting between your custom menu designer and the native menu designer by setting the _MENUDESIGNER system variable. This way, if your custom designer does not provide all the features of the native designer, it is simple to use the designer with the functionality you need. If several third-party tool providers ship products you literally can use all of them, just one at a time.
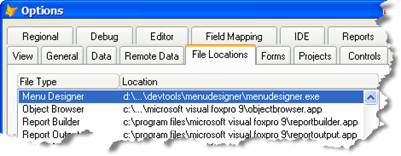
Figure 8. The _MENUDESIGNER system variable is set on the File Locations page of the Options dialog.
Once the new system variable is set, you open the customized menu designer the same way you open the native Visual FoxPro Menu Designer:
· MODIFY MENU
· CREATE MENU
· Modify a menu via the Project Manager.
· Create a new menu via the Project Manager.
· Select Menu from the New dialog presented after picking File | New on the menu or clicking the New button on the standard toolbar.
· Use the EDITSOURCE() function to open the source code of a menu.
· Use the Files Object Modify method to edit a menu.
If you use the CREATE MENU ?, MODIFY MENU ?, or MODIFY MENU commands, or click the Add button on the Project Manager, the Open File dialog is presented. If you pick a menu file or provide the file name, you continue to the custom menu designer, just as you would with the native Menu Designer. If you cancel the Open File dialog, the custom menu designer is not called at all.
If you CREATE MENU, click the New button on the Project Manager, or select the File | New menu option or New button on the Standard toolbar, you are presented with the New Menu dialog to select a regular menu or a shortcut menu. Selecting one of the two menu styles starts the designer; canceling indicates to Visual FoxPro the designer should not be started.
![]()
The Files collection’s Add method does not initiate the custom menu designer, just as it does not execute the native Menu Designer.
![]()
If you open the menu via the EDITSOURCE() function, it behaves as if you executed a MODIFY MENU NOWAIT.
Your customized menu designer can do anything you want, but it has to conform to some fundamental specifications.
![]()
Your customized menu designer must return a logical value. If the customized menu designer returns False, the native Visual FoxPro Menu Designer is opened; otherwise Visual FoxPro assumes the customized menu designer handled the call. This is a terrific design because third-party products that intentionally do not support specific functionality can gracefully not load and the native Menu Designer will function as it normally does.
The entry point into the designer code must accept three parameters. The parameters help you determine how the menu designer was called, important items like the menu file name, and the different clauses used in the MODIFY/CREATE MENU commands. The contents of the parameters differ depending on how the menu was called.
The first parameter is the file name. This parameter is a fully qualified path and file name (with MNX extension) when you specify a menu file or pick one via the Open dialog. When you do not provide the file, the file name is a generic file without the path and extension. In this case the parameter is “Menu” followed by an auto-incrementing number.
The second parameter is a numeric value indicating how the menu designer was started. Table 2 lists the valid parameter values and what they mean.
Table 2. Valid settings for the second menu designer parameter and the meaning of each of the values.
|
nCommandType |
Meaning |
|
1 |
A standard system menu was selected using the New Menu dialog. |
|
2 |
A shortcut menu was selected using the New Menu dialog. |
|
3 |
The menu designer was started by MODIFY MENU. |
The last parameter is an array with additional information about how the menu designer was called; if there’s no additional information to pass in, this parameter receives False. If the menu is new via the Project Manager’s New button, the array is has one row and is populated with “PROJECT” in the first column, and the project name with fully qualified path in the second column.
The other scenario causing an array to be passed in for the third parameter is to execute a CREATE MENU or MODIFY MENU command (in code or in the Command Window) with the optional IN, NOWAIT, SAVE, or WINDOW clause. The resulting array has one row for each of the clauses used in the command. If you do not use any of the clauses, there is no array. The clause is in the first column of the array. If you use the NOWAIT or SAVE clause, the second column always contains True. The IN clause has the name of the window or “SCREEN” in the second column. If you use the WINDOW clause, the name of the window is put in the second column of the array.
If neither of the two scenarios applies, the third parameter is passed as False. If you check PCOUNT(), you will see all three parameters are passed, so the third parameter is deliberately passed as .F., and is not just an optional parameter.
So the implementation is as simple as creating a program that accepts three parameters and deals with them appropriately, and assigning this program (with path if necessary) to the _MENUDESIGNER system variable. That is the easy part. If you are going to keep compatibility with the MNX file structure and allow the GenMenu process to run, you need to do a little research on how Visual FoxPro stores the menu source code in the MNX metadata file, and get your head around the GenMenu process. These are not difficult tasks, just something to consider before you start coding.
![]()
The menu metadata source code files (MNX/MNT) are documented in the 60Spec.PJX project found in the Tools\Filespec\ under the Visual FoxPro root directory.
So you have the implementation requirements, what are some practical implementation ideas? Here is a short list we considered since we learned about this functionality:
1) Write a menu designer just to edit prompts, results, or address a specific weakness of the native designer so your menu editing is less painful.
2) Write a menu designer that pre-processes the MNX file to add standard security, SKIP FOR logic, set the hot keys, or order the items on the menu pad to your preferences.
3) Write a menu designer that supports custom object menus you created over the years. There is nothing saying you need to conform to or support the MNX structure.
4) Write a menu designer with custom hooks for GenMenuX.
5) Write a complete replacement for the native Menu Designer with complete compatibility with the existing menu infrastructure.
![]()
The Developer Downloads for this chapter, available from www.hentzenwerke.com, include a test program called TestMenuDesignerParameters.PRG to demonstrate the parameters passed and the values assigned. Assign this program to the _MENUDESIGNER system variable and interact with the various menu designer calls to see what is passed to your custom menu designer.
While it would be great to supply you with a complete replacement for the Menu Designer, we do not have a couple hundred spare hours to do so and finish writing this chapter. Instead, we implement a quick menu designer sample to address the prompt editing and execution code (commands and procedures), Skip For, Message, and Comment properties because we think the native designer does not have enough space on the user interface to be very workable.
![]()
The Developer Downloads for
this chapter, available from www.hentzenwerke.com,
include a form (RasSimpleMenuDesigner.SCX) and a program
(RasSimpleMenuDesignerMain.PRG) that collaborate
and demonstrate how to write a very simple and functional custom
menu designer.
The example provided is not very robust and was created for demonstration purposes only. We recommend you make backups of the menus you want to work with in case something bad happens. The Save button is enabled, but does not actually save any changes. If you want to take the time to make sure the robustness you need is added to this sample code, you can uncomment the TABLEUPDATE command in the form’s Save method.
The main program (see Listing 3) accepts the three parameters passed by Visual FoxPro, checks to see if the menu exists, and calls the form presented as the “Simple Menu Designer.” If the menu file does not exist, which is the case if a new menu is created via the Project Manager New button or a CREATE MENU command, the native Menu Designer is called.
Listing 3. The main program for a simple menu designer.
* Simple Menu Designer - meant to serve as an example, not production solid
LPARAMETERS tcFileName, tnCommandType, taDetail
LOCAL loParameter AS Line, ;
loForm AS Form, ;
llReturnVal AS Logical
* Consider it default custom designer handled
* the request so native designer does not start
llReturnVal = .T.
IF VARTYPE(tcFileName) = "C"
IF FILE(tcFileName)
* Good, we have an existing menu, continue
* Create an object the form can use to pass along parameters
* which are used before the form Init() fires.
loParameter = CREATEOBJECT("line")
loParameter.AddProperty("cFileName", tcFileName)
_screen.AddProperty("__oRASSimpleMenuParameter", loParameter)
* Start user interface in modal mode
DO FORM RASSimpleMenuDesigner NAME loForm LINKED NOSHOW
loForm.Show(1)
_screen.__oRASSimpleMenuParameter = .NULL.
ELSE
* Let the native designer fire up and handle request.
llReturnVal = .F.
ENDIF
ELSE
MESSAGEBOX("You need to pass parameters to this program and the file name parameter is not valid", ;
0 + 16, ;
"Simple Menu Designer")
ENDIF
RETURN llReturnVal
The Simple Menu Designer (see Figure 9) example form reads the property _screen. __oRASSimpleMenuParameter.cFileName, opens the MNX file, filters out records without prompts, and displays the menu information. You can navigate to other menu items using the grid. The command and procedure code displays when you navigate to a menu item with command or procedure code. The Prompt, Skip For, Message, and Comment can be edited for any menu item. The Object Code combobox (display only) tells you what type of menu item is currently available for editing. Take a look at this combobox in the Form Designer so you can see how you can translate the underlying “codes” to something more understandable in your custom designer. There are several items in the menu metadata you will want to translate on your designer.
As we noted earlier in this section, we do not expect every developer to jump on this new feature and create their own menu designer, but we do expect developer tool vendors to take a shot. We know there is a lot of room for improvement over the native Menu Designer. If you do consider creating your own, make sure to consider all the functionality you want to provide and understand that you do not need to write a complete replacement for the native designer. Design and create something that services the pain you feel the most with the native designer and start with this functionality. Think outside of the box and know you can break the mold and even skip the native MNX metadata source code and the GenMenu process of creating the MPR source code. As with other parts of Visual FoxPro 9, Microsoft has removed limitations and in this case has blown the lid off and exposed hooks so you can completely replace the native functionality.
Microsoft did not place the Debugger high on the Visual FoxPro 9 priority list, but there are some very handy enhancements that should make it easier to figure out why your code does not work as you expect it to.
Constant support in Trace Window
Prior to Visual FoxPro 9, when stepping through code in the Trace window, there was no way to determine the value of a constant other than opening the source code containing the #DEFINE. In Visual FoxPro 9, hover the mouse over the constant and a tooltip appears showing the value, similar to memory variables.
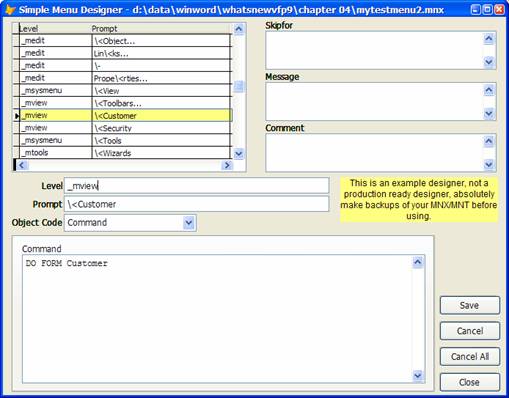
Figure 9. The Simple Menu Designer is an example of how you can use the new _MENUDESIGNER hook to create your own menu designer replacement.
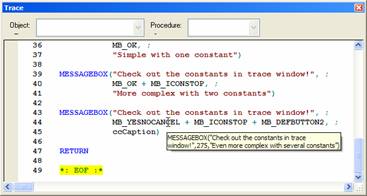
Figure 10. The Trace Window displays the compiled constant values in a tooltip.
There is one issue you need to be aware of with this new debugging feature. The tooltip shows the compiled line as the Visual FoxPro p-code interpreter sees it. If you use several constants together in a calculation, you only see the resulting value. We demonstrate this in Figure 10 with the MESSAGEBOX() function. The dialog box type parameter typically has two or more constants to determine the icon and buttons displayed with the message. Visual FoxPro compiles these together and the Trace Window displays the results.
The Watch window literally accepts anything you type into the watch expression textbox and tries to evaluate the expression. If errors occur prior to Visual FoxPro 9, you had no way of knowing it. In VFP 9 the errors display in the Debug Output (Figure 11) window. One example is typing THIS. in the expression and seeing the resulting error message in the Debug Output window.
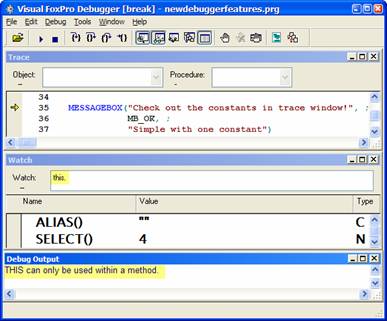
Figure 11. The Watch window allows you to include almost anything, including code that triggers errors. VFP errors triggered in the Watch window now display in the Debug Output window.
Debug output window is mouse wheel enabled
One debugger oversight the Fox Team fixed in Visual FoxPro 9 is the ability to use the mouse scroll wheel in the Output Window. This is not an earth-shattering fix, but if you are accustomed to using the mouse wheel, it is a nice addition.
Reports have never interacted with the Visual FoxPro debugger prior to Visual FoxPro 9. This presents a problem for developers who have reports with user-defined functions (UDFs) called in report expressions.
Visual FoxPro 8 throws Error 1651, “CANCEL or SUSPEND is not
allowed,” if you execute SET
The changes to the Report Designer (especially, the new ReportListener object) required the Fox Team to integrate debugging capabilities into reports. The integration is not limited to the ReportListener. You can debug your own UDF code as well, as shown in Figure 12.
![]()
The Developer Downloads for this chapter, available from www.hentzenwerke.com, include a report and a procedure file used to demonstrate how to call the debugger when previewing or printing a report. The report is called AuthorDebugging.FRX, and the program is called AuthorInitials.PRG.
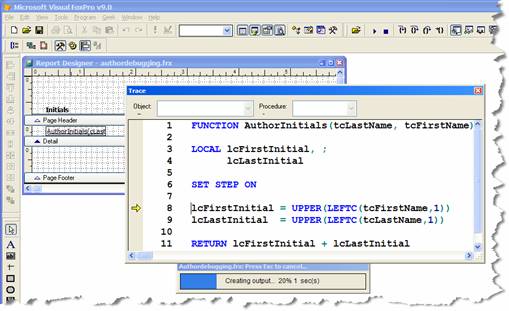
Figure 12. The debugger now works with reports so you can step through code called from a report expression or triggered through a ReportListener.
This enhancement is critical for developers who are writing ReportListener extensions, otherwise you would not have any way to debug your code as the report was executing. See Chapter 7, “Extending the Reporting System at Run Time,” for more details on the ReportListener object. The debugger is called in the same manner with SET STEP ON (or your favorite style of calling the debugger) in your code. The debugger does not interact with report expressions unless they trigger custom code in a ReportListener object, or call code in an object you created (different from a ReportListener), or run a user-defined function in program code.
The example we ship in the downloads is very easy to follow. First we create a report and in one of the report expressions call the AuthorInitials function. The AuthorInitials function takes the first and last name and assembles the initials from the name. In the function we add SET STEP ON. To simplify running the report we add the SET PROCEDURE TO code in the report data environment’s BeforeOpenTables method. The Trace window displays when the report is previewed or printed to a printer using the IDE toolbar buttons or the REPORT FORM command.
The Fox Team also wrote a special ReportListener subclass to help with debugging object assisted reports. This class, DebugListener, is found in the ReportListener.VCX class library in the FFC subdirectory of the VFP home directory. It is very easy to work with. First you instantiate the DebugListener class, and then you pass it to the REPORT FORM command:
loDebugListener = NEWOBJECT("debuglistener", HOME()+"ffc\_reportlistener.vcx")
REPORT FORM AuthorDebugging PREVIEW OBJECT loDebugListener
The DebugListener class
records details about how the report is executed and how the various objects
are rendered. Along the way it records various property settings during the
different stages of report execution. This class will be extremely handy in
determining why a report is not functioning as expected. The report isn’t
displayed or printed when the DebugListener is the ReportListener hooked into
the report. The report is processed, the different properties are recored, and
stored in a text file. This text file (see Figure 13) is displayed after
the report is finished. You can review the contents of this report to determine
how the report was processed from a ReportListener perspective.
Use the Class Browser for PRG-based classes
The Class Browser has always been able to open VCX files, but many developers prefer to write at least some of their classes in program code (PRG). One of the disadvantages of taking the PRG route was the inability to use the Class Browser to maintain the classes and get a visual representation of the class hierarchy. Visual FoxPro 9 removes this limitation.
The base functionality of the Class Browser (see Figure 14) is available for PRG-based classes, although there are a few differences when working with them. The first is the descriptions for the class library (the program in this case) and the descriptions for the individual classes are not available in the description pane (lower left corner). The second is the member descriptions (normally maintained in the lower right pane) cannot be added or edited. The third difference is you cannot filter out empty members in the member pane (upper right pane).
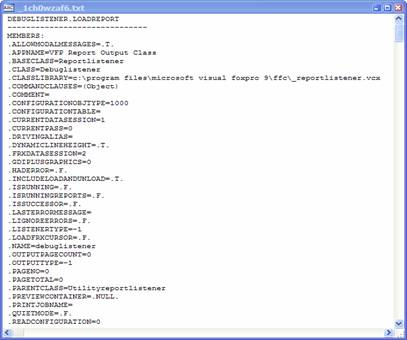
Figure 13. The DebugListener class records numerous property settings and rendering processes as a report is executed. The findings are saved in a text file and displayed when the report is done.
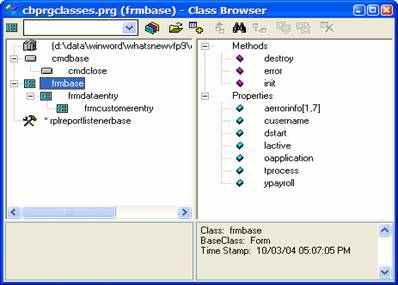
Figure 14. The Class Browser can open a program and display the classes just like it does for VCX class libraries.
The Class Browser does not dock by default, but because it is a VFP form and VFP forms are dockable, you can write code to dock the Class Browser. This is accomplished by running an add-in for the Activate event.
![]()
The Developer Downloads for this chapter, available from www.hentzenwerke.com, include a program called CBMakeDockableAddin.PRG, which demonstrates how you can create an add-in to dock the Class Browser.
Listing 4. Code that runs to dock the form when the Class Browser is started.
LPARAMETERS toBrowser
LOCAL lcName && Name of the Add-in
LOCAL lcComment && Comment for the Add-in
* Self registration if not called form the Class Browser
IF TYPE("toBrowser")= "L"
lcName = "
lcComment = "Developed by RAS for online forum discussion and example"
IF TYPE("_oBrowser")= "O"
* If Class Browser is running, use Addin() method
_oBrowser.Addin(lcName, STRTRAN(SYS(16),".FXP",".PRG"), "ACTIVATE", ;
, , lcComment)
ELSE
* Use the low level access of the Browser registration table
IF FILE(HOME() + "BROWSER.DBF")
lcOldSelect = SELECT()
USE (HOME() + "BROWSER") IN 0 AGAIN SHARED ;
ALIAS curRASClassBrowserAddinReg
SELECT curRASClassBrowserAddinReg
LOCATE FOR Type = "ADDIN" AND Name = lcName
IF EOF()
APPEND BLANK
ENDIF
* Always replace with the latest information
REPLACE Platform WITH "WINDOWS", ;
Type WITH "ADDIN", ;
Id WITH "METHOD", ;
Name WITH lcName, ;
Method WITH "ACTIVATE", ;
Program WITH LOWER( STRTRAN( SYS(16), ".FXP", ".PRG")), ;
Comment WITH lcComment
USE
SELECT (lcOldSelect)
ELSE
MESSAGEBOX("Could not find the table " + HOME() + ;
"BROWSER.DBF" + ", please make sure it exists.", ;
0 + 48, ;
_screen.Caption)
ENDIF
ENDIF
RETURN
ELSE
* Check to see if we really got called from the Class Browser
* and it is valid for VFP 9 and higher.
IF NOT PEMSTATUS(toBrowser, "Dockable", 5)
RETURN .F.
ELSE
toBrowser.Dockable = 1
toBrowser.Dock(1)
toBrowser.Refresh()
ENDIF
ENDIF
RETURN
The first three-quarters of the program register the program in Browser.DBF (the Class Browser Registration table). The docking code first confirms the developer is running in a version of Visual FoxPro supporting docking forms, docks the form to the left-side, and refreshes the Class Browser. See Chapter 13, “Forms and Controls,” for more details on how form docking is implemented.
Code References was introduced in Visual FoxPro 8 and has some nice usability enhancements added in Visual FoxPro 9.
The biggest benefit of using the updated Code References tool is the ability to have separate columns for the class, method, and line number instead of one column in the results grid. This simple enhancement allows developers to easily sort the results by method name. You can still retain the single column with the information concatenated together if you like. In fact, the tool defaults to the older style. You make the change to individual columns by selecting the Show separate columns for class, method, and line option in the Code References Option dialog (Figure 15).
The result set sort menu (Figure 16) is a little tricky to find. You have to select a cell in the grid, and then right-click the cell. The new option on this menu is the Sort By | Method. This option is available whether you show the Class/Method column or the individual class/method/line number columns.
The last set of additions is to the results treeview shortcut menu. There are three new options. The Expand All option expands all the nodes on the tree. The treeview is optimized to load the results as the nodes are expanded, therefore, expanding all could take some time depending on your existing results. The Collapse All option does the reverse and collapses all the nodes on the tree. The Sort by Most Recent First toggles the order of the search treeview. When it’s selected, the newest searches are at the top of the list; when it’s not selected, the searches are shown in the order they were done (oldest to newest).

Figure 15. The Code References tool now allows developers to choose between one column for the class/method/line or three separate columns. The Code References Options dialog is where you make this choice.

Figure 16. The Code References tool has a Sort By option on the result set shortcut menu. One of the new options is to sort by Method.
The Task Pane has a completely new pane called the Data Explorer and the Environment Manager pane has a couple of nice enhancements.
The Data Explorer lets you examine data and components
in Visual FoxPro databases, SQL Server databases, VFP free tables, or any other
ODBC or OLE DB compliant database via an
This tool offers:
· A way to view schema information for VFP, SQL Server, or ADO-connected data sources.
· Quick access to the data itself.
· Centralized maintenance of multiple databases without the need to change to different folders, servers, or projects.
· The ability to run queries in a similar fashion to SQL Server’s Query Analyzer.
· Functionality similar to the Visual Studio Server Explorer.
To use the Data Explorer, you set up a connection for each database you want to explore. The key to using the tool efficiently is understanding the features available for the type of connection you establish.
While you can run the Data Explorer through the Task Pane Manager, you can also run it as a standalone tool like this:
DO HOME()+"dataexplorer.app"
In this case, the Data Explorer runs as a regular form and creates a public memory variable called _oDataExplorer. You can use this memory variable to manipulate the look and feel of the Data Explorer window including docking the form. The code needed to dock this form is:
_oDataExplorer.Dockable = 1
_oDataExplorer.Dock(1)
We show the Data
Explorer docked to the left side of the Visual FoxPro IDE and in the Task Pane
in Figure 17. If you want the Data
Explorer docked each time you start it, you have to run the docking code each
time you start the tool. You can write a wrapper program you call from the
Command Window or add a custom menu item.

Figure 17. The Data Explorer is available in the Task Pane Manager; it can be run standalone without the Task Pane Manager, in which case, it’s dockable.
There are no options available for this pane via the Task Pane Options window. However, the Data Explorer has a separate Options dialog accessed from the Options button. The Data Explorer Options dialog provides you with the ability to change the font, determine whether the description pane and column schema information is displayed, plus manage add-ins, shortcut menus, and drag and drop operations. If you change things and then want to restore the default options, a button on this dialog lets you do so.
Connections
Connections are links pointing to the data you want to
access via the Data Explorer. Connections aren’t needed to work with SQL Server data. Each of the SQL
Server instances available on your machine or the network are loaded under the
SQL Servers node when you expand that node.
You have several
options when you define a connection. The connection types shipping with Visual
FoxPro 9 include FoxPro databases, a FoxPro directory, a FoxPro table (free or
contained), SQL Server, SQL database, and an ADO connection. Each of these
connection types have different properties to set up. You modify the list by
adding or removing “S” records in the DataExplorer.DBF file.
If you are working with
native Visual FoxPro data or remote data that is not SQL Server, you need to
add a connection. All connection information is stored in the DataExplorer.DBF
file (discussed in the “DataExplorer.DBF” section later in this chapter) so it
is available the next time you start the Data Explorer. To add a new
connection, click the Add Connection button at the top of the Data Explorer.
Adding a connection for
a Visual FoxPro database or a SQL Server database places the database under the
Connections node and provides direct access to the internals of the database.
You need to specify which database the connection refers to. You select the
Visual FoxPro database by navigating to a folder and selecting the DBC file.
SQL Server database selection is performed using the SQL Connection Properties
dialog (Figure 18). SQL Server
database connection requires you specify security information. Other connection
attributes include the connection timeout and query timeout parameters, and if
you want the column information displayed and the objects sorted
alphabetically.

Figure 18. The SQL Connections Properties dialog lets you specify the server and database when adding a new connection.
A FoxPro Table
connection is to a specific table (free or contained); all you do to set up
this connection is pick a table via the Open dialog. You can use this
connection type to save time drilling down through a database container
connection if you regularly work with a particular table. For example, you
might use it for an error log table you’re evaluating as you test a particular
bug.
The FoxPro Directory
connection lets you pick a folder once for the connection. This type of
connection provides access to all the database containers in the specified
folder. If you add or remove a database container from this folder, the
connection reflects the change.
![]()
The FoxPro Directory
connection has a distinct productivity advantage for developers who segregate
data into several VFP databases (such as a database for tables, another for views
to maintain tables, and another for views used in reporting), provided you keep
all the databases in one folder. Now all the databases are available without
the need to change to the folder, open all the databases, and switch between
them to access the views and stored procedures.
SQL Server connection
allows you to put a SQL Server on the connections node. You pick the SQL Server
you want using the same dialog as the SQL Connection Properties dialog (Figure 18).
The only difference is you don’t specify a database.
![]()
If you are working with a
specific SQL Server database, we have found
it quicker to add a connection to the SQL Server database rather than
traversing through the SQL Server node. The reason it is faster is the
SQL Server node initiates a search for all SQL Servers on the network
the first time it is expanded for each Data Explorer session. Making a
connection provides direct access without the search each time you use
the Data Explorer.
ADO connections are
perfect for databases you access via an OLE DB provider. You can base the
connection on a DataSource Name (DSN) or specify a connection string. There is
a Build... button available to assist you with the
construction of the connection string, including the ability to test the
connection. Operations available with ADO connections depend on the OLE DB
provider.
After you establish a
connection you may want to change properties of the connection. This is done
via the shortcut menu for the connection and selecting the Property item. Each
of the different connections have a different property dialog. The FoxPro
databases, tables, and directories property dialog presents two properties:
show column info and sort objects. You need to decide if these are turned on or
off. The SQL Connection Properties dialog (Figure 18) previously discussed is
displayed for SQL database connections. A variation of the SQL Connetion
Properties dialog is displayed for SQL Servers. The dialog only allows you to
set the default security, connection and query timeout parameters, and the show
columns / sort properties for SQL Server connections. You can change the ADO
DSN or connection string, the connection and query timeout parameters, and the
show column info on the ADO Connection Properties.
The interface has a bit
of a quirk for ADO connections. Once you add the ADO connection database it
does not change the name on the treeview node if you pick another database via
a connection string or DSN. You need to right-click the connection and select
the Rename Connection menu option.
Shortcut menus
The Data Explorer
has shortcut menus defined throughout the treeview interface. If you do not
take time to right-click items in the Data Explorer, you will miss a lot of the
built-in functionality. Some of the menu options are common, while some of them
are specific to the data object you are clicking.
The Run Query menu item
is common to all the nodes in the Data Explorer. This menu item starts the Run
Query dialog (Figure 19), which
provides a user interface to build queries and view the results in a read-only
grid. You can save the query to a file, load a query from a file to the edit
area, toggle the format between VFP SQL syntax and SQL Server syntax, and copy
the query to the clipboard in two formats (as a literal assigned to a variable,
or using the TEXT/ENDTEXT syntax). The clipboard code can be pasted into your
programs. This allows you to work on the query, get it the way you want,and
then dump the code into your applications. If you are running queries against
SQL Server data, the Messages page shows you the message results of the query.
This is very similar to the SQL Server Query Analyzer.

Figure 19. The Run Query dialog provides an interface to write queries and view result sets.
The Copy Results to Clipboard button performs a _VFP.DataToClip() with the result set of the query copied to the clipboard with space delimiters.
Refresh is the second most common shortcut menu item.
Selecting Refresh from the shortcut menu reloads the Data Explorer with updated
information. This is handy if you or someone on your team is making changes to
the database and want them reflected in the
Data Explorer.
The Filter menu item opens the Filter dialog (Figure 20), which allows developers
to reduce the number of items shown on a node in the Data Explorer. This comes
in handy when you have a lot of tables, columns in a table, stored procedures,
or other elements, and you want to reduce the number of items to be displayed.
You might be asking, how is this useful? If you are using a naming convention
and want to filter out just the related tables that start with a string, or you
just cannot see the table in the long list, you can use it to find this single
table.
When you are working with tables or views, there is a Browse menu item. It opens the table or queries the view and displays the records in a window with a grid. This grid is read-only for SQL Server tables and views, but is editable for VFP data. With VFP views, you can change the data in the grid, but the data is never committed to the underlying tables.

Figure 20. The Filter dialog gives developers the option to include or exclude certain nodes on the Data Explorer treeview based on the text of the node.
The Design menu item is available for VFP tables and views. By default, the Design option opens the Visual FoxPro Table Designer or View Designer, letting you change the structure of table, add triggers and rules (both column and table level), add comments, and create and maintain indexes. Views by default are opened in the View Designer.
The View Definition option is available for local and remote
views and stored procedures. The view definition code or stored procedure code
displays in a separate window (see Figure
21). The code displayed for local views is the SQL Select, selecting a remote
view displays CREATE VIEW code, and a stored procedure shows the actual program
code (for both VFP and remote databases). You can copy the code (by
highlighting and pressing CTRL+C) from the View Definition window in case you
want to run it or put it
into a program.

Figure 21. The View Definition dialog displays the SQL Select code for the view (both VFP local and remote views).
The shortcut menu for stored procedures includes a number of items not on any other shortcut menus. For remote data, you can run, edit, delete, and create new stored procedures from the Data Explorer. The remote data stored procedures are updated by running queries that alter, delete, and insert new stored procedures via SQL language scripts. Template code is provided for you when you select these options. You can also edit stored procedures for a local Visual FoxPro database. Doing so opens the native editor allowing procedures to be edited, added, or deleted.
Rename Connection and Remove Connection are only on the shortcut menu when you have a connection selected. They allow you to work with the connections after you add them. The rename option allows you to change the text in the connection treeview node. The remove option lets you remove this connection from the Data Explorer. Note that it only removes the reference; it doesn’t delete the database, server, or the FoxPro table.
Dragging and dropping
The drag and drop
options are not very obvious, but are documented in the Help file in the Data
Explorer Task Pane topic. You can select a node in the Data Explorer treeview,
and drop it into a program editor or onto the Form/Class Designer. Each of the
node types in the Data Explorer has different results, documented in Table 3.
The code generated in
the program editors is well commented. These comments are important as they
tell you what needs to be changed to make things work. Important details like
adding a user name and password to the connection string, telling you objects
that go out of scope are not available (all object reference memory variables
are declared LOCAL), where to add error checking, and where your custom code to
process the data should reside.
Table 3 documents the
results delivered with Visual FoxPro, but drag and drop behavior is
customizible. It’s driven by scripts written in VFP and the scripts can be
edited via the Data Explorer Options dialog (Figure 22). Click the Manage Drag/Drop button on this dialog.
Table 3. The drag and drop functionality from the Data Explorer differs
depending on whether you drop on a program editor or the Form/Class designer.
|
Object |
Code Editor
(program, method, stored procedure) |
Form/Class
Designer surface |
|
Databases |
For a SQL Server or
ADO connection, code is pasted into the editor to establish a connection,
create an ADO recordset, and set up a CursorAdapter to access the data. For a
VFP database, it just pastes the database name. |
Nothing |
|
Tables/Views |
For VFP Tables and
Views, a SQL Select statement including all the columns is pasted into the
editor. For SQL Server and ADO connections, code is pasted into the editor to
establish a connection, create an ADO recordset, and set up a CursorAdapter
to access the data. The table name is included in in the query in the CursorAdapter.SelectCmd
property. |
A grid is added to the
form or class; the grid class used is based on the current Field Mapping
settings. You still need to set the RecordSource to the table, and add a way
to connect to data. Your class must be a class that can contain other
objects, otherwise a message is displayed indicating the need for a container
class. |
|
Columns |
For VFP tables/view
columns, a SQL Select statement is pasted into the editor: SELECT
<ColumnName> FROM <table or view name>. For SQL Server and ADO
connections, code is pasted into the editor to establish a connection, create
an ADO recordset, and set up a CursorAdapter to access the data. The column
and the table/view name are included in the query in the CursorAdapter.SelectCmd
property. |
A textbox is added
to the form or class; the textbox class is based on Field Mapping settings.
The ControlSource is bound to the column, but you need to add a way to
connect to data. Your class must be a class that can contain other objects,
otherwise a message is displayed indicating the need for a container class. |
|
Object |
Code Editor
(program, method, stored procedure) |
Form/Class
Designer surface |
|
Stored Procedures |
For SQL Server and
ADO connections, code is pasted into the editor to connect to the data and
execute the stored procedure. The stored procedure name is included in the
EXEC call, and stored in the CursorAdapter.SelectCmd property. Parameters are
included if the stored procedure has parameters. VFP Stored Procedures are
SQL Select statements instead of a procedure call. This is a bug in the
initial release and hope it will be fixed in the future. |
Nothing |
|
Stored Procedure
Parameters |
There is a bug with SQL Server and ADO connections creating
a SQL Select statements where the FROM clause is the parameter, We expect
this to be corrected in the future. |
Nothing |
|
Functions |
For SQL Server
and ADO connections, code is pasted into the editor to connect to the data
and execute the function. The function name is included in the EXEC call, and
stored in the CursorAdapter.SelectCmd property. |
Nothing |

Figure 22. The Drag/Drop Manager is used to add/change the scripts, and ultimately the behavior of drag and drop operations in the Data Explorer.
Each of the operations can have a different script (and behavior) when items are dropped on a program editor or the Form/Class design surface. The script is Visual FoxPro code. The code can be changed directly in the editbox, but you can get colorization and IntelliSense when editing the script code via the Modify button. Documentation for the Data Explorer object model was not available at the time this material was written, but we hope Microsoft will release a white paper on the object model so developers can write powerful scripts. Some information on the object model can be understood by placing SET STEP ON in the existing scripts and exploring the code as it is executed, or by reviewing the Data Explorer source code available in the XSource folder.
Changing menu shortcut behavior
Just as drag and
drop functionality can be customized (see “Dragging and Dropping” earlier in
this chapter), so can shortcut menu behavior. Click the Manage
Menus button in the Data
Explorer Options dialog to open the Menu Manager dialog (Figure 23).

Figure 23. The Menu Manager is used to add and change the scripts, and ultimately the behavior of shortcut menus in the Data Explorer.
You can add new shortcut menu options, copy existing ones, and even delete current behavior. As we note in discussing the Drag/Drop Manager, the object model for the Data Explorer is not documented (as of the writing of this chapter), so you have to explore a little to understand how to code this script. The key to exploring the object model is to SET STEP ON in one of the existing scripts, possibly one you want to change. You need to find out what properties are available to determine whether the node is a view, what the view name is, and what database contains the view.
For our example, we selected a real developer requirement. Developers who use third-party tools instead of the View Designer might want their favorite third-party tool to run instead of the View Designer when they design a VFP view. The same shortcut script is called to design both tables and views. The normal behavior is to call the Design method for the currently selected node. Because you only want to change the behavior for views, you need to check what node is selected and what type of node it is, as in the code in Figure 23.
In the case of the ViewEditor (a free tool originally
developed by
The view name is easy to find because the current node in the treeview has a property called NodeText. This property contains the name of the selected database object. You can use the current node’s parent node to determine whether the NodeText for the parent node is “Views.” If so, you are designing a view; otherwise you perform the native behavior for tables. The tricky part is determining the database name. We searched for a while and found the current node’s grandparent node (parent’s parent node) has a property called OptionData, which is a multi-line text field storing property name and property value pairs. One of the properties is DatabaseName. The code parses out this information, and you can pass the three parameters to the ViewEditor as required. The complete code to override the Design script is included in Listing 5.
![]()
The Developer Downloads for this chapter, available from www.hentzenwerke.com, include a script to change the way the Data Explorer’s Design shortcut menu option behaves (opens up the ViewEditor instead of the native VFP View Designer). The script is found in DataExplorerDesignMenuScript.prg.
Listing 5. This code is intended for use in the Manage
Menu section of the Data Explorer options. Specify this code as the Script to
Run for the Design menu option and when you select this shortcut menu option,
White Light Computing’s ViewEditor (free or commercial version) will run.
LPARAMETERS oParam
*< RAS 07-Nov-2004, override default behavior with custom
*< execution of WLC ViewEditor for VFP views.
*< oParam.CurrentNode.Design()
IF oParam.CurrentNode.ParentNode.NodeText = "Views"
* Modify the lcEditor with your location
lcEditor = "D:\DevVFP8Apps\DevTools\ViewEditor3\ve3.exe"
lcView = oParam.CurrentNode.NodeText
lnLines = ALINES(laOptionData, ;
oParam.CurrentNode.ParentNode.ParentNode.OptionData)
lnRow = ASCAN(laOptionData, "DatabaseName=")
IF lnRow > 0
lcDBC = SUBSTRC(laOptionData[lnRow], ATC("=", laOptionData[lnRow]) + 1)
* Run ViewEditor passing view name, DBC, and "modal" parameter
DO (lcEditor) WITH lcView, lcDBC, .T.
ELSE
* Problem, could not find database for view, use native
* Data Explorer call as default
oParam.CurrentNode.Design()
ENDIF
ELSE
oParam.CurrentNode.Design()
ENDIF
You need to change the
folder in the sample code to match the location of the ViewEditor on your
machine (see the assignment of lcEditor). If you want, you can make this code
even more dynamic to search the registry for the key that indicates where the
ViewEditor
is installed. We did not include it in this sample code because the key is
different for
different versions.
Add-in Manager
The Add-in Manager
allows you to extend the Data Explorer query and data results providing
functionality not yet considered or implemented by Microsoft. The Add-in
Manager is accessed through the Data Explorer Options dialog using the Manage
Add-ins button. You can add new and delete existing add-ins, and adjust the
sequence the add-ins are listed on the menu. All add-ins are stored in the Data
Explorer.DBF file. Like all the other extensibility features of the Data
Explorer, the add-in is driven by VFP script program code. There is no
documentation as of this writing on how you can use this functionality, so the
only way to understand the extensions is to review the code delivered with VFP
9.
DataExplorer.DBF
The
DataExplorer.DBF free table resides in your HOME(7) folder and stores metadata
about the connections and data sources you have defined, queries defined for
later use, the extensibility data for treeview nodes, add-ins, and shortcut
menus. This table is automatically maintained when you add connections, define
queries, alter the menus and other extensibility features, or register add-ins.
If this information is important to you, add the HOME(7) directory to your
backup scheme.
Environment Manager - field mappings and form templates
The Environment Manager was introduced with the Task Pane Manager in Visual FoxPro 8, but has been improved in Visual FoxPro 9. It now reduces the struggle developers have setting Field Mapping for the IntelliDrop functionality used when you drag and drop fields from a cursor in the data environment onto a form. In addition, you can specify the form and formset template classes for a specific environment, and associate a FoxPro resource file with an environment set.
Developers who gravitated to the IntelliDrop capabilities introduced in Visual FoxPro 5 quickly became frustrated with the built-in Field Mapping dialog found in the Options dialog. It is tedious to use. If you have more than one set of base classes because you work on more than one project or use more than one framework, and have to reset the Field Mapping settings often, you probably find this dialog too time consuming to deal with and gave up. Several developers wrote utilities to manage the settings and with the projecthook class introduced in Visual FoxPro 6, integrated their utilities to work with the Project Manager. The Field Mapping functionality in the Environment Manager finally provides developers a built-in capability to define the base classes for the various data types and have the IntelliDrop settings defined to a specific environment so you can quickly change them as needed.
Use the Field Mapping page in the Environment Manager (Figure 24) to specify
the settings.
![]()
You can get to the Environment Manager two ways. Start the Task Pane Manager and navigate to the Environment Manager pane or execute the Environment Manager as a standalone application inside of the IDE from the Command Window.
DO HOME()+"envmgr.app"

Figure 24. The Task Pane Environment Manager tool has a new Field Mapping page where you configure the IntelliDrop settings for the environment.
![]()
If you are running multiple instances of Visual FoxPro and set Field Mapping using the Environment Manager, the Options dialog, or programmatically via a project hook, the other instance of Visual FoxPro will use the changed Field Mapping settings. This is not a new behavior introduced in Visual FoxPro 9, but a gotcha you need to be aware of.
Setting each of the data types through the dialog is as tedious in the Environment Manager as it is in the Options dialog. You need to select the data type, click the Modify button, navigate to the class library, and pick the class. Repeat this for each data type in your application. To eliminate a setting, pick the data type and click the Clear button. This clears the class and class library for only one data type. Use the Reset button to clear the settings for all the data types.
One way to work around this manual process is to hack the table where the settings are saved. The table is called EnvMgr.DBF and is located in the HOME(7) folder. The Field Mapping settings are saved in the SetValues column. In our opinion, editing this memo field is faster than using the user interface as it currently stands. Each data type is represented by a line in the field (Figure 25). The line begins with an asterisk, followed by the data type, an equal sign, and the class name. The class library immediately follows the class name; it’s delimited by the less than (<) and greater than (>) signs, and includes the full path.

Figure 25. You can hack the SetValues column in the EnvMgr.DBF file to edit the settings for the Field Mapping data types and the form templates.
The <default field mapping> environment allows you to specify which classes are assigned to the data types automatically when you create a new environment. This is useful for developers who use one set of base classes for many different projects. It is not going to help developers with different sets of base classes for different projects, different clients, or different frameworks. The default mappings are initially set to the field mappings set in the Options dialog and saved in the Registry.
Like the field mapping capability, the Environment Manager can now reset the current Form and Formset Template for each defined environment. These are the same templates set on the Forms page of the Visual FoxPro Options dialog. The new Forms page on the Environment Manager allows you to pick the class you want used as the superclass for any new forms or formsets created. These settings work the same way as the settings on the Forms page of the Options dialog. First, indicate you want to use one or both of the templates by selecting the checkbox, and then pick the class using the ellipsis button next to the textbox displaying the class and classlibrary.
![]()
If you are running multiple instances of Visual FoxPro and set the Form or FormSet Template using the Environment Manager, the other instance of Visual FoxPro will not use the changed template settings. This behavior is different from the Field Mapping behavior. If you want the second instance to use the new setting, open the Visual FoxPro Options dialog and click the Set As Default button to save the settings to the Windows Registry.
The last change to the Environment Manager is support for specifying a FoxUser resource file on the Environment Settings page. This allows you to have a specific resource file for each environment. If the resource file does not exist when you switch to a particular environment, you will be asked whether you want to have the Environment Manager create a new, completely empty one.
Replacing VFP native menu behavior
IntelliSense was introduced in Visual FoxPro 7. VFP’s version is still considered one of the most extensible implementations of the IntelliSense technology. When you first saw the properties, events, and methods (both intrinsic and custom) show up in the dropdown as you typed in an editor or the Command Window, many of you recognized the potential for increased productivity. But in your wildest imagination, did you ever think the IntelliSense engine could be used to hook into the VFP menu system? Beginning in VFP 9, when you make a selection from the menu, Visual FoxPro looks for a record in the IntelliSense table and determines whether there is custom code to run in response to your selection, instead of the native behavior. This means you can replace the native functionality with your own functionality.
![]()
You must have IntelliSense turned on to take advantage of the menu hit capability.
So how does this work? Visual FoxPro’s IntelliSense engine does the following when you make a menu selection from any of the system menus or native shortcut menus, if you have IntelliSense enabled:
1. Searches in the IntelliSense table for a MENUHIT record (described in detail later in this section). If it does not find one, the native behavior is performed.
2. Executes the script contained in the Data memo field of the MENUHIT record. A single object parameter is passed to this script.
3. Examines the return value of the script. If the script returns False or the ValueType property is not set to “V” or “L”, the native behavior is performed.
![]()
All menus built into Visual FoxPro are hooked into the MENUHIT script capability. This includes menu items dynamically added to the system menu (like those on the Table pad), and all the native shortcut menus.
The first thing you need to do is add the single MENUHIT
record to the IntelliSense
table. You do this with a simple browse or write a program to create the
record. There’s also
a Solution
in three columns with specific information. See Table 4 for the values
required to turn on
this functionality.
Table 4. Set up the MENUHIT record in the IntelliSense table for the three columns specified. The Data column does not have a fixed value; it contains the script code you write to call your menu hit handler code.
|
Column |
Value |
Description |
|
Type |
S |
Indicates the record is a Script type. |
|
Abbrev |
MENUHIT |
Indicates the record is a menu hit script record. |
|
Data |
|
Visual FoxPro code with your customized behavior (presents a custom dialog or runs some code to gain the desired result). |
The Data column contains script code (VFP program code) to execute a menu hit handler. You might think you need a separate MENUHIT record for each menu item you want to change. Visual FoxPro only supports one MENUHIT record so the script code needs to be generic to handle all the various menu calls you want to change. If you have multiple MENUHIT records in the IntelliSense table, Visual FoxPro uses the first record it finds.
![]()
The code in the MENUHIT record can call any “menu hit handler” code. This code can be an external program or other menu entries in the IntelliSense table (FoxCode.DBF).
There are many approaches to deal with this, but the script
in this record needs to call other code and pass along the parameter passed
into the MENUHIT script. The two most common are a call to an external program,
and a scheme to look up other records in the IntelliSense table. The sample
MENUHIT scripts shown in Listing 6 is the script inserted from the Solution
![]()
Microsoft did not implement a menu hit record in the IntelliSense
table because the Fox Team could not anticipate the strategy developers would
prefer. There is an example in the Solution
Listing 6. This sample script code for the MENUHIT record uses the IntelliSense table to define behavior for individual menu items. If there is no IntelliSense defined behavior records, then an external menu handler program is called.
LPARAMETERS toParameter
LOCAL lnSelect, lcCode, llReturn, lScriptHandled
TRY
* First try FoxCode lookup for Type="M" records
lnSelect = SELECT()
SELECT 0
USE (_FOXCODE) AGAIN SHARE ORDER 1
IF SEEK('M' + PADR(UPPER(toParameter.MenuItem), LEN(ABBREV)))
lcCode = DATA
ENDIF
USE
SELECT (lnSelect)
IF NOT EMPTY(lcCode)
llReturn = EXECSCRIPT(lcCode, toParameter)
lScriptHandled=.T.
ENDIF
* Handle by passing to external routine as specified in Tip field
IF !lScriptHandled
lcProgram = ALLTRIM(toParameter.Tip)
IF FILE(lcProgram)
DO (lcProgram) WITH toParameter,llReturn
ENDIF
ENDIF
* Custom script successful so let's disable native behavior
IF llReturn
toParameter.ValueType = 'V'
ENDIF
CATCH
ENDTRY
RETURN llReturn
This example implements
MENUHIT functionality by first looking up individual “M” (menu) records in the
IntelliSense table for menu items you want to handle. If a menu record is
found, the script for the specific menu item runs. The menu item script code
can still return False so the native behavior runs, but normally, it will
return True so the replacement behavior you added runs instead of the native
behavior. If no record is found, and there is a program in the Tip property
(implemented by adding a program to the Tip column of the MENUHIT record), the
program is called to handle the menu item. If there are no menu records, no
external program to call, or if False is returned from both the menu record
script and the external program, the native behavior runs.
The advantage of the
menu hit Solution
Now that you have established the menu hit record in the IntelliSense table, you need to put this feature to work with a specific menu hit. The key to the menu hit handler code is to determine what menu item was selected from the menu. This information is stored in a property called MenuItem of the object passed as a parameter to the MENUHIT script. The prompt for the pad is stored in a property called UserTyped. This is why it is important to pass this parameter from the menu hit script to the menu hit handler code. The properties of the parameter object are detailed in Table 5.
Table 5. The parameter object passed into the MENUHIT script has a number of parameters, this table only details the parameters used for MENUHIT.
|
Parameter |
Description |
|
MenuItem |
The prompt of the menu item selected. |
|
UserTyped |
The prompt of the system menu pad from which the menu item was selected. If it was a shortcut menu, this is an empty string. |
|
ValueType |
This is a return value to Visual FoxPro. Set it to “V” or “L” (both have the same results) to prevent the default behavior, and leave it blank if you want the native menu behavior to be performed. |
The implementation details of the menu hit handler code depend on your approach to the MENUHIT record in the IntelliSense table. Regardless, it needs to receive a parameter for the menu hit parameter object so you can use the various properties detailed in Table 5. The code should evaluate the situation and either process the altered behavior or do something to tell the menu hit script to run the native behavior.
The example demonstrated is for a replacement of the File | New… menu option discussed in the next section of this chapter. The code is based on adding a record to the IntelliSense table for each menu hit handled. The record in the IntelliSense table is found in Table 6.
If the “M” record is found, the frmNewDialog is instantiated and displayed, and True is returned, indicating the menu hit was intercepted and handled.
![]()
The prompts passed in with the parameter are localized. If you plan to distribute your menu hit code to developers using a different language, your code must take this into account.
The implementation of menu hits provides a completely new way to customize your Visual FoxPro IDE in ways we never thought possible. The next two sections provide concrete examples of implementations we think provide some added productivity and inspiration to create additional menu hit behavior.
Table 6. The details necessary to implement a replacement for the New dialog. You need to change the directory in the Data column to match where you install the APP.
|
Column |
Value |
|
Type |
M |
|
Abbrev |
NEW… |
|
Expanded |
|
|
Cmd |
|
|
Tip |
|
|
Data |
LPARAMETERS toParameter LOCAL llReturn TRY RELEASE _oNewDialog PUBLIC _oNewDialog _oNewDialog = NEWOBJECT('frmNewDialog', 'WlcNewDialog.vcx', ; 'd:\devvfp9apps\devtools\newdialog\wlcnewdialog.app') _oNewDialog.Show() llReturn = .T. CATCH ENDTRY RETURN llReturn |
|
Case |
|
|
Save |
|
|
Timestamp |
|
|
Source |
|
|
Uniqueid |
_1CU1DP395 |
|
User |
|
New Property / New Method replacement
Doug Hennig took the lead in exploring this technology during the beta and quickly developed a replacement for the New Property and New Method dialogs in Visual FoxPro. This replacement dialog (see Figure 26) addresses some shortcomings and extends the native behavior to integrate with some of the new MemberData features. Specifically, Doug wanted to address the following issues:
1. The native dialog does nothing to integrate with the Display and Favorites attributes of the new _MemberData property. (See Chapter 2, “Customizing the Property Sheet.”)
2. The native dialog is modal, which means you have to close it before you can do anything else. The custom dialog is not modal.
3. While the VFP 9 New Property dialog allows you to set the initial value for new properties, the default value is still False. In the custom dialog, default values are automatically set based on the Hungarian object naming convention. So if you name a property nBalance, the dialog assumes you are defining a numeric property and sets the initial value to zero.
4. The native dialog doesn’t tell you a member name is invalid until you press the Add button. The custom dialog disallows invalid member names as you are entering them. The Add and Add & Close buttons are only enabled if you enter a valid member name.
5. The native dialog requires you to first add the property, and then close the dialog. Closing the native dialog before adding means you lose the member. The custom dialog includes an Add & Close button so you can add the member and close the dialog in one step.
6. The custom dialog is dockable, resizable, and saves its position and size attributes to the FoxUser resource file so it shows up in the same place the next time it is opened. You can not only dock the dialog to one of the sides, you can also tab-dock it with other IDE forms like the Property Sheet, or any of the user dockable forms and tools (such as the Class Browser and Data Explorer discussed earlier in this chapter).
![]()
The NewPropertyDialog.APP
is available as a Solution

Figure 26. A replacement for the native Visual FoxPro New Property Dialog, it is modeless and handles the new _MemberData feature automatically.
The NewPropertyDialog application
registers itself in the IntelliSense file by adding three records. The first
record is the generic MENUHIT record. The implementation technique used is the
one discussed earlier in this chapter (see section “Replacing VFP native
menu behavior”) where individual menu
item records are added to the IntelliSense table. The other two records added
are for the New Property,,, and New Method,,, menu items. You can inspect the
entries to see how it works.
Once you register the
dialog, when you edit a form or class and choose to add a new property or
method, the replacement dialog displays. If you want to revert to the native
dialogs, remove the menu item records using the the Solution
The second menu behavior replacement we want to demonstrate is the ability to replace the File | New… dialog. The replacement new dialog (Figure 27) addresses several things:
1. It has one click access to create a new file. You create a new file by clicking the hyperlink label or the associated command button. The native VFP dialog forces a selection of the file type, followed by the selection of New or Wizard.
2. It has one click access to the appropriate Visual FoxPro wizard by right-clicking the hyperlink label or the command button. Alternatively, select the Run Wizard checkbox, and then click on the file type (hyperlink or button).
3. The dialog is not modal; you can create as many files as you want before closing the dialog. (The native VFP dialog is modal and closes when the file is created.)
4. The file types are organized in order of expected use (based on the developers preference of course).
There are some design decisions made with this version because of the way the various create commands work. For instance, the new class prompts you for the class name because the CREATE CLASS <class name> NOWAIT command cannot be executed with the NOWAIT unless the class name is provided. We wanted the code to continue processing after the class is created; otherwise clicking off the class prompts you to save it, making the dialog modal like. The same situation applies to CREATE FILE, CREATE FORM, CREATE LABEL, CREATE REPORT, CREATE PROGRAM, and CREATE PROJECT. We did leave some of the other objects with the modal like feel so you understand the design decision.
![]()
The Developer Downloads for this chapter, available from www.hentzenwerke.com, include the source code for the New Dialog replacement dialog. The project file is called WlcNewDialog.PJX and the application is WlcNewDialog.APP.

Figure 27. This modeless New Dialog is a replacement for the native Visual FoxPro New Dialog.
Again, there is not enough room in this chapter to detail the source code for this tool, but using it is simple. First change to the directory where you installed the WlcNewDialog.APP and execute it:
DO WlcNewDialog.app
The application
registers itself in the IntelliSense file by adding two records. The first
record is the generic MENUHIT record (the same one used by the New Property /
New Method menu hit and Solution
the New Property/Method dialog, this replacement adds individual menu item
records to the IntelliSense table. The other record added is for the New...
menu items. You can inspect the entries to evaluate the implementation. A text
file displays with Help when you click the
Help button.
Replacing native VFP shortcut menus
The MENUCONTEXT script in the IntelliSense table allows you to replace native shortcut menus in the Visual FoxPro IDE. The MENUCONTEXT script works like the MENUHIT scripts. Unfortunately, recreating an entire shortcut menu and its functionality is not a trivial task in most cases. We wish the implementation allowed developers to add items to a shortcut menu without replacing the entire shortcut menu.
This implementation is limited, as follows:
· You cannot replace or remove individual shortcut menu items. The script code can only stop the menu from displaying; you have to replace the entire menu.
· The script executes when the shortcut menu is invoked via the right-click or shortcut menu keyboard, not when the menu item is selected from the system menu.
· The internal menus are referenced by number and these numbers are not documented. You have to discover the internal menu identifiers using a technique described later in this section.
· The parameter object passed from IntelliSense provides a list of shortcut menu prompts, but no access to the result, SKIP FOR, MESSAGE, hot keys, or other menu clauses helpful in creating a custom shortcut menu.
· Creating a replacement for each item on a shortcut menu is not always possible because the IDE does not expose all the native functionality.
The first thing you need to do is add the single MENUCONTEXT record to the IntelliSense table. You do this with a simple browse or write a program to create the record. The record needs a minimum of three columns with the information indicated in Table 7.
Table 7. Set up the MENUCONTEXT record in the IntelliSense table for the three columns specified. The Data column does not have a fixed value; it contains script code you write to call your shortcut menu code.
|
Column |
Value |
Description |
|
Type |
S |
Indicates the record is a Script type. |
|
Abbrev |
MENUCONTEXT |
Indicates the record is a shortcut menu script record. |
|
Data |
|
Visual FoxPro code with your customized behavior (presents a custom shortcut menu or is some proxy code that runs other code to generate the shortcut menu). |
The MENUCONTEXT script must accept a single parameter, the same type of object passed into the MENUHIT script.
One of the tricky parts is determining the menu ID for each of the shortcuts you want to implement. Fortunately there is a straightforward way you can determine them. The menu ID is stored in the parameter object’s MenuItem property. Listing 7 provides some code to discover details about the parameter object passed to the MENUCONTEXT script. Listing 8 shows the results of this script when you invoke the Command Window’s context menu.
Listing 7. Insert this code into the Data field of the MENUCONTEXT record in the IntelliSense table to discover the details about the MENUCONTEXT parameter object properties.
LPARAMETERS toParameter
LOCAL lnI, llReturn
DEBUGOUT toParameter.MenuItem
DEBUGOUT toParameter.UserTyped
DEBUGOUT toParameter.ValueType
FOR lnI = 1 TO ALEN(toParameter.Items, 1)
DEBUGOUT lnI, "=", toParameter.Items[lnI]
ENDFOR
DEBUGOUT "---------"
RETURN llReturn
Listing 8. The results of running the MENUCONTEXT script in Listing 7 when the Command Window shortcut menu is invoked.
24446
.F.
1 = Cut
2 = Copy
3 = Paste
4 =
5 = Build Expression...
6 = Execute Selection
7 =
8 = Clear
9 =
10 = Properties...
You need the menu ID to determine which menu was called so
you can write code to respond to this menu invocation. These menu IDs will be
part of a DO CASE statement in
the shortcut menu hit handler program or used to identify records you might add
to the IntelliSense table using the same technique implemented for the menu hit
implementation.
The parameter object has an array property called Items
containing each of the
menu items on the shortcut menu. As we noted at the beginning of this section,
this is the only information about the shortcut menu we can gather. We cannot
determine, for each
item, what the SKIP FOR clause is, what the menu hot keys are, or what the
status bar message includes.
Replacement menus should use the DEFINE POPUP…SHORTCUT menu syntax. You can generate them using the Visual FoxPro Menu Designer or create the menus on-the-fly using Visual FoxPro code.
Because of all the limitations, we chose not to provide a sample of this technology. In summary, the MENUCONTEXT scripts are a disappointment, but still hold potential if you have the inspiration to replace an entire shortcut menu with better functionality. We suspect MENUCONTEXT scripts will be used sparingly.
GenDBC is a utility program included with Visual FoxPro since VFP 3.0. This tool generates a program to recreate a specified database and its associated tables, views, relations, connections, stored procedures, and so forth. GenDBC has been enhanced to support the new Varchar, Varbinary, and Blob data types for fields. One bug fix is included—GENDBC now generates the code for the AllowSimultaneousFetch, RuleExpression, and RuleText properties for views. The AllowSimultaneousFetch property was added to views in Visual FoxPro 8. The RuleExpression and RuleText properties for views have been around since Visual FoxPro 3.
New Solution
The Visual FoxPro Solution
CD HOME(2) + "Solution"
DO solution.app
Many of the new samples
for Visual FoxPro 9 focus on the Report Designer and the new features
introduced in this version. The rest show some of the new functionality,
including some features that can seriously impact your end user applications.
We are not going into
great detail for the new Solution
·
The
typical multiple detail band report
·
A multiple
detail band report used for calculations
·
Control
preview window for your report
·
Add a
custom report previewer in your form
·
Dynamic
formatting using ReportListeners
·
Report to
several outputs simultaneously using a ReportListener
·
HTML and
XML output with ReportListeners
·
Create
column chart reports using GDI+
·
Anchors
Away
·
BINTOC and
CTOBIN binary conversion
·
Binding to
Windows Message events
·
Control
button caption and image placement
·
Coverage
Profiler Performance Add-In
·
Dockable
Image Viewer
·
Fox Media
Player
·
Foxcode
menu scripts
·
Fun with
polygons
·
Utility to
scan for Memo corruption
![]()
The Developer Downloads for
this chapter, available from www.hentzenwerke.com,
include Chapter 4 Bonus, “Solution
It is obvious from the length of this chapter that the Fox Team focused on improving the development experience in several of the tools and designers. While much of the focus and attention has been given to the Report Designer changes, we think the changes to the other IDE tools will improve your development experience significantly.
Updates and corrections for this chapter can be found on Hentzenwerke’s website, www.hentzenwerke.com. Click “Catalog” and navigate to the page for this book.