Chapter 6
Extending the Reporting System at Design Time
Among the new and improved features in the reporting system of VFP 9 is the ability to extend the Report Designer to provide easier-to-use, more powerful, and more flexible report writing for your development team and even your end-users. In this chapter, you will learn about the new Report Builder application, how it captures and handles events raised by the Report Designer, and how you can create your own handlers to extend the VFP Report Designer in ways you never thought possible.
Earlier versions of VFP provided very little means of customizing the Report Designer, other than perhaps the appearance of the window it appeared in. One of the design goals for VFP 9 is to provide a mechanism for hooking into the behavior of the Report Designer to customize its appearance and behavior as much as possible. This is implemented by having events in the Report Designer, such as opening a report or adding an object, passed to an Xbase component that can take any action necessary when events occur.
The new system variable _REPORTBUILDER points to an application (referred to in this chapter as “the report builder application”) that receives notification about events from the Report Designer. When a design-time report event occurs and _REPORTBUILDER points to an existing application, the Report Designer creates a private data session, opens a copy of the FRX currently being edited in that data session, and then calls the report builder application. By default, _REPORTBUILDER is set to ReportBuilder.APP in the VFP home directory, but you can substitute another application if you wish. If you specify a non-existent application, no error occurs but events are not raised. Any application specified by _REPORTBUILDER must be modal in nature because the Report Designer expects to call it and receive a return value indicating what happened.
The Report Designer passes the parameters shown in Table 1 to the report builder application when an event occurs.
Table 1. The
parameters passed to the report builder application by the
Report Designer.
|
Parameter |
Type |
Description |
|
ReturnFlags |
N |
Passed by reference with an initial value of -1. Used to
return values to the Report Designer. |
|
EventType |
N |
An integer representing the event that occurred. |
|
CommandClauses |
O |
An object (based on the Empty baseclass) with properties indicating the clauses used in the CREATE/MODIFY REPORT command. |
|
DesignerSessionID |
N |
The data session ID of the Report Designer. |
ReturnFlags is used to return a value to the Report Designer. The possible return values are bit flags that can be summed. Adding 1 means the event was handled by the report builder application so the Report Designer’s normal action is suppressed (sort of like using NODEFAULT). Adding 2 indicates the report builder application made changes in the FRX cursor so the Report Designer should reload the changes into its internal copy of the FRX.
EventType contains a value identifying the event that occurred. Table 2 shows the possible values, along with the type of event (a report event, an object event, or a band event). The table also indicates whether adding 1 to the ReturnFlags parameter can suppress the event. “Must delete record” means a newly created object’s record has already been added to the FRX, so to suppress the creation of an object, you must delete its record in the FRX cursor and set the ReturnFlags parameter to 3 (the event was handled and changes should be reloaded).
Table 2. The EventType parameter contains one of these values indicating the type of report event.
|
Value |
Description |
Type |
Can Suppress |
|
1 |
A Properties dialog (for the report, a band, or an object)
is being invoked. |
Report, |
Yes |
|
2 |
An object or band is being created. |
Object, |
Yes (must delete record) |
|
3 |
Reserved for future use. |
|
|
|
4 |
An object or band is being removed. |
Object, |
Yes |
|
5 |
One or more objects are being pasted into the report from the clipboard. Each pasted object has the CURPOS field set to .T. |
Object |
Yes (must delete records) |
|
6 |
The report has been saved. |
Report |
No |
|
7 |
The report has been opened. |
Report |
No |
|
8 |
The report is to be closed. |
Report |
Yes |
|
9 |
The DataEnvironment is to be opened. |
Report |
Yes |
|
10 |
The report is to be previewed. |
Report |
Yes |
|
11 |
The Optional Bands dialog is being invoked. |
Report |
Yes |
|
12 |
The Data Grouping dialog is being invoked. |
Report |
Yes |
|
13 |
The Variables dialog is being invoked. |
Report |
Yes |
|
14 |
Ctrl-E was pressed on a label object. |
Object |
Yes |
|
15 |
The Grid Scale dialog is being invoked. |
Report |
Yes |
|
16 |
One or more objects are being created by a drag-and-drop operation from the DataEnvironment, a DBC, or the Project Manager. This event fires once for each object being created, and if a label is created, once for each label as well. |
Object |
Yes (must delete record) |
|
17 |
“Load data environment” was selected from the Report menu. |
Report |
Yes |
|
18 |
The report is to be printed. |
Report |
Yes |
|
19 |
“Quick Report” was selected from the Report menu. |
Report |
Yes |
CommandClauses has the properties shown in Table 3.
Table 3. The properties of the CommandClauses object provide information about how the Report Designer was invoked.
|
Property |
Type |
Description |
|
AddTableToDE |
L |
.T. if the Add Table to DataEnvironment option was turned
on in the Quick Report dialog. |
|
Alias |
L |
.T. if the Add Alias option was turned on in the Quick Report dialog or the ALIAS clause was specified in the CREATE REPORT FROM command. |
|
FieldList |
O |
A collection of numeric field numbers representing the fields specified in the Quick Report dialog or the FIELDS clause of the CREATE REPORT FROM command. |
|
File |
C |
The file name of the FRX open in the Report Designer. This file may not actually exist if CREATE REPORT/LABEL was used. |
|
Form |
L |
.T. if a form layout was chosen in the Quick Report dialog or the FORM clause was specified in the CREATE REPORT FROM command; .F. if a column layout was chosen or COLUMN was specified. |
|
From |
C |
Contains the table name specified in the CREATE REPORT FROM command. |
|
InScreen |
L |
.T. if the IN SCREEN clause was specified in the CREATE/MODIFY REPORT/LABEL command. |
|
InWindow |
C |
The name of the window specified in the IN <window> clause of the CREATE/MODIFY REPORT/LABEL command. |
|
IsCreate |
L |
.T. if the command was CREATE REPORT/LABEL; .F. if the command was MODIFY REPORT/LABEL. |
|
IsQuickReportFromMenu |
L |
.T. if the Quick Report function was invoked. |
|
IsReport |
L |
.T. if the command was CREATE/MODIFY REPORT; .F. if it was CREATE/MODIFY LABEL. |
|
NoEnvironment |
L |
.T. if the NOENVIRONMENT clause was specified in the MODIFY REPORT/LABEL command. |
|
NoOverwrite |
L |
.T. if the NOOVERWRITE clause was specified in the CREATE REPORT FROM command. |
|
NoWait |
L |
.T. if the NOWAIT clause was specified in the CREATE/MODIFY REPORT/LABEL command. |
|
Protected |
L |
.T. if the PROTECTED clause was specified in the CREATE/MODIFY REPORT/LABEL command. |
|
Save |
L |
.T. if the SAVE clause was specified in the CREATE/MODIFY REPORT/LABEL command. |
|
Titles |
L |
.T. if the Titles option was turned on in the Quick Report dialog or the TITLES clause was specified in the CREATE REPORT FROM command. |
|
Width |
N |
The number of columns specified in the CREATE REPORT FROM command (-1 if this clause was omitted). |
|
Window |
C |
The window name specified in the WINDOW <name> clause of the CREATE/MODIFY REPORT/LABEL command. |
The report builder application runs within a private data session
that contains the FRX cursor. The Report Designer passes its own data session
ID to the report builder application
in case the report builder needs to access the tables open in the
DataEnvironment of the
Report Designer.
The FRX cursor the Report Designer creates for the report builder application has the alias “FRX.” The record pointer is on the record for the object the event occurs for; this is the report header record (the first record in the cursor) if it’s a report event rather than an object event. The records for any objects selected in the Report Designer have the CURPOS field set to .T. There’s one slight complication with this: because the report header record uses CURPOS to store the value of the Show Position setting, you should ignore this record when looking at records with CURPOS set to .T. For example, to count the number of selected objects, use:
count for CURPOS and recno() > 1
ReportBuilder.APP
By default, _REPORTBUILDER is set to ReportBuilder.APP in the VFP home directory. This application provides a framework for handling design-time report events, plus it includes a set of more attractive and functional dialogs that replace the native ones used by the Report Designer (as discussed in Chapter 5, “Enhancements in the Reporting System”). You can distribute ReportBuilder.APP with your applications to provide its behavior in a run-time environment; see the “How To: Specify and Distribute ReportBuilder.App” topic in the VFP help for details.
In addition to the Report Designer calling it automatically, you can call ReportBuilder.APP manually to change its behavior for the current VFP session. It doesn’t write settings to any external location, such as a table, INI file, or the Windows Registry, so, with one exception you will see in a moment, state isn’t preserved from session to session.
· If you call it with no parameters or pass it 1, it displays an options dialog (see Figure 1) where you can change its behavior. You can also right-click any of the properties dialogs and choose Options to launch the Options dialog.
· Pass 2 and optionally the name of an FRX file to browse a report. Right-click the properties dialogs and choose Browse FRX to do the same thing for the current report.
· Pass 3 and the name of a DBF file to use that DBF as the handler registry or a blank string to use the internal handler registry table. (The handler registry is discussed later in this chapter.)
· Pass 4 and a numeric value to set the “handle mode.” The numeric values match the buttons in the When handling Report Designer events, the builder will setting shown in the options dialog. For example, DO (_REPORTBUILDER) WITH 4, 3 tells ReportBuilder to use the event inspector.
· Pass 5 and optionally the name and path of a file to create a copy of the internal handler registry table (if you don’t pass the second parameter, you’ll be prompted for the table to create).
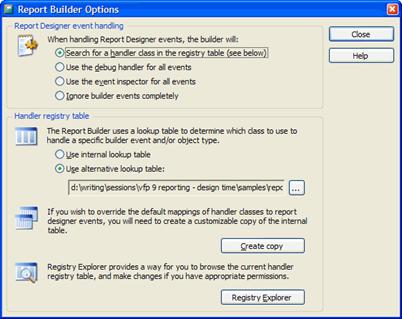
Figure 1. Configure the behavior of ReportBuilder.APP using the Report Builder Options dialog.
The Options dialog has the following features:
· You can define what happens when ReportBuilder.APP receives a report event. The choices are to search for a handler class in the handler registry table (the default behavior), use a “debug” handler for events (displays a dialog showing the FRX in a grid and allows modifications to it and other settings), use an “event inspector” handler (displays information about the event and the FRX in a MESSAGEBOX() window), or ignore report events. You can also display the event inspector window by right-clicking any properties dialog and choosing Event Inspector.
· You can specify what handler registry table to use, or make a copy of the internal one (the handler registry is discussed in “Registering report event handlers,” later in this chapter). You can also browse the selected registry table.
Here are some ways you can extend the functionality of the Report Designer.
· Replace ReportBuilder.APP with your own report builder application by changing _REPORTBUILDER.
· Wrap ReportBuilder.APP by changing _REPORTBUILDER to your own application and having your application call back to ReportBuilder.APP. If you used FoxPro 2.x, this may remind you of the GENSCRNX approach.
· Register event-handling objects in ReportBuilder.APP’s registry table. This will likely be the most popular choice because ReportBuilder.APP provides a report builder framework and lets you simply focus on handlers for report events.
Registering report event handlers
Two steps are required if you want to create your own report event handlers for ReportBuilder.APP to call when a report event fires. The first is to create a class that implements the desired behavior. It must have an Execute method that accepts an event object as a parameter, because that’s what ReportBuilder.APP expects. The second is to register the handler in ReportBuilder.APP’s handler registry table. We look at the second task first, and then spend the rest of this chapter discussing the first.
When a report event occurs, ReportBuilder.APP looks in a handler registry table to find a handler for the event. By default, it uses the handler registry table built into the APP file. This table provides handlers for many report events to have the new Xbase Report Designer dialogs used rather than the native ones. However, if you want to register your own handlers, you have to tell ReportBuilder.APP to use a different handler registry table. There are several ways to do this:
· DO (_REPORTBUILDER) and click on the Create copy button to write the internal handler registry table to an external one. By default, this copy is named ReportBuilder.DBF. When ReportBuilder.APP starts, it looks for a table called ReportBuilder.DBF in the current directory or VFP path. If it finds such a table, it uses that table rather than the internal one. So, simply creating this copy means ReportBuilder.APP will use it without having to do anything else.
· DO (_REPORTBUILDER) and click the Choose button to select the table to use.
· As mentioned earlier, use DO (_REPORTBUILDER) WITH 3, <DBF to use>, to specify the desired handler registry table without any UI.
Once you specify an external handler registry table, you can manually add or edit records in that table or, in the ReportBuilder.APP Options dialog, click the Explore Registry button and edit the records in the resulting dialog.
You can tell ReportBuilder.APP to use the internal handler registry table by selecting None in the dialog that appears when you click the Choose button or with DO (_REPORTBUILDER) WITH 3, ''. Note this only affects the current session of VFP, since ReportBuilder.APP will use any ReportBuilder.DBF it finds when VFP is restarted.
The handler registry table has the structure shown in Table 4.
Table 4. The structure of the handler registry table.
|
Field Name |
Type |
Values |
Description |
|
REC_TYPE |
C(1) |
E, F, G, H, or X |
Specifies the type of record: H: report event handler record F: report event filter record X: exit handler record G: GetExpression wrapper record E: run-time extension editor class |
|
HNDL_CLASS |
C(35) |
|
The name of the class to instantiate. |
|
HNDL_LIB |
C(50) |
|
The library containing the class. This field is too short for most paths, so the library (either VCX or PRG) should be in the current directory, VFP path, or open with SET CLASSLIB. |
|
NOTES |
C(50) |
|
Not used by ReportBuilder.APP. |
|
EVENTTYPE |
I |
0 - 19 or -1 |
Report event type ID (-1 means any event). See Table 2 for a list of the values. |
|
OBJTYPE |
I |
0 - 10, 99, or -1 |
Report object type. 99 is a special object type meaning multiple selected objects. -1 means any type of object. The rest of the values correspond with those in the OBJTYPE column in an FRX. |
|
OBJCODE |
I |
0 - 26 or -1 |
Report object code (-1 for any code). These values correspond with those in the OBJCODE column in an FRX. |
|
DEBUG |
L |
.T. or .F. |
.T. to use the debug handler instead of the class specified in HNDL_CLASS. |
|
NATIVE |
L |
.T. or .F. |
.T. to pass the report event back to the Report Designer for native behavior. |
|
FLTR_ORDR |
C(1) |
" ", "1", "2", etc. |
For filters and exit handlers only, specifies the order to apply them in. |
When a report event occurs, ReportBuilder.APP looks for the handler class to instantiate by looking for a record where EVENTTYPE matches the report event ID (or is -1), OBJTYPE matches the OBJTYPE column of the selected FRX record (or is -1), and OBJCODE matches the OBJCODE column of the selected FRX record (or is -1). Because ReportBuilder.APP uses the first handler record it finds that meets its conditions, you may need to delete or disable built-in handlers if you want to implement your own. One way you can disable a handler record without deleting it is to change EVENTTYPE to an invalid value. For example, you can add 100 to EVENTTYPE to disable a record, and then easily re-enable it by subtracting 100.
As you can see in Table 4, REC_TYPE registers different types of records. Here are the different types available:
· The report event handler (REC_TYPE = “H”) handles a report event. This is the only type of record where the ReportBuilder.APP checks the EVENTTYPE, OBJTYPE, and OBJCODE columns.
· The report event filter (REC_TYPE = “F”) is a class that gets an earlier crack at the report event than a handler does. While only a single handler is instantiated, ReportBuilder.APP instantiates the classes specified in all filter records, in FLTR_ORDER order, and calls their Execute methods. If any filter object’s AllowToContinue property is .F., no further processing happens and ReportBuilder.APP informs the Report Designer that the event was handled.
As you can see from these descriptions, although they can both respond to report events, there’s a big difference between event handlers and filters:
· Filters are instantiated on every report event, while a handler is only instantiated for the event it’s registered for in the handler registry table.
· All filters are instantiated on an event, while only a single handler is.
This means filters are good for behavior you want to occur on multiple, possibly all, events, while handlers are specific for one type of event.
· The exit handlers (REC_TYPE = “X”) are similar to a combination of filters and event handlers. After the other processing finishes, ReportBuilder.APP runs all registered exit handlers by instantiating the appropriate classes in FLTR_ORDER order and calls their Execute methods. These handlers are really just intended to perform any post-event cleanup behavior.
· The GetExpression wrapper (REC_TYPE = “G”) provides a wrapper or replacement for the GETEXPR dialog. It’s useful in the various places where a user clicks a button with an ellipsis (such as the one beside a field expression). There should only be one record with REC_TYPE = “G.”
· The Run-time extension editor (REC_TYPE = “E”) replaces the dialog that displays when you click the Edit Settings button for the Run-time Extension property in the Other page of the properties dialog for an object in the Report Designer. There should only be one record with REC_TYPE = “E.”
The report event handling process
When ReportBuilder.APP is called because a report event occurred, it does the following:
· Runs any registered filters as described earlier. Processing stops if any of them have AllowToContinue set to .F.
· Tries to find the handler for the event using the following search priority:
REC_TYPE = “H,” EVENTTYPE = event type, OBJTYPE = OBJTYPE value for the object, OBJCODE = OBJCODE value for the object
REC_TYPE = “H,” EVENTTYPE = event type, OBJTYPE = OBJTYPE value for the object, OBJCODE = -1
REC_TYPE = “H,” EVENTTYPE = event type, OBJTYPE = -1, OBJCODE = -1
REC_TYPE = “H,” EVENTTYPE = -1, OBJTYPE = -1, OBJCODE = -1
· If a handler is found, ReportBuilder.APP instantiates it and calls its Execute method. If a handler is not found, the event is passed back to the Report Designer and native behavior is used instead.
· If a handler is found, ReportBuilder.APP runs all registered exit handlers as described earlier.
Handler interfaces
Report event filters, event handlers, exit handlers, GetExpression wrappers, and run-time extension editors can be based on any class and have only a single required method. The method signatures are:
· Filters: Execute(toEvent). ReportBuilder.APP passes this method a reference to an event object, which we look at in the next section (“Event object”), with properties containing information about the event. To prevent further processing, set the custom AllowToContinue property to .F. in this method; in that case, you should set the ReturnFlags property of the event object appropriately.
· Event handlers: Execute(toEvent). This method also receives an event object. The return value is not important, but the ReturnFlags property of the event object is.
· Exit handlers: same signature as event handlers.
· GetExpression wrapper: GetExpression(tcDefaultExpr, tcDataType, tcCalledFrom, toEvent). tcDefaultExpr is the default expression for the dialog. tcDataType is the data type of the expression. tcCalledFrom indicates where this method was called: “PrintWhenExpression,” “FieldExpression,” “OleBoundField,” “OleBoundExpression,” “BandGroupOnExpression,” “VariableValueToStore,” or “VariableInitialValue.” toEvent is an event object. The return value is the expression.
· Run-time extension editors: same signature as event handlers.
Event object
ReportBuilder.APP passes an event object to the methods of handlers. This object has properties containing the parameters passed by the Report Designer to ReportBuilder.APP, plus some other useful information (see Table 5). It has several public methods, however, some are used by ReportBuilder.APP rather than an event handler. Table 6 shows the ones useful for an event handler.
Table 5. The properties of the event object that ReportBuilder.APP passes to report event handlers and filters.
|
Property |
Type |
Description |
|
BuilderPath |
C |
Path of ReportBuilder.APP. |
|
CommandClauses |
O |
The same CommandClauses object passed to ReportBuilder.APP from the Report Designer. |
|
DefaultRecno |
N |
The record pointer in the FRX cursor. |
|
DefaultSessionID |
N |
The data session of the Report Designer (the fourth parameter passed in from the Report Designer). |
|
EventType |
N |
The event type (the second parameter passed in from the Report Designer). |
|
FRXCursor |
O |
A helper object containing useful functions for interacting with the FRX cursor (discussed in the section of this chapter, “FRXCursor helper object”). |
|
FRXSessionID |
N |
The data session the FRX cursor is open in (the default session when the event handler is instantiated). |
|
HandleMode |
I |
Indicates how ReportBuilder.APP handles events: 1 means search for a handler class in the registry table, 2 means use the debug handler, 3 means use the event inspector, and 4 means ignore builder events. |
|
MultiSelect |
L |
.T. if multiple objects are selected in the Report Designer. |
|
ObjCode |
N |
The value of the OBJCODE field of the selected record in the FRX cursor. |
|
ObjType |
N |
The value of the OBJTYPE field of the selected record in the FRX cursor. |
|
Protected |
L |
.T. if the Report Designer was launched with the PROTECTED keyword. |
|
ReturnFlags |
N |
The value of this property is returned to the Report Designer in the first parameter passed in from the Report Designer. It’s initially set to 0; set it to the same range of values described for the ReturnFlags parameter. |
|
SelectedObjectCount |
N |
The number of selected objects in the report layout, determined by counting CURPOS = .T. in the FRX cursor (not counting the header record). |
|
SessionData |
O |
A reference to a Name-Value pair manager object used to store data between ReportBuilder.APP invocations. |
|
UniqueID |
C |
The value of the UNIQUEID field of the selected record in the FRX cursor. |
|
UnitConverter |
O |
A reference to an FRX unit converter object (the FRXUnitConverter class in FRXBuilder.VCX built into ReportBuilder.APP). This class has methods to convert between FRU (FoxPro Report Units, 1/10000 inch) and other units. |
|
UsingInternalRegistry |
L |
.T. if the internal registry table is used. |
Table 6. The methods of the event object that are useful to an event handler.
|
Method |
Parameters |
Returns |
Description |
|
GetEventTypeText |
[ tiEvent ] |
C |
Returns the name of a given event type. |
|
GetExpression |
tcDefaultExpr, |
C |
Displays a Get Expression dialog and returns the selected expression. |
|
GetExtensionEditor |
None |
O |
Instantiates and returns a reference to a run-time extension editor class as specified in the handler registry table. |
|
GetTargetTypeText |
[ tiObjType, tiObjCode ] |
C |
Returns the name of a given object type/object code. |
|
SetHandledByBuilder |
tlNoDefault |
.T. |
Pass .T. to add 1 to ReturnFlags. |
|
SetReloadChanges |
tlReload |
.T. |
Pass .T. to add 2 to ReturnFlags. |
FRXCursor helper object
This object, referenced in the FRXCursor property of the event object, provides methods you may find useful when working with an FRX. These methods are shown in Table 7. In the Parameters column of the table, “tcFRXAlias” is the alias of the FRX cursor; if it isn’t passed, “FRX” is assumed. This object also has a single property, ScreenDPI, that contains 96, because that’s the number of dots per inch used by the Report Designer.
Table 7. The methods of the FRXCursor helper object.
|
Method |
Parameters |
Returns |
Description |
|
BinStringToInt |
tcBytes |
N |
Returns the numeric equivalent of the binary data (in
least significant byte order) in a string of bytes. For example,
BinStringToInt(CHR(55) + CHR(1)) returns 311 because 55 + 1 * 256 = 311. |
|
BinToInt |
tcValue |
I |
Converts a string of binary digits into an integer. For example, BinToInt('10000010') returns 130. |
|
CharsetToLocale |
tnCharSet |
N |
Converts a font Charset value to a locale ID, usually for use with the STRCONV() function. |
|
CreateBandCursor |
[ tcFRXAlias ] |
L |
Creates a cursor with the alias Bands containing information about the bands in the report. |
|
CreateCalcResetOnCursor |
[ tcFRXAlias ] |
L |
Creates a cursor with the alias Reset_On containing information for each option in the Calculation Reset combobox. |
|
CreateDefaultPrintEnvCursor |
[ tcFRXAlias |
L |
Creates a one-record cursor with the alias specified in tcDestAlias (“DefPrnEnv” by default) with the same structure as an FRX, with the default printer environment data loaded into EXPR, TAG, and TAG2. |
|
CreateGroupCursor |
[ tcFRXAlias ] |
L |
Creates a cursor with the alias Groups containing information about data grouping in the report. |
|
CreateObjCursorRecord |
[ tcDestAlias, |
- |
Called by CreateObjectCursor to do the actual insertion of records in the Objects cursor |
|
CreateObjectCursor |
[ tcFRXAlias [, tiFilter |
L |
Creates a cursor with the alias specified in tcDestAlias (“Objects” by default) containing information about the objects in the report. Calls CreateBandCursor() if the Bands cursor isn’t open. The values for tiFilter are: 0 (the default): all objects in the FRX with grouped items omitted 1: selected (CURPOS = .T.) records only 2: all objects with grouped items as a single record 3: all objects with grouped items as individual records If tlRuntime is .F., each object’s start and end band are determined using the Report Designer’s algorithm. Specify .T. to use the reporting engine’s algorithm instead (there are some differences in the algorithms). Deleted records are included, so use SET DELETED ON to ignore them. |
|
CreateVariableCursor |
[ tcFRXAlias ] |
L |
Creates a cursor with the alias Vars containing information about the variables defined in the report. |
|
FRUToPixels |
tnFRU |
I |
Returns the corresponding pixels for a given number of FRU. |
|
GetBandFor |
tcUniqueID |
O |
Returns an object containing information about the start or end band that surrounds the given report object. |
|
GetFRUTextHeight |
tcText, tcTypeFace, tiSize |
N |
Returns the height in FRU of a given text and font spec. |
|
GetFRUTextWidth |
tcText, tcTypeFace, tiSize |
N |
Returns the width in FRU of a given text and font spec. |
|
GetFRXTimeStamp |
[ ttDateTime ] |
I |
Returns a FoxPro time stamp for a given datetime (DATETIME() is used by default). |
|
GetMetaDataDOMDoc |
[ tcFRXAlias ] |
O |
Returns an MSXML.DOMDocument object loaded with the meta data XML for the current record (stored in the STYLE memo). You can create this XML using the Runtime Extensions editor or by opening the FRX as a cursor and inserting it into STYLE. |
|
GetObjectsInBand |
tcBandID |
O |
Returns a collection of UNIQUEID values or record numbers (depending on the value of the second parameter) for each object contained in the specified band. |
|
GetReportAttribute |
tcAttrib |
Value |
Returns the specified attribute of the report header. The attributes are: Units: returns the units used by the ruler as a numeric value. Specify 1 for tiAlternate to retrieve the ruler units as a string (e.g. “inches”). MultiColumn: returns .T. if the report has more than one column. ColumnCount: returns the number of columns in the report. Protection: returns a binary string with the protection flags for the report. Snaked_Columns: returns .T. if columns are printed horizontally, .F. if printed vertically. |
|
GetSelectedObjectCount |
[ tcFRXAlias ] |
I |
Returns the number of currently selected objects (CURPOS=.T.) in the FRX cursor. |
|
GetTargetTypeText |
tiObjType, tiObjCode |
C |
Returns the name of a given object type and object code. |
|
GetTimeStampString |
tiTimeStamp |
C |
Converts a FoxPro time stamp into a readable string. |
|
GetUnitValueFromFRU |
tnFRUValue, tiUnits |
N |
Converts a value in FRUs to another specified unit. The choices for tiUnits is 0 or 1 for inches, 2 for metric, or 4 for characters; any other value assumes pixels. |
|
GoRec |
tiRec |
- |
Positions the specified alias (the default is the selected alias) to the desired record number with range checking. |
|
HasBand |
tiObjCode |
L |
Returns .T. if the report contains a band of the specified type. |
|
HasDetailHeader |
tcDetailBandID |
L |
Returns .T. if the specified detail band record has a detail header. |
|
HasProtectionFlag |
tcBytes, tiFlag |
L |
Returns .T. if the given binary data (bytes) has a specific protection flag set. |
|
InsertBand |
tiObjCode |
- |
Inserts a band of the specified type into the FRX cursor. The FRX cursor must be selected and positioned to the appropriate record for the insertion. |
|
InsertDataEnvRecord |
tiObjType, tcExpr, |
- |
Inserts a DataEnvironment record into the FRX cursor using the specified values for OBJTYPE, NAME, EXPR, and TAG. The FRX cursor must be selected and positioned to the appropriate record for the insertion. |
|
InsertDetailBand |
None |
- |
Inserts a detail band record into the FRX cursor. The FRX cursor must be selected and positioned to the appropriate record for the insertion. |
|
InsertDetailHeaderFooter |
None |
- |
Inserts detail header and footer records into the FRX cursor. The FRX cursor must be selected and positioned to the appropriate detail band record, and that detail band must not already have header and footer records. |
|
InsertSummaryBand |
tlNewPage, tlPageHeader, tlPageFooter |
- |
Inserts a summary band into the FRX cursor. The FRX cursor must be selected and not already have a summary band. |
|
InsertTitleBand |
tlNewPage |
- |
Inserts a title band into the FRX cursor. The FRX cursor must be selected and not already have a title band. |
|
IntToBin |
tiValue |
C |
The opposite of BinToInit: converts an integer into a string of binary digits. |
|
IntToBinString |
tiValue |
C |
The opposite of BinStringToInit: returns the binary version of an integer as a string of bytes in least significant byte order. |
|
PixelsToFRU |
tnPixels |
N |
Returns the corresponding FRU for a given number of pixels. |
|
PopPrintEnv |
None |
- |
Restores the printer environment from a previously saved cursor (likely created in PushPrintEnvToCursor). The cursor to pop from must be selected. |
|
PushPrintEnvToCursor |
tcRegisterAlias |
- |
Creates the specified cursor and saves the printer environment to it. |
|
SetColumnCount |
tiCols |
- |
Adjust the number of columns in the report to the specified value by adding or removing column, column header, and column footer records as necessary. The FRX cursor must be selected. |
|
StripQuotes |
tcValue |
C |
Strips single and double quotes from the specified string. |
|
SynchObjectPositions |
None |
- |
Resets non-deleted objects in the FRX relative to the start of the band they are in. This is typically used after bands have been resized. The Bands and Objects cursors must have been created and the FRX cursor must be selected. This method moves and doesn’t restore the record pointer. |
Creating report event handlers
Because most report event handlers have common requirements, for this chapter we created a base class handler called SFReportEventHandler, defined in SFReportBuilder.VCX. It’s a subclass of Custom. Its Init method instantiates an SFReportEventUtilities object into the oUtilities property. Like FRXCursor, this object has utility methods for dealing with report objects and events.
The Execute method of SFReportEventHandler saves the passed-in event object to its oEvent property and the oEvent property of the SFReportEventUtilities object, and then calls the OnExecute method, which is abstract in this class. In a subclass, don’t override the Execute method, but instead put the appropriate code into the OnExecute method.
lparameters toEvent
with This
.oEvent = toEvent
.oUtilities.oEvent = toEvent
.OnExecute()
.oEvent = .NULL.
.oUtilities.oEvent = .NULL.
endwith
To handle a particular report event, create a subclass of SFReportEventHandler and register it in the handler registry table. To make it easy to do the latter, use a program called InstallHandler.PRG. Pass it the class and library for the handler, the event number, and optionally the object type and code. It adds a record to the registry table (expected to be named ReportBuilder.DBF; change the USE and INSERT INTO statements to use a different table name) if it doesn’t exist, and disables any other handlers for the same event. Here’s the code for InstallHandler.PRG:
lparameters tcClass, ;
tcLibrary, ;
tnEventType, ;
tnObjType, ;
tnObjCode
local lcClass, ;
lnObjType, ;
lnObjCode
* Open the report builder table (creating it if necessary first).
if not file('reportbuilder.dbf')
do (_reportbuilder) with 5, 'reportbuilder.dbf'
endif not file('reportbuilder.dbf')
use ReportBuilder
* Use defaults for the object type and code if they weren't passed.
lnObjType = iif(vartype(tnObjType) = 'N', tnObjType, -1)
lnObjCode = iif(vartype(tnObjCode) = 'N', tnObjCode, -1)
* If the specified handler is already there, ensure it's enabled by
* setting EventType to the proper value. Otherwise, add a record for it.
lcClass = padr(upper(tcClass), len(Hndl_Class))
locate for upper(Hndl_Class) == lcClass and (EventType = tnEventType or ;
EventType = tnEventType + 100) and ObjType = lnObjType and ;
ObjCode = lnObjCode
if found()
replace EventType with tnEventType
else
insert into ReportBuilder ;
(Rec_Type, ;
Hndl_Class, ;
Hndl_Lib, ;
EventType, ;
ObjType, ;
ObjCode) ;
values ;
('H', ;
tcClass, ;
tcLibrary, ;
tnEventType, ;
lnObjType, ;
lnObjCode)
endif found()
* Disable any other handlers for the same event by setting their
* EventType code to an used value.
replace EventType with EventType + 100 for ;
EventType = tnEventType and ;
ObjType = lnObjType and ObjCode = lnObjCode and ;
not upper(Hndl_Class) == lcClass
* Clean up and exit.
use
![]()
The Developer Download files for this chapter, available at www.hentzenwerke.com, include Samples.PJX, SFReportBuilder.VCX, InstallHandler.PRG, InstallFilter.PRG, and files used by classes in SFReportBuilder.VCX. Note that one of the include files, SFReporting.H, includes \Program Files\Microsoft Visual FoxPro 9\FFC\FoxPro_Reporting.h. If you install these samples on a different drive than where VFP is installed, or if VFP is installed in a different directory than \Program Files\Microsoft Visual FoxPro 9, be sure to change the #INCLUDE statement in SFReporting.H to point to the correct path, and then rebuild Samples.PJX with the “Rebuild project” and “Recompile All Files” options checked.
Let’s look at some examples of useful report event handlers.
Report templates
When you create a new report, you get a blank report. Wouldn’t it be nice if VFP would automatically add certain common elements you want in every report? In other words, a report that’s used as the template for all new reports.
FoxPro has actually had this capability (although it’s undocumented) since the FoxPro DOS days. If you modify a report called Untitled.FRX, FoxPro will prompt you for a new name when you save it. However, this requires that you modify this report rather than creating a new one and only allows you to have one such template.
Now, with design-time report events, you can have report templates. There isn’t an event that fires when a report is created, but there is when one is opened, so simply check if the report is a new one or not (the utility method IsNewReport returns .T. if that’s the case). If it’s a new report, ZAP existing records in the FRX, APPEND FROM a template FRX file, and set the return flag to indicate the event was handled and the FRX was changed. Here’s the code in the OnExecute method of SFNewReportHandlerBasic (contained in SFReportBuilder.VCX):
with This
if .oUtilities.IsNewReport() and not empty(.cTemplateReport)
zap
append from (.cTemplateReport)
.oEvent.SetHandlerByBuilder(.T.)
.oEvent.SetReloadChanges(.T.)
go top
endif .oUtilities.IsNewReport() ...
endwith
The custom property cTemplateReport contains the name of the template FRX to use. By default, it contains Template.FRX. To register this class, run InstallNewReportHandlerBasic.PRG.
Now, to get even fancier, how about asking the user which template they want to use? SFNewReportHandlerFancy is a subclass of SFNewReportHandlerBasic with the following code in OnExecute:
local loForm
if This.oUtilities.IsNewReport()
loForm = newobject('SFSelectTemplateForm', 'SFReportBuilder.vcx')
loForm.Show()
if vartype(loForm) = 'O'
This.cTemplateReport = loForm.cTemplate
endif vartype(loForm) = 'O'
endif This.oUtilities.IsNewReport()
return dodefault()
This code uses the SFSelectTemplateForm class to display a list of available templates. This list comes from Templates.DBF that has fields containing the name of the template FRX, a descriptive name for the template, and a memo containing comments about the template. To register this class, run InstallNewReportHandlerFancy.PRG.
Figure 2 shows the Report Designer after running InstallNewReportHandlerBasic.PRG and typing CREATE REPORT MyNewReport in the Command window.
![]()
The Developer Download files for this chapter, available at www.hentzenwerke.com, include SFReportBuilder.VCX, SFCtrls.VCX, InstallNewReportHandlerBasic.PRG, InstallNewReportHandlerFancy.PRG, Templates.DBF, Template.FRX, ExecTemplate.FRX, and LedgerTemplate.FRX.
Figure 2. A report event handler that creates a new report from a template makes it easy to create consistent, attractive reports.
Custom dialog for new fields
One thing many VFP developers have wanted to do is replace
the dialog that appears when
a user adds a new field to a report. They want a dialog that’s both simpler (it
displays descriptive names for tables and fields) and more powerful (it doesn’t
require the tables to
be in the DataEnvironment or open and it has options for adding a label to go
along with
the field). Now you can take over the “new field” report event to finally
create the dialog
you want.
TestNewField.PRG calls several “install” programs to ensure the appropriate handlers are registered. It also creates a meta data object with collections of tables and fields read from a meta data table. We won’t look at that object here; feel free to examine it yourself.
When you run TestNewField.PRG, it automatically creates a new report, but nothing else appears different. However, because a class named SFNewTextBoxHandler is now the handler for new fields, when you add a field, you get the dialog shown in Figure 3 rather than the usual one.
Figure 3. This dialog, which appears when the user adds a new field to a report, makes it easy to select the desired field.
This dialog displays descriptive names for the tables and fields in the SQL Server Northwind database, which, of course, aren’t in the DataEnvironment or open in VFP. They don’t need to be because this information comes from meta data; the meta data table named REPMETA.DBF contains the name of each table and field, their descriptive names, field data types, sizes, and so forth. This dialog also allows you to indicate whether a label is created or not, and if so, whether it should be placed in the page header band above the field or to the left of the field in the same band as the field.
As with other subclasses of SFReportEventHandler, it’s the OnExecute method of SFNewTextBoxHandler that does the work. We won’t go over all the code in this method, just the more interesting stuff. First, this method displays the dialog shown above. If the user clicks OK, it retrieves some information about the selected field from the meta data (the data type, size, etc.). It then uses the SFReportEventUtilities object to retrieve the default font, size, and style from the header record in the FRX. It uses the FRXCursor helper object to determine the height and width of the field in FRUs, and updates the field’s record in the FRX accordingly.
lcFontName = .oUtilities.GetReportHeaderValue('FONTFACE')
lnFontSize = .oUtilities.GetReportHeaderValue('FONTSIZE')
lnFontStyle = .oUtilities.GetReportHeaderValue('FONTSTYLE')
lcFontStyle = .oUtilities.GetFontStyle(lnFontStyle)
* Determine the width and height for the textbox.
lnWidth = .oEvent.FRXCursor.GetFRUTextWidth(lcText, lcFontName, ;
lnFontSize, lcFontStyle)
lnHeight = .oEvent.FRXCursor.GetFRUTextHeight(lcText, lcFontName, ;
lnFontSize, lcFontStyle)
* Update the properties of the new textbox.
replace EXPR with lcField, ;
NAME with lcName, ;
WIDTH with lnWidth, ;
HEIGHT with lnHeight ;
PICTURE with iif(empty(lcPicture), '', '"' + lcPicture + '"'), ;
FILLCHAR with lcType, ;
FONTFACE with lcFontName, ;
FONTSIZE with lnFontSize, ;
FONTSTYLE with lnFontStyle, ;
USER with 'EXPR=' + lcExpr + ccCRLF ;
in FRX
Next it determines where to put the label object for the field. If it’s supposed to go in the page header, OnExecute asks the SFReportEventUtilities object to find a label in the page header band with “*:TEMPLATE” in its USER memo in the FRX cursor (this memo field is accessible on the Other page of the properties dialog). If such an object exists, it’s the template for the new label (font, style, vertical position, etc.). If “REMOVE” also appears, the code removes the template object from the report and makes the label the code is about to create the new template.
if lnPosition = 1
loBand = .oUtilities.GetBandObject(FRX_OBJCOD_PAGEHEADER)
loTemplate = .oUtilities.FindTemplateObject(loBand, ;
FRX_OBJTYP_LABEL, '*:TEMPLATE', .T.)
if vartype(loTemplate) = 'O'
if '*:TEMPLATE REMOVE' $ upper(loTemplate.User)
.oUtilities.RemoveReportObject(loTemplate.UniqueID)
loTemplate.User = strtran(loTemplate.User, ;
'*:TEMPLATE REMOVE', '*:TEMPLATE')
endif '*:TEMPLATE REMOVE' $ upper(loTemplate.User)
loObject = loTemplate
lnVPos = loObject.VPos
else
lnVPos = loBand.Stop - lnHeight - BAND_SEPARATOR_HEIGHT_FRUS
endif vartype(loTemplate) = 'O'
If the label is supposed to go in the same band as the field, OnExecute asks the SFReportEventUtilities object to find the band the field is in, and then like the previous code, to look in that band for a label with “*:TEMPLATE” in its USER memo and use it as the template.
else
loBand = .oEvent.FRXCursor.GetBandFor(FRX.UniqueID)
loTemplate = .oUtilities.FindTemplateObject(loBand, ;
FRX_OBJTYP_LABEL, '*:TEMPLATE', .T.)
if vartype(loTemplate) = 'O'
if '*:TEMPLATE REMOVE' $ upper(loTemplate.User)
.oUtilities.RemoveReportObject(loTemplate.UniqueID)
loTemplate.User = strtran(loTemplate.User, ;
'*:TEMPLATE REMOVE', '*:TEMPLATE')
endif '*:TEMPLATE REMOVE' $ upper(loTemplate.User)
loObject = loTemplate
endif vartype(loTemplate) = 'O'
endif lnPosition = 1
Finally, a new label is added to the report.
with loObject
.UniqueID = sys(2015)
.TimeStamp = This.oEvent.FRXCursor.GetFRXTimeStamp(datetime())
.Name = ''
.Expr = '"' + lcCaption + '"'
.Height = lnHeight
.Width = lnWidth
.VPos = lnVPos
.HPos = lnHPos
.ObjType = FRX_OBJTYP_LABEL
endwith
insert into FRX from name loObject
This is the most complicated event handler we’ve seen because it has to deal with more things in the FRX. Doing this type of work requires a fair bit of knowledge about the structure of an FRX, so be sure to check out the 90FRX report in the Tools\FileSpec subdirectory of the VFP home directory for documentation on the FRX.
By the way, this sample shows another cool new feature in VFP 9: design-time labels, discussed in Chapter 5, “Enhancements in the Reporting System.” Notice that when you add a field to the report, it displays the caption rather than the field name in the field object. That’s because the OnExecute method fills in the NAME column of the field object in the FRX with the caption for the field. When you use CREATE or MODIFY REPORT with the PROTECTED keyword, the Report Designer displays the contents of the NAME column rather than the EXPR column for field objects. This means you can display nice descriptive names for fields rather than the actual field names. Of course, the user will see the actual field names in the Properties dialog, but at least they see the nice names on the design surface.
![]()
The Developer Download files for this chapter, available at www.hentzenwerke.com, include SFReportBuilder.VCX, InstallNewField.PRG, TestNewField.PRG, and SFMetaData.VCX.
Generating cursors on the fly
So, now you can create a report from meta data using the SFNewTextBoxHandler handler, what happens when you try to preview the report? It won’t work, because the cursors are not open. Ah, but what if you hook into the preview or print events and generate the cursors before the report runs?
InstallPreview.PRG registers SFPreviewHandler as the handler for events 10 (previewing) and 18 (printing). The OnExecute method of SFPreviewHandler is fairly simple: it generates a SQL SELECT statement by looking at the fields in the report (we won’t look at the code that does this here), instantiates an object that opens a connection to the SQL Server Northwind database, sends the SQL SELECT statement to SQL Server to create a cursor, and tells the report engine to cancel the preview or print if it failed for some reason.
local lcSelect, ;
loConnection, ;
llOK
* Create the SQL SELECT statement we need for the report.
wait window 'Retrieving data...' nowait
lcSelect = This.CreateSQLStatement()
* Create a connection object and try to connect to the SQL Server
* Northwind database. If we succeeded, execute the SQL SELECT statement
* in the report's datasession.
loConnection = newobject('SFConnectionMgr', 'SFConnection.vcx')
loConnection.cConnectString = 'driver=SQL Server;server=(local);' + ;
'database=Northwind;trusted_connection=yes'
if loConnection.Connect()
llOK = loConnection.ExecuteStatement(lcSelect, ;
This.oEvent.DefaultSessionID, sys(2015))
endif loConnection.Connect()
* If we failed to connect or create the cursor, display a warning and
* flag that we've handled the event so the preview stops.
wait clear
if not llOK
messagebox(loConnection.cErrorMessage)
This.oEvent.SetHandlerByBuilder(.T.)
endif not llOK
If you want to try this code yourself, change the assignment statement for loConnection.cConnectString to the appropriate values for your Northwind database.
![]()
The Developer Download files for this chapter, available at www.hentzenwerke.com, include InstallPreview.PRG, SFConnection.VCX, and SFReportBuilder.VCX.
Summary
The VFP team certainly met their goals in the improvements they made to the reporting system. The dialogs available in ReportBuilder.APP are more attractive, easier to use, and more capable than those in earlier versions. The ability to hook into design-time report events means you can create customized report designers that are more powerful, flexible, and easier to use, for both your development team and your end users.
The next chapter looks at further extensibility in the reporting system, this time when running a report.
Updates and corrections for this chapter can be found on Hentzenwerke’s website, www.hentzenwerke.com. Click “Catalog” and navigate to the page for this book.