Chapter
5
Object Orientation in C# and Visual Basic .NET
With the release of Visual FoxPro 3.0, FoxPro became object-oriented. For those of you who have already made the leap to object-oriented programming, you know how difficult the transition can be. Fortunately, once you’ve learned OOP in VFP, it’s easy to learn the basics of OOP in .NET. This chapter shows how different object-oriented features are implemented in C# and Visual Basic .NET, while providing a comparison to Visual FoxPro’s object-orientation.
By its very nature, this chapter is one of the more controversial in this book. The two previous chapters were devoted to the basics of C# and Visual Basic .NET syntax, but this chapter moves into the meatier topic of object-orientation, providing a side-by-side comparison of the two languages. Many of you may use the information in these chapters to decide which .NET language to choose—and choice of language is often a religious issue!
As in the previous chapters, I’ll point out the differences in C# and VB .NET and offer some editorial comments on the approach I think is better. Although both languages compile down to the same intermediate language (MSIL), they implement .NET’s object-oriented features a little differently—and in some cases, one language has object-oriented features not available in the other language. Throughout this chapter, I’ll draw comparisons to Visual FoxPro’s object-oriented features so you can leverage your existing knowledge of OOP.
Where do you put your code?
Visual FoxPro allows you to place code in class methods, in functions or procedures stored in PRG files, or as procedural code stored in PRG files.
In contrast, all code in C# must be placed in classes. This
is similar to other pure object-oriented programming languages, such as Java
and SmallTalk that impose more discipline
on developers.
Visual Basic .NET takes an approach more like Visual FoxPro, in allowing you to place code and variables in either classes or modules. Similar to a class, a module is derived from the System.Object class and used to encapsulate items contained within it. The main differences between a class and a module are a class can be instantiated and implement interfaces, but a module cannot.
Another difference is in referencing members of a class, you must specify the name of the class followed by the member (for example, Customer.GetCreditLimit). In contrast, members declared in a module are like global variables and functions accessed from anywhere within your application. By default, members of a module are shared (For details, see the “Instance and static (Shared) members” section later in this chapter). You can compare placing code in modules to creating global variables, functions, and procedures in a Visual FoxPro PRG.
Are modules a “good thing” or a “bad thing”? I think the answer to this is subjective. Personally, I tend to prefer a more “pure” object-oriented approach, because I believe it promotes better programming practices. However, you may prefer the convenience of being able to create standalone functions and procedures in a Visual Basic .NET module.
Classes
At the very heart of any object-oriented language are classes. I’ll begin by discussing the mechanics of where and how you define classes.
In Visual FoxPro, you define classes visually in VCX files or manually in PRG files. Defining classes in C# and VB .NET takes an approach somewhere in between. In these languages, you can place class definitions in source files (either .cs or .vb files), which are similar to Visual FoxPro’s PRG files. However, Visual Studio .NET lets you easily navigate to a particular class and a specific method in a source code file using the class and member combo boxes at the top of the code-editing window.
The class combo box (Figure 1) contains a list of all classes defined in a source code file. Selecting a class from this combo box takes you to the class definition in the source code.
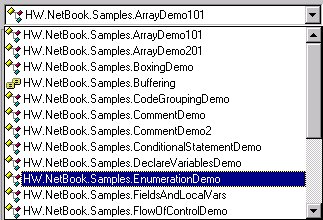
Figure 1. The class combo box, at the top left of the code-editing window, contains a list of all classes defined in the source code file.
The member combo box (Figure 2) contains a list of all members defined for the currently selected class. Selecting a member from this combo box takes you to the member in the source code file.
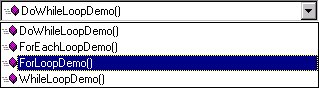
Figure 2. The member combo box at the top right of the code-editing window contains a list of all members for the currently selected class.
As you manually page or arrow up/down in the source code file, the selected items in these boxes change to reflect your current location in the source code—a nice feature.
Defining classes
In Chapter 3, “Introduction to C#”, and Chapter 4, “Introduction to Visual Basic .NET”, you learned the basics of defining classes. In this chapter I’ll review some of that information and expand on it.
Here’s an example of the most simple class definition in C#:
public class SimpleClass
{
}
And in VB .NET:
Public Class SimpleClass
End Class
In both cases, this code defines a class named “SimpleClass”. The public keyword is an access modifier specifying the visibility of the class. If you don’t specify an access modifier, the visibility defaults to “internal” for C# and the equivalent “friend” for VB .NET. Table 1 lists the access modifiers that apply to classes.
Table 1. C# and VB .NET class access modifiers
|
C# |
VB .NET |
Description |
|
public |
public |
Indicates no restrictions for accessing the class. |
|
internal |
friend |
Indicates the class is only accessible from code within the same assembly where the class is defined. |
Defining fields (member variables)
As discussed in Chapter 3, “Introduction to C#”, variables declared at the class level are known as fields, and as discussed in Chapter 4, “Introduction to Visual Basic .NET”, they are known as member variables in VB .NET. I don’t want to skip mentioning this here, but check out the corresponding chapter for details on each of these.
Defining properties
C# and Visual Basic .NET properties are similar to Visual FoxPro properties with associated access and assign methods. They are implemented as get and set accessor methods containing any code you want. Here is an example of a property used to retrieve and store the value of a private field (member variable in VB .NET).
In C#:
private int age = 99;
public int Age
{
get
{
return this.age;
}
set
{
this.age = value;
}
}
And in Visual Basic .NET:
Private _age As Integer = 99
Public Property Age() As Integer
Get
Return _age
End Get
Set(ByVal Value As Integer)
_age = Value
End Set
End Property
In this code, the property has a get method used to retrieve the value from a private field, and a set method that stores a value to the private field. Notice the C# code sample takes advantage of C#’s case sensitivity, by naming the private field age and the property Age. Because VB .NET isn’t case sensitive, you need to give any associated member variable a different name than the property.
![]()
It is not required for a property to have an associated field (member variable), although they often do. For example, rather than getting and setting the value of a field, code within a property might read and write data instead.
Notice in the C# sample code, the set method uses an intrinsic parameter named value. When client code saves a value to a property, it is stored in this intrinsic value variable. In contrast, although the Set method in the VB .NET sample code explicitly declares a variable named Value, you are allowed to change the name of this variable (although I can’t think of a compelling reason to do so).
Read-only and write-only properties
In C#, if you want to create a read-only property, all you have to do is leave out the set accessor method. For example:
private int
height;
public int Height
{
get
{
return this.height;
}
}
You do the same thing in Visual Basic .NET, but you must also add the ReadOnly keyword to the property definition:
Private _height As Integer
Public ReadOnly Property Height() As Integer
Get
Return Me._height
End Get
End Property
If you want to create a write-only property in C#, just leave out the get accessor method. You do the same thing in Visual Basic .NET, but you must also add the WriteOnly keyword to the property definition.
Defining methods
A class doesn’t do much without methods. Here’s an
example of a simple method declaration
in C#:
public void SimpleMethod()
{
}
And in Visual Basic .NET:
Public Sub SimpleMethod()
End Sub
This code defines a method named “SimpleMethod” that returns nothing (void, in C#). Both C# and VB .NET require parentheses after the name of the method. As shown in the next section, these parentheses contain a list of parameters passed to the method. In this case, even though there are no parameters, you must still add the parentheses as a placeholder.
Here’s an example of a C# method that returns a boolean value:
public bool SimpleMethodBool()
{
return true;
}
This is exactly the same as the previous C# method declaration, except I specified the return value is boolean rather than void, and I added a line of code that returns a boolean value. This is extremely consistent syntax.
Now here’s the same method in Visual Basic .NET:
Public Function SimpleMethodBool() As Boolean
Return True
End Function
Notice the method is declared as a function rather than a subroutine (Sub) and has an additional As clause specifying the type of the return value. What’s going on here?
In VB .NET, to specify a method return nothing, you must declare it as a subroutine (Sub). If a method returns a value, you must declare it as a Function and use the As clause to specify the return value type.
In all the methods shown above, the public keyword is an access modifier specifying the class visibility. Table 2 lists all access modifiers for C# and VB .NET members.
Table 2. C# and VB .NET class member access modifiers
|
C# |
VB .NET |
Description |
|
public |
Public |
No restrictions for accessing the member. |
|
protected |
Protected |
The member is only accessible from within the class or from classes derived from the class. |
|
internal |
Friend |
The member is only accessible from code within the assembly where the member is defined. |
|
protected internal |
Protected Friend |
The member is only accessible from within the class or from code within the assembly where the member is defined. |
|
private |
Private |
The member is only accessible within the containing class. |
Specifying method parameters
There are a few different kinds of method parameters in C# and VB .NET (Table 3) described in the following sections.
Table 3. C# and VB .NET method parameters
|
C# parameter keywords |
VB .NET |
Description |
|
(no keyword needed) |
ByVal |
Value parameter—the default for C# and VB .NET |
|
reference |
ByRef |
Reference parameter |
|
params |
ParamArray |
Parameter array |
|
out |
Not required |
Output parameter |
|
n/a |
Optional |
Optional parameter |
Value parameters
Just as in Visual FoxPro, the default parameter type in both C# and Visual Basic .NET is a value parameter. In practical terms, if the method you call changes the value of the parameter, the value is not changed in the calling method. Here’s an example of a method with a value parameter in C#:
public void ValueParam(int age)
{
age++;
}
And in Visual Basic .NET:
Public Sub ValueParam(ByVal age As Integer)
age = age + 1
End Sub
In C#, if you don’t specify otherwise, the parameter is passed by value. In VB .NET, if you don’t specify the kind of parameter, Visual Studio .NET automatically inserts the ByVal keyword for you.
Reference parameters
When you pass a parameter by reference, if the method changes its value, the value is also changed in the calling method. Here’s an example using a reference parameter in C#:
public void ReferenceParam(ref int age)
{
age++;
}
And in Visual Basic .NET:
Public Sub ReferenceParam(ByRef age As Integer)
age += 1
End Sub
In C#, if a method accepts a reference parameter, you must specify in the method call that you are passing the value by reference:
PtDemo.ReferenceParam(ref age);
In Visual Basic .NET, you don’t have to specify you’re passing the value by reference:
PtDemo.ReferenceParam(Age)
Array parameters
You can pass a variable number of parameters to a C# or VB .NET method by declaring an array parameter. Within the method body, you can use a foreach loop to access all items in the passed array.
In C#:
public void ArrayParam(params int[] ages)
{
string AgeMsg = "";
foreach (int i in ages)
{
AgeMsg += i + ": ";
}
MessageBox.Show("Ages: " + AgeMsg, "Array Parameter demo");
}
In Visual Basic .NET:
Public Sub ArrayParam(ByVal ParamArray ages() As Integer)
Dim AgeMsg As String = ""
Dim i As Integer
For Each i In ages
AgeMsg += i.ToString() & ": "
Next i
MessageBox.Show("Ages: " & AgeMsg, "Array Parameter demo")
End Sub 'ArrayParam
Output parameters
C# has output parameters—a parameter type not available in Visual Basic .NET. An output parameter is similar to a reference parameter, but it allows you to pass a variable to a method without first specifying an initial value. If you remember from Chapter 3, “Introduction to C#”, in an effort to encourage good programming practices, C# requires you to specify a value for all variables before using them. Output parameters are the one exception to the rule. To demonstrate, here’s a C# method that declares a single output parameter:
public void OutParam(out int age)
{
age = 39;
}
And here’s an example of code calling this method:
int JackBennysAge;
PtDemo.OutParam(out JackBennysAge);
Notice this code declares the variable JackBennysAge, but never stores an initial value. So why aren’t output parameters available in VB .NET? Because VB .NET does not require you to initialize variables (although it’s a good idea to specify initial values anyway!).
Optional parameters
Visual Basic .NET has a type of parameter not available in C#—optional parameters. Optional parameters provide a way to specify a particular parameter that is not mandatory. When declaring an optional parameter, you must specify a default value in case the caller doesn’t pass a value for the optional parameter. For example, here’s a VB .NET method that declares a single optional parameter with a default value of 50:
Public Sub OptionalParam(Optional ByVal age As Integer = 50)
At first, optional parameters might seem like a great feature. However, you should probably avoid using them! One reason is C# does not recognize optional parameters—it sees them as mandatory, just like every other parameter. This is an important consideration if you anticipate C# clients may be accessing your code. Optional parameters can also introduce problems if you ever decide to change the default value of the optional parameter. For details, see the MSDN article “Exploiting New Language Features of Visual Basic .NET, Part 2” (http://msdn.microsoft.com/msdnmag/issues/01/08/instincts/instincts0108.asp).
In reality, avoiding optional parameters is not a real loss. You can actually accomplish the same thing by means of overloaded methods.
Overloaded methods
In Visual FoxPro, all class methods must have unique names. You may be surprised to learn this is not true in C# or Visual Basic .NET. Both languages allow you to create multiple methods with the same name—as long as the number and type of parameters is different. For example, the following code defines a class with two methods, both named “DisplayMessage”.
In C#:
public class OverloadedMethodsDemo
{
public void DisplayMessage(string message, string caption)
{
MessageBox.Show(message, caption);
}
public void DisplayMessage(string message)
{
this.DisplayMessage(message, "Application Message");
}
}
And in Visual Basic .NET:
Public Class OverloadedMethodsDemo
Public Overloads Sub DisplayMessage(ByVal message As String, _
ByVal caption As String)
MessageBox.Show(message, caption)
End Sub 'DisplayMessage
Public Overloads Sub DisplayMessage(ByVal message As String)
Me.DisplayMessage(message, "Application Message")
End Sub 'DisplayMessage
End Class 'OverloadedMethodsDemo
Although these methods have the same name, they have a different signature. In object-oriented terminology, the word signature refers to the type and order of a method’s parameters. In this case, the first overload of the DisplayMessage method accepts two string parameters—one named “message” and the other named “caption”. The second overload accepts only one string parameter named “message”.
When a client calls the DisplayMessage method, the compiler examines the parameters passed to the method and determines which overloaded method should be called. For example, the following code instantiates the OverloadedMethodsDemo class. The second line of code calls the DisplayMessage method with a single string parameter, and the third line of code calls the method with two string parameters.
In C#:
OverloadedMethodsDemo OverloadDemo = new OverloadedMethodsDemo();
OverloadDemo.DisplayMessage("Overloaded methods are great!");
OverloadDemo.DisplayMessage("Overloaded methods are great!", "Overload demo");
In Visual Basic .NET:
Dim OverloadDemo As New OverloadedMethodsDemo()
OverloadDemo.DisplayMessage("Overloaded methods are great!")
OverloadDemo.DisplayMessage("Overloaded methods are great!", "Overload demo")
The compiler is satisfied with these two calls because there are overloaded methods matching each set of parameters. However, if you try to call the DisplayMessage method with an incorrect number of parameters (for example, no parameters, more than two parameters, or parameters that are not string types), the compiler displays an error message.
Visual Studio .NET’s IntelliSense lets you know if a method you are calling is overloaded. For example, Figure 3 shows the popup displayed by VS .NET when entering code that calls the DisplayMessage overloaded method.

Figure 3. When you enter code that calls an overloaded method in Visual Studio .NET’s code editor, a popup displays showing details of the overloaded methods.
So, where would you use overloaded methods? When you have a method with optional parameters, you should create overloaded methods representing the different variations of parameters that can be passed to the method. This is much cleaner than having a single method checking which parameters have been passed.
Constructor methods
All Visual FoxPro classes possess an Init method that automatically executes when a class is instantiated. C# and VB .NET also have constructor methods that perform a similar function.
In C#, you declare a constructor method by adding a method with the same name as the containing class:
public class ConstructorDemo
{
public ConstructorDemo()
{
}
}
In Visual Basic .NET, you declare a constructor by adding a New method to the class definition:
Public Class ConstructorDemo
Public Sub New()
End Sub
End Class
I actually prefer the VB .NET convention, because it’s easier to quickly identify a constructor that’s consistently named the same.
Notice in both code samples that neither constructor specifies a return value. This is because .NET constructors are not allowed to return values unlike Visual FoxPro where you can return a boolean False to prevent a class from instantiating.
Constructors with parameters
As in Visual FoxPro, you can specify parameters for constructor methods in .NET. This allows you to pass values to a class when it is first instantiated.
Here’s an example in C#:
public class ConstructorDemo
{
private string connectString;
public ConstructorDemo(string connect)
{
this.connectString = connect;
}
}
And in Visual Basic .NET:
Public Class ConstructorDemo
Private connectString As String
Public Sub New(ByVal connect As String)
Me.connectString = connect
End Sub
End Class
In this code, the value passed in the constructor is used to initialize the value of a private field. If you don’t explicitly declare a constructor, a default constructor is automatically provided.
Here is an example of passing a value to the constructor of a class when it is instantiated.
In C#:
ConstructorDemo ConstructDemo = new
ConstructorDemo("server=(local);uid=sa;pwd=;database=Northwind;");
And in Visual Basic .NET
Dim ConstDemo As _
New ConstructorDemo("server=(local);uid=;pwd=;database=NorthWind;")
As with other methods, you can also create overloaded constructor methods. Based on the parameters you pass when instantiating a class, the appropriate constructor is called.
Destructor methods
Visual FoxPro classes have a Destroy method that executes when an object is released. Typically you place code in this method to perform cleanup for the object. This works well because you have complete control over when an object is destroyed in Visual FoxPro.
In contrast, .NET has something called non-deterministic finalization. This means you don’t have explicit control over when an object is destroyed. When the last reference to a .NET object is released, the object itself is not released from memory. The object is not released until the next time the common language runtime’s garbage collector runs (see the “Garbage collection” section later in this chapter for details).
In both C# and Visual Basic .NET classes, you can add a Finalize method that executes when the object is destroyed. Just remember you can’t determine when this method is executed.
Class inheritance
One key feature of object-orientation is class
inheritance, also known as implementation
inheritance. C# and Visual Basic .NET both have single inheritance, meaning
a class can only have one parent class. In .NET, the term base class is used in place of Visual FoxPro’s “parent
class”. Personally, I prefer the term “parent class” because it’s more
descriptive and more readily understood.
Specifying a base class
When you define a class in C# or VB .NET, if you don’t specify otherwise, its default base class is the .NET Framework’s System.Object class. Here is an example showing how to specify a base class.
In C#:
public class BaseClassDemo : Component
{
}
In Visual Basic .NET:
Public Class BaseClassDemo
Inherits Component
End Class
This code defines a class named BaseClassDemo derived from the .NET Framework’s Component class (System.ComponentModel.Component). In C#, you declare a base class by placing a colon followed by the base class name (: Component) at the end of the first line of the class declaration. In Visual Basic .NET, you place the keyword Inherits followed by the base class name on the second line of the class declaration.
Inheritance works the same way in .NET as it does in Visual FoxPro. A subclass inherits all members (properties, events, methods, and fields) from its base class, including implementation code.
Overriding inherited methods
At times, you may want a class to override an inherited method. In Visual FoxPro, the simple act of placing code in a method causes the method to be overridden. Unfortunately, in VFP all it takes is a single space character to unintentionally override a parent method.
You can “accidentally” override a method in C# and Visual Basic .NET by creating a method in a class with the same name and signature as an inherited method. For example, the following code declares a class named MyBaseClass with a single method named DisplayMessage. It also declares a subclass of MyBaseClass named “OverrideMethodDemo” that contains a duplicate DisplayMessage method.
In C#:
public class MyBaseClass
{
public void DisplayMessage()
{
MessageBox.Show("Base class method!", "Override demo");
}
}
public class OverrideMethodDemo : MyBaseClass
{
public void DisplayMessage()
{
MessageBox.Show("Subclass method!", "Override demo");
}
}
In Visual Basic .NET:
Public Class MyBaseClass
Public Sub DisplayMessage()
MessageBox.Show("Base class method!", "Override Demo")
End Sub
End Class
Public Class OverrideMethodDemo
Public Sub DisplayMessage()
MessageBox.Show("Subclass method!", "Override Demo")
End Sub
End Class
When you run this code, the OverrideMethodDemo.DisplayMessage method is executed, but the base class method is not. In reality, this is not a legal way to override a method in either C# or Visual Basic .NET. In both languages, the compiler catches this error and displays it as a warning (Figure 4).
![]()
Figure 4. The C# and VB .NET compilers display a warning if you create a method in a class with the same name and signature as an inherited method.
The following code demonstrates the proper syntax for overriding methods by using the override keyword (C#) or the Overrides keyword (VB .NET) in the method declaration.
In C#:
public class MyBaseClass
{
public virtual void DisplayMessage()
{
MessageBox.Show("Base class
method!", "Override demo");
}
}
public class OverrideMethodDemo : MyBaseClass
![]() {
{
{
MessageBox.Show("Subclass
method!", "Override demo");
}
}
And in Visual Basic .NET:
Public Class MyBaseClass
Public Overridable Sub DisplayMessage()
MessageBox.Show("Base class method!", "Override Demo")
End Sub
End Class
Public Class OverrideMethodDemo
![]() Inherits MyBaseClass
Inherits MyBaseClass
MessageBox.Show("Subclass method!", "Override Demo")
End Sub
End Class
When you instantiate the OverrideMethodDemo class and run its DisplayMessage method, the code in the OverrideMethodDemo subclass is executed, but the DisplayMessage method in the parent is not executed.
Virtual (Overridable) methods
Virtual methods can be overridden by a subclass. In Visual FoxPro, all methods are virtual because you can override any inherited public or protected method simply by placing code in the method of a subclass. There is no such thing as a “non-virtual” method in Visual FoxPro.
In contrast, methods are non-virtual by default in C# and VB .NET and cannot be overridden. In order to override a method, it must be specifically marked as virtual (C#) or Overridable (VB .NET) in the base class. If you look closely at the code in the previous section, you will see the DisplayMessage method in MyBaseClass was marked virtual (Overridable for VB .NET).
![]()
If you override a virtual method, the method in the subclass marked “override” is automatically virtual too.
Extending inherited methods
More often than not, you extend rather than completely override an inherited method. In Visual FoxPro you accomplish this by placing code in a method, then issuing a DODEFAULT command. You can run DODEFAULT first, before executing your subclass code, or you can run your code first, and then issue a DODEFAULT.
To call a base class method in C#, you use the base keyword:
public class CallBaseMethodDemo : MyBaseClass
{
public override void DisplayMessage()
{
MessageBox.Show("Subclass method!", "Call base method demo");
base.DisplayMessage();
}
}
To call a base class method in VB .NET, you use the MyBase keyword:
Public Class CallBaseMethodDemo
Inherits MyBaseClass
Public Overrides Sub DisplayMessage()
MessageBox.Show("Subclass method!", "Call base method demo")
MyBase.DisplayMessage()
End Sub
End Class
In this example, code first executes in the subclass method and afterwards calls the base class method. You can easily reverse this order by placing the call to the base class first in the subclass method.
Polymorphism and virtual methods
Visual FoxPro is a weakly typed language, so you don’t specify the types of variables. You simply declare a variable and instantiate an object. For example:
x = CREATEOBJECT("MyClass")
As you’ve already seen, when instantiating an object in C#
and in Visual Basic .NET,
you always declare the type of the variable that holds a reference to the
object (assuming
VB .NET’s Option Strict is “On”). For example, the following code declares a
variable
named “ClientObj” of the type Client, and then stores a new instance of the
Client class into the variable.
In C#:
Client ClientObj;
ClientObj = new Client();
And in Visual Basic .NET:
Dim Client As ClientObj
ClientObj = New Client()
In this example, the code declares a variable of a specific type, and then instantiates an object from that type—no surprises here.
However, in both C# and VB .NET, when you declare a variable of a particular type it can also hold a reference to any subclass of that type. Take for example the class hierarchy shown in Figure 5, which shows Client and Invoice classes derived from the ABusinessObject class.
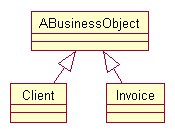
Figure 5. When you declare a variable of a particular type it can also hold a reference to any subclass of that type.
Given this hierarchy, you can declare a variable of type ABusinessObject and then store a reference to either the Client or Invoice object in this variable.
In C#:
ABusinessObject BizObj;
BizObj = new Client();
BizObj = new Invoice();
And in Visual Basic .NET:
Dim BizObj As ABusinessObject
BizObj = New Client()
BizObj = New Invoice()
This technique allows you to write more generic code that works with families of objects, making use of object-oriented polymorphism rather than coding to a specific class.
Hiding inherited methods
So far, you’ve learned about overriding and extending inherited methods. However, there are other situations where you may want to completely hide an inherited method and redeclare it.
To hide an inherited method in C#, use the new keyword in the method declaration:
public class HideMethodDemo : MyBaseClass
{
public new void DisplayMessage()
{
MessageBox.Show("Subclass method!", "Hide method demo");
}
}
To hide an inherited member in Visual Basic .NET, use the shadows keyword in the method declaration:
Public Class HideMethodDemo
Inherits MyBaseClass
Public Shadows Sub DisplayMessage()
MessageBox.Show("Subclass method!", "Hide method demo")
MyBase.DisplayMessage()
End Sub
End Class
In what situations might you choose to completely hide an inherited method? First of all, you can use it to override a method not marked as virtual (or Overridable). Although I said earlier only virtual methods can be overridden, you can get around this rule by redeclaring a method with the new or shadows keyword.
![]() Be
judicious when deciding to hide an inherited method. If a base class method has
not been marked as “virtual”, the developer may have a good reason for not
allowing you to override the method. Test your code well!
Be
judicious when deciding to hide an inherited method. If a base class method has
not been marked as “virtual”, the developer may have a good reason for not
allowing you to override the method. Test your code well!
For example, the following code declares a class named BaseClass with a single non-virtual method named “DisplayMessage”. It then declares a subclass of HideMethodBase named “HideMethodDemo” that redeclares the DisplayMessage method. This method even contains a call to the base class DisplayMessage method!
In C#:
public class HideMethodBase
{
public void DisplayMessage()
{
MessageBox.Show("Base class method!", "Override demo");
}
}
public class HideMethodDemo : HideMethodBase
![]() {
{
{
MessageBox.Show("My new method", "Hide method demo");
base.DisplayMessage();
}
}
In Visual Basic .NET:
Public Class HideMethodBase
Public Sub DisplayMessage()
MessageBox.Show("Base class method!", "Override demo")
End Sub
End Class
Public Class HideMethodDemo
Inherits HideMethodBase
![]() '
Hide the DisplayMessage method in the base class
'
Hide the DisplayMessage method in the base class
MessageBox.Show("My new method", "Hide method demo")
MyBase.DisplayMessage()
End Sub
End Class
There’s one “gotcha” when hiding an inherited method in this way. If you use the polymorphic trick of declaring a variable of the type HideMethodBase, but you actually instantiate an instance of the HideMethodDemo subclass instead, you get unexpected behavior when calling the DisplayMessage method.
Here’s this scenario in C#:
HideMethodBase HideBase = new HideMethodDemo();
HideBase.DisplayMessage();
And in Visual Basic .NET:
Dim HideBase As HideMethodBase = New HideMethodDemo()
HideBase.DisplayMessage()
When you run this code, rather than calling the DisplayMessage method belonging to the HideMethodDemo class, it calls the DisplayMessage method belonging to the HideBase base class instead! This is opposite of the behavior you might expect, so you need to write code with this in mind.
Another good example of a scenario where you can hide an inherited method involves third-party .NET components. Say you purchase a third-party component, subclass it, and add a custom method called PrintMessage. What happens if the company who created the component releases a new version and adds their own PrintMessage method? This leaves you with two choices. You can rename your custom method, but you may have countless lines of code in your applications calling the PrintMessage method and they all need to change.
Another option is to hide the newly inherited method causing the problem. You can then add a custom method to your subclass that calls it in the base class.
Here’s the solution shown in C#:
public class MyBaseClass
{
public virtual void PrintMessage()
{
MessageBox.Show("Printing message!", "Hide method demo");
}
}
public class HideMethodDemo : MyBaseClass
{
// Hide the PrintMessage method in the base class
![]() {
{
MessageBox.Show("Hiding the inherited method!", "Hide method demo");
}
// Create a custom method that calls the base class method
public void PrintMsg()
![]() {
{
}
}
And in Visual Basic .NET:
Public Class MyBaseClass
Public Overridable Sub PrintMessage()
MessageBox.Show("Printing message!", "Hide method demo")
End Sub
End Class
Public Class HideMethodDemo
Inherits MyBaseClass
![]() '
Hide the PrintMessage method in the base class
'
Hide the PrintMessage method in the base class
MessageBox.Show("Hiding the inherited method!", "Hide method demo")
End Sub
' Create a custom method that calls the base class method
![]() Public Sub PrintMsg()
Public Sub PrintMsg()
End Sub
End Class
In this code, the HideMethodDemo class hides the PrintMessage method in the base class. It then declares a method named PrintMsg that calls PrintMessage method in the base class.
Preventing inheritance
As mentioned in the section “Virtual (Overridable) Methods”, C# and VB .NET methods are non-virtual by default, meaning they cannot be overridden in subclasses. In contrast, methods marked as “virtual” can be overridden.
There may be cases where you override a virtual method in a base class, but you don’t want other subclasses to override the method in your class. You can prevent someone from overriding your method by marking it as sealed (C#) or NotOverridable (VB .NET).
For example, the following code declares a base class named “PreventInheritanceBase” containing a single virtual method named “DisplayMessage”. It also declares a subclass of PreventInheritanceBase named “PreventInheritanceSubclass” that marks the DisplayMessage method as sealed. This prevents subclasses of PreventInheritanceSubclass from further overriding this method.
In C#:
public class PreventInheritanceBase
{
public virtual void DisplayMessage()
{
MessageBox.Show("This is a virtual method!", "Prevent inheritance demo");
}
}
public class PreventInheritanceSubclass : PreventInheritanceBase
![]() {
{
{
MessageBox.Show("Sealed method!", "Prevent inheritance demo");
}
}
In Visual Basic .NET:
Public Class PreventInheritanceBase
Public Overridable Sub DisplayMessage()
MessageBox.Show("This is a virtual method!", _
"Prevent inheritance demo")
End Sub 'DisplayMessage
End Class 'PreventInheritanceBase
Public Class PreventInheritanceSubclass
Inherits PreventInheritanceBase
![]()
MessageBox.Show("This overrides a virtual method, then seals it!", _
"Prevent inheritance demo")
End Sub 'DisplayMessage
End Class 'PreventInheritanceSubclass
In addition to preventing inheritance at the method level, you can also specify an entire class cannot be inherited using the sealed keyword (C#) or the NotInheritable keyword (VB .NET). For example, the following code declares the “PreventClassInheritDemo” class cannot be subclassed.
In C#:
public sealed class PreventClassInheritDemo
{
}
In Visual Basic .NET:
Public NotInheritable Class PreventClassInheritDemo
End Class
Abstract classes and methods
There are two main types of classes in object-oriented programming—concrete and abstract. All of the classes you have seen so far are concrete; they have code in their methods that implements specific functionality. For example, in the previous section, the DisplayMessage method displays a message to the user. Concrete classes are meant to be instantiated and their methods called by client code.
In contrast, an abstract class is not intended to be
instantiated. Its main purpose is to define an interface for a family of
classes. It is abstract in the sense that it is conceptual as opposed to
concrete. For example, you may conceive the need to create a class to access
application settings. This class needs a method to retrieve settings and
another method to
save settings.
The following code shows how to declare an abstract class named “AppSettingsBase” that represents this concept.
In C#:
public abstract class AppSettingsBase
{
public abstract string GetSetting(string key);
public abstract void SetSetting(string key, string value);
}
And in Visual Basic .NET:
Public MustInherit Class AppSettingsBase
Public MustOverride Function GetSetting(ByVal key As String) As String
Public MustOverride Sub SetSetting(ByVal key As String, _
ByVal value As String)
End Class 'AppSettingsBase
To mark a class as abstract, use the modifier abstract (C#) or MustInherit (VB .NET) in the class definition. In the AppSettingsBase class there are two abstract methods. These abstract methods represent the concept of retrieving and saving application settings. An abstract method does not contain implementation code. It simply defines a method signature including the method name, parameters and their types, and a return value and its type. To mark a method as abstract, use the modifier abstract (C#) or MustOverride (VB .NET).
You now have a class that defines an interface for retrieving and saving application settings. Now you can create concrete implementations of this abstract class to do the real work. For example, Figure 6 shows the abstract AppSettingsBase class with two subclasses. AppSettingsRegistry accesses settings stored in the Windows Registry and AppSettingsXml accesses settings stored in an XML file.
![]()
UML syntax dictates abstract class names are shown in italics and concrete classes are shown in regular font. It also dictates abstract methods are shown in italics, but the tool I used to create the diagram (Rational Rose) doesn’t allow you to mark a method as abstract!
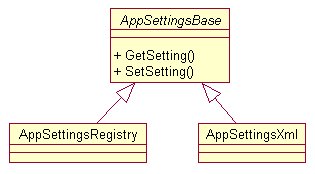
Figure 6. You can define an abstract class that defines an interface for a family of related classes.
The following code defines the AppSettingsRegistry class in C#:
public class AppSettingsRegistry :
AppSettingsBase
{
public override string GetSetting(string key)
{
string setting = "";
// Code that reads a setting from the Windows Registry
return setting;
}
public override void SetSetting(string key, string value)
{
// Code that stores a setting to the Windows Registry
}
}
And in Visual Basic .NET:
Public Class AppSettingsRegistry
Inherits AppSettingsBase
Public Overrides Function GetSetting(ByVal key As String) As String
Dim setting As String = ""
' Code that reads a setting from the Windows Registry
Return setting
End Function 'GetSetting
Public Overrides Sub SetSetting(ByVal key As String, _
ByVal value As String)
' Code that stores a setting to the Windows Registry
End Sub 'SetSetting
End Class 'AppSettingsRegistry
Obviously, these classes don’t do much “as is” because there are comments in the methods where there should be implementation code. Notice the subclass provides an implementation for both the GetSetting and SetSetting methods. When you create a class derived from an abstract class, both C# and VB .NET require you provide an implementation for all abstract methods. If you don’t, the compiler displays a warning accordingly.
Concrete methods in abstract classes
C# and VB .NET allow you to have both abstract and concrete methods in an abstract class. Why would you declare a concrete method in an abstract class? If there is common or default behavior you want all classes to inherit, you can create concrete methods containing code inherited by all subclasses. A subclass can choose to override a concrete method inherited from an abstract class if the default behavior does not suit that particular class.
When to create abstract classes
So, in what situations would you create an abstract
base class? You should create an
abstract class when there are multiple ways to implement application
functionality. The application settings class just discussed is a good example
of this. There are multiple ways
you can implement an application settings class—by storing settings in the
Windows
Registry, an XML file, an INI file, and so on. You can create a concrete class
for each of
these implementations.
Instantiating concrete subclasses
To make the best use polymorphism with abstract and concrete classes, you should write generic code when working with concrete subclasses.
For example during application startup, you might instantiate a concrete AppSettingsRegistry class. For the most flexibility, you should declare a field of the type AppSettingsBase and store an instance of the concrete subclass in this field.
In C#:
public class MyApp
![]() {
{
public MyApp()
{
this.CreateAppSettingsObj();
}
public virtual void CreateAppSettingsObj()
![]() {
{
}
}
And in Visual Basic .NET:
Public Class MyApp
![]() Public Sub New()
Public Sub New()
Me.CreateAppSettingsObj()
End Sub 'New
Public Sub CreateAppSettingsObj()
Me.AppSettingsObj = New AppSettingsRegistry()
End Sub 'CreateAppSettingsObj
End Class 'MyApp
This code declares a class named “MyApp” with a field named “AppSettingsObj” of the type AppSettingsBase—the abstract class defined in the previous section. This field holds a reference to the application settings object. In the constructor of this class, a call is made to the CreateAppSettingsObj method containing code that creates an instance of AppSettingsRegistry and stores it in the AppSettingsObj field. This is the only method in your application that needs to know the specific concrete class that was instantiated. All other code in your application references the application settings object as if it were of the type AppSettingsBase.
![]()
If you add new members to concrete subclasses, you can’t access those members when referencing an object by the abstract base class type. To keep your code as generic as possible, try to add methods at the abstract level rather than the concrete level.
The real beauty of this design is its extensibility. Imagine you later decide to save application settings to a DBF, rather than the Registry. All you have to do is create a new concrete subclass of AppSettingsBase (for example, AppSettingsDbf) to access settings stored in a DBF and change the code in the CreateAppSettingsObj to instantiate the new class.
In C#:
public virtual void CreateAppSettingsObj()
{
this.AppSettingsObj = new AppSettingsDbf();
}
And in Visual Basic .NET:
Public Overridable Sub CreateAppSettingsObj()
Me.AppSettingsObj = New AppSettingsDbf()
End Sub 'CreateAppSettingsObj
This makes your application far more extensible, and maintainable.
Programming to an interface rather than an implementation
What you have just seen is an example of “programming to an interface rather than an implementation”. This concept is commonly discussed in object-oriented books, but I find many developers have difficulty understanding this concept.
“Programming to an implementation,” is undesirable. It means writing software hard-coded to a specific concrete functionality. For example, you might hard-code reading and writing application settings to an XML file.
In contrast, “programming to an interface” is desirable. In this particular case, it means creating an abstract base class to define an interface for a family of classes and writing code to talk to the interface.
Interface inheritance
When Visual FoxPro 3 was released, it introduced implementation inheritance to FoxPro. With implementation inheritance, subclasses inherit the properties, events, and methods of their base class, as well as any associated code. Visual FoxPro 7 introduced interface inheritance, (which was unfortunately limited to COM components). In contrast, C# and Visual Basic .NET have full support for both implementation and interface inheritance.
Interfaces are similar to classes in defining properties and methods that other classes can inherit. However, an interface only defines method signatures. It does not contain any implementation code that can be inherited. For example, the following code defines an interface named IDbConnection with four properties and six methods.
![]()
All your interface names should be Pascal-cased and prefixed with an uppercase “I”. This means the first two letters of an interface name are always in upper case (for example, IDbConnection). This is a naming convention used by Microsoft that helps easily differentiate between classes and interfaces.
If you’re familiar with ADO.NET, the IDbConnection interface should look familiar to you. It is one of the interfaces defined in the .NET Framework’s System.Data namespace.
In C#:
public interface IDbConnection
{
// Properties
string ConnectionString();
string ConnectionTimeOut();
string Database();
// Methods
IDbTransaction BeginTransaction();
IDbTransaction BeginTransaction(IsolationLevel level);
void ChangeDatabase(string databaseName);
void Close();
IDbCommand CreateCommand();
void Open();
}
In Visual Basic .NET:
Public Interface IDbConnection
' Properties
Function ConnectionString() As String
Function ConnectionTimeOut() As String
Function Database() As String
' Methods
Overloads Function BeginTransaction() As IDbTransaction
Overloads Function BeginTransaction(level As IsolationLevel) _
As IDbTransaction
Sub ChangeDatabase(databaseName As String)
Sub Close()
Function CreateCommand() As IDbCommand
Sub Open()
End Interface 'IDbConnection
As you can see, defining an interface is similar to defining a class, except there is no code in the properties or methods.
Implementing interfaces
After you have defined an interface, you can specify that one or more classes implement the interface. When a class implements an interface, it is agreeing to a contract. This contract specifies the class will implement all the properties and methods in the interface. For example, there are a few classes in the .NET Framework class library that implement the IDbConnection interface including SqlConnection, OracleConnection, and OleDbConnection. If you look at the help file for these classes, you see each of them implement all the properties and methods in the IDbConnection interface.
What if you want to create a new .NET class that connects to Visual FoxPro data? You can declare a class and specify that it implements the IDbConnection interface.
In C#:
public class VfpConnection : IDbConnection
{
}
And in Visual Basic .NET
Public Class VfpConnection
Implements IDbConnection
End Class 'VfpConnection
In C#, you specify a class implements an interface by placing
a colon and the name of
the interface at the end of the first line of the class definition (: IDbConnection). This
is similar to the syntax for declaring a base class. In Visual Basic .NET, you
add the Implements keyword
and the name of the Interface on a line following the initial line of
the class definition.
If you compile this class “as is”, the compiler displays ten errors, one for each member of the IDbConnection interface. The error messages inform you that you are not living up to your contract. You have indicated you are implementing the IDbConnection interface, but you have not declared an implementation for each of these members in the VfpConnection class.
To satisfy the compiler, you must declare a property and method for each of the properties and methods in the IDbConnection interface. The following code provides a bare bones implementation of each interface member. If you were really creating this Visual FoxPro connection class, you would place implementation code in each property and method.
In C#:
public class VfpConnection : IConnection
{
// Properties
public string ConnectionString()
{
return null;
}
public string ConnectionTimeOut()
{
return null;
}
public string Database()
{
return null;
}
public
{
return new ConnectionState();
}
// Methods
public IDbTransaction BeginTransaction()
{
return null;
}
public IDbTransaction BeginTransaction(System.Data.IsolationLevel level)
{
return null;
}
public void ChangeDatabase(string databaseName)
{
}
public void Close()
{
}
public IDbCommand CreateCommand()
{
return null;
}
public void Open()
{
}
}
And in Visual Basic .NET:
Public Class VfpConnection
Implements IConnection
' Properties
Public Function ConnectionString() As String _
Implements IConnection.ConnectionString
Return Nothing
End Function 'ConnectionString
Public Function ConnectionTimeOut() As String _
Implements IConnection.ConnectionTimeOut
Return Nothing
End Function 'ConnectionTimeOut
Public Function Database() As String _
Implements IConnection.Database
Return Nothing
End Function 'Database
Implements IConnection.State
Return New ConnectionState()
End Function 'State
' Methods
Public Overloads Function BeginTransaction() As IDbTransaction _
Implements IConnection.BeginTransaction
Return Nothing
End Function 'BeginTransaction
Public Overloads Function BeginTransaction _
(ByVal level As System.Data.IsolationLevel) As IDbTransaction _
Implements IConnection.BeginTransaction
Return Nothing
End Function 'BeginTransaction
Public Sub ChangeDatabase(ByVal databaseName As String) _
Implements IConnection.ChangeDatabase
End Sub 'ChangeDatabase
Public Sub Close() _
Implements IConnection.Close
End Sub 'Close
Public Function CreateCommand() As IDbCommand _
Implements IConnection.CreateCommand
Return Nothing
End Function 'CreateCommand
Public Sub Open() _
Implements IConnection.Open
End Sub 'Open
End Class 'VfpConnection
Implementing multiple interfaces
Although C# and Visual Basic .NET have a single implementation inheritance model (a class can be derived from only one base class), a class can implement multiple interfaces. For example, the following code declares a class named “Person” derived from the Component class that implements the IEmployee and IStockHolder interfaces.
In C#:
public class Person : Component, IEmployee, IStockHolder
{
}
In Visual Basic .NET:
Public Class Person
Inherits Component
Implements IEmployee, IStockHolder
End Class 'Person
Implementing interfaces with the Class View window in C#
If you are implementing an interface with more than a few members, it can be quite a bit of work implementing each interface member. If you are implementing an interface found in the .NET Framework class library, this usually entails copying and pasting into your code method signatures from a .NET Help topic detailing the interface.
If you are using C#, the Class View window provides a much easier way to implement an interface (this feature is not available in Visual Basic .NET). First, enter the class definition in the code-editing window. For example:
public class VfpConnection : IDbConnection
{
}
Next, right-click on the class definition and select Synchronize Class View from the shortcut menu. This opens the Class View window with the VfpConnection class highlighted in the tree view (Figure 7).
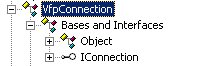
Figure 7. The Class Viewer displays the base class a class is derived from and any interfaces it implements.
If you expand the VfpConnection class node, you see a Bases and Interfaces node. If you expand this node, you see the base class of VfpConnection (Object) and the interfaces it implements (IConnection).
If you expand the IConnection interface node, you see a list of all properties and methods in the interface. To implement an interface member in the VfpConnection class, just right-click the member and select Add | Override from the shortcut menu (Figure 8).

Figure 8. In C#, you can use the Class Viewer to implement interfaces and methods from base classes.
After selecting this menu option, a method declaration is automatically added to the VfpConnection class. For example:
public System.Data.IDbTransaction BeginTransaction(System.Data.IsolationLevel
level)
{
return null;
}
Notice VS .NET fully qualifies class names in the code it generates. If you have already referenced the necessary namespace, you can remove the fully qualified name:
public IDbTransaction BeginTransaction(IsolationLevellevel)
{
return null;
}
This is nice because it’s not just for interfaces. It also works for base class members. If you expand the base class node in the Class Viewer, right-click on a property or method, and select Add | Override from the shortcut menu, a declaration is added for the selected member.
Referencing classes by interface
In the section on abstract classes, you learned how to declare a variable that is the type of an abstract class, and then reference subclasses using the variable. This lets you write generic code that “programs to an interface, rather than an implementation”. This same principle holds true for interfaces.
You can declare a variable of a specific interface type, and then use the variable to reference any class that implements the interface. For example, the following code declares a variable of the type IDbConnection and stores a reference to a VfpConnection object. The subsequent lines of code show you can also store a reference to the SqlConnection, OracleConnection, and OleDbConnection object.
In C#:
IDbConnection Command = new VfpConnection();
Command = new SqlConnection();
Command = new OracleConnection();
Command = new OleDbConnection();
In Visual Basic .NET:
Dim Command As IDbConnection = New VfpConnection()
Command = New SqlConnection()
Command = New OracleConnection()
Command = New OleDbConnection()
When you reference an object through a particular interface, the only members you can access are the members of the specified interface—even if the class has other members in addition to those present in the interface. For example, given the above sample code, VS .NET IntelliSense on the Command object only displays the members shown in Figure 9.
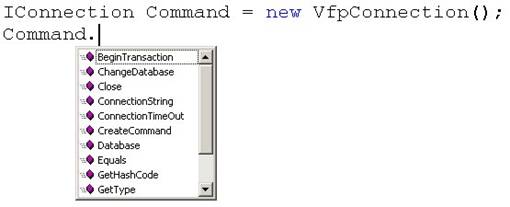
Figure 9. When you reference an object via a specific interface, you only have access to the members of that interface.
Polymorphism and interfaces
In the previous sections, I used a data access interface (IDbConnection) to demonstrate the basics of .NET interfaces, because it provides a real world example of how you can achieve generic data access in your applications. The .NET Framework class library contains a number of generic data access interfaces implemented by concrete .NET data providers, such as the SQL Server data provider and the Oracle data provider. This is an example of polymorphism, because each interface can take many concrete forms.
However, if you instantiate the concrete classes that comprise these .NET data providers and use them directly, you are effectively hard-coding your data access. In contrast, if you reference these classes through the generic interfaces they implement, you are programming to an interface, rather than an implementation. This allows you to access data generically, giving your applications flexible data access.
Deciding between abstract classes and interfaces
When you get down to it, abstract classes and interfaces provide similar benefits. They both define interfaces that concrete classes can inherit, providing the flexibility that comes with object-oriented polymorphism. So, how do you decide whether to use an abstract class or an interface in a given situation?
There are a variety of criteria you can use, but one of the more practical considerations is whether or not the classes implementing the common behavior are related. If you are defining functionality for a family of related classes (as with the application settings classes discussed earlier in this chapter), you can use an abstract class. If the common functionality needs to be implemented across unrelated classes, then use interfaces.
For more information, see the .NET Help topic “Recommendations for Abstract Classes vs. Interfaces”.
Instance and static (Shared) members
There are two main types of class members—instance and static (Shared in VB .NET) members. Instance members are the default type of member in both C# and Visual Basic .NET. They are fields, properties, methods, and so on, which belong to each instance of a class. For example, the following code declares a class named InstanceMemberDemo with a public instance field named Counter. The class also contains an IncrementCounter method that increments the Counter field and displays its value in a MessageBox.
In C#:
public class InstanceMemberDemo
{
public int Counter = 1;
public void IncrementCounter()
{
this.Counter++;
MessageBox.Show("Counter = " + Counter);
}
}
And in Visual Basic .NET:
Public Class InstanceMemberDemo
Public Counter As Integer = 1
Public Sub IncrementCounter()
Me.Counter += 1
MessageBox.Show(("Counter = " & Counter.ToString()))
End Sub 'IncrementCounter
End Class 'InstanceMemberDemo
Now take a look at the following code that creates and manipulates instances of this class.
In C#:
InstanceMemberDemo InstanceDemo1 = new InstanceMemberDemo();
InstanceMemberDemo InstanceDemo2 = new InstanceMemberDemo();
InstanceDemo1.IncrementCounter();
InstanceDemo2.IncrementCounter();
And in Visual Basic .NET:
Dim InstanceDemo1 As New InstanceMemberDemo()
Dim InstanceDemo2 As New InstanceMemberDemo()
InstanceDemo1.IncrementCounter()
InstanceDemo1.IncrementCounter()
The first two lines of code create instances of the class named “InstanceDemo1” and “InstanceDemo2”. At this point, both Counter fields are set to 1. After running the third line of code that calls the IncrementCounter method of InstanceDemo1, the Counter field in InstanceDemo1 is set to two, and the Counter field in InstanceDemo2 is still set to one. After running the fourth line of code that calls the IncrementCounter method of InstanceDemo2, both instances have their Counter field set to two (Figure 10). This is because each instance has its own copy of the variable. This is the way Visual FoxPro works. All members of Visual FoxPro classes are instance members.
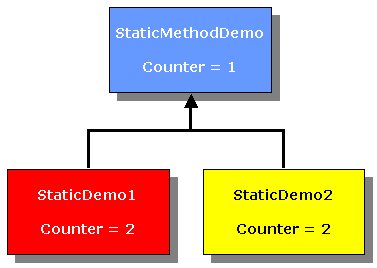
Figure 10. Each instance of a class has its own copy of all instance members
Now you’re ready to look at static members. Static members belong to the class itself, rather than to each instance of the class. Only one copy of a static member exists in an application regardless of how many instances of the class are created.
To illustrate this point, I’ll change the Counter field in the previous example to a static member. Notice I also changed the way I reference the Counter field. Rather than referencing it as this.Counter (C#) or Me.Counter (VB .NET), it must simply be referenced as Counter. When you think about it, this makes sense. The keywords this and Me refer to an instance of an object, and in this scenario, the Counter field does not belong to instances of the class, it belongs to the StaticMethodDemo class itself.
In C#:
public class StaticMemberDemo
{
public int Counter = 1;
public void IncrementCounter()
{
Counter++;
MessageBox.Show("Counter = " + Counter);
}
}
And in Visual Basic .NET
Public Class StaticMemberDemo
Public Shared Counter As Integer = 1
Public Sub IncrementCounter()
Counter += 1
MessageBox.Show(("Counter = " & Counter.ToString()))
End Sub 'IncrementCounter
End Class 'StaticMemberDemo
Now, take a look at the code that instantiates and manipulates these classes.
In C#:
StaticMemberDemo StaticDemo1 = new StaticMemberDemo();
StaticMemberDemo StaticDemo2 = new StaticMemberDemo();
StaticDemo1.IncrementCounter();
StaticDemo2.IncrementCounter();
And in Visual Basic .NET:
Dim StaticDemo1 As New StaticMemberDemo()
Dim StaticDemo2 As New StaticMemberDemo()
StaticDemo1.IncrementCounter()
StaticDemo2.IncrementCounter()
When the first two lines of code are executed, the Counter field is set to its initial value of one, but remember this value is stored at the class level, rather than with each instance of the class. When the IncrementCounter method is called on the StaticDemo1 object, the Counter field is set to two. When the IncrementCounter method is called on the StaticDemo2 object, the Counter field is set to three (Figure 11).
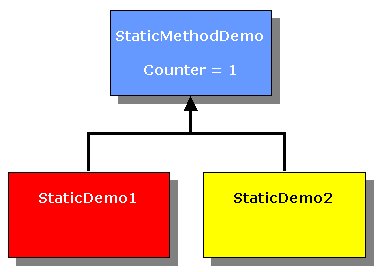
Figure 11. Static members belong to the class itself rather than to each instance of the class.
Because this is a static field, the field and its value are stored at the class level. When you reference the Counter field from within either object, it points back to the field and value stored at the class level.
![]()
Static properties and fields are similar to global variables in Visual FoxPro.
Referencing static class members
As you’ve already seen, when you reference a static class member from within an instance of a class, you don’t use this or Me. So, how do you access static members from outside the class? You do this by using the syntax “ClassName.Member”. For example, look at the following code that references the static Counter field declared in the StaticMemberDemo class.
In C#:
MessageBox.Show("Counter: " + StaticMemberDemo.Counter);
And in Visual Basic .NET:
MessageBox.Show(("Counter: " & StaticMemberDemo.Counter.ToString()))
It may take a little while to wrap your mind around static members, because they’re new to Visual FoxPro developers, but in reality I’ve used them extensively in the sample code shown so far. For example, look at the previous code sample calling “MessageBox.Show”. Notice I never instantiated an instance of the MessageBox class—I simply called its Show method directly. As you might guess, the Show method of the MessageBox class is a static member. If you look at the .NET Help topic “MessageBox Members”, you’ll see the Show method is marked with a yellow “S”, to indicate it is static (“Shared” in VB .NET).
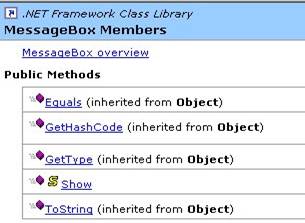
Figure 12. The .NET Help file displays a yellow “S” next to all static class members.
This convention is used throughout the .NET Help file, so you can easily determine whether members are instance or static.
Events and delegates
Events happen. Objects raise events and other objects respond to them. Visual FoxPro has traditionally been weak in the area of events. Although you can write code that responds to events in VFP, you can’t raise your own custom events as in Visual Basic 6. Although Visual FoxPro’s event model is limited, it is simple and straightforward. All you have to do is place code in an event, and it executes when the event fires.
In contrast, C# and VB .NET both have full support for raising and responding to events. The .NET event model is more robust and flexible than Visual FoxPro’s, but with this flexibility comes a small learning curve in understanding and implementing events.
The .NET event model is based on the object-oriented Observer design pattern. This model involves three main entities:
· An event transmitter
· An event receiver
· A delegate
The event transmitter is responsible for raising the event, which is usually fired as a result of an action. For example, if the user clicks a button, the button raises its Click event. An event receiver, or handler, is an object that captures and responds to an event. As with the Observer design pattern, the event transmitter does not know which object or specific method on an object handles the event it raises. Due to this loose coupling, you need an object to act as an intermediary between the event transmitter and event receiver. This object is the delegate.
Delegates
A delegate is a class that holds a reference to an object method. This is something new to VFP developers. In Visual FoxPro, there are object references, but a delegate holds a reference to a single method on an object!
Each delegate class can only refer to methods matching one
specific signature. When
you define a delegate class, you specify the signature of the methods it
references. For example, the .NET Framework class library contains a generic
delegate class for handling events called “EventHandler”.
Here is its definition in C#:
delegate void EventHandler(object sender, EventArgs e);
And in Visual Basic .NET:
Delegate Sub EventHandler(sender As Object, e As EventArgs)
This code is a bit different from how you declare “normal” classes. When you declare a delegate, you specify an associated method signature. The EventHandler delegate has a signature with two parameters. The first parameter is an “object” type. It holds a reference to the event transmitter. The second parameter is an “EventArgs” type. It is used to pass any information from the event transmitter to the event receiver. The EventArgs class is the base class for all classes passing data from events. It represents an event that does not pass any data.
If your event transmitter does not pass any information to the event receiver, you can use this generic EventHandler delegate class with its object and EventArgs parameters. Otherwise, you must create your own custom delegate class.
An events example
This section takes you through creating your own custom event transmitter, delegate, and event receiver demonstrating how to localize your application text by means of .NET events (“localizing” is the process of translating text to another language). To do this, you will create a LanguageMgr object that raises a Localize event. You will also create a MyLabel class, which is a Windows Forms label acting as the event receiver, or handler, responding to the Localize event. Finally, you will create a “LocalizeDelegate” class to act as an intermediary between the language manager object and the label object (Figure 13).

Figure 13. In the .NET event model, there are three primary objects; the event transmitter, the delegate, and the event receiver.
Creating a delegate
In this example, you need to create a delegate to act as an intermediary between the LanguageMgr and the MyLabel objects. When the LanguageMgr class raises its Localize event, it passes a single integer argument to any objects that handle the event. This integer represents the primary key of a record in a Language table. Because this parameter needs to be passed, you cannot use the .NET Framework’s generic EventArgs class when declaring this delegate (it represents an event that does not pass any data).
So, here is the event arguments definition in C#:
public class LocalizeEventArgs : EventArgs
{
// The language property and associated field
private int language;
public int Language
{
get { return language; }
set { language = value; }
}
// The constructor
public LocalizeEventArgs(int language)
{
this.Language = language;
}
}
And in Visual Basic .NET:
Public Class LocalizeEventArgs
Inherits EventArgs
' The language property and associated field
Private _language As Integer
Public Property Language() As Integer
Get
Return _language
End Get
Set(ByVal Value As Integer)
_language = Value
End Set
End Property
' The constructor
Public Sub New(ByVal language As Integer)
Me.Language = language
End Sub 'New
End Class 'LocalizeEventArgs
Now, you’re ready to declare a delegate that uses this new LocalizeEventArgs class. The following code declares a delegate named LocalizeDelegate that holds references to methods with the following signature:
· An object parameter
· A LocalizeEventArgs parameter
· No return value
Here is the delegate declaration in C#:
public delegate void LocalizeDelegate(object sender, LocalizeEventArgs e);
And in Visual Basic .NET:
Public Delegate Sub LocalizeDelegate(ByVal sender As Object, _
ByVal e As LocalizeEventArgs)
If you try to make the delegate hold a reference to an object method that does not have this signature, you will get a compiler error.
Creating an event transmitter
Now it’s time to create an event transmitter. The following code declares a class named LanguageMgr that contains a custom Localize event. This is the part you can’t do in Visual FoxPro. You are allowed to hook into existing VFP events, but you can’t create your own custom events.
This class also contains a method named SetNewLanguage that accepts a single integer parameter specifying the unique id of a language. This method instantiates a LocalizeEventArgs class and passes the language integer in the class constructor. It then passes the LocalizeEventArgs object to its OnLocalize method.
In C#, the OnLocalize method first checks if the Localize event is null. If no delegates are registered with the Localize event, then it will be null. If it’s not null, the method passes the event arguments object to the Localize event. In Visual Basic .NET, you don’t need to perform this check. If no delegates have been registered with the event, you can raise the event without throwing an exception.
In C#:
public class LanguageMgr
{
/// Specifies a custom event member that is of the type LocalizeDelegate
public event LocalizeDelegate Localize;
public void SetNewLanguage(int language)
{
LocalizeEventArgs e = new LocalizeEventArgs(language);
this.OnLocalize(e);
}
/// This method raises the event by invoking the delegates
protected virtual void OnLocalize(LocalizeEventArgs e)
{
if (Localize != null)
{
// Invoke the delegates, specifying this class as the sender
Localize(this, e);
}
}
}
And in Visual Basic .NET:
Public Class LanguageMgr
' Specifies a custom event member that is of the type LocalizeDelegate
Public Event Localize As LocalizeDelegate
' This method raises the event by invoking the delegates
Protected Overridable Sub OnLocalize(ByVal e As LocalizeEventArgs)
RaiseEvent Localize(Me, e)
End Sub 'OnLocalize
Public Sub SetNewLanguage(ByVal language As Integer)
Dim e As New LocalizeEventArgs(language)
Me.OnLocalize(e)
End Sub 'SetNewLanguage
End Class 'LanguageMgr
When the Localize event fires, it passes the LocalizeEventArgs object to all delegates registered with the event. In the next section, you will create an event handler object and register it with the event transmitter using the custom delegate class.
![]()
You may wonder why the LanguageMgr class has a separate method called “OnLocalize” containing the code that raises the event. Why not just put this code directly in the SetNewLanguage Method? Because placing this code in a separate method allows subclasses of LanguageMgr to handle the event by overriding this method. For details, see the “Overriding events defined in the .NET Framework” section later in this chapter
Creating the event handler
Now you’re ready to create the event handler. The following code declares a class named “MyLabel” derived from the Windows Forms Label class.
In C#:
public class MyLabel : Label
{
public void Localize(object sender, LocalizeEventArgs e)
{
// Localize the label's text
MessageBox.Show("Localizing the control to language: " +
e.Language);
}
}
And in Visual Basic .NET:
Public Class MyLabel
Inherits Label
Public Sub Localize(ByVal sender As Object, _
ByVal e As LocalizeEventArgs)
' Localize the label's text
MessageBox.Show(("Localizing the control to language: " & _
e.Language.ToString()))
End Sub 'Localize
End Class 'MyLabel
Notice the Localize method has the same signature as defined in the LocalizeEventArgs delegate. This allows you to use LocalizeDelegate to hold a reference to this method as shown in the next section.
Registering the event handler with the event transmitter
Now that you’ve defined all the pieces, you’re ready to register the MyLabel.Localize event handler method with the event transmitter.
The following code first instantiates the LanguageMgr class, which is the event transmitter. Next, it instantiates the MyLabel class, which is the event handler. The third line of code is a bit different in C# versus VB .NET. In C#, this line of code instantiates an instance of the custom LocalizeDelegate, passing a reference to the LabelObj’s Localize method in its constructor. It uses the += operator to register the delegate with the Localize event of the language manager.
In C#:
// Instantiate the event transmitter
LanguageMgr LangMgr = new LanguageMgr();
// Instantiate the event handler
MyLabel LabelObj = new MyLabel();
// Register the delegate with the event
LangMgr.Localize += new LocalizeDelegate(LabelObj.Localize);
// Fire the Localize event by setting a new language
LangMgr.SetNewLanguage(1);
In Visual Basic .NET, you don’t need to explicitly “wire-up” to a delegate, because it’s done automatically for you. The third line of VB .NET code uses the AddHandler statement to associate the Localize event with the LabelObj.Localize event handler:
' Instantiate the event transmitter
Dim LangMgr As New LanguageMgr()
' Instantiate the event handler
Dim LabelObj As New MyLabel()
' Register the delegate with the event
AddHandler LangMgr.Localize, AddressOf LabelObj.Localize
' Fire the Localize event by setting a new language
LangMgr.SetNewLanguage(1)
For details on how this works in VB .NET, see the .NET Help topic “Delegates and the AddressOf Operator”.
The last line of code triggers the language manager’s Localize event, by calling the SetNewLanguage method. The UML sequence diagram in Figure 14 shows the basic message flow between the LanguageMgr, LocalizeDelegate, and MyLabel objects. Notice the event transmitter (LanguageMgr) never talks directly to the event handler (MyLabel). All communication takes place through the delegate (LocalizeDelegate).
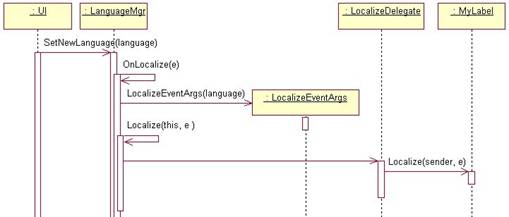
Figure 14. This diagram demonstrates the basic message flow between event transmitter, delegate, and event handler objects.
Overriding events defined in the .NET Framework
In the .NET Help topic “Event Usage Guidelines”, Microsoft recommends creating a protected, virtual method for raising an event so subclasses can handle the event by overriding the method.
Microsoft followed this standard when defining events in the .NET Framework classes. This means you can override events defined in the .NET Framework by overriding the event’s associated OnEventName method. For example, the .NET Help topic “Overriding the Paint Event” contains the following sample code for overriding the Paint event of the System.Windows.Forms.Control class.
In C#:
public class FirstControl : Control{
 {
{
// Call methods of the System.Drawing.Graphics object.
e.Graphics.DrawString(Text, Font, new SolidBrush(ForeColor),
ClientRectangle);
}
}
In Visual Basic .NET:
Public Class FirstControl
Inherits Control

' Call methods of the System.Drawing.Graphics object.
e.Graphics.DrawString(Text, Font, New SolidBrush(ForeColor), _
RectangleF.op_Implicit(ClientRectangle))
End Sub
End Class
This code defines a class named “FirstControl” derived from the .NET Framework’s System.Windows.Forms.Control class. The code shown in grey overrides the OnPaint method of the Control class. Notice the method first calls the base class’s OnPaint method before it performs its own processing. You must call the OnEventName method of the base class in this way to ensure registered delegates receive the event.
Event handling using WithEvents in Visual Basic .NET
Although you can use the same technique for creating events in Visual Basic .NET as in C#, VB .NET provides an alternate method using the WithEvents and Handles keywords. This methodology isn’t as flexible as the one described in the previous section, but if your needs are more basic, it provides an easy way to raise and respond to events in VB .NET.
A great place to see WithEvents at work is the VB .NET user interface code. For example, the Visual Basic .NET source code for this book has a Windows Form code-behind file named SampleCodeForm.vb. A search for the phrase “WithEvents” takes you to several form-level variables declared using the WithEvents keyword. The following code declares a variable named “cmdClose” of the type System.Windows.Forms.Button. The WithEvents keyword specifies this variable contains an object that is a source of events.
Friend WithEvents cmdClose As System.Windows.Forms.Button
Further down in the source code is the following handler code for this event. The Handles keyword specifies this method handles the cmdClose.Click event.
Private Sub cmdClose_Click(ByVal sender As System.Object, _
ByVal e As System.EventArgs) Handles cmdClose.Click
Me.Close()
End Sub
This is extremely easy and straightforward, eliminating the need to work with delegates directly—Visual Basic .NET handles delegate registration for you behind the scenes. Although WithEvents can be used for many VB .NET event handling situations, the .NET Help topic “WithEvents and the Handles Clause” lists the following restrictions on the use of WithEvents variables:
· You cannot use a WithEvents variable as a generic object variable. You must specify a class name when you declare the variable.
· You cannot use WithEvents to declaratively handle shared events, because they are not tied to an instance that can be assigned to a WithEvents variable.
· You cannot create arrays of WithEvents variables.
· WithEvents variables allow a single event handler to handle one or more kind of event, or one or more event handlers to handle the same kind of event.
For more information on using WithEvents,
see the .NET Help topic “Writing
Event Handlers”.
Event handling made easy in Visual Studio .NET
As shown in the previous section, creating your own custom events, event handlers, and delegates takes a bit of effort. Fortunately, Visual Studio .NET makes plugging into events much easier than this. Take a quick look at a simple example.
Say you have a button on a Windows form named “cmdClose”. If you open this form in design mode in Visual Studio .NET and double-click the button, it automatically adds an event handler method behind the scenes. You can add custom code to this method that automatically executes when the event fires. For example, the following event handler method contains code to close the form.
In C#:
private void cmdClose_Click(object sender, System.EventArgs e)
{
this.Close();
}
And in Visual Basic .NET:
Private Sub cmdClose_Click(ByVal sender As System.Object, _
ByVal e As System.EventArgs) Handles cmdClose.Click
Me.Close()
End Sub
However, this code is only half the story. If you expand the “Windows Form Designer Generated Code” section, you will see the following code.
In C#:
this.cmdClose.Click += new System.EventHandler(this.cmdClose_Click);
In Visual Basic .NET:
Friend WithEvents cmdClose As System.Windows.Forms.Button
This code should look somewhat familiar! As discussed previously, the C# code instantiates a delegate of the type EventHandler, passing a reference to the cmdClose_Click event handler method. In Visual Basic .NET, the code is even easier, because there are no delegates involved. The WithEvents keyword declares the cmdClose variable contains an object that is a source of events.
Double-clicking a user interface element in Visual Studio .NET automatically creates an event handler for the object’s default event. So, how do you create event handlers in VS .NET for other events?
Automatically creating event handlers in C#
If you’re working with C#, you automatically create event handlers in VS .NET as follows:
1. From within Visual Studio .NET, select the object in design mode.
2. Go to the Properties Window (press F4 if it’s not visible).
3. Select the Events button at the top of the dialog (the button with the lightning bolt shown in Figure 15).
4. Double-click on the desired event and VS .NET automatically places an event handling method in the form for you.
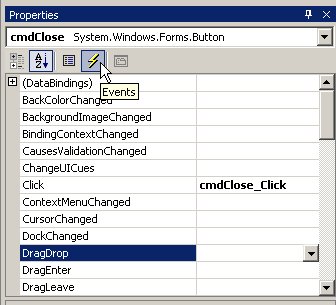
Figure 15. In C#, you can see an object’s events by selecting it in design mode and clicking the Events button in the Properties Window.
![]()
If you accidentally double-click on an event in the Properties Window, or on a user interface element in design mode, you can easily remove the event handling code automatically added to the form by right-clicking on the event in the Properties Window and selecting Reset from the shortcut menu.
Automatically creating event handlers in Visual Basic .NET
If you’re working with Visual Basic .NET, you automatically create event handlers in VS .NET as follows:
1. In Visual Studio .NET’s code editor, select the desired WithEvents variable from the combo box at the upper left of the code-editing window.
2. Choose the event you want to handle from the combo box at the upper right of the code-editing window.
3. VS .NET automatically places an event-handling method in the file for you.
Structures
Structures are similar to classes, but rather than being reference types, they are value types (For more information, see the “Value and reference types” section in Chapter 3, “Introduction to C#). Because they are value types, they have a slight speed advantage over classes.
Structures are defined in C# as shown in this sample:
public struct StructureDemo
{
public string FirstName;
public string MiddleName;
public string LastName;
public string GetName()
{
return FirstName + " " +
MiddleName + " " +
LastName;
}
}
And in Visual Basic .NET:
Public Structure StructureDemo
Public FirstName As String
Public MiddleName As String
Public LastName As String
Public Function GetName() As String
Return FirstName & " " & MiddleName & " " & LastName
End Function 'GetName
End Structure 'StructureDemo
Structures can:
· Have properties and methods.
· Raise and handle events.
· Implement interfaces.
Structures cannot:
· Have subclasses.
· Have protected members (this makes sense because they can’t have subclasses).
Copying structures
Because structures are value types, you can copy values from one structure to another by simply assigning one structure variable to another. For example, the following code instantiates two instances of the StructureDemo structure. It sets the properties of the first instance, and then assigns the first structure variable to the second variable. When the last line is executed, it displays a message showing the second structure now has the same property values as the first.
In C#:
StructureDemo StructDemo1 = new StructureDemo();
StructureDemo StructDemo2 = new StructureDemo();
StructDemo1.FirstName = "Alexander";
StructDemo1.MiddleName = "James";
StructDemo1.LastName = "McNeish";
StructDemo2 = StructDemo1;
MessageBox.Show("Structure2 Name: " + StructDemo2.GetName(), "Structure demo");
In Visual Basic .NET:
Dim StructDemo1 As New StructureDemo()
Dim StructDemo2 As New StructureDemo()
StructDemo1.FirstName = "Alexander"
StructDemo1.MiddleName = "James"
StructDemo1.LastName = "McNeish"
StructDemo2 = StructDemo1
MessageBox.Show("Structure2 Name: " & StructDemo2.GetName(), "Structure demo")
Deciding between classes and structures
Structures are value types, so their data is stored on the stack rather than the heap. This means you should use a structure only if the object you create has a small instance size. Objects large in size should be classes.
One common use for structure is as a device for passing parameters. If you have several parameters you need to pass to a method, you can create a structure with a different property to hold each parameter value.
![]()
Behind the scenes, all value data types such as Boolean, Byte, Int32, and Decimal are actually structures!
Attributes
.NET attributes allow you to place extra descriptive information in your code that the compiler turns into metadata within your project’s assembly. Attributes are useful at a variety of levels, such as an assembly, a class, or a class member. They can also be applied for a variety of reasons, as you’ll see in this section.
When you create a new project in Visual Studio .NET, a file named Assembly.cs (or Assembly.vb) is automatically added to your project. This file contains attributes that apply to the entire assembly.
Here is an excerpt from a C# Assembly.cs file:
[assembly: AssemblyTitle("")]
[assembly: AssemblyDescription("")]
[assembly: AssemblyCompany("")]
[assembly: AssemblyProduct("")]
[assembly: AssemblyCopyright("")]
[assembly: AssemblyTrademark("")]
And from a Visual Basic .NET Assembly.vb file:
<Assembly: AssemblyTitle("")>
<Assembly: AssemblyDescription("")>
<Assembly: AssemblyCompany("")>
<Assembly: AssemblyProduct("")>
<Assembly: AssemblyCopyright("")>
<Assembly: AssemblyTrademark("")>
The keyword assembly indicates these attributes are applied at the assembly level. If you enter a description between the double quotes for each attribute, the compiler turns the description into metadata within your project’s assembly. If you want a quick way to view this attribute information, you can use the Intermediate Language Disassembler (IL DASM) discussed in Chapter 1, “Introduction to .NET”. This tool is located in the FrameworkSDK\ Bin folder below the directory on your machine containing the .NET Framework.
To launch the disassembler, just double-click the ildasm.exe file. To open an assembly, select File | Open from the menu. Use the Open dialog for navigating to and opening the desired assembly. Once the assembly is open, double-click the MANIFEST node (Figure 16).
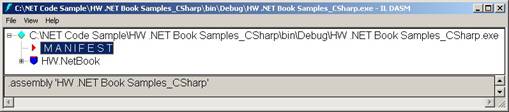
Figure 16. You can view assembly-level attributes using the Intermediate Language Disassembler.
This opens a window containing IL code, along with comments displaying the attribute text. Although this is interesting, the most practical way to examine attributes is at runtime by means of reflection. For more information, see the “Reflection” section later in this chapter.
Believe it or not, attributes are actually classes. The .NET Framework class library contains a few hundred attribute classes for all occasions! All attribute classes are derived from the System.Attribute class.
Here is an example of an attribute applied at the method level. The Obsolete attribute allows you to specify a method is going to eventually be removed.
In C#:
public class AttributeDemo
{
[Obsolete("Method will be removed in the next version")]
public void YourFavoriteMethod()
{
}
}
And in Visual Basic .NET:
Public Class AttributeDemo
<Obsolete("Method will be removed in the next version")> _
Public Sub YourFavoriteMethod()
End Sub 'YourFavoriteMethod
End Class 'AttributeDemo
If any code in your application calls this method, the compiler displays the warning message specified in the attribute declaration:
..YourFavoriteMethod()' is obsolete: 'Method will be removed in the next version'
You will see more examples of how attributes are used in Chapter 12, “XML Web Services”. For more general information, see the .NET Help topic “Extending Metadata Using Attributes”. For information on creating your own custom attributes, see the .NET Help topic “Writing Custom Attributes”.
Indexers
The use of Indexers is an object-oriented convenience feature that allows you to access an object as if it is an array. Indexers are similar to properties, but their accessors take parameters.
For example, the following code declares a class named “Address” with three public string fields named “Street”, “CityState”, and “Zip”. Indexers give users the option of accessing instances of the class as an array, with each of these fields representing a different row in the array. The code highlighted in grey is the indexer declaration. This particular indexer specifies instances of the Address class can be treated as a one-dimensional array with an int index.
In C#:
public class Address
{
public string Street, CityState, Zip;
![]() /// Indexer for the Street, CityState &
Zip fields
/// Indexer for the Street, CityState &
Zip fields
{
get
{
switch (index)
{
case 0:
return Street;
case 1:
return CityState;
case 2:
return Zip;
default:
throw new IndexOutOfRangeException(
"Invalid Address element specified " + index);
}
}
set
{
switch (index)
{
case 0:
Street = value;
break;
case 1:
CityState = value;
break;
case 2:
Zip = value;
break;
default:
throw new IndexOutOfRangeException(
"Invalid address element specified " + index);
}
}
}
/// Initialize the address properties
public Address()
{
this[0] = "
this[1] = "
this[2] = "22903";
}
}
And in Visual Basic .NET:
Public Class Address
Public Street, CityState, Zip As String
' Indexer for the Street, CityState & Zip fields
Default Public Property Item(ByVal index As Integer) As String
Get
Select Case index
Case 0
Return Street
Case 1
Return CityState
Case 2
Return Zip
Case Else
Throw New IndexOutOfRangeException("Invalid element specified " & _
index.ToString())
End Select
End Get
Set(ByVal Value As String)
Select Case index
Case 0
Street = Value
Case 1
CityState = Value
Case 2
Zip = Value
Case Else
Throw New IndexOutOfRangeException("Invalid element specified " & _
index.ToString())
End Select
End Set
End Property
' Initialize the address properties
Public Sub New()
Me(0) = "
Me(1) = "
Me(2) = "22903"
End Sub 'New
End Class 'Address
Within the body of the indexer declaration the get and set accessors use the integer index to access values in the Street, CityState, and Zip fields.
Here is an example of code used to access an instance of this class as an array.
In C#:
Address AddressObj = new Address();
MessageBox.Show("Indexer address: \n\n" +
AddressObj[0] + "\n" +
AddressObj[1] + "\n" +
AddressObj[2] + "\n");
And in Visual Basic .NET:
Dim AddressObj As New Address()
MessageBox.Show(("Indexer address: " & ControlChars.Lf & _
ControlChars.Lf & AddressObj(0) & ControlChars.Lf & _
AddressObj(1) & ControlChars.Lf & AddressObj(2) & ControlChars.Lf))
Notice how similar this is to accessing an array. You simply reference the object name followed by brackets or parentheses containing the index of the element you want to access.
Garbage Collection
If the phrase “memory leak” makes your skin crawl, you’ll be happy to learn about the .NET Framework’s garbage collector. In Visual FoxPro, you have to be extremely careful about cleaning up after objects when you are done using them. When you release an object, its Destroy method is fired, and the memory allocated for it is freed up—if all goes well.
In .NET, as you instantiate objects, the runtime allocates memory for them on the heap. However, rather than having to worry about releasing objects yourself, the .NET runtime takes care of this for you. Periodically, .NET’s garbage collector checks for objects in the heap no longer being used and reclaims their memory.
Because the garbage collector periodically releases objects from memory on an “as-needed” basis, you can’t count on an object being released at a specific time. Although it may take a while to get used to giving up this control, you’ll find this works well in most cases.
Dispose methods
Because there is a delay between the time you are finished with an object and when the garbage collector physically releases it, if your object uses system resources such as database connections, you may want to provide clients with a method they can call to release these resources whenever they choose.
The .NET Framework’s IDisposable interface supplies a Dispose method that consumers of your object can call to release resources acquired by your object. For more information on implementing the IDisposable interface, see the .NET Help topics “Implementing a Dispose Method” and “Initialization and Termination of Components”.
Destructors and Finalize methods
All classes inherit the Finalize method from the System.Object class. This method automatically fires when the garbage collector releases an object. The Finalize method also automatically calls the Dispose method on classes that implement the IDisposable interface. Because this is the case, you should always call GC.SuppressFinalizeMethod from your Dispose method.
Normally, you don’t have to worry about the Finalize method. However, if your object is using unmanaged resources, you may want to add code to your object to clean up these resources when the object is destroyed.
If you’re using C#, you accomplish this by declaring a destructor method for your class. In the same way C# constructors are named the same as their containing class, destructors are also given the name of their containing class preceded by a tilde (~). For example, if you have a class named “Customer”, you would create a destructor as follows:
~ Customer()
{
// Cleanup Code
}
C# destructors are designed to automatically call the object’s Finalize method.
If you’re using Visual Basic .NET, you don’t create destructors as in C#. Instead, you create an override of the Finalize method in your class, placing the necessary cleanup code directly in this method. For example:
Protected Override Sub Finalize()
' Cleanup Code
MyBase.Finalize()
End Sub
Although placing cleanup code in destructor or Finalize methods is useful when you need it, be forewarned that doing so can impact application performance. Also, as mentioned previously, you can’t guarantee when the Finalize method of an object will execute, so do not rely on the timing of any code placed in the Finalize method. For details, see the .NET Help topics “Finalize Methods and Destructors” and “Automatic Memory Management”.
C#’s using statement
C#’s using statement has a convenience feature not available in Visual Basic .NET. In this context, using is something completely different than when you are “using” a namespace. The using statement provides a more automatic way of calling the Dispose method of an object. For example, the using statement in the code shown below instantiates a class named “UnmanagedResource”. Within the curly braces of the using statement, you place code that uses the MyRes object. When the object loses scope at the bottom of the using statement, the object’s Finalize method is automatically called.
public class UsingDemo
{
public void MyMethod()
{
using (UnmanagedResource MyRes = new UnmanagedResource())
{
// Use the MyRes object
}
}
}
Note the class you instantiate in the using statement must implement the IDisposing interface.
Operator Overloading
The C# language has an advanced object-oriented feature called operator overloading that is not available in Visual Basic .NET. Earlier in this chapter, you learned about method overloading—an object-oriented technique that allows you to create multiple methods with the same name.
Operator overloading allows you to do something similar with operators. You can provide new meaning for operators such as +, -, !, ++, and --, by defining static methods in classes using the operator keyword.
Although this is an interesting feature, it’s probably not one you will use often. Rather than going into detail here, you can check out two good examples of operator overloading in the .NET Help topic “Operator Overloading Tutorial”. For a list of operators that can be overloaded, see the .NET Help topic “Overloadable Operators”.
Reflection
In Visual FoxPro, there is a certain freedom and flexibility that comes from specifying the class of an object be instantiated at run time. For example, I use an abstract factory in my Visual FoxPro applications allowing me to data drive my class instantiation. I call the abstract factory’s GetClassName method, passing a token specifying the kind of class I want to instantiate. The abstract factory looks up this token in a table, returning the name of the class I should use. I then pass the class name to the CREATEOBJECT command, which instantiates an object from the specified class.
lcClassName = goApp.oFactory.GetClassName("SecurityMgr")
loSecurityMgr = CREATEOBJECT(lcClassName)
If you are using the new command in C# or in Visual Basic .NET (assuming Option Strict is “On”), you are required to specify the type of the class you will instantiate at compile time.
In C#:
Customer CustomerObj = new Customer();
In Visual Basic .NET:
Dim CustomerObj As New Customer()
Fortunately, there is a way to achieve Visual FoxPro’s object creation flexibility in C# and VB .NET by using reflection. .NET reflection supplies objects that encapsulate assemblies, modules, and classes, allowing you to dynamically create an instance of a class. Some other things you can do with reflection are:
· Load assemblies and modules.
· Retrieve information about class constructors.
· Retrieve information about class methods and invoke them.
· Retrieve information about class fields and get/set their values.
· Retrieve information about class events and add/remove event handlers.
· Retrieve information about class properties and get/set their values.
· Retrieve information about method parameters.
· Generate MSIL code on the fly.
Accessing type information
You get type (class) information from assemblies already loaded in memory by calling the static Type.GetType method. This and other reflection methods return a System.Type object you use to derive information about classes.
For example, the following code calls the GetType method, passing a string containing the fully qualified name of the Client class declared in this chapter’s sample code.
In C#:
Type ClientType = Type.GetType("HW.NetBook.Samples.Client");
In Visual Basic .NET:
Dim ClientType As Type = Type.GetType("HW.NetBook.Samples.Client")
After running this code, you can examine the ClientType object to discover information about the Client class. Because it is a Type object, it has a number of properties and methods you can use to get information about the Client class. Table 4 lists some of the more interesting properties and methods.
Table 4. Type objects have a good number of properties and methods you can use to find out information about classes.
|
Properties |
Description |
|
Assembly |
The assembly where the type is declared. |
|
BaseType |
The type from which the current type directly inherits. |
|
FullName |
The fully qualified name of the type, including the namespace. |
|
GUID |
The GUID associated with the type. |
|
IsAbstract |
Specifies if the type is abstract. |
|
IsClass |
Specifies if the type is a class. |
|
IsCOMObject |
Specifies if the type is a COM object. |
|
IsEnum |
Specifies if the type is an enumeration. |
|
IsInterface |
Specifies if the type is an interface. |
|
Name |
The name of the type |
|
Namespace |
The namespace of the type |
|
UnderlyingSystemType |
Specifies the .NET Framework base class the type is based on. Even if you have several layers of inheritance in your class hierarchy, this property displays the first .NET Framework base class in the hierarchy. |
|
Methods |
Description |
|
FindInterfaces |
Returns an array of Type objects representing a list of interfaces implemented or inherited by the current type. |
|
FindMembers |
Returns an array of FilterMember objects of the specified member type (i.e. constructor, property, event, method). |
|
GetEvent |
Gets a specific event inherited or declared by the current type. |
|
GetField |
Gets a specific field of the current type. |
|
GetInterface |
Gets a specific interface implemented or inherited by the current type. |
|
GetMember |
Gets the specified members of the current type. |
|
GetMethod |
Gets a specific method of the current type. |
|
GetProperty |
Gets a specific property of the current type. |
|
InvokeMember |
Invokes a specific member of the current type. |
To obtain information about types located in assemblies that are not loaded, you can use the Assembly.GetType or Assembly.GetTypes methods.
Late binding with reflection
When the type of an object is determined at run time rather than compile time, this is known as late binding. This is the type of binding used with Visual FoxPro’s CREATEOBJECT command. Following is some code that simulates CREATEOBJECT.
The code declares a class you instantiate using late binding.
In C#:
public class Message
{
public void ShowMessage(string msg)
{
MessageBox.Show(msg, "Message class");
}
}
And in Visual Basic .NET:
Public Class Message
Public Sub ShowMessage(ByVal msg As String)
MessageBox.Show(msg, "Message class")
End Sub 'ShowMessage
End Class 'Message
The following code instantiates the Message class and calls its ShowMessage method.
In C#:
// Get the type to use from the assembly.
Type MessageType = Type.GetType("HW.NetBook.Samples.Message");
// Get the method to call from the type.
MethodInfo ShowMessageMethod = MessageType.GetMethod("ShowMessage");
// Create an instance of the Message class.
Object MessageObj = Activator.CreateInstance(MessageType);
// Create the arguments array.
Object[] args = new Object[1];
// Set the arguments
args[0] = "I'm using late binding!!!";
// Invoke the PrintHello method.
ShowMessageMethod.Invoke(MessageObj, args);
In Visual Basic .NET:
' Get the type to use from the assembly.
Dim MessageType As Type = Type.GetType("HW.NetBook.Samples.Message")
' Get the method to call from the type.
Dim ShowMessageMethod As MethodInfo = MessageType.GetMethod("ShowMessage")
' Create an instance of the Message class.
Dim MessageObj As Object = Activator.CreateInstance(MessageType)
' Create the arguments array.
Dim args(0) As Object
' Set the arguments
args(0) = "I'm using late binding!!!"
' Invoke the PrintHello method.
ShowMessageMethod.Invoke(MessageObj, args)
The first line of code uses the static Type.GetType method to retrieve a Type object that contains information about the HW.NetBook.Samples.Message class. You can use Type.GetType because the Message class is contained in an assembly already loaded.
The second line of code calls the Type object’s GetMethod requesting information on the Message.ShowMessage method. GetMethod returns a MethodInfo object you can use to invoke the ShowMessage method.
The third line of code uses the static Activator.CreateInstance method to create an instance of the Message class. Next, an array of type Object is created to pass a parameter to the Message.ShowMessage method when it is invoked. Even if the method you are calling does not have any parameters, you still need to declare an empty Object array as follows.
In C#:
Object[] args = new Object[1];
And in Visual Basic .NET:
Dim args(0) As Object
Finally, the last line of code invokes the Message.ShowMessage method.
If you need to get type information for a class not in a loaded assembly, you use the static Assembly.Load method. For example, the following code loads the MyOtherAssembly file and retrieves the HW.NetBook.Samples.MyClass type from the assembly.
In C#:
Assembly assem = Assembly.Load("MyOtherAssembly");
// Get the type to use from the assembly.
Type helloType = assem.GetType("HW.NetBook.Samples.MyClass");
In Visual Basic .NET:
Dim assem As [Assembly] = [Assembly].Load("MyOtherAssembly")
' Get the type to use from the assembly.
Dim helloType As Type = assem.GetType("HW.NetBook.Samples.MyClass")
Late binding in Visual Basic .NET
In addition to the methodology shown in the previous section, there’s an easier way to implement late binding in Visual Basic .NET using the Object data type.
VB .NET treats the Object data type in special way. Unlike C#, VB .NET allows you to store an object reference into a variable of type Object and call methods on the object even though the .NET Object class does not implement those methods.
For example, the following code declares a class with a method named “CallMethod” that accepts an Object parameter. In this method there is a single line of code that calls a DisplayMessage method on this object.
Public Class ObjectLateBindingDemo
Public Sub CallMethod(ByVal obj As Object)
obj.DisplayMessage()
End Sub
End Class
In order to get this code to compile, you must set VB .NET’s Option Strict setting to “Off” (for more information on Option Strict, see Chapter 4, “Introduction to Visual Basic .NET”). This tells the compiler to ignore the rules of strict typing.
Turning strict typing off allows you to pass an object reference of any type to CallMethod. The compiler blissfully ignores the fact you declared a variable of type Object and are calling a method (DisplayMessage) not implemented in the Object class.
If you pass an object to CallMethod that implements the DisplayMessage method, everything goes smoothly at run time. However, if you pass an object that does not implement this method, you get a runtime error.
The fact that you have to turn off strict typing in order to use this feature should make you think twice before using it. As I recommended in Chapter 4, “Introduction to Visual Basic .NET”, you should never turn Option Strict off because you miss the benefit of catching errors at compile time rather than run time.
Performance and late binding
Although late binding provides flexibility, a substantial price is paid in performance. This is because the compiler does not know at compile time the class being used, so binding must be performed at runtime instead.
I suggest using late binding only when you absolutely need it. You should stick to early binding as a general rule. If you are designing your applications well, you can achieve a similar effect by means of abstract classes and interfaces as described earlier in this chapter—and without incurring a performance penalty.
Conclusion
This chapter gives a good overview of C# and Visual Basic .NET’s object-oriented features. Again, this is not an exhaustive list of all features, but an introduction to object-orientation in .NET. In the final analysis, both C# and Visual Basic .NET go beyond the OO capabilities of Visual FoxPro and provide a number of advanced features to help you create flexible, well-designed software applications.