Chapter
10
Building Web Applications with ASP.NET
If you’ve never created a Web application before because you
didn’t have time to climb the learning curve, ASP.NET could be your big chance.
This chapter shows you how to utilize everything you learned in the previous
chapter about building Windows Forms applications (plus a few extra twists) in
building ASP.NET Web Form Applications. It also demonstrates how to reuse the
business objects created in the previous chapter by taking you step-by-step
through the process of creating an ASP.NET Web Application.
Microsoft made a mistake a number of years ago
underestimating the tremendous impact the Internet would have on our world.
After realizing the error of its ways, Microsoft responded by creating Active
Server Pages (ASP)—a platform for creating, deploying, and running Web
applications. Although ASP contained some interesting technologies, it
definitely fell in the category of a “knee jerk” reaction. ASP allowed you to
get the job done, but not in the most efficient way.
In contrast, Active Server Pages.NET (ASP.NET) is a vast
improvement over ASP. Rather than using scripting languages to write
server-side code that is interpreted at run time, ASP.NET allows you to use
fully object-oriented languages such as C# and Visual Basic .NET to create code
that can be compiled and cached on the server for faster performance. ASP.NET
also provides a more robust event-driven model allowing events to be raised on
the client and handled on the server. In addition, Microsoft has done a great
job making the Windows Forms and Web Application architecture and design tools
similar enough so a developer can move from one to the other without incurring
a huge learning curve.
ASP.NET actually encompasses two different technologies—Web
Forms and Web Services. This chapter focuses on Web Forms. To learn about Web
Services, see Chapter 12, “XML Web Services”.

For information on using ASP.NET with Visual FoxPro 7, check out
the white paper by Cathi Gero (this book’s technical editor!) at http://msdn.microsoft.com/library/default.asp?url=/library/en-us/dnfoxgen7/html/usingaspnetwithvfp7.asp
What is a Web Application?
A typical Web application is comprised of Web pages,
configuration files, code files containing business object classes, images, and
references to external .NET assemblies. In this walk-through, you will see how
each element is used in an ASP.NET Web application.
A Web application starts the first time a user requests a
page from the server (for example, by entering the URL of the Web site). The
application continues to run until the Web server (the physical machine) is
restarted, IIS is restarted, or if any of the application’s configuration files
are edited.

There are a number of configuration settings where you specify
different conditions for starting a new process in your Web
application—percentage of memory used, number of unprocessed requests waiting in
the request queue, and so on. Adjusting these settings can help make your Web
applications more available and more stable. For more information, see the
“Machine.config” and “Web.config” sections later in this chapter.
What is a Session?
By default, the Web is a stateless environment. If you
send multiple requests from your Web browser to a particular Web site, you
automatically disconnect and reconnect between each request. A series of
successive requests coming from a single browser is known as a session.
The first request sent from a client browser to a Web application begins a
session for that client. By default (you can change this setting), if the
client is idle for longer than 20 minutes, the session is automatically ended
by the server.
Based on this disconnected model, your Web applications need
some way to keep track of all the user sessions. ASP.NET steps in the gap and
keeps track of each user session automatically. It does this by generating a
unique Session ID when a client sends its first request to your Web site. This
Session ID is passed back to the client by means of a cookie or modified URL.
For more information on sessions, check out the “The Session Object” section
later in this chapter.
Creating a Web Application
As in Chapter 9, “Building .NET Windows Forms
Applications”, you will learn about creating ASP.NET Web applications by
example. In this chapter you will recreate the Windows Forms application from
chapter 9 as a Web Forms application.
To create a new Web Application:
1. From
the Visual Studio .NET Start Page,
click the New Project
button.
2. In
the New Project
dialog’s Project Types pane,
select Visual C# to
create a C# Web application or Visual
Basic .NET to create a VB .NET Web application. In the Templates pane on the
right, select ASP.NET Web
Application.
3. Notice
that the Name text box is
disabled and contains the text “WebApplication1” and (if you’re creating the
Web Application on your local machine) the Location
text box contains the text “http://localhost/WebApplication1”. To change the
name of the Web application, you must change the name of the directory in the Location text box. This
is different from a Windows Forms application where you can change the name of
the application and the directory independently. In this example, change the
last part of the directory name from “WebApplication1” to
“MyFirstWebApplication”. As you type this in, notice that it automatically
changes the Name of the
application to “MyFirstWebApplication” (Figure 1).
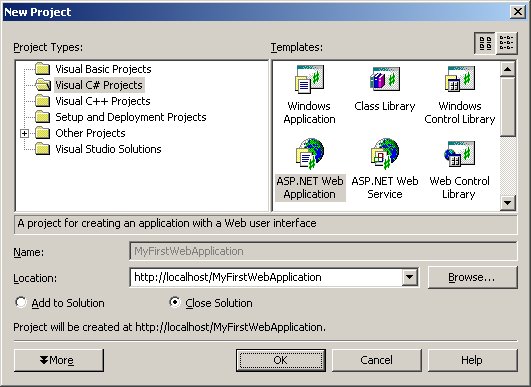
Figure 1. The Location text box specifies the
virtual root directory for your Web application.
4. Click
the OK button.
At this point, you may feel a
bit like Al Gore when the “Creating the Web” dialog displays. While this dialog
is displaying, VS .NET creates a new application for you using the ASP.NET Web
Application template you selected. After a few moments, a new form named
WebForm1.aspx is displayed in design mode in the Visual Studio .NET IDE (Figure
2).
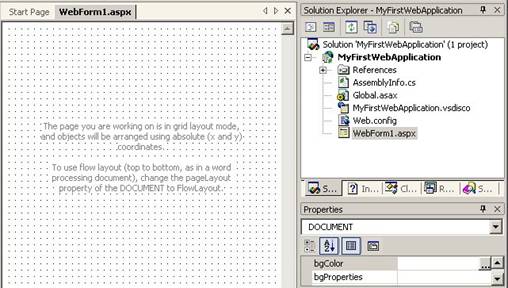
Figure 2. Visual Studio .NET creates an ASP.NET
Web Application from the template you select in the New Project dialog.
As you can see this is already very similar to creating a
Windows Forms application—VS .NET created an application for you containing a
single form. Before taking a closer look at this Web form, first you’ll do a
little housekeeping and then learn a little more about what happens behind the
scenes when using VS .NET to create a Web Forms application.
Renaming the project namespace
The housekeeping involves renaming the project’s
namespace. When you create a new Web application, VS .NET automatically sets
your project’s namespace to the same name as the project—which is most likely
not what you want!
If you’re using Visual Basic .NET, before you can change the
project’s namespace, you must first close the WebForm1.aspx. To do this, you
can simply click the close button [X]
to the right of the VS .NET IDE tabs.
To change the project’s namespace, in the Solution Explorer,
right-click on the project (the second node in the Solution Explorer)
and select Properties from
the shortcut menu, which launches the Property
Pages dialog. In the left pane under the Common Properties folder,
select General (if it’s
not already selected).
If you’re using C#, in the right pane, change the Default Namespace from
“MyFirstWebApplication” to “HW.NetBook.Samples”. If you’re using VB .NET, in
the right pane, change the Root
namespace to “HW.NetBook.Samples”. When you’re done, click the OK button to save
changes.
Now you just need to change any existing references to the
old name space. Select Edit | Find
and Replace | Replace in Files from the main menu to launch the Replace in Files dialog.
In the Find What box,
enter “MyFirstWebApplication” and in the Replace
with box enter “HW.NetBook.Samples” (make sure you type the case
correctly if working with C#). Now click the Replace
All button, which launches a Replace
All warning dialog. Just click OK
to ignore the warning. After clicking OK,
a dialog appears telling you how many occurrences were replaced. If you’re
using C#, it should say, “4 occurrence(s) replaced”. If you’re using Visual
Basic .NET it should say, “2 occurrence(s) replaced”.
Understanding virtual directories
When you created the new Web application and specified
the location of the application as “http://localhost/MyFirstWebApplication”
(Figure 1), you were actually specifying a virtual
directory. In the world of IIS, a
virtual directory is a directory on the Web server that contains a Web
application. It is virtual in the sense that it does not describe the exact
physical location of a directory on the machine, but provides a higher-level
virtual name that, behind the scenes, is associated with a real
directory.
In the Location string, the “localhost” directory refers to
the home directory of the Web Server. In IIS, this is set up by default to be
c:\inetput\wwwroot, and therefore the MyFirstWebApplication virtual directory
would be physically located in the c:\inetpub\wwwroot directory (Figure 3).

Figure 3. When you create a new Web application,
VS .NET creates a virtual directory that, by default, is physically located in
the c:\inetpub\wwwroot directory.
If you look in the new MyFirstWebApplication directory from
within Windows Explorer, you’ll see that VS .NET has created a variety of files
and subfolders in your new virtual directory (Figure 4).

Figure 4. VS .NET places a variety of files in
your Web application’s virtual directory.
You’ll be taking a closer look at some of these files in the
next section, but for now, notice there is a project file in this directory
(.csproj for C# or .vbproj forVB .NET ),
but no solution file (.sln). VS .NET puts the solution file in a subfolder of
the “My Documents\Visual Studio Projects\” directory. In the example, it
creates a subfolder named “MyFirstWebApplication” and places the MyFirstWebApplication.sln
and associated .suo file in this folder. So, when you need to reopen your Web
application after restarting Visual Studio .NET, you can find your solution in
this folder.
However, this does not mean your Web application’s source
code is stored in two different places. Remember the solution is simply a
container—similar to Visual FoxPro’s project (PJX) file—with links to projects
and files. For now, all your source code is stored in your Web application’s
virtual directory.
A closer look at the Web form
Now look a little closer at “WebForm1” in your new Web
application. A Web form can be viewed in either Design mode (Figure 2) or in
HTML mode. If WebForm1 is not currently opened in the IDE, double-click on the
form in the Solution Explorer. To switch to HTML mode, either click on the HTML
tab at the bottom left of the Web Forms designer or right-click the Web form
and select View HTML Source
from the shortcut menu. As you make changes to the Web form in design mode, VS
.NET automatically changes the HTML source accordingly. On the other hand, if
you know something about HTML, you can manually edit the HTML source and your
changes will be reflected in Design mode.
If you view the HTML source of WebForm1, you will see the
following HTML.
In C#:
<%@ Page
language="c#" Codebehind="WebForm1.aspx.cs"
AutoEventWireup="false" Inherits="HW.NetBook.Samples.WebForm1
%>
<!DOCTYPE HTML
PUBLIC "-//W3C//DTD HTML 4.0 Transitional//EN" >
<HTML>
<HEAD>
<title>WebForm1</title>
<meta name="GENERATOR" Content="Microsoft
Visual Studio 7.0">
<meta name="vs_defaultClientScript"
content="JavaScript">
<meta name="vs_targetSchema"
content="http://schemas.microsoft.com/intellisense/ie5">
</HEAD>
<body MS_POSITIONING="GridLayout">
<form id="Form1" method="post" runat="server"
>
</form>
</body>
</HTML>
If you’re using Visual Basic .NET, the only line that’s
different is the first line at the top of the page:
<%@ Page language="vb"
Codebehind="WebForm1.aspx.vb" AutoEventWireup="false"
Inherits="HW.NetBook.Samples.WebForm1 %>
This first line of code is known as a page directive.
The “Page Language” attribute tells the compiler the language used for the code
contained in the Web page (typically “c#” or “vb”). The “CodeBehind” setting
specifies a code-behind file associated with the .aspx file—in this case
either WebForm1.aspx.cs (C#) or WebForm1.aspx.vb (VB .NET).
The code-behind file and code-behind class
An ASP.NET Web page consists of two main parts—the
visible representation stored in the .aspx file and associated code stored in a
.cs or .vb code-behind file (which gets its name from “the code file behind the
form”.) This structure lets you separate the user interface from the executable
code. When you create a Web page in Visual Studio .NET, it automatically creates
both an .aspx file and a code-behind file. It associates the two by placing the
name of the code-behind file in the .aspx page directive as seen in the
previous section.
If you look at the list of files in the Solution Explorer, by
default, you won’t see the code-behind file. To make this file visible, click
on Solution Explorer’s “Show All Files” icon button, the second button from the
right at the top of the window. When you click this button, a plus sign appears
next to the WebForm1.aspx file. If you expand the plus sign, you will see the
associated code-behind file (Figure 5).
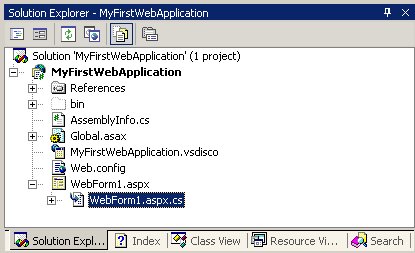
Figure 5. If you click on the “Show All Files”
icon button in the Solution Explorer, you can see your Web form’s code-behind
file.
To view the contents of the code-behind file, double-click
the file in the Solution Explorer and VS .NET opens it in the IDE. The
code-behind file contains the following code-behind class definition.
In C# (excluding the namespace directives):
public class WebForm1 : System.Web.UI.Page
{
private void
Page_Load(object sender, System.EventArgs e)
{
// Put user code to
initialize the page here
}
}
In Visual Basic .NET:
Public Class
WebForm1
Inherits System.Web.UI.Page
[Web Form Designer
Generated Code]
Private
Sub Page_Load(ByVal sender As System.Object,ByVal e As _
System.EventArgs) Handles MyBase.Load
'Put user code to initialize the page
here
End
Sub
End Class
As you can see, VS .NET automatically added code to this
code-behind file that defines a class named WebForm1 derived from the
System.Web.UI.Page class.
Now here’s the interesting part—look back at the
WebForm1.aspx page directive:
<%@ Page language="c#"
Codebehind="WebForm1.aspx.cs" AutoEventWireup="false"
Inherits="HW.NetBook.Samples.WebForm1 %>
Notice the “Inherits” attribute specifies the .aspx page
inherits from the WebForm1 class (belonging to the HW.NetBook.Samples
namespace). When you compile your Web application under Visual Studio .NET, the
.aspx file is compiled into a class derived from the code-behind class! This
means you can add methods and other members to the WebForm1 code-behind class
and they will be inherited by the class created from the .aspx file at runtime.
You will see examples of how this works later in this chapter.
Hello .NET World!
Before diving further into the details of ASP.NET Web
applications, you can get some immediate gratification by creating a simple
“Hello .NET World!” Web page.
To start, select the WebForm1.aspx file in design mode. This
involves clicking the WebForm1.aspx tab and making sure the Design tab at the bottom
left of the IDE is selected. Notice the text in the middle of the Web form (Figure
6) states the Web form is set to work in “grid layout” mode, and objects
dropped on the form are arranged using absolute coordinates. For this example,
you will change the Web form to use “flow layout”, which is more like a word
processing document (you’ll use grid layout mode later in this chapter). To
switch to flow layout, go to the Properties Window and change the pageLayout property to
“FlowLayout”. When you do this, the dotted grid lines disappear and the text in
the middle of the Web form changes accordingly.

Figure 6. By default, Web forms are set to work
in “grid layout” mode, but you can change their mode to “flow layout” to behave
more like a word processing document.
Now, drag and drop a label from the VS .NET Toolbox onto the Web form
(make sure the Web Forms
tab of the Toolbox is
selected). The label is automatically placed in the upper left-hand corner of
the form. Next, go to the Properties Window, change the (ID) property from
“Label1” to “lblHelloWorld”, and then change the Text
property to “Hello .NET World!”. This changes the visible text of the label on
the Web form accordingly.
Now change the font of the label. Click to the right of the
label control on the Web form (click at the point where your mouse pointer is
an “I-beam” rather than a quad-arrow) and you should see the Formatting toolbar
(Figure 7).

Figure 7. The Formatting toolbar allows you to
change the appearance of visual elements on your Web form.
Open the combo box that is set to “Normal” by default and select “Heading 1”
instead as shown in Figure 7. When you do this, it increases the font size and
bolds the label text.
Now you’re ready to compile and run your Web application. To
do this, click the Start
button or press F5.
When the Web application runs, you should see the text “Hello .NET World!” in
large, bold letters (Figure 8).
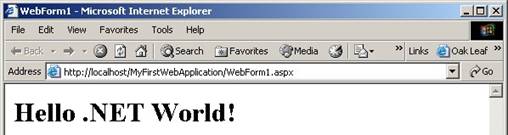
Figure 8. The obligatory Hello World application
provides immediate gratification for building your first Web application.
Now that you’ve gotten your first, simple Web application
under your belt, it’s time
for a quick overview of the different types of controls available to you when
creating Web Forms applications.
There are three basic types of Web controls in ASP.NET:
·
HTML controls
·
HTML server controls
·
Web Forms controls
HTML controls
HTML controls are the “classic” controls such as
<h1>, <input>, and <div>. These
controls are not processed by the Web server, but are sent directly to the
client browser for rendering. If you want the lightest-weight (but least
capable) controls for your Web forms, use HTML controls.
HTML server controls
HTML server controls are one step above regular HTML
controls regarding capability. Although the HTML for these controls looks very
similar to classic HTML controls, they have the added ability to enable
server-side processing, which includes data binding and responding to events
(discussed later in this chapter). These controls are designed to be most like
original HTML controls, so developers who are familiar with classic HTML
controls should feel very comfortable using these new ASP.NET counterparts.
Web Forms controls
Web Forms controls are the most capable of all the
ASP.NET controls. Rather than trying to imitate classic HTML controls, Web
Forms controls more closely resemble Windows forms controls. They can also
enable server-side processing, as do HTML server controls, but they are even
more powerful. For example, they can automatically detect the level of HTML
support provided by a browser and adjust their HTML output accordingly. In
addition,
they are useful in creating more complex controls such as the ad rotator and
calendar
controls. Based on their advanced capabilities, these are the controls used for
the examples
in this chapter.

To use Web Forms controls on your Web pages, make sure you have
the Web Forms tab selected in Visual Studio .NET’s Toolbox when you drag and
drop controls on your forms.
Now that you know about the different types of controls you
can use in creating Web Forms, take a closer look at what’s going on behind the
scenes with ASP.NET.
The global.asax file
Take a look at another file shown in the Solution
Explorer—the global.asax file. When you first create a new Web Application or
Web Service through Visual Studio .NET, a global.asax file is automatically
placed in the root directory of your application. At run time, the global.asax
file is automatically parsed and compiled by the CLR into a
dynamically-generated class derived from the .NET HttpApplication base class.
As its name suggests, this class represents a Web application and it’s used to
process requests from users.
If you right-click the global.asax file and select Open With from the
shortcut menu, it displays the Open
With dialog. Select “Source Code (Text) Editor” and then click
the Open button. When
the file opens, you will see an application directive similar to the
page directive found in the WebForm1.aspx file.
Here it is in C#:
<%@ Application
Codebehind="Global.asax.cs"
Inherits="HW.NetBook.Samples.Global"%>
And in Visual Basic .NET:
<%@ Application Codebehind="Global.asax.vb"
Inherits="HW.NetBook.Samples.Global"
%>
The “Codebehind” attribute specifies the name of the
associated code-behind file, and the “Inherits” attribute specifies the class
from which the global.asax file inherits—in this case
HW.NetBook.Samples.Global.
Right-click on global.asax in the Solution Explorer and
select View Code from the
shortcut menu to open the code-behind file named global.asax.cs (C#) or
global.asax.vb (VB .NET). If you look at the code contained in this code-behind
file, you’ll see it defines a class named Global derived from the
System.Web.HttpApplication class.
In C#:
public class Global : System.Web.HttpApplication
{
public Global()
{
InitializeComponent();
}
// The rest of the class
not shown for space reasons
}
In Visual Basic .NET:
Public Class Global
Inherits
System.Web.HttpApplication
#Region " Component Designer Generated Code "
Public Sub New()
MyBase.New()
'This call is
required by the Component Designer.
InitializeComponent()
'Add any
initialization after the InitializeComponent() call
End Sub
' The rest of the class
not shown for space reasons
#End Region
End Class
The first time a user requests any resource or URL
within your Web application, your Web application starts and the global.asax
file is parsed and compiled into a class derived from this Global class. The
object instantiated from this class processes requests from the user.
If you look further down in the class definition, you’ll see
application and session event handlers for the following events:
·
Application_Start
·
Session_Start
·
Application_BeginRequest
·
Application_EndRequest
·
Application_AuthenticateRequest
·
Application_Error
·
Session_End
·
Application_End
You place code in any of these empty event handler methods to
respond to the corresponding ASP.NET events. You can also add your own custom
members (such as methods, properties, fields) to this class. For example, at
Application Startup you may want to call Server.MapPath to determine the
current server path and store it in a static variable. This saves you from
making this call over and over again (and incurring a performance hit)
throughout your application. Add the following code shown in grey to your
global.asax file.
In C#:
public class
Global : System.Web.HttpApplication
 {
{
public Global()
{
InitializeComponent();
}
protected void Application_Start(Object sender, EventArgs e)
 {
{
}
// The rest of the class definition not shown here for space
reasons
}
In Visual Basic .NET:
Public Class Global
Inherits
System.Web.HttpApplication

#Region " Component Designer Generated Code "
Public Sub New()
MyBase.New()
'This call is
required by the Component Designer.
InitializeComponent()
'Add any
initialization after the InitializeComponent() call
End Sub
’ The rest of the class
not shown for space reasons
#End Region
Protected Sub
Application_Start(sender As [Object], e As EventArgs)

End Sub
'Application_Start
End Class
Now you can reference the static ServerPath property from
anywhere within your Web application. For example, the following code derives a
fully qualified path to a config.xml file by prepending the value stored in
Global.ServerPath to the file name.
Here’s the code in C#:
string ConfigFile = Global.ServerPath +
"\\config.xml";
And here it is in Visual Basic .NET:
Dim ConfigFile As String = Global.ServerPath +
"\config.xml"
Global objects
As a subclass of the HttpApplication base class, this
Global class exposes some important objects globally accessible throughout your
Web application. Some of these are:
·
Server
·
Application
·
Session
·
Response
·
Request
·
User
·
Site
Each of these objects is detailed in the following sections.
The Server object
The Server object is an instance of the
System.Web.HttpServerUtility class. This object has properties and methods
allowing you to get and set information regarding the machine where the Web
server is running as well as helper methods for processing Web requests.
Here is an example of accessing the MachineName property of
the Server object.
In C#:
string ServerName = Server.MachineName;
In Visual Basic .NET:
Dim ServerName As String = Server.MachineName
Notice you simply need to type the name of the Server object
followed by the property or method to access it from code. Table 1 lists
some other commonly used members of the Server object.
Table 1. Commonly used members of the Server
object
|
Member name
|
Type
|
Description
|
|
MachineName
|
Property
|
Property that stores the server’s
computer name
|
|
ScriptTimeout
|
Method
|
Gets and sets the server’s request
time-out
|
|
ClearError
|
Method
|
Clears the last error
|
|
GetLastError
|
Method
|
Returns the last error
|
|
HtmlDecode
|
Method
|
Decodes a string that has been
encoded to eliminate invalid HTML characters
|
|
HtmlEncode
|
Method
|
Encodes a string to be displayed in
a browser
|
|
MapPath
|
Method
|
Returns the physical file path of
the specified virtual directory
|
|
Transfer
|
Method
|
Transfers execution to the
specified Web page
|
|
UrlDecode
|
Method
|
Decodes a string encoded for HTTP
transmission and sent to the server in a URL
|
|
UrlEncode
|
Method
|
Encodes a string for HTTP
transmission from the server to the client via the URL
|
The Application object
The Application object is an instance of the
System.Web.HttpApplicationState class allowing you to share global data and
objects across multiple sessions in an ASP.NET application. The Application
object has a Contents dictionary collection property where you can add data and
objects at runtime that can be accessed from any user session. Although you can
specifically reference the Contents collection property to add or access items
in the collection, because it has been defined as an indexer, you simply access
the Contents collection by using the indexer syntax (For more information on
Indexers, see Chapter 5, “Object Orientation in C# and Visual Basic.
NET”).
For example, add the following code shown in grey to the
Application_Start method of the global.asax file. This code adds a new string
object named “ConnectString” to the Contents collection.
In C#:
protected void Application_Start(Object sender,
EventArgs e)
{
![Text Box: Application["ConnectString"] = "server=(local);uid=;pwd=;database=MainData;";](NETforVFPDevelopers_Chapter10_files/image021.gif) Global.ServerPath
= Global.ServerPath = Server.MapPath("");
Global.ServerPath
= Global.ServerPath = Server.MapPath("");
}
And in Visual Basic .NET:
Sub Application_Start(ByVal sender As Object, ByVal e As
EventArgs)
 Global.ServerPath = Server.MapPath("")
End Sub
To access this string, you use a similar syntax, but you must
cast the value to the appropriate type—this is because all objects stored in
the collection are stored as the Object type. For example, the following code
gets the value of the ConnectString item from the Application object.
In C#:
string Connect = (string)Application["ConnectString"];
In Visual Basic .NET:
Dim Connect As String =
CStr(Application("ConnectString"))
In a nutshell, the Application object provides an easy way to
store data and objects accessible from any user session.
Application object pitfalls
There are a few things to watch out for when using the
Application object. First of all, if you have a Web farm (a single Web site
that contains multiple Web servers) or a Web garden (a single Web server
machine with multiple processors), be aware that the Application object is
specific to a single process running on a single processor. This means sessions
running on different processors or different physical machines do not have
access to the same Application object. If you need truly global access to data
from all sessions running in a Web farm or Web garden, you can store the
information in a globally accessible database or data file, such as an XML
file.
If you allow clients to modify global data stored in the
Application object, you need to be aware of concurrency issues. Take for
example the following code making use of a Counter value in the Application
object.
In C#:
int Count = (int)Application["Counter"];
Count += 1;
Application["Counter"] = Count;
And in Visual Basic .NET:
Dim Count As Integer = CInt(Application("Counter"))
Count += 1
Application("Counter") = Count
What happens if another session increments the Application
object’s Counter value between the time this session gets the value, increments
it, and stores it back to the Application object? The first session’s increment
of the Counter would be lost. To prevent this, you call the Application
object’s Lock and Unlock methods.
In C#:
Application.Lock();
int Count = (int)Application["Counter"];
Count += 1;
Application["Counter"] = Count;
Application.UnLock();
In Visual Basic .NET:
Application.Lock()
Dim Count As Integer = CInt(Application("Counter"))
Count += 1
Application("Counter") = Count
Application.UnLock()
The call to the Application object’s Lock method causes the
Application object to lock access to any items subsequently accessed in the
Contents collection. For example, once the second line of code executes, the
“Counter” variable is locked to any other sessions, until the call to
Application.Unlock is made. Obviously, if you lock the Application object, you
want to unlock it as quickly as possible! Also beware of any “deadly embrace”
problems you may encounter when you allow a piece of code to lock more than one
variable. If Process A has the first variable locked and Process B has the
second variable locked, they could each be waiting indefinitely for the other
process to unlock the variable.
Fortunately, if you don’t unlock the Application logic after
locking it, the Web server unlocks the Application object when it finishes
processing the .aspx file.
The Session object
The Session object is an instance of the
System.Web.SessionState.HttpSessionState class. In the same way the Application
object stores information accessible from all sessions in an application, the
Session object stores session state—information accessible from all Web forms
in a single user session. The unique session ID keeps each session’s data
separate from all other session data.
The Session object also has a Contents dictionary collection
property accessible with indexer syntax. For example, the following code adds a
new string object named “ISBN” that contains an ISBN number to the Contents
collection.
In C#:
Session["ISBN"] = "0-596-00171-1";
And in Visual Basic .NET:
Session("ISBN") = "0-596-00171-1"
Here’s an example of accessing this item in C#:
string ISBN = Session["ISBN"];
And in Visual Basic .NET:
Dim ISBN As String = Session("ISBN")
The Session object is extremely useful for storing
information that needs to be passed from one page to the next in a given
session.

By default, Session state is stored in memory outside of the
ASP.NET process. This means if the server is restarted or crashes (IIS—not the
physical server), session state is not lost! For other Session state options
see the “Caching data and objects” section later in this chapter.
The Session object has a number of other useful properties
and methods. Some of the most frequently used members are listed in Table 2.
Table 2. Commonly used members of the Session
object
|
Member name
|
Type
|
Description
|
|
IsCookieless
|
Property
|
If True, specifies the session ID
is embedded in the URL. If False, indicates the session ID is stored in an
HTTP cookie.
|
|
IsNewSession
|
Property
|
Returns a boolean value indicating
if the session was created with the current request.
|
|
Mode
|
Property
|
Specifies how session state is
cached. The value of this setting is
one of the four SessionStateMode enumerations: InProc (the default), Off,
SqlServer, StateServer. For more information on session state caching, see
the “Caching Data and Objects” section later in
this chapter.
|
|
SessionID
|
Property
|
Gets the current unique session ID.
|
|
Abandon
|
Method
|
Cancels the current session.
|
|
Clear
|
Method
|
Clears all values from the session
state.
|
The Response object
The Response object is an instance of the System.Web.HttpResponse
class and is one of the most important objects in ASP.NET. This object sends
information from the Web server to
the client.
For example, the following code displays a simple “Hello .NET
World” message to the client’s browser.
In C#:
Response.Write("Hello .NET World");
And in Visual Basic .NET:
Response.Write("Hello .NET World")
The Response object can also redirect to another page. The
following example redirects the client to the Hentzenwerke web site.
In C#:
Response.Redirect("http://www.hentzenwerke.com");
And in Visual Basic .NET:
Response.Redirect("http://www.hentzenwerke.com")
Table 3 lists some other commonly used properties and
methods of the Response object.
Table 3. Commonly used members of the Response
object
|
Member name
|
Type
|
Description
|
|
Buffer
|
Property
|
Specifies whether output should be
buffered (wait until the entire Response is finished processing).
|
|
Expires
|
Property
|
Specifies the number of minutes
before a page cached in a browser expires.
|
|
IsClientConnected
|
Property
|
Returns a boolean value indicating
if the client is still connected.
|
|
Flush
|
Method
|
Sends all buffered output to the
client.
|
|
Redirect
|
Method
|
Redirects a client to the specified
URL.
|
|
Write
|
Method
|
Writes the specified information to
the client.
|
The Request object
The Request object is an instance of the
System.Web.HttpRequest class, and one of the most important ASP.NET objects.
This object allows you to read HTTP values sent from the client to the Web
server. You learn a lot about the client from the properties of the Request
object.
For example, the following code uses the Browser property of
the Request object to return an HttpBrowserCapabilities and display information
about the client’s browser (Figure 9).
In C#:
HttpBrowserCapabilities bc = Request.Browser;
Response.Write("<H1>Browser
capabilities</H1>");
Response.Write("Type = " + bc.Type +
"<br>");
Response.Write("Platform = " + bc.Platform +
"<br>");
Response.Write("Supports Frames = " + bc.Frames +
"<br>");
Response.Write("Supports Cookies = " +
bc.Cookies + "<br>");
In Visual Basic .NET:
Dim bc As HttpBrowserCapabilities = Request.Browser
Response.Write("<H1>Browser
capabilities</H1>")
Response.Write(("Type = " + bc.Type +
"<br>"))
Response.Write(("Platform = " + bc.Platform +
"<br>"))
Response.Write(("Supports Frames = " + bc.Frames +
"<br>"))
Response.Write(("Supports Cookies = " +
bc.Cookies + "<br>"))
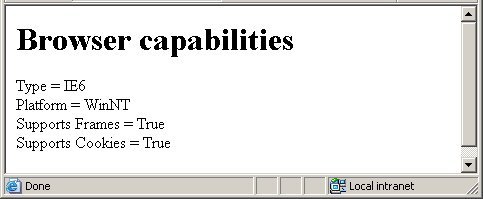
Figure 9.You can use the Request object to find
out information about a client’s browser.
The User object
The User object is an instance of the System.Security.Principal.WindowsPrincipal
class. You can use this object to check the Windows group membership of the
current user, if the user has been authenticated. For example, the following
code uses the IsInRole method of the User object to see if the user is in the
Windows Group “Guests”.
In C#:
bool IsAdministrator = User.IsInRole("Guests");
In Visual Basic .NET:
Dim IsAdministrator As Boolean =
User.IsInRole("Guests")
For more information on users and security, see Chapter 14,
“.NET Security”.
The Site object
The Site object is an instance of the
System.Security.Policy.Site class. This object can be used to determine the Web
site where an assembly originates.
For more information on security, see Chapter 14, “.NET
Security”.
Making changes to global.asax at run time
If you make changes to the global.asax file while the
Web application is running, ASP.NET page framework detects the change. It
completes all outstanding requests, sends the Application_OnEnd event to any
listeners, and restarts the application.
ASP.NET
configuration files
There are two main configuration files used by ASP.NET:
·
Machine.config
·
Web.config
In ASP.NET, configuration information is stored in XML
configuration files. This makes remote administration a snap because you can
edit these files using any standard XML parser or text editor. In addition,
these files can be edited without stopping and restarting the server. Once the
changes are made to the configuration files, the new settings apply to any new
client requests.
Machine.config
The Machine.config file is the root configuration file
that provides default settings for the entire Web server. This file is located
beneath your Web server’s Windows directory in the <Windows
Directory>\Microsoft.NET\Framework\<version>\CONFIG folder.
Each Web application inherits default configuration settings
from the Machine.config file.
Web.config
Each Web application can have one or more Web.config
files that apply ASP.NET configuration settings to its own directory and all
subdirectories. These files are used to override or extend the configuration
settings inherited from the Machine.config file. For
more information on how this inheritance works, check out the .NET Help topic
“Configuration Inheritance”.
Here are some examples of settings found in the Web.config
file:
<compilation
defaultLanguage="c#"
debug="true"
/>
The compilation element contains a defaultLanguage setting
indicating the default language of your Web application. The debug setting
specifies whether you want the compiler to create debug information for your
pages. This is obviously desirable when first creating and testing your Web
application. However, when you’re ready to deploy a completed, well-tested
application, you should set debug to “false” to generate a more compact (and
faster) version of your Web application devoid of debug information.
Here’s another element in Web.config named “customErrors”.
<customErrors
mode="RemoteOnly"
/>
The mode setting in this element specifies how to display
ASP.NET error messages to users. This setting has three possible values as you
can see by reading the comments above the setting in the Web.config file:
·
On – Always display custom (friendly) messages
·
Off – Always display detailed ASP.NET error
information
·
RemoteOnly – (the default) Display custom
(friendly) messages to users not running on the local Web server. This setting
is recommended for security purposes, so you do not display application detail
information to remote clients.
For more information on these and other settings, check out
the .NET Help topic “ASP.NET Configuration”.
Now you’re ready to create a Customers Orders Web form
similar to the Windows Form created in the previous chapter. Before creating
this form, remove the “Hello .NET World!” label added earlier in this chapter.
To do this, right-click on the label in design mode and select Delete from the shortcut
menu. Also, set the style back from “Heading1” to “Normal”
by clicking on the Web form in the location where the label was then select “Normal” from the Format
toolbar.
Renaming the Web form code-behind file and
class
Next, rename the Web form file to something more
meaningful. In the Solution Explorer, right-click the WebForm1.aspx file and
select Rename from the
shortcut menu. Change the name of the file to CustomerOrders.aspx. Notice this
also changes the name of the code-behind file (CustomerOrders.aspx.cs in C# or
CustomerOrders.aspx.vb in VB .NET). Now that you’ve changed the name of the
source code file, you need to change the name of the actual Web form class. To
do this, double-click the code-behind file in the Solution Explorer, which
opens the code file in the Visual Studio .NET IDE. Change the name of the class
from “WebForm1” to “CustomerOrders”.
In C#:
public class CustomerOrders : System.Web.UI.Page
In Visual Basic .NET:
Public Class CustomerOrders
Inherits
System.Web.UI.Page
Adding controls to the Web form
Now it’s time to add some controls to the Web form.
Make sure the CustomerOrders.aspx is open in design mode, then drag and drop a
label from the VS .NET Toolbox
onto the Web form. With the label control selected, go to the Properties Window
and change the (ID)
property to “lblCustomerID” and the Text
property to “Customer ID:”.
Next, drag and drop a TextBox control from the Toolbox to the Web form.
The text box should be automatically placed to the right of the label. Go to
the Properties Window and change the (ID)
property to txtCustomerID.
Now add a Submit button to the Web form. Click to the right
of the text box—this places the cursor to the immediate right of the text box.
Press the space bar three times to add a bit of space between the text box and
the button you’re getting ready to add. Next, drag and drop a Button from the Toolbox to the right of
the text box. With the button selected, go to the Properties Window and set the
button’s (ID) property to
“btnSubmit” and its Text
property
to “Submit”.
Before adding the next control, you need to create a new line
in the Web form. To do this, click to the immediate right of the text box and
press the Enter key. This should drop the cursor down beneath the Customer ID
label. Drag and drop a DataGrid control from the Toolbox
onto the Web form directly below the Customer ID label. In the Properties Window,
change its (ID) property to
grdOrders. At this point, your Web form should look the same as the form shown
in Figure 10.
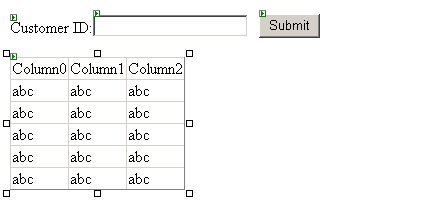
Figure 10. You drag and drop controls from the VS
.NET toolbox onto a Web form the same way as you do with a Windows Form.
If you’re not particularly fond of the default font for
controls on this form, you can easily change the fonts of all controls. First,
select all controls, go to the Properties Window, and expand the Font node. You can then
select different font attributes. In the sample code, I’ve selected a Font Name of “Verdana”
and a Font Size of
“Smaller”.
Next, you can improve the appearance of the DataGrid by
applying an auto-format style to it. With the DataGrid selected in design mode,
go to the Properties Window, and click the AutoFormat
hyperlink label (Figure 11).
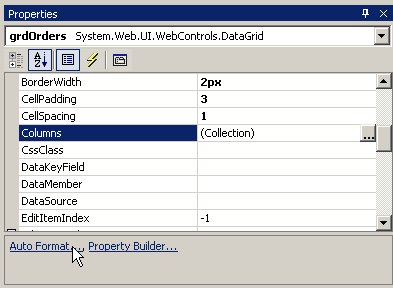
Figure 11. Select the Auto Format hyperlink in
the Properties Window to automatically apply a visual style to a DataGrid.
In the Auto Format dialog,
select any scheme you want, but for this example, I chose “Professional 2”.
After selecting the scheme, click OK
to apply the scheme to the DataGrid.
Now it’s time to specify columns for the DataGrid. Click on
the DataGrid in design mode and go to the Properties Window. Select the Columns property and
click the ellipses button (…) next to the Columns
property. This launches the grdOrders
Properties dialog allowing you to add one or more columns to the
DataGrid. You are going to add four columns to the grid that hold Order ID,
Order Date, Ship Name, and Ship Country.
First, uncheck the Create
columns automatically at run time box at the top of the dialog.
This prevents columns from being automatically generated from the data source
at rum time. You don’t need them dynamically generated because you are going to
manually specify all columns at design time.
Notice this dialog has a mover box that lets you add items
from the left side of the mover to the right side. In the left mover list box,
there are four different column types to choose from:
·
Bound column
·
Button column
·
Hyperlink column
·
Template column
The Bound Column
option creates a column bound to a data source. The Button
Column option allows you to add buttons to the DataGrid that the
user can click, usually to start off some process or to edit, update, or delete
items in the DataGrid. The Hyperlink
Column allows you to add a hyperlink label to a column that the
user can click, which usually redirects them to another form where they can
edit the selected item. A Template
Column allows you to create a column containing any combination
of HTML, text, and controls.
For the first column, add a hyperlink column containing the
Order ID. This allows users to click on the column to select an order to be
edited. It also launches an Order Edit page and passes the ID of the selected
Order to that page. To add this column, select Hyperlink
Column in the Available
columns list, and then click the mover button ( > ) to add the
column to the Selected
columns list. When you do this, it displays HyperLinkColumn properties
at the bottom of the dialog (Figure 12).
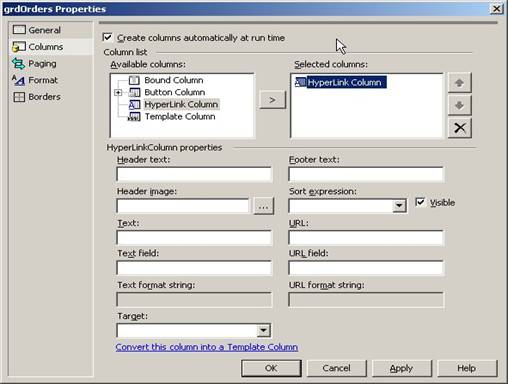
Figure 12. The Web Forms DataGrid Properties
dialog allows you to add a variety of columns to your DataGrid.
In the Header text
box and the Text field box,
enter “Order ID”. This sets the OrderID field as the data source for the
hyperlink text displayed in this column. In the URL
field box, enter “OrderID”, and in the URL
format string box enter “OrderEdit.aspx?orderID={0}”. The URL field specifies the
data source field containing the value to be passed to the target page—in this
case, the OrderID field. The first part of the URL
format string (OrderEdit.aspx) specifies the target Web page
requested when a user clicks on an Order ID hyperlink. The second part of the URL format string
(?orderID={0}) specifies a parameter named “orderID” is passed to the target
page. The “{0}” is a substitution parameter. ASP.NET substitutes the value of
the field specified in the URL
field text box (in this case OrderID) when it creates the link at
run time. For example, if the currently selected order ID is 10372, the link
created is:
OrderEdit.aspx?orderID=10372
The value of the orderID parameter is easily retrieved from
within the OrderEdit page you will soon create.
Now add a bound column to the DataGrid by selecting Bound Column in the Available
columns list and clicking the mover button. When you do this, a different set
of properties displays in the bottom half of the dialog. In the Header text box, enter
“Order Date” and in the Data field
box enter “OrderDate”.
Add another bound column to the DataGrid and set its Header text to “Name” and
its Data field to
“ShipName”. Next, add one more bound column to the DataGrid, settings its Header text to “Country”
and its Data field to
“ShipCountry”.
Now, set the width of each column in the DataGrid. In the
left pane of the grdOrders
Properties dialog, select Format.
When you do this, a TreeView named Objects
is displayed in the right side of the dialog. Select the Columns node and you will
see the four columns you just added to the DataGrid. Select the first column
(Columns[0]) and a Width
text box and associated combo box are displayed (Figure 13).
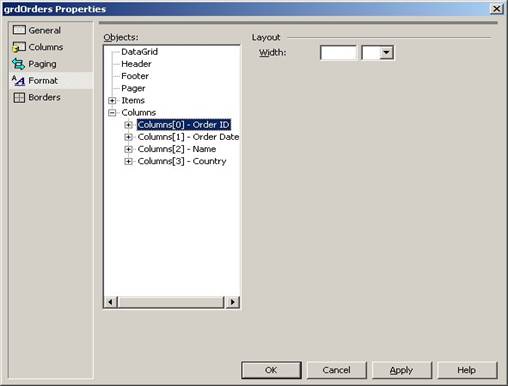
Figure 13. You can set the widths of DataGrid
columns in the Properties dialog.
In the Width
text box, enter 75 for the Order ID column. When you enter the width, a “px”
(an abbreviation for “pixels”) displays in the combo box—just accept the “px”
setting. Next, set the width of the Order Date column to 100, the Name column
to 200, and the Country column to 100. When you’re done, click the OK button to close the
dialog and apply the new column settings to your DataGrid. If you look at the
CustomerOrders form in design mode, it should look like Figure 14.
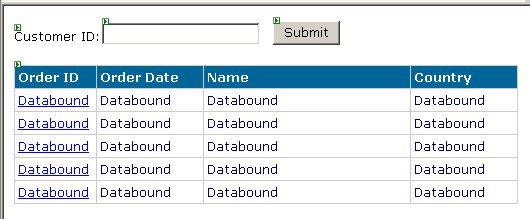
Figure 14. The DataGrid in design mode reflects
column settings you apply in the DataGrid’s Properties dialog.
Next, change the background color of the Web form to grey.
Click on the Web form in design mode, go to the Properties Window, and select
the bgColor property.
Click the ellipses button (…) next to the property to launch the Color Picker dialog. You
can pick any color you like, but for this example, I selected the Named Colors tab, and
selected the “Gainsboro” grey color in the far right center of the color
palette (Figure 15). Click the OK
button to select the color.
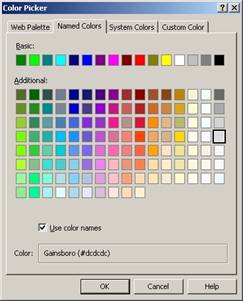
Figure 15. You can set the background color of a
Web form using the Color Picker
Now you need to set up data access for the form by reusing
business objects created for your Windows Forms application in the previous
chapter.
Accessing data by means of business objects
In Chapter 9, “Building .NET Windows Forms
Applications”, you created three different business objects—Orders, OrderItem,
and Shipper. You can use these same business objects in your Web Forms
application. There are a few ways to accomplish this, but the easiest method
right now is adding the source code files to your Web Forms application.
To add these source code files, right-click your Web Forms
project in the Solution Explorer and select Add
| Add Existing Item from the shortcut menu. In the Add Existing Item dialog,
navigate to the “Simple Windows Application” directory you created in the
previous chapter, and select the five business object source code files (Figure
16). These are Business.cs, Data.cs, OrderItemBusiness.cs,
OrderBusiness.cs, and ShipperBusiness.cs. If you created a Visual Basic .NET
Windows Forms application, these files will have a “vb” extension rather than a
“cs” extension. After selecting all five files, click the Open button.
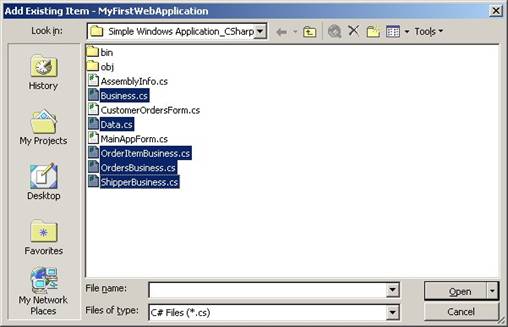
Figure 16. You can add files belonging to one
.NET project to any other .NET project
After clicking the Open
button, these five files should be listed in the Solution Explorer.

Typically, with business objects that are going to be used from
multiple projects, you should create a separate Class Library project in Visual
Studio .NET and add your business object source code files to this project. You
can then compile a DLL containing just your business object classes. This DLL
can then be referenced from multiple projects (such as a Windows Form
application and a Web Forms application).
Now you need to add code to the Web form to retrieve data
from the business object that is displayed in the Orders DataGrid. To do this,
edit the CustomerOrders.aspx.cs (C#) or CustomerOrders.aspx.vb (VB .NET) code
file. At the top of the code file, add the following namespace reference.
In C#:
using HW.NetBook.Samples.Business;
And in Visual Basic .NET:
Imports HW.NetBook.Samples.Business
Go back to the CustomerOrders form in design mode and
double-click the Submit
button. This automatically adds an event handler to the code-behind file. Add
the following code to this event handler.
In C#:
private void btnSubmit_Click(object sender,
System.EventArgs e)
{
// Instantiate the Orders
business object
Orders OrderObj = new
Orders();
// Get all Orders for the
user-specified customer and bind
// the DataGrid to the
resulting DataSet
DataSet ds =
OrderObj.GetOrdersByCustomerID(this.txtCustomerID.Text);
this.grdOrders.DataSource
= ds;
this.grdOrders.DataBind();
}
In Visual Basic .NET:
Private Sub btnSubmit_Click(sender As Object, e As
System.EventArgs) _
Handles
btnSubmit.Click
' Instantiate the Orders
business object
Dim OrderObj As New
Orders()
' Get all Orders for the
user-specified customer and bind
' the DataGrid to the
resulting DataSet
Dim ds As DataSet =
OrderObj.GetOrdersByCustomerID(Me.txtCustomerID.Text)
Me.grdOrders.DataSource
= ds
Me.grdOrders.DataBind()
End Sub 'btnSubmit_Click
This code instantiates the Orders business object, calls its
GetOrdersByCustomerID method, and passes the value of the Customer ID text box.
It then binds the DataGrid to the resulting DataSet.
Testing the Customer Orders Web form
Now you’re ready to test the Customer Orders Web form
to see if what you’ve done so far is working properly. To do this, select Build | Build Solution from
the menu. If everything compiles correctly, run the Web Forms application by
pressing F5 or click the Run button (if it doesn’t compile correctly, fix the
errors and compile again). When Internet Explorer opens, you should see the Customer ID label and
text box as well as the Submit
button (Figure 17).

Figure 17. When you run the Web Forms
application, it displays the Customer ID label and text box as well as the
Submit button.
To test the application’s data access abilities, enter the
text “QUEEN” in the Customer ID
text box and click the Submit
button. After a few moments, you should see a list of orders displayed in the
Orders DataGrid (Figure 18).
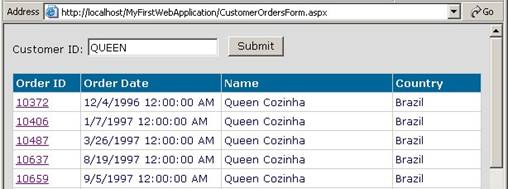
Figure 18. When you enter a customer ID, the
customer’s orders are displayed in
the DataGrid.
At this point, if you try to click on any of the order ID
hyperlink labels, you would get an error, because you haven’t created the Order
Edit Web form. You’ll do this soon, but first take a closer look at what’s
happening behind the scenes.
A look at the flow of events
When you first run the Web Forms application the
following occurs (see also Figure 19):
1.
The browser sends a request to the Web server for the
CustomerOrders.aspx page.
2. The
Web server receives the request and instantiates the CustomerOrders Web
page class.
3. The
Web page’s Page_Init event fires.
4. The
Web page’s Page_Load event fires.
5. The
Web server processes the page and sends HTML output back to the browser.
6. The
browser renders the HTML for display to the user.
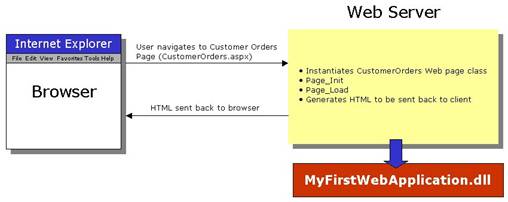
Figure 19. When a client browser requests an
ASP.NET Web page, the server instantiates the associated page class and
generates HTML, which is sent back to the browser to be rendered.
To see the HTML passed back to the browser, run the
application, and when the page is initially displayed in the browser, select View | Source from the
menu. You should see HTML that looks something like this:
<!DOCTYPE HTML PUBLIC "-//W3C//DTD HTML 4.0
Transitional//EN" >
<HTML>
<HEAD>
<title>WebForm1</title>
<meta content="Microsoft Visual Studio 7.0"
name="GENERATOR">
<meta
content="C#" name="CODE_LANGUAGE">
<meta
content="JavaScript" name="vs_defaultClientScript">
<meta
content="http://schemas.microsoft.com/intellisense/ie5"
name="vs_targetSchema">
</HEAD>
<body bgColor="gainsboro">
<form name="Form1" method="post"
action="CustomerOrders.aspx" id="Form1">
<input
type="hidden" name="__VIEWSTATE"
value="dDwxMTU0MzQ2MTEzO3Q8O2w8aTwxPjs+O2w8dDw7bDxpPDc+Oz47bDx0PEAwPDs7Ozs7Ozs7Ozs+Ozs+Oz4+Oz4+Oz6oG5OBeOfpfCgjFYH5BiaCehjOwg=="
/>
<P>
<span id="lblCustomerID"
style="font-family:Verdana;font-size:Smaller;">Customer
ID:</span>
<input name="txtCustomerID" type="text"
id="txtCustomerID"
style="font-family:Verdana;font-size:Smaller;" />
<input type="submit" name="btnSubmit"
value="Submit" id="btnSubmit"
style="font-family:Verdana;font-size:Smaller;" /></P>
<P>
</P>
</form>
</body>
</HTML>
In addition to the normal HTML you would expect to see,
notice there is also a hidden “input” element located in the middle of the HTML
with the name “_VIEWSTATE” and a value string of seemingly incomprehensible
characters. This hidden field is the mechanism used by ASP.NET to transfer page
state information between the browser and the server. In the context of
a Web page, “state” refers to the values of a Web page’s variables and
controls. Since the Web is a stateless environment, you need some mechanism to
store and retrieve the state of a page as it gets passed back and forth between
the browser and the server.
To understand more fully how this works, take a look at the
sequence of events occurring when a user retrieves orders for a specified
customer using your Web application.
When the user enters a customer ID and clicks the Submit button, the
following occurs (see also Figure 20):
1.
Clicking the Submit
button raises the Click event on the browser.
2. The
CustomerOrders page posts back to the Web server, including the value entered
by the user in the Customer ID text box.
3. In
response, the Web server instantiates the CustomerOrders Web page class.
4. The
Web page’s Page_Init event fires.
5. The
Web page’s Page_Load event fires.
6. The
event handler for the Submit button’s Click event (btnSubmit_Click) is executed
to respond to the Click event raised on the browser.
7. The
btnSubmit_Click event handler code instantiates the Orders business object,
retrieves the Customer ID value from the text box, and passes it to the
object’s GetOrdersByCustomerID method.
8. The
Orders DataGrid is bound to the DataSet returned from the Orders object.
9. The
Web server processes the page again and sends HTML back to the browser.

Figure 20. During a round-trip, a Web form is
posted to the server, processed, and sent back to the browser again.
 The
process of sending a Web form from the browser to the Web server then back
again is known as a “round trip”.
The
process of sending a Web form from the browser to the Web server then back
again is known as a “round trip”.
If you view the source code in your browser again, this time
you’ll see HTML for the DataGrid. In addition, you’ll notice the state stored
in the hidden field is considerably larger than before. This is because it now
contains state information for the DataGrid that was passed back from the Web
server.
Creating the Order Edit form
Now we need to create an Order Edit Web form that lets
users edit a selected order. In the Solution Explorer, right-click on the
project node and select Add | Add Web
Form from the shortcut menu to launch the Add New Item dialog with
the Web Form template
pre-selected. In the Name
text box, change the name of the Web form to OrderEdit.aspx, and then click the
Open button. This opens
the new OrderEdit form in design mode. For this form, leave the pageLayout property set
to “GridLayout”. This gives you a similar feel as creating Windows forms—you
can position controls anywhere on the design surface.
Next, go to the Properties Window and select the bgColor property. Click
the ellipses button (…) next to the property to launch the Color Picker dialog.
Again, as you did for the CustomerOrders form, click the Named Colors tab and
select the “Gainsboro” grey color on the far right center of the palette.
Now you’re ready to drop some controls on the Web form. First
select the Web form in design mode. For easier placement of controls, select Format | Snap to Grid
from the main menu. Next, drag and drop the controls listed in Table 4
on the form, setting their ID
and Width properties
as specified in the table. Note that the Size setting in Table 4 is only a
suggestion—you can set the size to any value you wish. For an idea of where to
locate the controls, see Figure 21.
Table 4. Class, ID, text, and size of controls on
the Order Edit Web form
|
Class
|
Control ID
|
Text
|
Size
|
|
Label
|
lblOrderID
|
Order ID:
|
-
|
|
TextBox
|
txtOrderID
|
|
100
|
|
Label
|
lblName
|
Name:
|
-
|
|
TextBox
|
txtName
|
|
260
|
|
Label
|
lblAddress
|
Address:
|
-
|
|
TextBox
|
txtAddress
|
|
328
|
|
Label
|
lblCity
|
City:
|
-
|
|
TextBox
|
txtCity
|
|
175
|
|
Label
|
lblRegion
|
Region:
|
-
|
|
TextBox
|
txtRegion
|
|
185
|
|
Label
|
lblPostalCode
|
Postal Code:
|
-
|
|
TextBox
|
txtPostalCode
|
|
107
|
|
Label
|
lblCountry
|
Country:
|
-
|
|
TextBox
|
txtCountry
|
|
185
|
|
Label
|
lblShippers
|
Shippers:
|
-
|
|
DropDownList
|
cboShippers
|
|
175
|
|
Label
|
lblOrderItems
|
Order Items
|
-
|
|
DataGrid
|
grdOrderItems
|
|
355
|
Again, if you want to change the font of all controls on this
form, drag a “lasso” around the controls to select them all, go to the
Properties Window, and change the Font
properties to whatever you like. In the sample code, I’ve changed the Font Name to “Verdana”
and the Font Size to
“Smaller”.
Now select a color scheme for the Order Items DataGrid.
Select the DataGrid in design mode and click the AutoFormat hyperlink label at the
bottom right of the Properties Windows (Figure 11). In the Auto Format dialog choose
a scheme from the list and click OK
to close the dialog (in the sample code, I’ve selected the “Colorful 1”
scheme).
Next, add columns to the Order Items DataGrid. Select the
DataGrid in design mode, go to the Properties Window, and select the Columns property. Click
on the ellipses (…) button next to the Columns
property to launch the DataGrid
Properties dialog. First, uncheck the Create
columns automatically at run time checkbox, and then add four
bound columns to the DataGrid as shown in Table 5.
Table 5. Properties for columns in the DataGrid on
the Order Edit Web form
|
Column Type
|
Header Text
|
Data Field
|
|
Bound Column
|
Product
|
ProductID
|
|
Bound Column
|
Unit Price
|
UnitPrice
|
|
Bound Column
|
Qty
|
Quantity
|
|
Bound Column
|
Discount
|
Discount
|
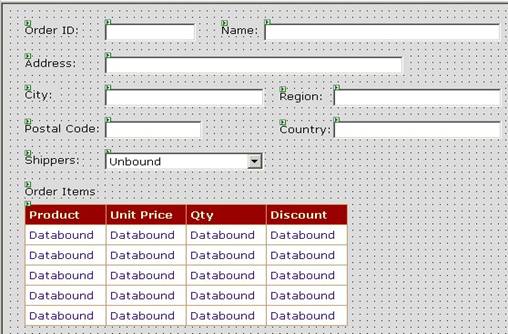 Figure
21. When you set a Web form’s pageLayout property to GridLayout, you can
place controls on the form wherever you like—similar to a Windows form.
Figure
21. When you set a Web form’s pageLayout property to GridLayout, you can
place controls on the form wherever you like—similar to a Windows form.
Now it’s time create data access and data binding code for
the Shippers DropDownList and the Order Items DataGrid controls so they can
display their corresponding data at run time. Double-click the OrderEdit form
design surface, which places you in the Page_Load event handler method. Before
adding code to this method, go to the top of the code file and add the
following namespace reference.
In C#:
using HW.NetBook.Samples.Business;
And in Visual Basic .NET
Imports HW.NetBook.Samples.Business
Now go back down to the bottom of the code file and add the
following code to the Page_Load Event.
In C#:
private void Page_Load(object sender, System.EventArgs
e)
{
if (! IsPostBack)
{
// Get the Order ID
passed to this page
int OrderID =
int.Parse(Request.QueryString["orderID"]);
// Get the specified
order and data bind the order controls
Orders OrderObj = new
Orders();
DataSet dsOrder =
OrderObj.GetOrderByOrderID(OrderID);
DataRow drOrder =
dsOrder.Tables["Orders"].Rows[0];
// Persist the
DataSet to the Session state
Session["OrderDataSet"]
= dsOrder;
this.txtOrderID.Text
= drOrder["OrderID"].ToString();
this.txtName.Text =
drOrder["ShipName"].ToString();
this.txtAddress.Text
= drOrder["ShipAddress"].ToString();
this.txtCity.Text =
drOrder["ShipCity"].ToString();
this.txtRegion.Text =
drOrder["ShipRegion"].ToString();
this.txtPostalCode.Text
= drOrder["ShipPostalCode"].ToString();
this.txtCountry.Text
= drOrder["ShipCountry"].ToString();
// Get a list of all
shippers
Shipper ShipperObj =
new Shipper();
DataSet dsShippers =
ShipperObj.GetShippers();
// Get the index of
the row that should be preselected
int Index = 0;
foreach (DataRow dr
in dsShippers.Tables[ShipperObj.TableName].Rows)
{
if
((int)dr["ShipperID"] == (int)drOrder["ShipVia"])
{
break;
}
Index++;
}
// Data bind the
combo box
this.cboShippers.DataTextField
= "CompanyName";
this.cboShippers.DataValueField
= "ShipperID";
this.cboShippers.DataSource
= dsShippers;
this.cboShippers.SelectedIndex
= Index;
this.cboShippers.DataBind();
// Get all order
items for the specified order id
OrderItem
OrderItemObj = new OrderItem();
DataSet dsOrderItems
= OrderItemObj.GetOrderItems(OrderID);
this.grdOrderItems.DataSource
= dsOrderItems;
this.grdOrderItems.DataBind();
}
}
And in Visual Basic .NET
Private Sub Page_Load(ByVal sender As System.Object, _
ByVal e As
System.EventArgs) Handles MyBase.Load
If Not IsPostBack Then
' Get the Order ID
passed to this page
Dim OrderID As
Integer = Integer.Parse(Request.QueryString("orderID"))
' Get the specified
order and data bind the order controls
Dim OrderObj As New
Orders()
Dim dsOrder As
DataSet = OrderObj.GetOrderByOrderID(OrderID)
Dim drOrder As
DataRow = dsOrder.Tables("Orders").Rows(0)
' Persist the
DataSet to the Session state
Session("OrderDataSet") = dsOrder
Me.txtOrderID.Text
= drOrder("OrderID").ToString()
Me.txtName.Text =
drOrder("ShipName").ToString()
Me.txtAddress.Text
= drOrder("ShipAddress").ToString()
Me.txtCity.Text =
drOrder("ShipCity").ToString()
Me.txtRegion.Text =
drOrder("ShipRegion").ToString()
Me.txtPostalCode.Text = drOrder("ShipPostalCode").ToString()
Me.txtCountry.Text
= drOrder("ShipCountry").ToString()
' Get a list of all
shippers
Dim ShipperObj As
New Shipper()
Dim dsShippers As
DataSet = ShipperObj.GetShippers()
' Get the index of
the row that should be preselected
Dim Index As
Integer = 0
Dim dr As DataRow
For Each dr In
dsShippers.Tables(ShipperObj.TableName).Rows
If
CInt(dr("ShipperID")) = CInt(drOrder("ShipVia")) Then
Exit For
End If
Index += 1
Next dr
' Data bind the
combo box
Me.cboShippers.DataTextField = "CompanyName"
Me.cboShippers.DataValueField = "ShipperID"
Me.cboShippers.DataSource = dsShippers
Me.cboShippers.SelectedIndex = Index
Me.cboShippers.DataBind()
' Get all order
items for the specified order id
Dim OrderItemObj As
New OrderItem()
Dim dsOrderItems As
DataSet = OrderItemObj.GetOrderItems(OrderID)
Me.grdOrderItems.DataSource = dsOrderItems
Me.grdOrderItems.DataBind()
End If
End Sub
First this code checks the form’s IsPostBack property to
determine if the page is being loaded for the first time or in response to a
post back from the Web browser. If it’s being loaded in response to a post back,
all of the code in this method is bypassed. This is necessary because running
this code on a post back would overwrite any changes the user makes to the
order.
If IsPostBack is false, the code in this method retrieves the
value of the orderID parameter passed to it from the CustomerOrders page. It
does this by calling the ASP.NET Request object’s QueryString method, passing
the name of the parameter. The QueryString method returns a string value that
is converted into an integer.
Next, the code instantiates the Orders object and calls its
GetOrderByOrderID method, passing the order ID received from the Customer
Orders page. Notice after retrieving the DataSet from the Orders object, it
persists the DataSet to the Session object. This is done because later in this
particular example you are going to update the selected order stored in the
DataSet. Storing the DataSet in the Session state allows you to retrieve the
DataSet from the Session object when the update is performed. If you didn’t
persist the DataSet, you would lose all of your changes when the form is posted
back to the Web site.
After persisting the Orders DataSet, controls are bound to
the DataSet. Next, DataSets
are retrieved from the Shippers and OrderItems business objects and the
controls are bound
to data.
Here’s a special note about binding to a DropDownList
control. If you want to pre-select an item in the DropDownList control, the
only way you can do this is by setting its SelectedIndex property. However,
when you bind to a DataSet, there’s no straightforward way to retrieve the
index of the DataRow you want selected. That’s why there’s a “for each” loop in
this method—it loops through the DataRows to find the index of the Shipper
DataRow whose Shipper ID field contains the same value as the Order’s ShipVia
field. It would be much better if Microsoft came up with an easier
way to do this—perhaps by means of a SelectedValue property.
Here’s another
important point—typically, in a Web forms application, if you need to retrieve
data from the back end for read-only purposes, you can use a DataReader and
Data Command object rather than a DataSet, since a DataReader provides faster
(though read-only) access to data. This means any place in the application
where I require read-only data (as in the case of Shippers) then I would use a
DataReader rather than a DataSet. For more information on using a DataReader,
see Chapter 7, “Data Access with ADO.NET”.
Testing the Order Edit form
Now it’s time to test your work on the Order Edit form
so far. Compile and run the Web application by pressing the Start button or pressing
F5. The Customer Orders Web form appears first. Enter the word “QUICK” in the
Customer ID text box and click Submit. This fills the Orders DataGrid with all
orders for the specified customer.
Click on any hyperlink label in the Order ID column to
display the Order Edit form (Figure
22).
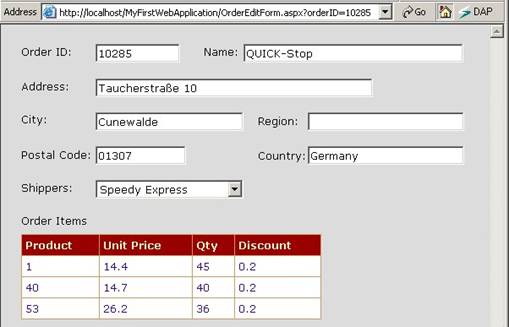
Figure 22. The Order Edit Web form knows the
order to display based on the orderID parameter passed to it from the Customer
Orders page.
If you take a close look at Internet Explorer’s Address box at the top of
Figure 22, you’ll see a string “?orderID=10285” at the end of the URL. This is
the order ID selected in the Customer Orders form. This parameter is passed to
the Order Edit form when you click on the hyperlink label in the first column
of the Order Items DataGrid. This value is also used in the Order Edit page to
retrieve data from the Orders and OrderItem business objects.
A look at the flow of events
When the user clicks on an Order in the CustomerOrders
form, the following occurs (see Figure 23 also):
1.
A request is sent to the Web Server for the OrderEdit
Web page. In this request, an orderID parameter is passed containing the
selected order ID.
2. The
Web server receives the request and instantiates the OrderEdit Web page class.
3. The
Web page’s Page_Init event fires.
4. The
Web page’s Page_Load event fires. Within this event, a check is performed to
determine if the page is being loaded for the first time or in response to a
post back. In this case, it’s the first time the page is loaded, so the Orders
business object is instantiated, a DataSet containing the order returns from
the Orders object, and the Web server controls are bound to the DataSet.
5. All
order items are retrieved from the Order Items business object and the Order
Items DataGrid is bound to this DataSet.
6. The
Web server processes the page and sends HTML output back to the browser.
7. The
browser renders the HTML for display to the user.
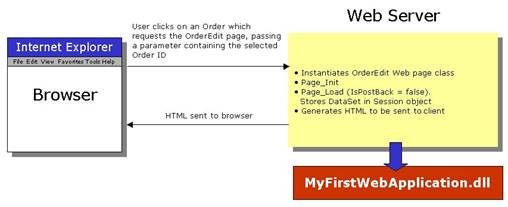
Figure 23. The diagram shows the flow of events
when a user clicks on an Order in the CustomerOrders form.
Again, if you want to see what was sent back to the browser,
select View | Source from
the Internet Explorer menu.
Updating data
Now it’s time to add updating capabilities to the Order
Edit Web page. Start by adding a button to the form. In the sample code, I’ve
added it directly below the Country
text box. Set the button’s (ID)
property to “btnUpdate” and its Text
to “Update”.
Next, double-click the new Update
button. This adds an event handler method named btnUpdate_Click to the Web
form. Add the following code to this method.
In C#:
// Retrieve the original Orders DataSet from the Session
object
DataSet dsOrders = (DataSet)Session["OrderDataSet"];
// Instantiate the orders business object and get the table name
Orders OrderObj = new Orders();
string OrderTable = OrderObj.TableName;
// Save the values in the Web server control to the Orders
DataSet
dsOrders.Tables[OrderTable].Rows[0]["ShipName"] =
this.txtName.Text;
dsOrders.Tables[OrderTable].Rows[0]["ShipAddress"] =
this.txtAddress.Text;
dsOrders.Tables[OrderTable].Rows[0]["ShipCity"] =
this.txtCity.Text;
dsOrders.Tables[OrderTable].Rows[0]["ShipRegion"] =
this.txtRegion.Text;
dsOrders.Tables[OrderTable].Rows[0]["ShipPostalCode"] =
this.txtPostalCode.Text;
dsOrders.Tables[OrderTable].Rows[0]["ShipCountry"] =
this.txtCountry.Text;
dsOrders.Tables[OrderTable].Rows[0]["ShipVia"] =
this.cboShippers.SelectedItem.Value;
// Tell the Orders business object to save the DataSet
OrderObj.SaveDataSet(dsOrders);
// Redirect back to the Customer Orders Web page
Response.Redirect("CustomerOrders.aspx");
And in Visual Basic .NET:
' Retrieve the original Orders DataSet from the Session
object
Dim dsOrders As DataSet =
CType(Session("OrderDataSet"), DataSet)
' Instantiate the orders business object and get the table name
Dim OrderObj As New Orders()
Dim OrderTable As String = OrderObj.TableName
' Save the values in the Web server control to the Orders DataSet
dsOrders.Tables(OrderTable).Rows(0)("ShipName") = _
Me.txtName.Text '
dsOrders.Tables(OrderTable).Rows(0)("ShipAddress") = _
Me.txtAddress.Text '
dsOrders.Tables(OrderTable).Rows(0)("ShipCity") = _
Me.txtCity.Text '
dsOrders.Tables(OrderTable).Rows(0)("ShipRegion") = _
Me.txtRegion.Text '
dsOrders.Tables(OrderTable).Rows(0)("ShipPostalCode") =
_
Me.txtPostalCode.Text '
dsOrders.Tables(OrderTable).Rows(0)("ShipCountry") = _
Me.txtCountry.Text '
dsOrders.Tables(OrderTable).Rows(0)("ShipVia") = _
Me.cboShippers.SelectedItem.Value '
' Tell the Orders business object to save the DataSet
OrderObj.SaveDataSet(dsOrders)
' Redirect back to the Customer Orders Web page
Response.Redirect("CustomerOrders.aspx")
This code retrieves the Order DataSet you persisted to the
Session object earlier. Next, it retrieves values from the Web server controls
and stores them in the Order DataSet. It then passes the DataSet to the Orders
business object’s SaveDataSet method. Afterwards, it passes control back to the
Customer Orders form.
To test the Web application’s new updating capabilities,
compile and run the application by clicking the Run
button or pressing F5. In the Customer
Orders form, enter a Customer ID and click the Submit button to display
all orders for the customer. Next, select an order from the Orders DataGrid, which
takes you to the Order Edit
page. In this page, change one or more of the values at the top of the form
(i.e. the “Region”), and click the Update
button. After the record is updated, control should be transferred back to the Customer Orders page.
A look at the flow of events
When the user clicks the update button on the OrderEdit
form, the following occurs (see Figure 24 also):
1.
The user clicks on the Update button, raising the Click
event on the browser.
2. The
OrderEdit page is posted back to the Web server, including all values entered
in any of the Web server controls.
3. In
response, the Web server instantiates the OrderEdit Web page class.
4. The
Web page’s Page_Init event fires.
5. The
Web page’s Page_Load event fires.
6. The
event handler for the Update button’s Click event (btnUpdate_Click) is executed
to respond to the Click event raised on the browser.
7. The
btnUpdate_Click event handler code retrieves the Orders DataSet (that was
stored earlier) from the Session object. It then updates the DataSet from the
Web server controls and uses the Orders business object to save the DataSet.
8. The
code in the btnUpdate_Click method redirects to the CustomerOrders page.
9. The
Web server responds to the redirection and instantiates the CustomerOrders page
class. It goes through the normal instantiation process, and then the Web
server processes the page and generates HTML to send back to the client
browser.
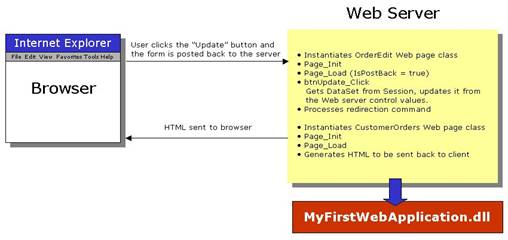
Figure 24. The diagram shows the flow of events
when the user clicks the update button on the OrderEdit form.
Caching data and objects
In this example, you persisted the DataSet to the
ASP.NET Session object. There are actually a variety of ways to cache data and
objects in an ASP.NET application. The following sections describe some of
these options.
The Session object
As you saw in the sample code for this chapter, the
Session object gives you quick access to data and objects. However, session
data is duplicated for every user connected to your Web application. This means
you need to be wary of situations where you need to persist more
than just a few records in a DataSet, because ASP.NET saves a unique copy of
the DataSet
for each user session. On the plus side, the Session object works well in Web
farm and Web garden architectures.
For more information on ASP.NET session state, see the .NET Help
topic “Session State”.
The web.config file
When you create a new Web Application or Web Service,
VS .NET creates a web.config file for your project. Among other things, this
file allows you to configure the way the Session works. The settings that
control sessions are found in the <sessionState> element. Here is an
example of what this element looks like:
<sessionState
mode="InProc"
stateConnectionString="tcpip=127.0.0.1:42424"
sqlConnectionString="data
source=127.0.0.1;user id=sa;password="
cookieless="false"
timeout="20"
/>
The mode attribute lets you specify where the Session
object stores its data. The options are:
·
InProc - In the local memory on the Web server
(the default). Use this setting if your Web application has low traffic.
Although this option performs the fastest because it’s stored in the memory of
the same process as the worker process, it consumes computer memory and with
high traffic could bog down your server. In addition, if you use this setting
and you scale to a Web farm, you’ll need to do some extra work to make sure
each user gets directed to the proper server within the farm that stores their
Session data.
·
StateServer - The memory of a remote server.
This setting allows you to easily scale your application to a Web farm because
it stores Session objects in the memory of a computer than can be accessed by
all servers in the farm. However, since the session information is still stored
in memory, you can again run into problems if you get high traffic on your Web
site and the Session data consumes a large chunk of memory.
·
SqlServer - In a SQL Server database. This is
the best setting to ensure the highest scalability. This solution is scaleable
because it doesn’t consume memory—Session objects are stored in a SQL Server
database. In addition, it’s usable in a Web farm, because all servers in the
farm have access to the SQL Server database.
·
Off – Turns off session state
The stateConnectionString attribute specifies the server name
and port where session state is stored when the mode attribute is set to
“StateServer”.
The sqlConnectionString attribute is used to specify the
connection string for SQL Server when the mode attribute is set to “SqlServer”.
The cookieless attribute lets you specify if cookies are used
to maintain session state. If set to true, the session state is maintained by
modifying URLs with an ID uniquely identifying the session rather than using
cookies.
The timeout attribute specifies the number of minutes a
session can be idle before it
is abandoned.
The Application object
The Application object stores data and objects viewable
from all user sessions. However, the Application Object does not work with Web
farms. So, if creating the most scaleable Web application is high on your needs
list, you should avoid storing state in the Application object to avoid
reworking your application in the future.
The Cache object
The ASP.NET Cache object is visible across sessions (as
is the Application object). It has the added ability of letting you associate
duration, priority, and decay factors for any items you store in it. These
settings allow the Cache object to limit the impact of cache data on the
server’s memory. When memory begins to fill up with cached data, the Cache
object purges data based on its priority and how recently it was used. One
drawback of the Cache object is it does not work with Web farms.
Using a Web Service for caching
Rather than using the Session object, you can create a
custom Web Service for caching. This has an advantage over the Session object
in being accessible outside the confines of IIS.
Using session-specific XML files
Another caching option allowing you to reduce the
memory demands of your Web server is storing information on the server in
session-specific XML files. You identify XML files with a particular session by
using the Session ID. The Session ID is a unique, random string generated for
each session. You retrieve this string from the Session object’s SessionID
property (Session.SessionID).
Protection against IIS crashes
When I was writing this chapter, I had the unfortunate
experience of having my computer reboot while I was working with Visual Studio
.NET on the sample Web application. This reboot caused IIS to cease functioning
because it corrupted a key file—MetaBase.bin. The MetaBase.bin file stores a
variety of configuration settings on versions of IIS prior to 6.0 (where it has
been replaced by XML files).
If you’re working with a version of IIS that uses the
MetaBase.bin file, you can save yourself some headaches by making a backup of
this file using the Internet
Services Manager (In Windows XP, it’s called Internet Information Services).
You launch it from Control Panel’s Administrative
Tools or in Windows 2000, from the Start
| Programs | Administrative Tools | Internet Services Manager
menu.
If you’re using Windows 2000, once the Internet Services Manager
dialog appears, right-click on the server node and select Backup/Restore Configuration
from the shortcut menu (Figure 25). If you’re using Windows XP, you need
to select the All Tasks
option to see the Backup/Restore
Configuration option.
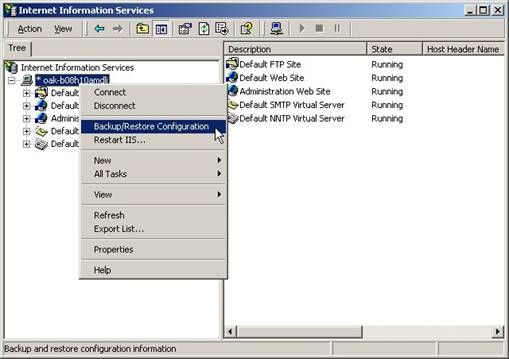
Figure 25. Making a backup of your MetaBase.bin
file on versions of IIS prior to 6.0 helps you recover from accidental reboots
of your Web server machine.
When you select this option, the Configuration
Backup/Restore dialog appears (Figure 26). If you
previously created any configuration backups, these appear in the Backups list. You can
choose to Delete a backup, Restore a backup (you’d do this to recover from a
fatal crash), or create a new backup.
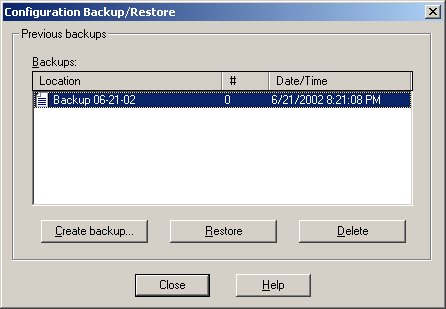
Figure 26. The Configuration Backup/Restore
dialog allows you to create new backups, restore backups, or delete backups of
your MetaBase.bin file.
If you click the Create
backup… button, it prompts you for a Configuration backup name.
Just enter a descriptive name, click the OK
button, and it automatically creates a backup of your MetaBase.bin file.
Conclusion
Microsoft’s .NET team has done a great job in bringing
Web development to the masses, providing an environment that makes it easy to
create event-driven Web Forms applications. If you create business objects for
your .NET applications, you don’t have to duplicate your application logic when
building both a Windows Forms and Web Forms application—most of the work is
done once in building business objects either type of application can use.
However, Web Forms is only half of ASP.NET—Chapter 12
introduces you to the other half—“XML Web Services”.