Chapter
14
.NET Security
As sophisticated hackers continue to spawn new generations of malicious computer viruses, security has become an increasingly important issue for both software developers and end users. Microsoft has taken security to new levels in the .NET Framework. Not only does it help you avoid running potentially destructive code, it also gives you the ability to implement user security for denying and granting user access.
Just about every software application needs some type of security. In Visual FoxPro applications, security usually takes the form of preventing users from accessing secure areas of the application or from viewing and editing sensitive data. In VFP, you have to design and write your own security code or purchase a third-party application framework that provides this functionality for you. In contrast, there are two main types of security built right into the .NET Framework—role-based security and code access security.
Role-based security allows you to control what end users can do in your .NET applications. This is similar to the security you are probably already using in your Visual FoxPro applications. There may be functionality in your application you don’t want certain groups of users to access. You may have other areas of your application where you allow some users to have read-write privileges and others to have read-only privileges. The .NET Framework contains classes that provide this ability.
Code access security is not available in Visual FoxPro applications. It is enforced by the .NET runtime and helps you avoid running “evil” code that can do bad things to your computer. Code access security has become particularly important with the advent of .NET’s new deployment model allowing you to easily install .NET assemblies downloaded from the Internet on your computer. The downside of this model is assemblies may contain code that intentionally (or unintentionally) wreaks havoc on your computer. Because Microsoft is moving to this sort of Internet-downloadable software distribution model, they spent resources incorporating security into the .NET Framework.
The first part of this chapter focuses on code access security introducing the tools and classes provided by the .NET Framework and the Windows operating system you can use to define and enforce security for your desktop and Internet applications. The second part of the chapter shows you how to define and enforce role-based security. Fortunately, Microsoft has created a consistent model so once you learn one type of security you can easily learn the other.
Code Access Permissions
I’m not a big fan of running code from unknown sources on my computer. Although I’m religious about backing up my laptop—which is my main development machine—it would be a real pain to get it back in working order after being demolished by malicious code.
.NET helps you breathe a little easier in this regard if you’re careful and follow the rules. .NET allows you to grant or deny code the permission to perform a particular type of operation or access a specific resource. For example, you may want to deny an assembly the permission to perform read or write operations to files and directories on your local computer or network drives. You may also want to deny permission to access resources such as your local hard drive, your database, or your Windows Registry. This is where .NET permissions come in.
The .NET Framework has a variety of permission classes that enforce restrictions on managed code. Table 1 lists the different permission classes found in the framework. I’ll take a closer look at these classes later in this chapter and show you how to implement them in your .NET applications.
Table 1. .NET code access permissions
|
Permission |
Description |
Namespace |
|
DirectoryServicesPermission |
Access to the System.DirectoryServices classes. |
System.DirectoryServices |
|
DNSPermission |
Access to the Domain Name System (DNS). |
System.Net |
|
EnvironmentPermission |
Read or write environment variables. |
System.Security.Permissions |
|
EventLogPermission |
Read or write access to event log services. |
System.Diagnostics |
|
FileDialogPermission |
Access files selected by the user in an Open dialog box. |
System.Security.Permissions |
|
FileIOPermission |
Read, append, or write files or directories. |
System.Security.Permissions |
|
IsolatedStorageFilePermission |
Access private virtual file systems. |
System.Security.Permissions |
|
IsolatedStoragePermission |
Access isolated storage, which is storage associated with a specific user and some aspect of the code’s identity, such as its Web site, publisher, or signature (abstract base class). |
System.Security.Permissions |
|
MessageQueuePermission |
Access message queues through the managed Microsoft Message Queue (MSMQ) interfaces. |
System.Messaging |
|
OleDbPermission |
Access to databases using OLE DB. |
System.Data.OleDb |
|
PerformanceCounterPermission |
Access performance counters. |
System.Diagnostics |
|
PrintingPermission |
Access printers. |
System.Drawing.Printing |
|
ReflectionPermission |
Discover information about a type at run time. |
System.Security.Permissions |
|
RegistryPermission |
Read, write, create, or delete registry keys and values. |
System.Security.Permissions |
|
SecurityPermission |
Execute, assert permissions, call into unmanaged code, skip verification, and other rights. |
System.Security.Permissions |
|
ServiceControllerPermission |
Access running or stopped services. |
System.ServiceProcess |
|
SocketPermission |
Make or accept connections on a transport address. |
System.ServiceProcess |
|
SqlClientPermission |
Access to SQL Databases. |
System.Data.SqlClient |
|
UIPermission |
Access user interface functionality. |
System.Security.Permissions |
|
WebPermission |
Make or accept connections on a Web address. |
System.Net |
As you peruse Table 1, you will see some permission classes that make a lot of sense, such as FileIOPermission, OleDbPermission, and SqlClientPermission. However, other classes such as UIPermission may seem unnecessary—why would you prevent code from displaying a message to the user?
Here’s a good example—a few times a year I get e-mails from well-meaning friends and relatives warning me of a virus that’s sweeping the globe. I’m told I can easily fix the problem by deleting a particular virus-laden file from my hard drive. In reality, the file I am told to delete has nothing to do with a virus, but is actually a file necessary to the Windows operating system. The moral of this story is that I may not want code from unknown sources popping up dialogs telling users to perform actions that can debilitate their computers.
Figure 1 displays all of the classes from Table 1 in a UML class diagram, to give you a clearer picture of the code access permission class hierarchy.
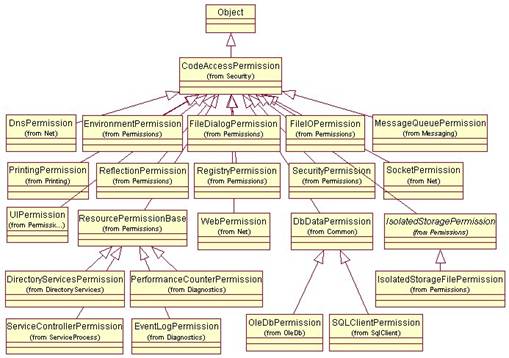
Figure 1. The code access permission class hierarchy.
Creating custom code access permissions
Although the built-in permission classes cover many of the permissions you need to administer in your application, there are times when you need to create your own custom permission classes. For examples of when and how you should create your own custom permissions, see the .NET Help topic “Creating Your Own Code Access Permissions”.
It’s a matter of trust
How much do you trust the code you’re getting ready to run? If you’ve written it yourself, and it resides on your local machine, the level of trust should be pretty high! However, if you’ve just downloaded an assembly from the Internet and a company you are not familiar with publishes it, your level of trust should be very low. So how do you specify which permissions apply to a particular assembly? This is done by means of a security policy.
Security policy
A security policy is a set of rules telling the .NET runtime what permissions to grant to assemblies from different sources. When the runtime gets ready to run an assembly, it determines the identity of the assembly (such as where the code came from and who published it) and then checks the security policy to determine the rights it should be given.
Security policy levels
There are four different security policy levels as shown in Table 2.
Table 2. Security policy levels
|
Policy level |
Description |
Specified by |
|
|
Applies to all managed code for every computer and user on the network. |
Administrator |
|
Machine |
Applies to all managed code on a computer. |
Administrator |
|
User |
Applies to code in all the processes associated with the current operating system user. |
Administrator or user |
|
Application domain |
Applies to managed code in the host’s application domain. |
Set programmatically |
These four security policies form a hierarchy, with the enterprise policy at the top of the food chain (Figure 2), and each subsequent policy beneath the previous.
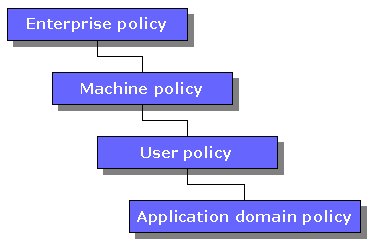
Figure 2. Security policy hierarchy.
You set permissions at the enterprise level that apply to all computers and users on the network. Permissions set at the machine level apply to all users on a given machine and the user policy specifies permissions for the current operating system user. The application domain security policy level lets you specify security for a particular application domain.
![]()
.NET’s application “domain” replaces the “process” as the smallest unit of application isolation on a Windows system. You can have multiple domains within a single process that isolate applications from each other. For more information, see the .NET Help topic “Application Domains Overview”.
At run time, when determining the permissions for an assembly, all security policy levels are evaluated, and the code is granted the minimum permissions granted by any of the levels.
In this chapter, I discuss security policies at the machine level. For information on setting security policy for all other levels, see the .NET Help topic “Security Policy Best Practices”.
Viewing and configuring code access security policies
There are two .NET tools you can use to configure code access security policies. The first is the Code Access Security Policy Tool (Caspol.exe) command-line utility. The other tool is the .NET Framework Configuration tool (Mscorcfg.msc) that provides a graphical user interface for configuring security policies. Although Caspol provides more capabilities, I will show you the .NET Framework Configuration tool in the sections that follow because its graphical interface helps you better understand the .NET Framework’s security concepts. For more information on Caspol, see the .NET Help topic “Code Access Security Policy Tool (Caspol.exe)”.
![]() The
enterprise, machine, and user-level security policies can be configured using
one of these .NET configuration tools, but the application domain policy can
only be set programmatically.
The
enterprise, machine, and user-level security policies can be configured using
one of these .NET configuration tools, but the application domain policy can
only be set programmatically.
To launch the .NET Framework Configuration tool in Windows 2000, click the Windows Start button and select Programs | Administrative Tools | Microsoft .NET Framework Configuration. In Windows XP go to the Control Panel, select Administrative Tools, and then select Microsoft .NET Framework Configuration. When the tool appears, select the Runtime Security Policy node in the left pane (Figure 3).
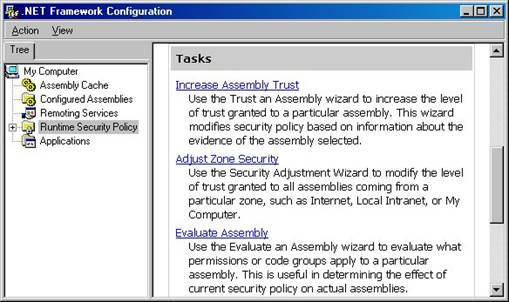
Figure 3. The .NET Framework Configuration tool can be used to configure code access security policies.
The .NET Framework Configuration tool allows you to configure settings by using either wizards or configuration dialogs. The right pane contains a list of tasks with wizards. You will run one of these wizards later in the chapter, but first look at the tree view in the left pane.
If you expand the Runtime
Security Policy node, you see the three configurable policy
levels—
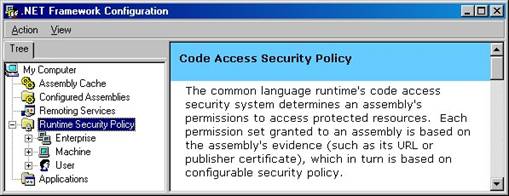
Figure 4. Security policy can be configured at
the
User levels.
If you expand the Machine node, you see three additional nodes—Code Groups, Permission Sets, and Policy Assemblies (Figure 5).
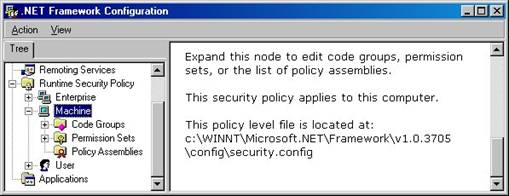
Figure 5. Each policy level contains Code Groups, Permission Sets, and Policy Assemblies nodes.
The
Code groups
Each security policy contains a hierarchy of code groups. A code group is a logical grouping of code with similar characteristics, such as where the code came from (for example, Local machine, Internet, Intranet).
For code to be included in a particular group, it must meet a specific membership condition. Each code group has only one code membership condition. The .NET Framework has eight default membership conditions represented by the classes listed in Table 3.
Table 3. Code group membership conditions
|
Membership condition |
.NET class |
Membership requirement |
|
All code |
AllMembershipCondition |
A membership condition for all code. |
|
Application Directory |
ApplicationDirectoryMembership Condition |
Assemblies located in the same directory or in a child directory of the running application. |
|
Hash |
HashMembershipCondition |
The hash value of the assembly. |
|
Publisher |
PublisherMembershipCondition |
Assemblies digitally signed with a specified certificate. |
|
Site |
SiteMembershipCondition |
The HTTP, HTTPS, or FTP Web site where the code originated |
|
Strong Name |
StrongNameMembershipCondition |
Assemblies that have the specified strong name public key (and optionally name and version) |
|
URL |
UrlMembershipCondition |
The URL where the code originated. An asterisk can be used as a wildcard character at the end of the URL. Examples: http://www.MySite.com/MyAssembly.dll ftp://ftp.MySite.com/pub/* |
|
Zone |
ZoneMembershipCondition |
The zone, or region, where the code originated. |
The .NET runtime uses the criteria listed in Table 3 (also known as evidence) to determine the placement of code into a code group.
Expand the Code Group node in the .NET Framework Configuration tool (Figure 6) and you see the All_Code node. This node forms the root of the code group tree and the top of the code group hierarchy. This is the first code group listed in Table 3. All .NET assemblies belong to this code group—no membership condition is necessary!
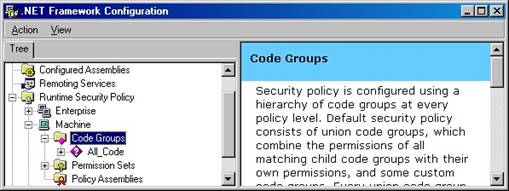
Figure 6. All .NET assemblies belong to the All Code group by default—no membership condition is necessary.
If you expand the All_Code node, you see a list of child code group nodes (Figure 7).
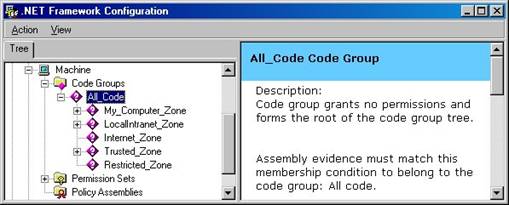
Figure 7. The All_Code node sits at the top of a hierarchy of code group nodes that define membership conditions for assemblies.
“Zone” is also one of the code groups listed in Table 3. Because zones are one of the most commonly used code group membership conditions, the following section details each type of zone used by .NET security policies.
Zones
The Zone code groups provide a way to specify membership conditions based on an assembly’s origin. If you have toyed with Internet Explorer’s security settings, you may be familiar with the concept of zones. Table 4 lists the different zones used by .NET security policies.
Table 4. Security policy zones
|
Zone |
Description |
|
My Computer |
Applies to code that exists on the local computer. |
|
Local Intranet |
Used for code located on a company’s intranet. |
|
Internet |
This is a “catch all” zone used for code located on Web sites not specified as belonging to any other zone. |
|
Trusted Sites |
Used for code located on Web sites you trust. The URL of one or more Web sites can be added to the Trusted zone. |
|
Untrusted Sites |
Used for code located on Web sites you do NOT trust. The URL of one or more Web sites can be added to the Untrusted zone |
Now, I’ll show you how to use the .NET Framework Configuration tool’s Security Adjustment Wizard to view the security policy zone settings on your local computer. Afterwards, I’ll come back to the tree view and look at the settings in greater detail. To launch the wizard, select the Runtime Security Policy node in the left pane and click the Adjust Zone Security link in the right pane. This displays the Security Adjustment Wizard (Figure 8).
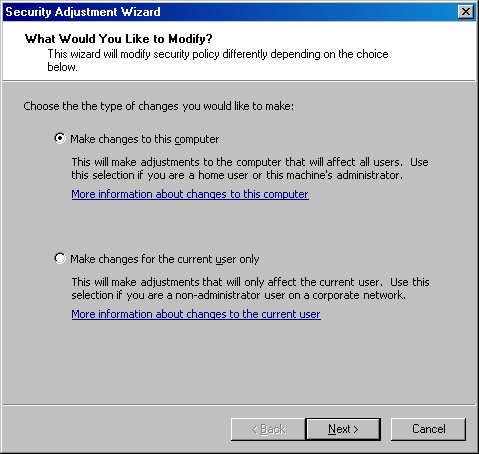
Figure 8. The Security Adjustment Wizard allows you to modify security policy for the local computer or for the current user.
The wizard allows you to modify the security policy for the local computer or the current user. Accept the default setting Make changes to this computer, click the Next button, and the Security Adjustment Wizard displays (Figure 9).
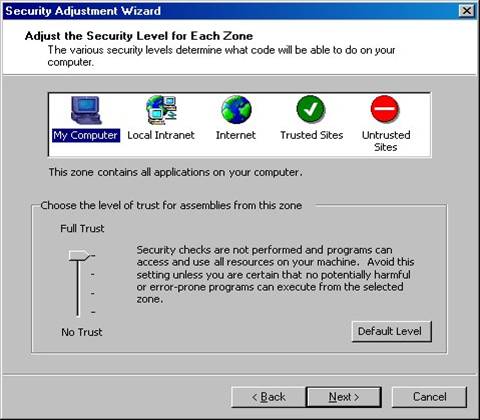
Figure 9. The Security Adjustment Wizard allows you to configure security settings for assemblies coming from a particular zone.
The top of the dialog displays a pane containing the different .NET security zones. Each of these corresponds to a zone code group node shown in Figure 7. To change the security level for a particular zone, select the zone at the top of the dialog and use the track bar at the bottom of the dialog to select the desired level of trust. To set the default level for a particular zone, click the Default Level button. Here are the different “level of trust” choices as described by their associated text:
· Full Trust – Security checks are not performed and programs can access and use all resources on your machine. Avoid this setting unless you are certain no potentially harmful or error-prone programs can execute from the selected zone. This is the default setting for the My Computer zone.
·
Medium Trust – Programs might not be able
to access most protected resources
such as the registry or security policy settings, or access your local file
system without user interaction. Programs can connect back to their site of
origin, resolve domain names, and use all windowing resources. This is the
default setting for the Local
Intranet zone.
· Low Trust – Programs might not be able to access protected resources such as the registry, environment variables, domain names, or security policy settings. Programs have limited ability to use windowing resources and your local file system. This is the default setting for the Trusted Sites zone.
· No Trust – Programs might not be allowed to execute. This is the default setting for the Internet zone and the Untrusted Sites zone.
If you click the wizard’s Next button, it displays a list of zones and their associated security levels (Figure 10). If you click Finish, it saves any changes you have made.
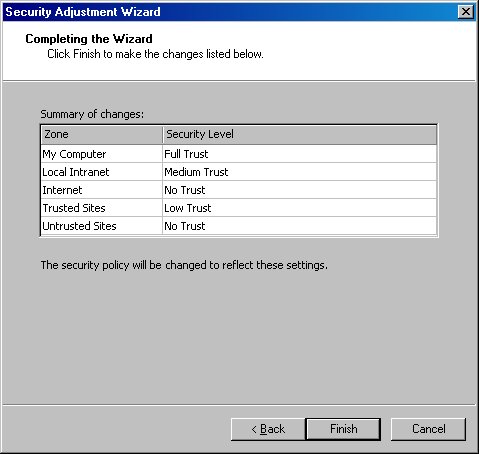
Figure 10. The last page of the Security Adjustment Wizard shows a list of all zones and their associated security level.
Specifying zone web sites
You can use Internet Explorer to specify the Web sites that belong to the Local intranet, Trusted sites, and Restricted sites zones.
From within Internet Explorer, select Tools | Internet Options from the main menu to launch the Internet Options dialog (Figure 11).
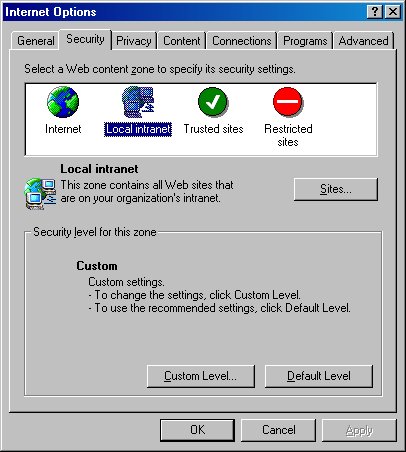
Figure 11. You can use the Internet Options dialog in Internet Explorer to specify the Web sites that belong to the Local intranet, Trusted sites, and Restricted sites zones.
Local Intranet zone
If you select the Local Intranet zone at the top of the Internet Options dialog, and then click the Sites button, it displays a Local intranet dialog (Figure 12) for specifying the Web sites included in the Local Intranet zone. All Web sites included in the Local Intranet zone use the security settings specified for this zone.
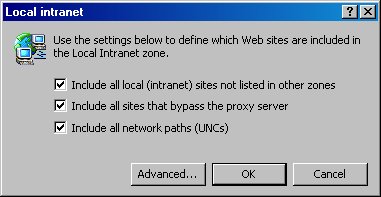
Figure 12. The Local intranet dialog allows you to specify the Web sites included in the Local Intranet zone.
If you click the Advanced…
button, a second dialog is launched allowing you to add or remove Web sites
from the Local intranet zone. You can also use this dialog to add Web sites
that are not in your local intranet. You might do this if you want to give an
external Web site the same permissions as sites on your local intranet—I
recommend doing this judiciously!
Trusted sites
If you select the Trusted sites zone at the top of the Internet Options dialog and click the Sites button, it displays a Trusted sites dialog (Figure 13) that allows you to specify the Web sites included in the Trusted sites zone.
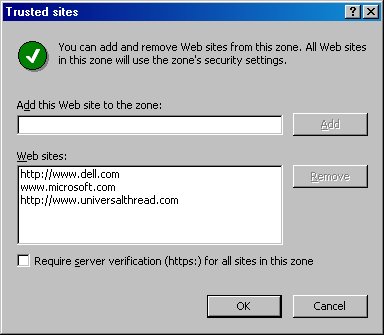
Figure 13. The Trusted sites dialog allows you to add and remove Web sites from the Trusted sites zone.
As you can see in Figure 13, I’ve added three Web sites to my Trusted sites zone, which grants additional “trusted” permissions to these Web sites.
Restricted sites
If you select the Restricted sites zone at the top of the Internet Options dialog and click the Sites… button, it displays the Restricted sites dialog (which is similar to the dialog shown in Figure 13) that allows you to add and remove Web sites from the Restricted sites zone.
Why would you want to restrict all software from a particular site? At times, you may determine that a site is known to contain unstable or malicious code. You can use this dialog to add that site to the list of restricted sites causing them to run in an extremely restricted environment or not allowing them to run at all!
Viewing code group detail
Now that you’ve seen a higher-level view of zone code groups, it’s time to take a more detailed look at them. To do this, launch the .NET Framework Configuration tool again, and in the left pane, expand the Runtime Security Policy | Machine | Code Groups | All_Code node as shown in Figure 7.
If you select the My_Computer_Zone, a description of the code group is shown in the right pane. This description informs you this code group allows full access to all resources and the current policy level is “FullTrust”.
At the bottom of the right pane is a list of Tasks that can be performed on the My_Computer_Zone code group—in this case, “Edit Code Group Properties” and “Add a Child Code Group”. You can also choose to perform these tasks (and more) by clicking the Action menu pad or right-clicking the node and selecting New or Properties from the menu (Figure 14).

Figure 14. The .NET Framework Configuration tool allows you to add, duplicate, copy, delete, rename, and edit security code groups.
If you select New from the menu, it launches the code group Properties dialog, allowing you to create a new code group. If you select Properties from the menu, it also launches the code group Properties dialog (Figure 15).
![]()
This section describes the basics of the code group Properties
dialog. For more information on creating your own custom code groups, see the
.NET
Help topic “Configuring Code Groups Using the .NET Framework
Configuration tool”.
The General tab of the dialog allows you to specify the name and description of the code group. At the bottom of the tab are two check boxes in the If the membership condition is met group box. As described by their associated text, these check boxes let you change how the .NET runtime evaluates permissions for the code group.
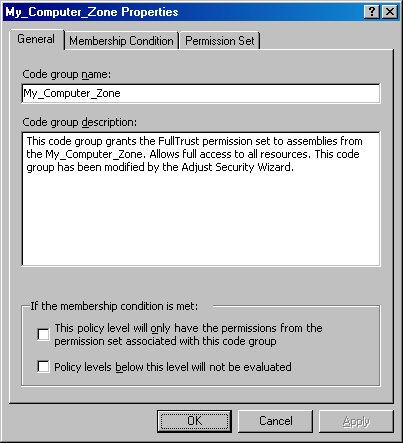
Figure 15. The code group Properties dialog lets you specify a code group’s name, description, membership conditions, and permission set.
If you click the Membership Condition tab, you see two combo boxes. The first combo box allows you to select the condition type for the code group (Figure 16).

Figure 16.The Membership Condition tab allows you to select a membership condition type for the code group.
The options listed in this combo box are the same code group membership conditions listed in Table 3 earlier in this chapter. You can also select a custom code group you define yourself (see the next section for details). Based on the option you select in the upper combo box, additional input controls are displayed beneath it or, in the case of the “All Code” and “Application Directory” selection, no additional input controls are displayed at all. If “Zone” is selected in the condition type combo box, a second combo box is displayed allowing you to select the desired zone (Figure 17).
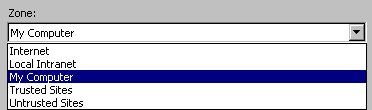
Figure 17. When configuring a zone membership condition, a second combo box is displayed allowing you to select the desired zone.
Permission sets
The third tab of the code group Properties dialog introduces a new concept—named permission sets. A named permission set is a grouping of one or more permissions given a friendly name and description. Table 5 lists the built-in named permission sets found in the .NET Framework.
Table 5. Built-in permission sets
|
Permission set |
Description |
|
Full Trust |
Full access to all resources. |
|
Skip Verification |
Skip verification of code in the assembly. This is a powerful permission that should only be applied to highly trusted code. |
|
Execution |
Permission to run, but no permission to use protected resources. |
|
Nothing |
No permissions. Code cannot run. |
|
Local Intranet |
The default policy permission set within an enterprise. |
|
Internet |
The default policy permission set suitable for code from an unknown origin. |
|
Everything |
All standard, built-in permissions, except the permission to skip verification. |
At the top of the Permission tab is a combo box containing a list of the permission sets shown in Table 5. I’ll discuss a few of these so you can get a better understanding of how permission sets work.
If you select the “LocalIntranet” option from the Permission set combo box, it displays the permissions associated with the Local Intranet permission set (Figure 18).
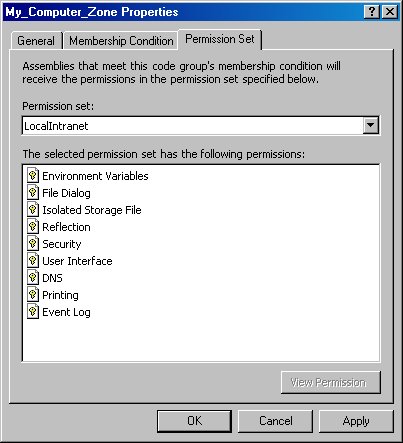
Figure 18. The Permission Set tab of the code group Properties dialog allows you to view the permissions that belong to a given permission set.
You can select any of the permissions in the list box and click the View Permission button to view details for the permission. For example, if you view details for the “File Dialog” permission, the Permissions Viewer dialog is displayed and informs you “The File Dialog Permission is unrestricted”.
If you double-click the “Security” permission (which is the same as clicking the View Permission button), the Permissions Viewer dialog displays a list of security permissions that are granted and denied (Figure 19).
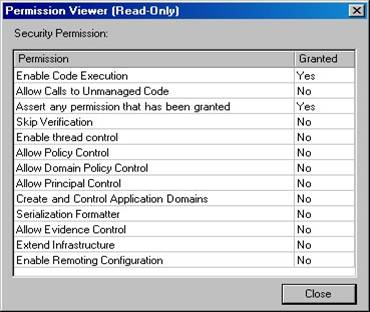
Figure 19. When you view a security permission in the Permission Viewer, it displays a list of permissions that have been granted or denied.
Creating custom permission sets
Notice when you edit one of the built-in permission sets, the title bar of the Permissions Viewer indicates the permission is (Read-Only). This is because all the built-in permission sets are read only. Although you can’t edit built-in permission sets, you can create your own.
If you expand the Permission Sets node in the .NET Framework Configuration tool, you see a list of the built-in permission sets (Figure 20).
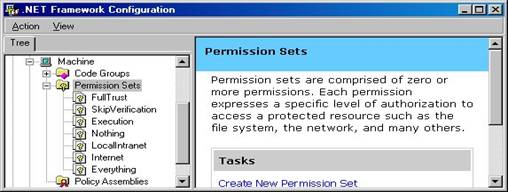
Figure 20. You can view the built-in permission sets and create your own custom permissions sets via the .NET Framework Configuration tool.
To create your own custom permission set, right-click on the Permission Sets node and select New from the shortcut menu. This launches the Create Permission Set wizard (Figure 21). This wizard is pretty intuitive, so I won’t provide a detailed explanation of how to use it. If you need additional information, see the .NET Help topic “Configuring Permission Sets Using the .NET Framework Configuration Tool”.
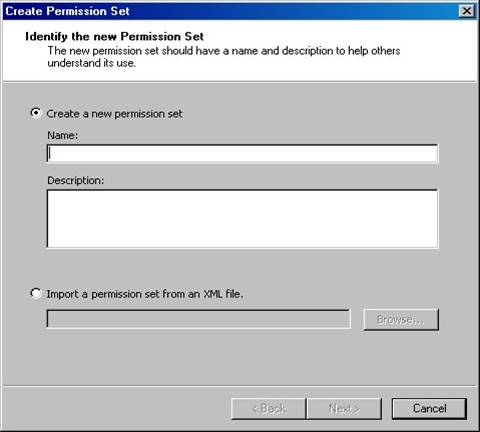
Figure 21. The Create Permission Set wizard allows you to create your own custom permission sets.
Any custom permission sets you create belong to the policy level in which they are created. For example, if you create a new permission set under the Machine node, the permission set belongs to the machine-level security policy. Any custom permission sets you create automatically display in the .NET Framework Configuration tool.
Policy assemblies
As mentioned earlier in the chapter, the .NET Framework implements permissions and membership conditions as classes. For the .NET runtime to evaluate security policies, the runtime must have full trust access to all assemblies containing permission and membership condition classes.
Now look at the .NET Framework assemblies that fall into this
category. In the .NET
Framework Configuration tool expand the Runtime Security Policy node,
expand the Machine node (you
could also choose the
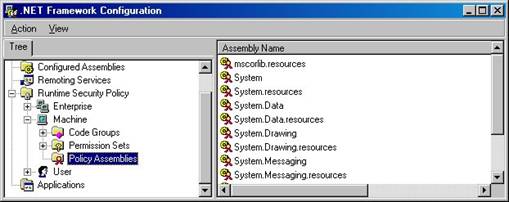
Figure 22. All assemblies containing security classes must be added to the list of policy assemblies so they can be accessed by the .NET runtime.
If you create your own custom security classes, you need to add the assembly containing these classes (and any assemblies they depend on) to the list of policy assemblies. For more information, see the .NET Help topic “Adding an Assembly to the Policy Assemblies List”.
Security policy configuration files
Each security level’s settings (
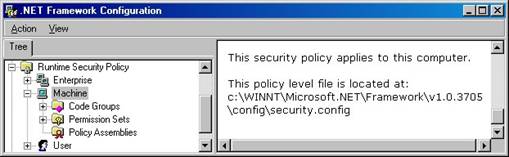
Figure 23. Each security level’s settings are stored in its own configuration file.
If you’re the curious sort, you can open these configuration files in Visual Studio .NET (or your text editor of choice) to view their contents.
Evaluating assemblies
After you’ve set up your security policies, how can you determine which permissions or code groups will be applied to a particular assembly at runtime? The .NET Framework Configuration tool has an Evaluate Assembly wizard that allows you to do this!
To launch this wizard, right-click on the Runtime Security Policy node and select Evaluate Assembly from the shortcut menu. Follow the steps in the wizard to select an assembly and view the permissions granted to the assembly at runtime or the code groups that give permissions to the assembly.
Play well with others—request permissions
When the .NET runtime loads your assembly, how does it know the kind of things your code will do so it can determine up front whether your code has the proper permissions to perform these functions? The answer is that it doesn’t—unless your assembly requests permissions!
You can place attributes in your assembly that indicate the permissions your assembly requires in order to function properly. When your code requests permissions, it gives the runtime an opportunity to refuse to run the assembly if one or more of the permissions your code requires is denied. This is better for the end user because they find out up front they cannot run your code, rather than finding out part way through using your software. Requesting permissions also makes it easier for administrators to set up security policy for your assembly and grant permissions accordingly.
Here is another incentive for requesting permissions—if you don’t explicitly request permissions, you must write code that gracefully handles all situations where a required permission may not be granted at runtime (the .NET runtime raises an exception when a permission is denied).
You can also specify that your code receive a minimum set of permissions and no more. This makes for safer code, because bugs in your software cannot be exploited by evil minds to damage protected resources.
Requesting permissions
To demonstrate how to request permissions, you will build a console (command-line) application in Visual Studio .NET. On the Visual Studio .NET Start Page, click the New Project button to launch the New Project dialog (Figure 24).
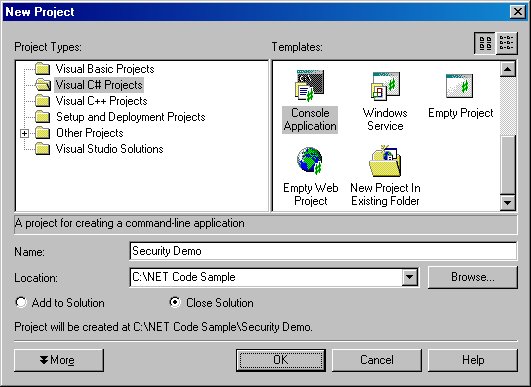
Figure 24. This dialog shows the settings in the New Project dialog for creating a console application named “Request Permissions Demo”.
In the left pane of the dialog, select either Visual C# Projects or Visual Basic Projects. In the right pane, select Console Application. In the Name text box, enter “Security Demo”. Also, make sure the Location text box contains the directory where you want to create the new project. When you’re ready, click the OK button.
When VS .NET finishes creating your new console application, you should see a new file named Class1.cs (or Module1.vb) open in the IDE containing the following code.
In C#:
using System;
namespace Security_Demo
{
/// <summary>
/// Summary description for Class1.
/// </summary>
class Class1
{
/// <summary>
/// The main entry point for the application.
/// </summary>
[STAThread]
static void
{
//
// TODO: Add code to start application here
//
}
}
}
And in Visual Basic .NET:
Module Module1
End Module
Notice when you create a Console Application in Visual Studio .NET, it creates a class file for C# and a module file for VB .NET. In this example, you really do want a class file, so if you created a VB .NET Console Application, you need to perform the following additional steps:
1. In the Solution Explorer, right-click on Module1.vb and select Delete from the shortcut menu. Click OK when the delete confirmation dialog displays.
2. Right-click the project node (the second node from the top) and select Add | Add Class… from the shortcut menu.
3. In the Add New Item dialog, accept the default class name “Class1.vb”, and click the Open button. This adds a new file named “Class1.vb” to your project.
4. In the Solution Explorer, right-click on the project, and select Properties from the shortcut menu.
5. In the left pane of the Property Pages dialog, select General under the Common Properties node.
6. In the Startup Object combo box on the right, select “Sub Main”. This tells VS .NET to use the class containing the Main method (which you’ll add in a moment) as the startup object.
7. Click OK to save changes.
Now the Visual Basic .NET project is up to speed with the C# project.
The code in the C# file defines a single class named “Class1”
with a single method named
In C#:
static void
![]() {
{
}
In the Visual Basic .NET project there is a definition for a class named “Class1”, but it does not have a Main method by default. Add the following code shown in grey to Class1, which includes a Main method declaration and the code that interacts with the console.
 Public Class Class1
End Class
Now you’re ready to get down to the business of requesting permissions. There are three different ways you can request permissions for assemblies:
· RequestMinimum – Tells the .NET runtime the specified permission must be granted in order for the assembly to run.
· RequestOptional – Tells the .NET runtime the specified permission would be nice to have granted, but the assembly will still run even if the permission is denied. If you request optional permissions, you must write code to gracefully handle situations where the permission is denied.
· RequestRefuse – Tells the .NET runtime the specified permission should not be granted to the assembly. This ensures your assembly only gets the permissions it needs and helps prevent others from misusing your assembly for malicious purposes.
![]()
In addition to permissions you can request at the assembly level, you can also request permissions at the class and method level. These permissions allow you to do things such as access resources not available to the caller and require all callers higher in the stack to be granted a particular permission. For more information, see the .NET Help topic “SecurityAction Enumeration”.
Now you will add three assembly-level permission requests to the console application to demonstrate requesting “minimum”, “optional”, and “refuse” requests. Add the following code to the top of your Class1 source code file. In the C# source code file, place it directly beneath the using System; statement. In VB .NET, place it at the very top of the file.
In C#:
using System.Security.Permissions;
[assembly:UIPermissionAttribute(SecurityAction.RequestMinimum,
Unrestricted = true)]
[assembly:SecurityPermissionAttribute(SecurityAction.RequestOptional,
Flags = SecurityPermissionFlag.UnmanagedCode)]
[assembly:FileIOPermissionAttribute(SecurityAction.RequestRefuse, "C:\\")]
In Visual Basic .NET:
Imports System.Security.Permissions
<Assembly: UIPermissionAttribute(SecurityAction.RequestMinimum, _
Unrestricted:=True)>
<Assembly: SecurityPermissionAttribute(SecurityAction.RequestOptional, _
Flags:=SecurityPermissionFlag.UnmanagedCode)>
<Assembly: FileIOPermissionAttribute(SecurityAction.RequestRefuse, _
Read:="C:\")>
The first statement requests unrestricted access to the user interface and the clipboard. Because the specified SecurityAction is “RequestMinimum”, the .NET runtime will not run the assembly unless this permission is granted.
The second statement requests access to unmanaged code. With the specified security action “RequestOptional”, the .NET runtime still runs the assembly even if the permission is not granted.
![]()
If you request optional permissions for an assembly, the .NET runtime only grants the permissions you have requested, and no others. This means when you request optional permissions, you also need to explicitly request all required permissions or they will not be granted!
The third statement requests access to files and folders on the C: drive be denied for this assembly. This helps guarantee the assembly cannot be used maliciously to read or write to the file system.
Requesting Permission Sets
Rather than requesting individual permissions, you can request the built-in permission sets “Nothing”, “Execution”, “Full Trust”, “Internet”, “LocalIntranet”, and “SkipVerification”. For example, the following code requests the “Internet” named permission set.
In C#:
[assembly:PermissionSetAttribute(SecurityAction.RequestMinimum, Name="Internet")]
And in Visual Basic .NET:
<Assembly: PermissionSetAttribute(SecurityAction.RequestMinimum, _
Name:="Internet")>
This is much more convenient than requesting individual permissions.
Role-based security
Now it’s time to take a closer look at the other half of the .NET security picture—role-based security. As mentioned at the beginning of the chapter, this is the kind of security you may already have in your Visual FoxPro applications. You grant and deny permissions based on the identity of the current user.
.NET’s role-based security can interoperate with COM+ Services or you can create your own custom authentication mechanism.
Users and roles
Like it or not, your software is going to have users! Users can either be people who are physically interacting with your software or they can be other programs accessing the functionality of your software.
A role is a category of users who have the same security privileges. For example, in a point-of-sale software application, you might have roles such as Administrator, Sales Rep, Accountant, and Stock Clerk. You may have several different real-world users who belong to each role—and for that matter, an individual user may be assigned multiple roles.
Identity objects
In the .NET Framework, identity objects represent application users. Identity objects contain a name, such as a user name or Windows account, and an authentication type, such as Kerberos V or NTLM.
The .NET Framework has a GenericIdentity class that represents a generic user, a WindowsIdentity class that represents a Windows user, and a PassportIdentity class for Microsoft Passport authentication. I’ll take a closer look at the WindowsIdentity class in the upcoming sections of this chapter.
Principal objects
In the .NET Framework, a principal object represents both the identity and roles of an application user.
The .NET Framework class library has an IPrincipal interface
defining the basic functionality of a principal object. It’s a very simple
interface that includes a single
property and a single method. The Identity property lets you get the identity
of the current principal. The IsInRole method allows you to determine if the
current principal belongs to a specified role.
There are two classes in .NET that implement this interface—a
GenericPrincipal class representing a generic principal, and a WindowsPrincipal
class that allows you to check the Windows group membership of a Windows user (Figure
25). You can also build your own custom principal objects by creating a
class that implements the IPrincipal interface. For
more information on implementing interfaces, see Chapter 5, “Object-Orientation
in C# and Visual Basic .NET”.
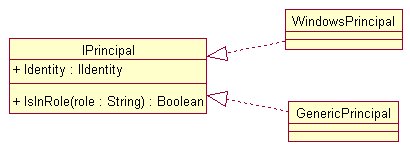
Figure 25. As shown in this UML class diagram, the WindowsPrincipal and GenericPrincipal .NET classes implement the IPrincipal interface.
Accessing the principal object
The .NET Framework makes information about the
principal available to the current thread. For this example, I’ll use the
WindowsPrincipal class to show you how to access the
principal object.
The first step in accessing the principal object is to indicate you want to use a WindowsPrincipal object. Go back to the console application you created earlier in the chapter and add the following namespace references at the top of the Class1 source code file.
In C#:
using System.Security.Principal;
using System.Threading;
And in Visual Basic .NET:
Imports System.Security.Principal
Imports System.Threading
Now change all of the code in the Main method to the following. First in C#:
static void
{
/// Set the principal policy
AppDomain.CurrentDomain.SetPrincipalPolicy(PrincipalPolicy.WindowsPrincipal);
/// Get the current principal object
WindowsPrincipal principal =
(WindowsPrincipal)Thread.CurrentPrincipal;
/// Get the identity object
WindowsIdentity identity = (WindowsIdentity)principal.Identity;
string UserID = "Name: " + identity.Name + "\n"
+
"Anonymous: " + identity.IsAnonymous +
"\n" +
"Authenticated: " + identity.IsAuthenticated +
"\n" +
"Guest: " + identity.IsGuest + "\n" +
"System: " + identity.IsSystem + "\n" +
"Token: " + identity.Token + "\n" +
"Administrator: " + principal.IsInRole(WindowsBuiltInRole.Administrator);
Console.WriteLine("User identity--" + "\n\n" +
UserID);
Console.ReadLine();
}
And in Visual Basic .NET:
<STAThread()> _
Shared Sub
'/ Set the principal policy
AppDomain.CurrentDomain.SetPrincipalPolicy( _
PrincipalPolicy.WindowsPrincipal)
'/ Get the current principal object
Dim principal As WindowsPrincipal = CType(Thread.CurrentPrincipal, _
WindowsPrincipal)
'/ Get the identity object
Dim identity As WindowsIdentity = CType(principal.Identity, _
WindowsIdentity)
Dim UserID As String = "Name: " & identity.Name & ControlChars.Lf & _
"Anonymous: " & identity.IsAnonymous.ToString() & ControlChars.Lf & _
"Authenticated: " & identity.IsAuthenticated.ToString() & _
ControlChars.Lf & "Guest: " & identity.IsGuest.ToString() & _
ControlChars.Lf & "System: " & identity.IsSystem.ToString() & _
ControlChars.Lf & "Token: " & identity.Token.ToString() & _
ControlChars.Lf & "Administrator: " & _
principal.IsInRole(WindowsBuiltInRole.Administrator).ToString()
Console.WriteLine(("User identity--" & ControlChars.Lf & _
ControlChars.Lf & UserID))
Console.ReadLine()
End Sub '
As mentioned previously, this code first tells .NET to use a WindowsPrincipal object. Next, it retrieves the current principal object from the current thread using the static CurrentPrincipal property of the Thread class. Next, it gets the identity object from the principal object, building a string from the values of the identity object’s properties. Finally, this string is displayed to the console. Notice the principal object’s IsInRole method is used to determine if the user is in the role of Administrator.
Before this code can execute, there is one more step you need to take—request a code-access permission that allows you to manipulate the principal object. Add the following statement to the list of attribute declarations.
In C#:
[assembly:SecurityPermissionAttribute(SecurityAction.RequestOptional,
Flags = SecurityPermissionFlag.ControlPrincipal)]
In Visual Basic .NET:
<Assembly: SecurityPermissionAttribute(SecurityAction.RequestMinimum, _
Flags:=SecurityPermissionFlag.ControlPrincipal)>
This is necessary because, as mentioned earlier, when you request an optional permission, .NET does not grant any other permissions unless they are specifically requested.
Now you’re ready to run this sample console application. To do this, just press F5 to compile and run the application. This displays a DOS window containing your user identity information (Figure 26).
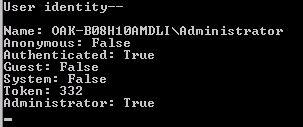
Figure 26. You can obtain the current user’s identity information from the principal object’s Identity property.
Performing security checks using the Principal object
There are several ways you can use the principal and identity objects to perform security checks. First of all, you can call the principal object’s IsInRole method in your code to determine if the current user is in a particular role and grant or deny permissions accordingly.
Alternately, you can use PrincipalPermissionAttributes to declare role-based permission requirements similar to what you’ve already seen with code access security. The PrincipalPermissionAttribute class represents the identity or role the principal must match in order to be granted a particular permission.
For an example of how this can be done, first add the following namespace reference to the top of the Class1 source code file.
In C#:
using System.Security;
And in Visual Basic .NET:
Imports System.Security
Next, add the following method to the sample console application’s Class1 class.
In C#:
[PrincipalPermissionAttribute(SecurityAction.Demand,
Role = "BUILTIN\\Administrators")]
public static void CreateUserAccount()
{
//
// Place code here to create user account
//
Console.WriteLine("Created user account!");
}
And in Visual Basic .NET:
<PrincipalPermissionAttribute(SecurityAction.Demand, _
Role:="BUILTIN\Administrators")> _
Public Shared Sub CreateUserAccount()
'
' Place code here to create user account
'
Console.WriteLine("Created user account!")
End Sub 'CreateUserAccount
This code declares a method named “CreateUserAccount” that doesn’t actually do much except display a message to the console. Conceptually, this method contains code that creates a new user account. Typically, only a system administrator should perform this sort of task. The attribute declaration preceding the method allows you to specify only users in the role of Administrator can run this method.
Now, add some code that calls this new method. Add the code shown in grey to the Main method, before the call to Console.ReadLine.
In C#:
Console.WriteLine("User identity--" + "\n\n" + UserID);
Console.ReadLine();
In Visual Basic .NET:
Console.WriteLine(("User identity--" & ControlChars.Lf & _
ControlChars.Lf & UserID))
Console.ReadLine()
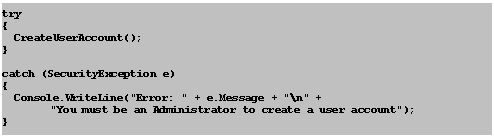
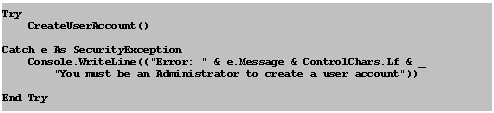
Now press F5 to compile and run the application. This code makes a call to the new CreateUserAccount method within a try block. If you are not an Administrator, the catch block runs, informing you of the need to be an Administrator to create a user account. If you are an administrator, you see the message “Created user account”.
Web Application Security
Security for your Web applications is extremely important. Stories of hackers breaking into “secure” sites makes the news just about every week, and companies like Microsoft continually release updates to Web browser and Web server software to plug any holes that are found.
Fortunately, Microsoft had security well in mind when designing ASP.NET (which includes both Web Forms applications and Web Services). This section touches on a few of the key features of ASP.NET security and provides links where you can learn more.
Security in ASP.NET has two layers. The first layer is Internet Information Server (IIS), which has its own security model completely independent of ASP.NET. If a request is granted by IIS, it is passed on to the second layer, ASP.NET, which has its own security model and criteria that can be configured to accept or reject requests.
Restricting access to a Web site
There are three ways ASP.NET restricts users from accessing your Web site:
· Authentication – Verifying the identity of a user.
· Authorization – Determining if a user has permission to access a resource.
·
Impersonation – Executing code under the context
of an authenticated and
authorized user.
The following sections discuss these in greater detail.
Authentication
IIS and ASP.NET examine a user’s credentials (usually
an ID and password) to determine their identity. These credentials are
validated against an authority. If an authority identifies a user, they
are considered “authenticated”, and can continue on to authorization (discussed
in the next section). Authentication is not a requirement for an ASP.NET
application. If you do not authenticate clients, the user is considered anonymous.
![]()
Although authorization is not a requirement for an ASP.NET application, if there is any part of your ASP.NET application you must secure, you need to authenticate your users.
Several types of authorities can validate a user’s credentials:
· Windows – Windows authentication uses IIS to authenticate users. When a user is authenticated, IIS passes a security token to ASP.NET, which ASP.NET uses to create a WindowsPrincipal object as discussed earlier in this chapter.
· Forms – Forms authentication uses an HTML form to prompt users for an ID and password. These credentials are passed directly to code in your ASP.NET application, which usually authenticates the credentials against records in a SQL Server database or entries in an XML file. If a user is authenticated, a cookie is issued to the client that it must present on subsequent requests.
· Passport – Passport authentication uses Microsoft’s centralized authentication service that provides a single logon and profile services for member sites.
·
None – You can specify an authentication
provider of “None” if your site does not authenticate users or if you have
implemented your own custom authentication mechanism.
You specify the authentication provider you want to implement in a web.config or machine.config file (for a discussion of these files, see Chapter 10, “Building Web Applications with ASP.NET”). Here is an example of a configuration setting that enables Forms authentication:
<system.web>
<authentication mode="Forms" />
</system.web>
For more information on authentication providers and the pros and cons of each, see the .NET Help topic “ASP.NET Authentication”.
Authorization
Once a user has been authenticated, you can perform authorization to determine if they have the rights to access the resource they are requesting. There are two main types of authorization, File Authorization, and URL Authorization.
File Authorization
If you use Windows authentication, you can use File authorization to determine if a user can access a requested resource. File authorization ties into the Access Control List (ACL) security system in Windows NT, Windows 2000, and Windows XP. File authorization requires all valid users of a Web application to have a Windows user account. You can add users to groups and assign permissions to groups with the Windows Computer Management Console.
URL Authorization
You can use URL authorization in conjunction with any type of authentication. User, role, and permission information is placed in <authorization> elements stored in web.config and machine.config files.
Here is an example of URL authorization. This authorization section grants access to Jordan, Timothy, and Alexander, but denies access to Bob, and anonymous users ("?"):
<authorization>
<allow users="Jordan", "Timothy", "Alexander", roles="Administrators" />
<deny users="Bob" />
<deny users="?" />
</authorization>
You can also grant or deny permission to the GET, HEAD, or POST HTTP verbs. For example, the following authorization section allows all users ("*") to make GET requests, but denies all users except Greg to make POST requests.
<authorization>
<allow verb="GET", users="*" />
<allow verb="POST" users="Greg” />
<deny verb="POST" users="*" />
</authorization>
By default, the machine.config file (which specifies default settings for all Web applications on your server) contains an authorization section that allows access to all users:
<allow users="*" />
With this default setting, if you don’t specify differently in any of your web.config files, all users have access to your Web application.
For more information on File and URL authorization as well as the pros and cons of each, see the .NET Help topic “ASP.NET Authorization”.
Impersonation
All code that runs on the Windows platform is associated with a user. By default, ASP.NET applications run using the “ASPNET” user account, which has reduced privileges by default. The ASPNET user account is automatically created when you install the .NET Framework on a machine with IIS installed. ASP.NET impersonation allows an ASP.NET application to execute with a different identity, usually that of the client making the request.
Impersonation is disabled by default. You enable impersonation by adding an <identity> section in a web.config or machine.config file. This is the default setting in the machine.config file:
<identity impersonate="false" >
If you want to enable impersonation for all Web applications on a machine, set the value of the “impersonate” attribute to “true” in the machine.config file. If you want to turn it on for a single ASP.NET application, add this setting to a web.config file located in the virtual directory of the Web application.
If impersonation is set to “true”, when a request is processed from an authenticated user, ASP.NET assumes the identity of that user. If the user is not authenticated (anonymous), then ASP.NET runs as the IUSR_MachineName account.
You can also specify that ASP.NET always impersonate a specific user. To do this, add an <identity> section to a configuration file, specifying the user name and password. For example, the following code tells ASP.NET to impersonate the user “Markus” with the password “guacamole”.
<identity impersonate="true" name="Markus" password="guacamole">
For more information on ASP.NET impersonation, see the .NET
Help topic
“ASP.NET Impersonation”.
Conclusion
This chapter just scratches the surface of security in the .NET Framework. It would really take several hundred pages to give a comprehensive overview of .NET’s security features. Microsoft continues to make a push for more comprehensive and advanced security features, so I recommend staying tuned to Microsoft’s MSDN Web site for the latest information on security innovations for .NET.