Chapter
15
Interoperability with Visual FoxPro
Microsoft has provided a two-way street for interoperability
between .NET and “other” software such as Visual FoxPro. They have made it extremely
easy to access your
Visual FoxPro code from .NET and also access the functionality of .NET from
Visual FoxPro. This chapter shows you how easy it is to bridge the divide
between .NET and Visual FoxPro.
Most likely you have thousands of lines of Visual FoxPro code you’ve spent countless hours creating, debugging, tweaking, and enhancing until it suits your needs and those of your end users. Now with the arrival of .NET do you have to throw all this code away? Definitely not!
Fortunately, Microsoft is in the same boat as you. Think of all the software applications Microsoft produced without using .NET. Although Microsoft will rewrite some applications, rewriting all their applications in .NET would be a colossal undertaking without enough benefits to make it worthwhile.
Based on this, Microsoft made it very easy to interoperate with (I hate to use the word) “legacy” software so you can protect your code investment. Here are some examples of situations where you may need to interop with Visual FoxPro code from .NET:
· .NET Web Forms applications accessing Visual FoxPro business objects stored in a component library.
· .NET Windows Forms applications accessing middle-tier business objects stored in a component library.
· .NET XML Web Services accessing Visual FoxPro business objects stored in a component library.
· .NET Windows Forms applications accessing a Visual FoxPro Windows desktop application as an automation server (similar to how you access Microsoft Office applications from VFP).
Two technologies make this possible, COM (Component Object Model) and XML.
Interoperability via COM
Once upon a time there was COM. Microsoft created COM
to provide interoperability between software applications and components
written in diverse languages such as C++, Visual FoxPro, and Visual Basic. Even
non-Microsoft languages such as
COM lets you instantiate objects written in other languages,
call their methods, access their properties, and respond to their events
without knowing the language used to create
the component.
COM moves into the 21st century by creating a
bridge between .NET and the rest of the world. If you need to access your
Visual FoxPro applications from .NET, you must compile your FoxPro code into a COM server.
Types of COM servers
There are two main types of COM servers—in-process servers (DLLs) and out-of-process servers (EXEs). Important differences exist between these two types of servers dictating which you should use in different situations.
In-Process servers
An in-process server is a DLL loaded and run within the same Windows process as the client. This provides fast access to objects contained in the server because there is no cross-process communication necessary. One limitation of in-process servers is they cannot interact with the user interface (you can’t show forms, display messages, and so on).
Typically, in-process servers contain multiple business objects instantiated by clients that call their methods to perform a variety of functions. This model covers the first three scenarios discussed earlier in this chapter and is the most common way to access VFP code.
Out-Of-Process servers
An out-of-process server is an EXE running in its own Windows Process apart from the client. This model incurs a slight performance hit because of the extra work the operating system performs to pass calls from one process to another. However, out-of-process servers do have the ability to interact with the user interface.
This means you can start an out-of-process server, such as a Visual FoxPro desktop application, from within a .NET application and access its functionality programmatically—much the same way you access Microsoft Office applications from within Visual FoxPro.
Visual FoxPro’s COM capabilities
Fortunately, the Microsoft Fox team continued to enhance Visual FoxPro’s COM capabilities with each new version. These enhancements are critical in using newer technologies such as COM+ and .NET.
![]() For more information on
Visual FoxPro and COM, check out the book “What’s New in Visual FoxPro 7” from
Hentzenwerke Publishing.
For more information on
Visual FoxPro and COM, check out the book “What’s New in Visual FoxPro 7” from
Hentzenwerke Publishing.
Interoperability via XML
Although COM gives you the ability to instantiate a
Visual FoxPro object from .NET, you
still need a mechanism for passing data between .NET and Visual FoxPro. The
mechanism
is XML.
Again, the Fox team comes to the rescue by providing built-in XML functionality starting with version 7.0 of VFP. The CursorToXml, XmlToCursor, and XmlUpdateGram functions convert between Visual FoxPro’s native cursor format and XML, a key .NET data format.
You’ll be looking closer at these functions in the next section as you build a Visual FoxPro component accessible from .NET.
Creating a Visual FoxPro COM server
In this section you’ll create an in-process Visual FoxPro COM server to demonstrate how easy it is to access your VFP code from .NET.
The first step in building a COM server is creating a new Visual FoxPro project. Create a new, empty VFP project named comdemo.pjx in the bin\debug directory of this book’s sample code. (Below the HW .NET Book Samples_CSharp directory if you’re working with C#, or the HW .NET Book Samples_Visual Basic directory if you’re working with VB .NET). After creating the new project, add a PRG file to the project and place the following class definition code in the PRG:
DEFINE CLASS Employee AS Session OLEPUBLIC
cStartPath = ""
PROCEDURE INIT
*--- Issue SET commands appropriate for COM servers
SET RESOURCE OFF
SET EXCLUSIVE OFF
SET REPROCESS TO 2 SECONDS
SET CPDIALOG OFF
SET DELETED ON
SET EXACT OFF
SET SAFETY OFF
*--- Save the server startup path
This.cStartPath = ADDBS(JUSTPATH(Application.ServerName))
SET PATH TO (This.cStartPath)
ENDPROC
*--- Get all Employees
PROCEDURE GetAllEmployees() AS String ;
HELPSTRING "Returns an XML string containing all employees"
LOCAL lcXML
SELECT * FROM Employees INTO CURSOR Employee
CURSORTOXML("Employee", "lcXML", 0, 0, 0, "1")
USE IN Employee
RETURN lcXML
ENDPROC
*--- Get the specified employee
PROCEDURE GetEmployeeByID(empID AS Integer) AS String ;
HELPSTRING "Returns an XML string containing the specified employee"
LOCAL lcXML
SELECT * FROM Employees WHERE ;
EmployeeID = empID INTO CURSOR Employee
CURSORTOXML("Employee", "lcXML", 0, 0, 0, "1")
USE IN Employee
RETURN lcXML
ENDPROC
ENDDEFINE
This code defines a class named Employee subclassed from Visual FoxPro’s Session class. The Session class is used because it ensures all business objects have their own private data session. The OLEPUBLIC keyword tells the Visual FoxPro compiler to make the class public to users of the COM server. Only classes marked as OLEPUBLIC are visible and accessible to the outside world.
The Employee class contains three methods—Init, GetAllEmployees, and GetEmployeeByID. The Init method issues SET commands appropriate for COM servers. It also saves the DLL startup path and issues a SET PATH to this directory. This allows the other COM server methods to find the data they need.
The other two methods make use of the strong-typing AS clause introduced in Visual FoxPro 7.0. This clause specifies the type of method parameters and their return values. Both methods declare a String return value, which in this case is an XML string. The GetEmployeeByID method also uses the AS clause to declare a single integer parameter. The HELPSTRING keyword specifies the method description stored to the type library.
![]()
Visual FoxPro’s strong-typing features are only used for IntelliSense and to create type libraries for COM servers. The compiler does not enforce them!
Testing the Employee class
Before compiling the comdemo project into a COM server, it’s best to test the business object classes within Visual FoxPro first. This is important because it’s very difficult to debug VFP COM servers!
To test the Employee class, enter the following code in the VFP Command Window:
SET PROCEDURE TO business.prg
EmployeeObj = CREATEOBJECT("Employee")
?EmployeeObj.GetAllEmployees()
When you run the GetAllEmployees method, the resulting XML string containing all employees is displayed in the Visual FoxPro desktop.
You can test the GetEmployeeByID method by entering the following command in the Visual FoxPro Command Window. This time you’ll use the STRTOFILE command to write the resulting XML string to a file, and then examine the file contents:
STRTOFILE(EmployeeObj.GetEmployeebyID(1), "Employee.xml")
MODIFY FILE Employee.xml
When you run the MODIFY FILE command, it displays the contents of the Employee.xml file that looks like this (I’ve left the schema information out for the sake of space):
<?xml version = "1.0" encoding="Windows-1252" standalone="yes"?>
<VFPData>
<xsd:schema id="VFPData" xmlns:xsd="http://www.w3.org/2001/XMLSchema" xmlns:msdata="urn:schemas-microsoft-com:xml-msdata">
<!-- Left out the schema information to save space-->
</xsd:schema>
<employee>
<employeeid>1</employeeid>
<lastname>Davolio</lastname>
<firstname>
<title>Sales Representative</title>
<titleofcourtesy>Ms.</titleofcourtesy>
<birthdate>1948-12-08T00:
<hiredate>1992-05-01T00:
<address>
<city>
<region>WA</region>
<postalcode>98122</postalcode>
<country>
<homephone>(206) 555-9857</homephone>
<extension>5467</extension>
<notes>Education includes a BA in
psychology from
<reportsto>2</reportsto>
<photopath/>
</employee>
</VFPData>
As you can see, Visual FoxPro does all of the heavy lifting for you by converting the cursor into an XML string and automatically generating a schema to go with it!
Compiling the COM server
Now it’s time to compile the COM server. To do this, click the Project Manager’s Build button to launch the Build Options dialog (Figure 1). Select Multi-threaded COM server (dll) under Build Action, select Recompile All Files, and Display Errors under Options. When you’re done, click the OK button to build the COM server.
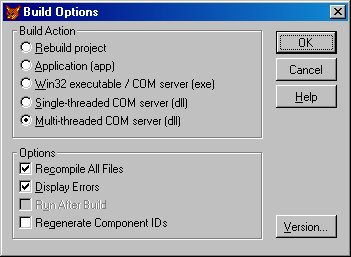
Figure 1. Visual FoxPro allows you to build both EXE and DLL COM Servers.
The build process creates three output files:
· comdemo.dll –COM server
· comdemo.tlb –Type Library
· comdemo.vbr –Registry file
The comdemo COM Server
The comdemo.dll file is the COM server and is the main output file. This file contains the compiled code for the Employee business object class, although in most cases COM servers contain multiple business object classes.
When you compile a COM server, all OLEPUBLIC classes in the server are automatically registered in the build machine’s Windows Registry. You view these entries in the Registry using the Windows Registry Editor tool. To launch the Registry Editor, click the Windows Start button and select Run. In the Run dialog, enter “RegEdit” in the Open box, and then click OK.
When the Registry Editor dialog appears (Figure 2), in the left pane select the HKEY_CLASSES_ROOT node of the tree view. This is the node where your COM server’s classes are registered.
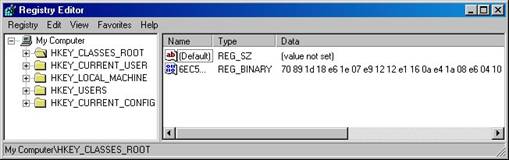
Figure 2. The HKEY_CLASSES_ROOT node of the Windows Registry contains entries for your COM server classes.
From the Registry Editor’s Edit menu, select Find to launch the Find dialog (Figure 3). In the Find what box, enter “comdemo” and click the Find Next button.
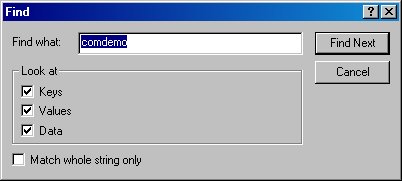
Figure 3. The Registry Editor’s Find dialog allows you to search for your COM server classes in the Windows Registry.
After several seconds, the Registry Editor should find your comdemo.Employee class. This is indicated by the appearance of an expanded node in the tree view located in the left pane, and the string “comdemo.Employee” in the right pane under the Data column.
The node text in the left pane contains a series of alpha-numeric characters (Figure 4). This is the Employee object’s Globally Unique Identifier (GUID). This GUID is an identifier generated during the compile process guaranteed to uniquely identify your COM object.
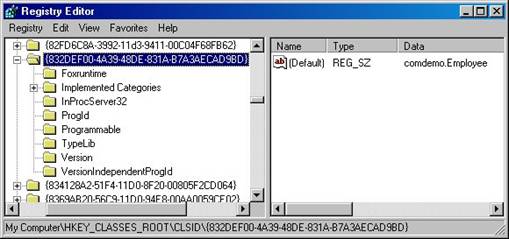
Figure 4. The Globally Unique Identifier (GUID) generated at compile time uniquely identifies your COM Server objects.
If you expand this node, you see sub-nodes containing additional information about your COM object.
The comdemo type library
Another by-product of the COM server build process is the comdemo.tlb file. This is your COM server’s type library. A type library is a binary file describing the public classes in your COM server.
To view the contents of your server’s type library, launch Visual FoxPro’s Object Browser by selecting Tools | Object Browser from the main Visual FoxPro menu. Next, click the Open Type Library button (the button farthest left at the top of the Object Browser window). This launches the Open dialog (Figure 5).
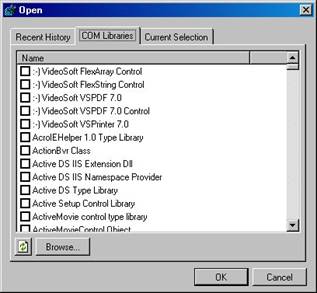
Figure 5. The Visual FoxPro Object Browser’s Open dialog lets you select a type library to view in the Object Browser.
Select the COM Libraries tab. It may take a few seconds before the tab gets focus as the Windows Registry searches for all COM libraries. Click the Browse button to launch the Open dialog (Figure 6). Navigate to the folder containing your comdemo type library.
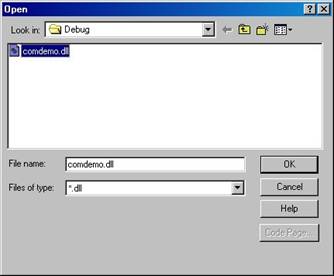
Figure 6. You can open either DLLs or TLBs in Visual FoxPro’s Object Browser depending on the platform on which the COM server was created.
Notice in Figure 6 the default file type is “*.dll”. Isn’t the type library stored in a TLB file? The answer is it can be stored in both, depending on the operating system used to create the COM server. If you build a Visual FoxPro COM server on a Windows NT, 2000, or XP machine, the type library is placed in the external TLB file and is also embedded within the DLL. If you build a VFP COM server on a Windows 98 machine, the type library is only found in the TLB file, not in the DLL.
If you’ve created the COM Server on Windows 98, in the Files of type combo box, select “*.tlb”, select comdemo.tlb, and click OK. If you’ve created the server on a newer platform, just select comdemo.dll and click OK.
When you click OK, focus returns to the Object Browser (Figure 7) dialog. Expand the comdemo type library node shown in the left pane of the Object Browser, then expand the Classes node and select the Employee class beneath it. Next, in the right pane expand the Methods node and select the GetEmployeeByID method.
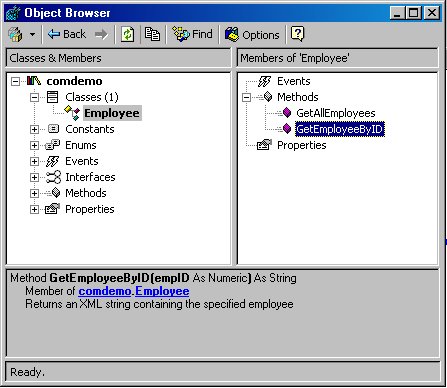
Figure 7. The Object Browser dialog allows you to view details of all OLEPUBLIC classes and their public properties and methods.
In the description pane at the bottom of the dialog, there is a description of the GetEmployeeByID method as shown in Figure 7. The description says the GetEmployeeByID method accepts a single numeric parameter and returns a string value. It also displays the method description you specified in the HELPSTRING attribute.
The comdemo Windows Registry file
The last of the three files generated by building your COM server is the comdemo.vbr Windows Registry file. This file contains the GUIDs for the classes in your COM server. If you open the comdemo.vbr file with a text editor you’ll see something like this:
VB5SERVERINFO
VERSION=1.0.0
HKEY_CLASSES_ROOT\comdemo.Employee = comdemo.Employee
HKEY_CLASSES_ROOT\comdemo.Employee\NotInsertable
HKEY_CLASSES_ROOT\comdemo.Employee\CLSID = {832DEF00-4A39-48DE-831A-B7A3AECAD9BD}
HKEY_CLASSES_ROOT\CLSID\{832DEF00-4A39-48DE-831A-B7A3AECAD9BD} = comdemo.Employee
HKEY_CLASSES_ROOT\CLSID\{832DEF00-4A39-48DE-831A-B7A3AECAD9BD}\ProgId = comdemo.Employee
HKEY_CLASSES_ROOT\CLSID\{832DEF00-4A39-48DE-831A-B7A3AECAD9BD}\VersionIndependentProgId = comdemo.Employee
HKEY_CLASSES_ROOT\CLSID\{832DEF00-4A39-48DE-831A-B7A3AECAD9BD}\InProcServer32 = comdemo.dll
HKEY_CLASSES_ROOT\CLSID\{832DEF00-4A39-48DE-831A-B7A3AECAD9BD}\InProcServer32\"ThreadingModel" = Apartment
HKEY_CLASSES_ROOT\CLSID\{832DEF00-4A39-48DE-831A-B7A3AECAD9BD}\TypeLib = {97FD3B3E-2115-4DEE-B50B-B8761A45C358}
HKEY_CLASSES_ROOT\CLSID\{832DEF00-4A39-48DE-831A-B7A3AECAD9BD}\Version = 1.0
HKEY_CLASSES_ROOT\CLSID\{832DEF00-4A39-48DE-831A-B7A3AECAD9BD}\Foxruntime = VFP7T.DLL
HKEY_CLASSES_ROOT\INTERFACE\{17BE97B1-AAD2-4604-9253-DAB268C1E2F4} = Employee
HKEY_CLASSES_ROOT\INTERFACE\{17BE97B1-AAD2-4604-9253-DAB268C1E2F4}\ProxyStubClsid = {00020424-0000-0000-C000-000000000046}
HKEY_CLASSES_ROOT\INTERFACE\{17BE97B1-AAD2-4604-9253-DAB268C1E2F4}\ProxyStubClsid32 = {00020424-0000-0000-C000-000000000046}
HKEY_CLASSES_ROOT\INTERFACE\{17BE97B1-AAD2-4604-9253-DAB268C1E2F4}\TypeLib = {97FD3B3E-2115-4DEE-B50B-B8761A45C358}
HKEY_CLASSES_ROOT\INTERFACE\{17BE97B1-AAD2-4604-9253-DAB268C1E2F4}\TypeLib\"Version" = 1.0
; TypeLibrary registration
HKEY_CLASSES_ROOT\TypeLib\{97FD3B3E-2115-4DEE-B50B-B8761A45C358}
HKEY_CLASSES_ROOT\TypeLib\{97FD3B3E-2115-4DEE-B50B-B8761A45C358}\1.0 = comdemo Type Library
HKEY_CLASSES_ROOT\TypeLib\{97FD3B3E-2115-4DEE-B50B-B8761A45C358}\1.0\0\win32 = comdemo.dll
HKEY_CLASSES_ROOT\TypeLib\{97FD3B3E-2115-4DEE-B50B-B8761A45C358}\1.0\FLAGS = 0
As already mentioned, when you build a COM server, Visual FoxPro automatically registers the COM server in the Windows Registry of the build machine. If you want to move your COM server to a different machine, the VBR file allows you to register the class definitions in the Windows Registry of the target machine.
For details on using the VBR file to register a Visual FoxPro COM server, see the VFP Help topics “CliReg32.exe Remote Automation Utility” and “Using Remote Automation”.
Testing the COM server from Visual FoxPro
Before accessing the comdemo server from .NET, it’s a “best practice” to test it from Visual FoxPro first. To do this, enter the following commands in the VFP Command Window:
EmployeeObj = CREATEOBJECT("comdemo.Employee")
?EmployeeObj.GetAllEmployees()
This time you didn’t have to issue a SET PROCEDURE command. Instead, you specified the name of the COM server (“comdemo”) and the name of the business object (“Employee”) in the CREATEOBJECT command. Visual FoxPro searches the Windows Registry for this COM object and instantiates it for you.
You test the GetEmployeeByID method by issuing the same command as you did earlier:
STRTOFILE(EmployeeObj.GetEmployeebyID(1), "Employee.xml")
MODIFY FILE Employee.xml
Now, knowing your COM server is working properly, it’s time to access it from .NET.
Creating a .NET test project
Now you will make a very simple .NET Windows Application with a single form containing a DataGrid for testing the VFP COM server.
From the Visual Studio .NET Start Page, click the New Project button. In the left pane of the New Project dialog (Figure 8), select Visual C# Projects or Visual Basic Projects depending on the language you want to use for this project.
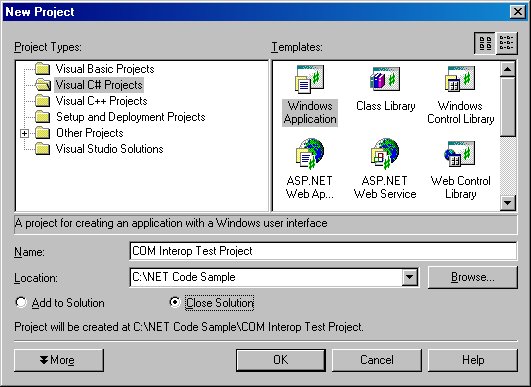
Figure 8. You can create a simple Windows Application to test a VFP COM server.
In the Templates pane on the right, select Windows Application. In the Name box, change the name of the application to “COM Interop Test Project” and click OK. When VS .NET finishes creating your new project, it displays a form named “Form1” in the IDE. Normally, you would use this form to be your main application desktop window, but for this simple example you’ll use it to host a DataGrid instead.
First, make the form big enough to hold a DataGrid with several columns. To do this, you simply resize the form by dragging its bottom right corner or you can select the Properties Window and change the form’s Size property to something around 640,340. Also change the form’s Text property to “COM Interop Test” and its Name property to “InteropTestForm”.
If you’re using C#, there is one additional step. In the Solution Explorer, right-click on Form1.cs and select View Code from the shortcut menu. Next, in the Main method of the form change the “Form1” reference to “InteropTestForm”:
static void
{
Application.Run(new InteropTestForm());
}
If you’re using Visual Basic .NET, there’s also an additional step you need to take. In the Solution Explorer, right-click on the project and select Properties from the shortcut menu. In the left pane of the Property Pages dialog, beneath the Common Properties node, select General. In the right side of the dialog, in the Startup object combo box, select “InteropTest Form”. Click OK to save changes and close the dialog. Afterwards, view the form in design mode by clicking on the Form1.cs [Design] tab in the VS .NET IDE.
Now drag a DataGrid control from the VS .NET Toolbox and drop it on the form. You make the Toolbox visible by hovering your mouse pointer over the Toolbox tab. If you don’t see the Toolbox tab, select View | Toolbox from the main menu. After dropping the DataGrid on the form, resize it to fill up most of the form. For example, you can set its Location property to 40,30, and its Size property to 550,220. Also change its Name property to grdEmployees.
Now drag and drop a Button control from the Toolbox onto the bottom of the form under the DataGrid. For example, set its Location property to 280,270. Change the button’s Name property to btnGetData and its Text property to “Get Data”. When you’re done, your form should look like the form shown in Figure 9.
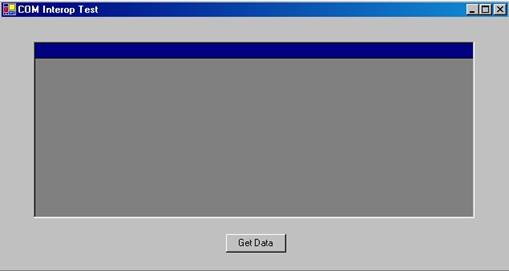
Figure 9. A simple form to test a Visual FoxPro COM server.
Click the Save All button at the top of the Visual Studio .NET IDE to save all changes you have made so far.
Referencing the Visual FoxPro COM server
Now you’re ready to add a reference to the Visual FoxPro COM server to your new project. To do this, go in the Solution Explorer, right-click the Reference node beneath your project, and select Add Reference from the shortcut menu (Figure 10).
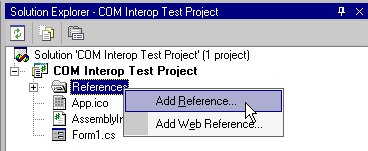
Figure 10. You use the Solution Explorer for adding a COM server reference to a .NET project.
This launches the Add Reference dialog. Select the COM tab (Figure 11), click the Browse button, and navigate to your comdemo project’s directory.
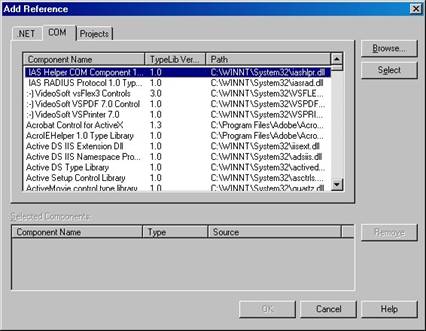
Figure 11. The Add Reference dialog lets you add .NET assembly or COM component references to your .NET project.
If you generated the COM server on a Windows 98 machine, select the comdemo.tlb file. If you generated the COM server on a newer operating system, select the comdemo.dll file and click the Open button. This takes you back to the Add Reference dialog, with the comdemo file shown in the Selected Components list at the bottom of the dialog. Click OK to add a reference to the COM server to your .NET project.
You should now see a comdemo node in the Solution Explorer beneath the References node (Figure 12).
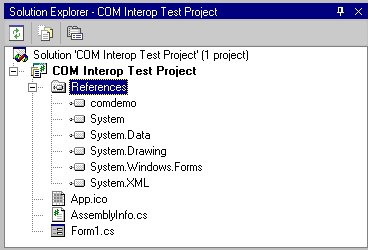
Figure 12. COM Servers and .NET assemblies referenced from your .NET projects are listed under the References tab of your project
If you select the comdemo node in the Solution Explorer and look at the Path property in the Properties Window, you will see it does not reference comdemo.dll. Rather, it refers to a .NET assembly named “Interop.comdemo.dll”. This is a Runtime Callable Wrapper (RCW) automatically created by Visual Studio .NET when you added a reference to comdemo.dll. This RCW acts as an intermediary between .NET and the Visual FoxPro comdemo.dll (Figure 13). A wrapper class is created in the RCW for each class in your COM server. Rather than calling methods on a COM object directly, .NET calls methods on a wrapper class in the RCW that in turn calls the corresponding method on the VFP COM object.
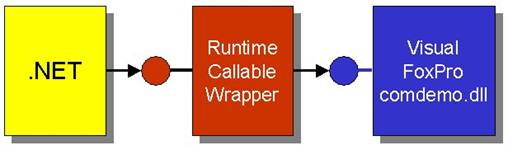
Figure 13. Visual Studio .NET automatically creates a Runtime Callable Wrapper (RCW) that is an intermediary between .NET and your COM components.
Take a closer look at this Runtime Callable Wrapper. Open the VS .NET Object Browser by selecting View | Other Windows | Object Browser from the shortcut menu. In the Object Browser, you should see a node named “interop.comdemo” (Figure 14). Expand the comdemo node, and if you’re using C#, you will see three items listed: Employee, EmployeeClass, and IEmployee (I’ll look at VB .NET in a moment).
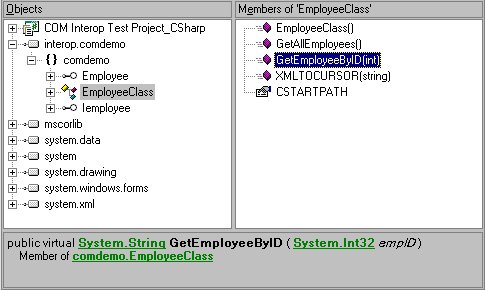
Figure 14. You can view a Runtime Callable Wrapper from .NET’s Object Browser.
Both Employee and IEmployee are interfaces and EmployeeClass is the concrete class you need to instantiate from within .NET. As you can see, VS .NET takes the original class name and appends the suffix “Class”. If you select the EmployeeClass node, three methods appear in the right pane—your two original methods, GetAllEmployees and GetEmployeeByID, and a new method called EmployeeClass, which is the .NET constructor method.
If you select the GetEmployeeByID method, details of the method display at the bottom of the Object Browser (Figure 14). As you can see, the GetEmployeeByID method returns a string value (System.String) and accepts a single integer parameter (System.Int32).
If you’re using Visual Basic .NET, you should see a node named Interop.comdemo in the Object Browser (Figure 15). If you expand the comdemo node, you only see one class named Employee and no interfaces. This is a bit different than what you saw in C#, where there was one class named “EmployeeClass” and two interfaces. If you click on the Employee class, in the right pane you see all the same methods as in C#, except for the constructor method.
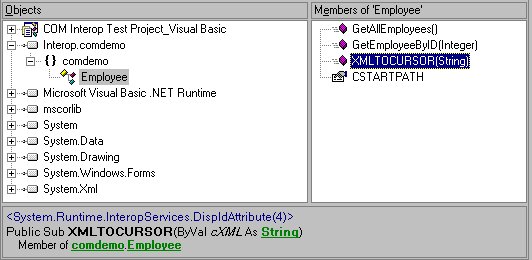
Figure 15. Rather than showing you the name of the wrapper class, the VB .NET Runtime Callable Wrapper shows you the original name of the COM class.
If you right-click on either pane of the Object Browser and select Show Hidden Members from the shortcut menu, the Iemployee interface is displayed (Figure 16), although the Employee interface shown in C# is not.
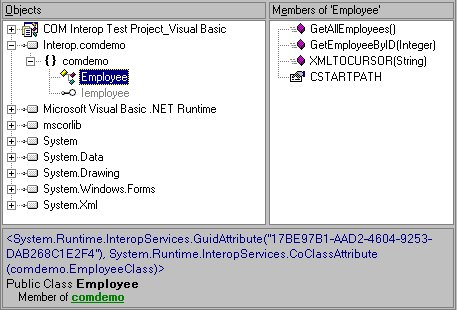
Figure 16. If you select the Employee class in the VB .NET RCW, it displays the name of the wrapper class in the description pane at the bottom of the browser.
Regarding the difference in the class name, if you select the
Employee class in the
Object Browser, the
description pane at the bottom of the browser shows the class refers to
comdemo.EmployeeClass. Because you need to instantiate the EmployeeClass in
.NET
(not the “Employee” class) I think the Runtime Callable Wrapper created by C#
is
more informative.
Using the COM server Employee object
Now it’s time to add code to the Windows Form to instantiate the Employee business object and call its methods.
Select Form1 in design mode and double-click the Get Data button. This automatically adds a new btnGetData_Click event handler method to the form. Before adding code to this method, add a reference to the interop.comdemo namespace at the top of the code file (VS .NET assigns classes in your COM server to a namespace with the same name as your DLL). You should also add a reference to the System.IO namespace, which you’ll need soon.
In C#:
using comdemo;
using System.IO;
In Visual Basic .NET:
Imports comdemo
Imports System.IO
Now, in the btnGetData_Click event handler method at the bottom of the code window, add the following code.
In C#:
private void btnGetData_Click(object sender, System.EventArgs e)
{
// Instantiate the Employee class
EmployeeClass Employee = new EmployeeClass();
// Get an XML string containing all Employees
string EmployeesXml = Employee.GetAllEmployees();
// Create a new DataSet and fill it from the XML string
DataSet dsEmployees = new DataSet();
dsEmployees.ReadXml( new StringReader(EmployeesXml));
// Clear and then set the DataBindings of the grid
this.grdEmployees.DataBindings.Clear();
this.grdEmployees.SetDataBinding(dsEmployees,
dsEmployees.Tables[0].TableName);
}
In Visual Basic .NET:
Private Sub btnGetData_Click(ByVal sender As System.Object, _
ByVal e As System.EventArgs) Handles btnGetData.Click
' Instantiate the Employee class
Dim Employee As New EmployeeClass()
' Get an XML string containing all Employees
Dim EmployeesXml As String = Employee.GetAllEmployees()
' Create a new DataSet and fill it from the XML string
Dim dsEmployees As New DataSet()
dsEmployees.ReadXml(New StringReader(EmployeesXml))
' Clear and then set the DataBindings of the grid
Me.grdEmployees.DataBindings.Clear()
Me.grdEmployees.SetDataBinding(dsEmployees, _
dsEmployees.Tables(0).TableName)
End Sub
This code instantiates the EmployeeClass Runtime Callable Wrapper and calls its GetAllEmployees method. Behind the scenes, the RCW in turn calls the GetAllEmployees method on the Visual FoxPro Employees COM object, which returns an XML string containing all employees. The RCW takes the return value and returns it as a .NET string type.
Another feature worth noting is you get IntelliSense on methods of the RCW (Figure 17) because it is consuming the interface of your COM object and re-exposing it as a .NET interface.

Figure 17. You get IntelliSense for your COM objects in Visual Studio .NET thanks to the Runtime Callable Wrapper.
Running the Interop sample
Now it’s time to compile and run the Interop sample application. To do this, you can simply press F5. When the form is first displayed, the grid is empty. If you click the Get Data button, it runs code retrieving XML data from the Visual FoxPro Employee COM object and binding the DataGrid to the data. The data is then displayed in the DataGrid (Figure 18).
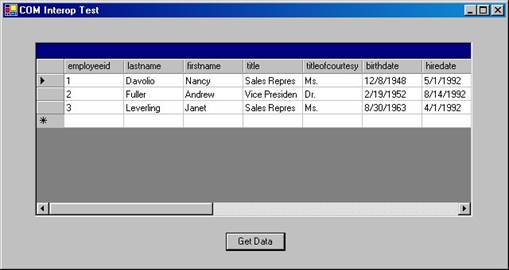
Figure 18. XML data returned from a Visual FoxPro COM object is easily read into a .NET DataSet and displayed in a DataGrid.
To close the sample form, click the close button [X] in the upper right corner of the form.
Using Visual FoxPro COM objects from ASP.NET
Although using Visual FoxPro COM objects from ASP.NET is similar to using them from a .NET Windows application, there are enough nuances to warrant creating a simple ASP.NET Web Forms application to demonstrate the differences.
Creating a Web Forms test application
From the Visual Studio .NET Start Page, click the New Project button. In the left pane of the New Project dialog, select Visual C# Projects or Visual Basic Projects depending on the language you want to use for this project.
In the Templates pane on the right, select ASP.NET Web Application. In the Location box, change the name of the application to “Web COM Interop Test Project”, and then click the OK button. When VS .NET finishes creating your new Web project, it displays a form named WebForm1 in the IDE. You’ll use this form to host a DataGrid containing records retrieved from the Visual FoxPro Employees COM object.
To do this, drag and drop a DataGrid from the Visual Studio Toolbox onto the upper left corner of the Web form. Next, change the appearance of the DataGrid similar to what you did on the Windows form. Go to the Properties Window, change the ID property to “grdEmployees”, and the Width to 600px. When you’re done, your grid should look like Figure 19.
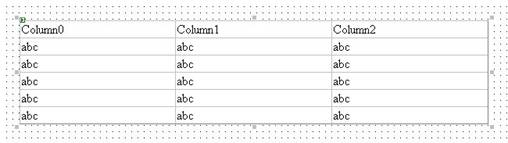
Figure 19. A Web Forms DataGrid can display data retrieved from a Visual FoxPro COM object.
Now go one step further with the DataGrid to make it look just a bit more attractive. With the DataGrid selected in design mode, click the Auto Format hyperlink at the bottom left of the Properties Window. This launches the Auto Format dialog (Figure 20). You can choose any style you wish, but for this example, I’ve chosen “Colorful 1”.
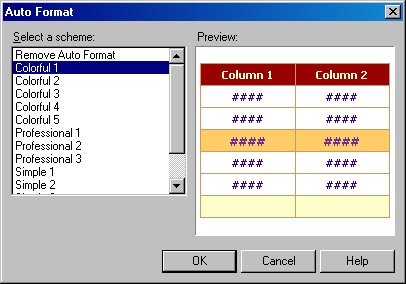
Figure 20. The Auto Format dialog allows you to easily change the appearance of your DataGrids.
Next, you need to specify the columns for the DataGrid. Unlike the Windows Forms DataGrid, which looks passable without specifying any column information, the Web Forms DataGrid needs a little more coaxing. To specify columns for the DataGrid, select the DataGrid on the Web Form, and then click the Property Builder hyperlink at the bottom left corner of the Properties Window. This launches the DataGrid Properties dialog (Figure 21).
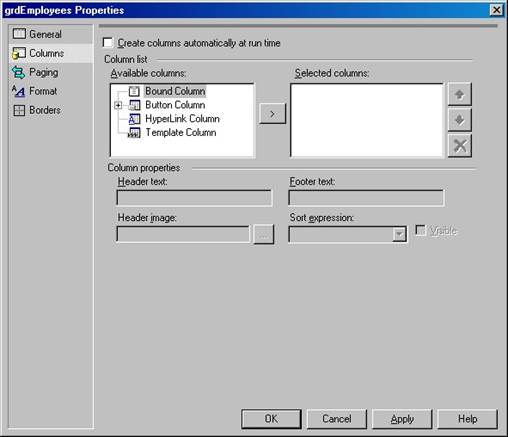
Figure 21. The DataGrid’s Properties dialog lets you specify the columns to display in a Web Forms DataGrid.
Select the Columns item in the left pane and a columns mover control is displayed as shown in Figure 21. Next, clear the Create columns automatically at run time check box. Afterwards, select Bound Column in the Available Columns list and click the mover button (>) to add the bound column to the Selected columns list. In the Header Text box, enter “Last Name” and in the Data Field box enter “LastName”.
Add three more bound columns to the DataGrid with Header Text and Data Field properties shown in Table 1. When you have added all of the columns to the DataGrid, click the OK button to close the dialog.
Table 1. Web Forms DataGrid columns
|
Header Text |
Data Field |
|
First Name |
First Name |
|
Title |
TitleOfCourtesy |
|
Home Phone |
HomePhone |
When you’re done, your DataGrid should look like the one shown in Figure 22.
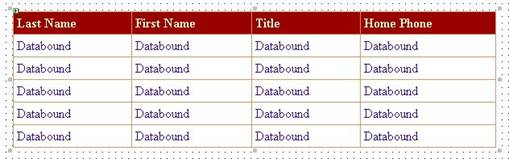
Figure 22. You should specify columns for your Web Forms DataGrids so they look more presentable.
Setting the aspCompat attribute
When you use a COM component from an ASP.NET page, you should set the page’s aspCompat property to true. Do this now, and then I’ll explain the importance of this setting.
Click on the Web Form design surface and go to the Properties Window. Select the aspCompat property, open its associated combo box, and select “True” (Figure 23).
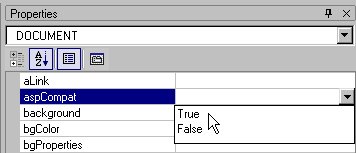
Figure 23. If you are accessing a COM component from an ASP.NET page, you should set the page’s aspCompat property to True.
Normally, ASP.NET runs in multi-threaded apartment (MTA) mode. However, Visual FoxPro COM components are single-threaded apartment (STA) objects. The aspCompat property tells ASP.NET to execute in STA mode. Although you won’t get an error if you don’t change this setting, your application runs slowly and may experience deadlocks. For more information, see the .NET Help topic “COM Component Compatibility”.
Referencing the Visual FoxPro COM server
Before going further, you need to add a reference to the Visual FoxPro COM server in your Web Forms project. To do this, in the Solution Explorer, right-click the References node and select Add Reference from the shortcut menu to launch the Add Reference dialog. Select the dialog’s COM tab and click the Browse button. In the Select Component dialog, navigate to the folder containing comdemo.dll, select the file, and then click the Open button (If you’re on a Windows 98 machine, select comdemo.tlb). This brings you back to the Add Reference dialog with “comdemo.dll” displayed in the Selected Components list. Click the OK button and VS .NET adds a Runtime Callable Wrapper assembly named “comdemo” under the References node of your project (Figure 24).
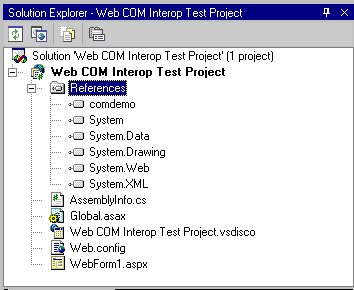
Figure 24. You can add a reference to a VFP COM server in your ASP.NET Web Forms application the same as in a .NET Windows Forms application.
Using the COM Server Employee object
Now it’s time to add code to retrieve XML data from the Visual FoxPro Employees COM object and display it in the DataGrid. To do this, double-click the form’s design surface. VS .NET displays the Web Form’s code-behind file, adding a new event handler method called Page_Load. Before placing code in this method, add the following namespace references at the top of the code-behind file.
In C#:
using comdemo;
using System.IO;
And in Visual Basic .NET:
Imports comdemo
Imports System.IO
Next, add the following code to the Page_Load method.
In C#:
private void Page_Load(object sender, System.EventArgs e)
{
// Instantiate the Employee class
EmployeeClass Employee = new EmployeeClass();
// Get an XML string containing all employees
string EmployeesXml = Employee.GetAllEmployees();
// Create a new DataSet and fill it from the XML string
DataSet dsEmployees = new DataSet();
dsEmployees.ReadXml( new StringReader(EmployeesXml));
// Data bind the grid to the DataSet
this.grdEmployees.DataSource = dsEmployees;
this.grdEmployees.DataBind();
}
And in Visual Basic .NET:
Private Sub Page_Load(ByVal sender As System.Object, _
ByVal e As System.EventArgs) Handles MyBase.Load
' Instantiate the Employee class
Dim Employee As New EmployeeClass()
' Get an XML string containing all employees
Dim EmployeesXml As String = Employee.GetAllEmployees()
' Create a new DataSet and fill it from the XML string
Dim dsEmployees As New DataSet()
dsEmployees.ReadXml(New StringReader(EmployeesXml))
' Data bind the grid to the DataSet
Me.grdEmployees.DataSource = dsEmployees
Me.grdEmployees.DataBind()
End Sub
This code instantiates the EmployeeClass Runtime Callable Wrapper and calls the object’s GetAllEmployees method, which returns an XML string containing all employees. It then fills a DataSet from the XML string and binds the grid to the DataSet.
Running the Web Interop sample
Now you’re ready to run the Web Interop sample. To do this, press the F5 key to compile and run the project. When your Web browser appears, you should see a DataGrid containing data as shown in Figure 25.
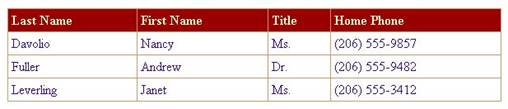
Figure 25. The DataGrid displays XML data retrieved from the Visual FoxPro Employee COM object.
Other resources
There are some great on-line articles available regarding COM Interop with Visual FoxPro. The first is Rick Strahl’s on-line article “.NET Interop for Visual FoxPro Applications” found at the following URL:
http://www.west-wind.com/presentations/VfpDotNetInterop/vfpDotNetInterop.htm
Rick’s article covers information not discussed in this chapter, such as returning Visual FoxPro objects from COM server methods for use in .NET. It also includes some interesting speed comparisons using classic ASP vs. ASP.NET to access Visual FoxPro COM objects.
Another great resource is Cathi Gero’s on-line article “Using ASP.NET in Visual Studio .NET with Visual FoxPro 7.0”. You can view this article at the following URL:
http://msdn.microsoft.com/library/?url=/library/en-us/dnfoxgen7/html/usingaspnetwithvfp7.asp
Cathi’s article demonstrates the following four scenarios:
· Accessing Visual FoxPro Data Using OLE DB
· Accessing a Visual FoxPro COM component
· Accessing a Visual FoxPro 7.0 XML Web Service
· Accessing Visual FoxPro Data from an ASP.NET Web Service
You can also periodically check the Visual FoxPro “Got-Dot-Net” Web site for new information on this topic: http://www.gotdotnet.com/team/vfp/.
Conclusion
Microsoft has done a great job making it very easy to access “legacy” code from .NET and allowing you to save your investment in your existing Visual FoxPro applications. However, if you’ve placed most of your application logic within methods and events of your Visual FoxPro user interface, you need to migrate this code into business objects that can be instantiated and accessed from .NET Windows Forms applications, Web Forms applications, and Web Services.